background image


31 

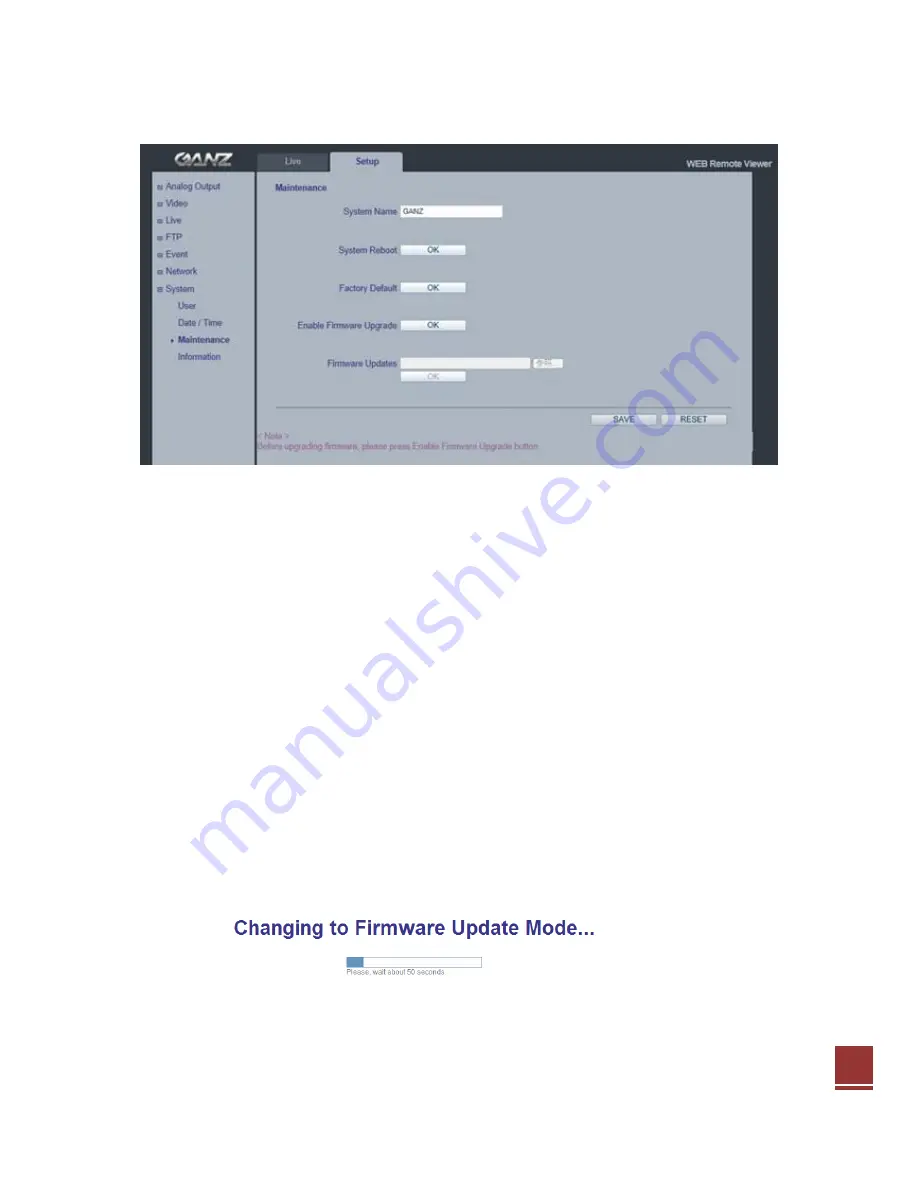
10.3 System > Maintenance 


System Name 

Choose a system name to identify the camera when using e-mail notifications. 
 

System Reboot 

Reboot the camera. 
 

Factory Default 

To reset the camera settings to the original factory default settings. 


Enable Firmware Upgrade / Firmware Updates 

To upgrade Firmware of the camera, follow the instruction below. 

NOTE: 

Preconfigured and customized settings should be saved before the firmware 

is upgraded. 


1)  Enable Firmware Upgrade mode with clicking 

“OK” of Enable Firmware       

Upgrade menu. 

2)  The camera automatically switches to Firmware Upgrade mode. 


Summary of Contents for PixIPro ZN-MDI243M-IR

Page 1: ...1 H 264 MINI DOME NETWORK CAMERA ZN MDI243M IR...

Page 2: ...art apparatus combination to avoid injury from tip over 12 Unplug this apparatus during lightning storms or when unused for long periods of time 13 Refer all servicing to qualified service personnel S...

Page 3: ...ntrol 16 5 2 2 Day Night Control 17 5 2 3 White Balance Control 17 5 2 4 Image Property Control 17 6 LIVE 18 6 1 SETUP 18 6 2 PRIVACY MASKING 19 7 FTP 20 7 1 FTP CONFIG 20 7 2 FTP EVENT 20 7 3 FTP PER...

Page 4: ...support power to the camera to be delivered via the network eliminating the need for a power outlet and reducing installation costs Steady power could be guaranteed with a central Uninterruptible Powe...

Page 5: ...supplied Red On Camera reset is started Flash Factory Default is started 3 Reset Button Press this button to restore the camera 4 Video output for service monitor This analog video output is available...

Page 6: ...6 Installation Preparation 1 Remove Dome Cover Please turn counterclockwise the dome cover by grasping the bottom of the camera 2 Adjustment Image position ROTATE 90 TILT 0 75 PAN 178...

Page 7: ...7 Mounting to a Ceiling Wall Secure the camera to ceiling or wall with supplied tapping screws like below 1 In Ceiling Mount Tapping Screw M4x30 2...

Page 8: ...8 2 Surface Mount Anchor 2 Tapping Screw M4x30 2...

Page 9: ...Explorer 2 Enter the IP address or host name of the camera in the Location Address field of your browser Press Enter 3 Login dialog will appear when the camera is accessed for the first time 4 The def...

Page 10: ...og output page Select the Video Format 2 Connect supplied video monitor cable to video output connector then connect it to analog monitor with coaxial cable Adjust lens position Or otherwise check the...

Page 11: ...ream A benefit of unicasting is in case one stream fails it only affects one user Multicasting Will be supported is bandwidth conserving technology that reduces bandwidth usage by simultaneously deliv...

Page 12: ...RTSP This unicast method is RTP tunneled over RTSP This could be used to exploit the fact that it is relatively simple to configure firewalls to allow RTSP traffic 3 The Setup The GANZ PixelPro is con...

Page 13: ...ormat of the analog BNC output from the camera NTSC PAL Analog Output is selectable 5 Video The following descriptions show examples of some of the features available in the GANZ PixelPro 5 1 Codec Th...

Page 14: ...stream These images then are displayed and updated at a rate sufficient to create a stream that shows constantly updated motion The Motion JPEG stream uses considerable amounts of bandwidth but also...

Page 15: ...lPro can use during a network connection Max Bandwidth Specify the maximum bandwidth that the GANZ PixelPro can use during a network connection Output resolution table for PixelPro First Stream Second...

Page 16: ...to control camera exposure manually To compensate for poor lighting conditions you can adjust the Color level Brightness Sharpness Contrast and Exposure control NOTE When AE is enabled some of the sub...

Page 17: ...h according to the current lighting conditions 5 2 3 White Balance Control WB Mode ON ATW Automatic White balance OFF MWB Manual White balance The White balance adjustment setting is used to make the...

Page 18: ...ticasting as the bandwidth consumption will be much lower Viewer Setup LiveView Protocol RTP Unicast UDP RTP Multicast UDP RTP over RTSP TCP Buffering Time frame based Determines 0 90 x 1 30 sec 0 3se...

Page 19: ...the mask color Black White Light Gray Dark Gray Yellow Red Blue Green Mask Creation Procedure 1 Click Privacy Mask in the Live menu 2 Select Area1 or 2 to activate a setup window 3 Set the Mask Color...

Page 20: ...using the FTP server Specify the external FTP server information such as IP address port number Username and password Note When the first stream is set to 1920x1080 please set the 2nd stream to MJPEG...

Page 21: ...specify event mapping for Event FTP Effective Period You can specify Always or Schedule 7 3 FTP Periodical Periodical FTP Sending It enables FTP transmission periodically Directory This folder will b...

Page 22: ...es Configuring Motion Detection 1 Click Motion Detection in the Event Config menu 2 Select an Area from Area1 to 4 to activate a Motion setup window 3 Click the Motion window and select an area that y...

Page 23: ...ssible to define conditions that would cause the camera to respond with certain actions A triggered event happens as a result of a trigger which could be motion detection For example E mail could be s...

Page 24: ...router There are also options for setting up notification of changes in the IP address and for using the Internet Dynamic DNS Service Notes To receive notification whenever the camera s IP address ch...

Page 25: ...please assign IP address as following process 1 Execute MultiUpgradeTool exe it will search the camera on the network 2 After the camera is listed in camera list select the camera 3 Type in the all n...

Page 26: ...64 stream Enter the RTSP port number to use The default setting is 554 NOTE After changing the default port numbers the user can use the MultiUpgradeTool exe to search and connect automatically 9 3 Ne...

Page 27: ...error email messages from the camera to predefined addresses via SMTP Note1 Frequency Mail server may register the sender to SPAM list when frequency is set to 1 Min It may be better to set 5 Min for...

Page 28: ...ink net are both registered together User can connect to the camera using either http mac address dvrlink net or http user defined name dvrlink net If user defined name is already registered an error...

Page 29: ...10 System 10 1 System User Access the camera and the Configure Root Password dialog appears Enter the User name ADMIN and password is 1234 To changed password or add a user click SETUP SYSTEM USER Fil...

Page 30: ...w video streams Use the predefined formats or use your own custom date and time formats Network Time Server the camera will obtain the time from an NTP server every 60 minutes Specify the NTP server s...

Page 31: ...ettings to the original factory default settings Enable Firmware Upgrade Firmware Updates To upgrade Firmware of the camera follow the instruction below NOTE Preconfigured and customized settings shou...

Page 32: ...camera back to factory default holding down about 10 20 sec the reset button on the Camera Using the web browser 1 Go to SETUP System Maintenance 2 Click Factory Default Button and wait 1 minute for c...

Page 33: ...33 10 4 System Information System Information You can confirm the system information if the camera here...

Page 34: ...34 11 Dimension mm FRONT BOTTOM 2 5 1...

Page 35: ...age Size 5 56mm H x 3 43mm V 6 53mm Diagonal White Balance ATW MANUAL PRESET Electronic Zoom 2 10x Client Software AGC Yes BLC Yes Iris Fixed Iris F2 0 Shutter Speed 1 4 1 10 1 12 5 1 15 1 20 1 25 1 3...

Page 36: ...Smart Phone iOS Android Security Password Protection SDK API HTTP based API ONVIF Profile S VMD User set 4 ROI Region Of Interest 10 Step Sensitivity Alarm Trigger VMD Alarm Event E mail notification...

Page 37: ...37...

Page 38: ...38...

Page 39: ...39 159 1 0...

Reviews: