background image


Storm Form and Storm Form DMX User Guide 

Version 1.1 – 2/25/2021 

STANDALONE OPERATION


Some applications may not require live DMX control. In order to configure your Storm Form DMX for 
standalone operation, all you must do is use the CH1 slider on the Generic Console control screen to set 
the desired intensity level. Once the light has the desired output, tap the “STORE AS DEFAULT” button at 
the lower left portion of the screen to save this setting directly into the light fixture. Now, when the light 
fixture receives power it will automatically go to this newly saved DEFAULT setting once it’s boot 
sequence is complete. Please note that if DMX signal is passed to the fixture while it is operating in 
standalone mode, the DMX signal will override the standalone setting.


DMX CONTROLLED OPERATION


The Storm Form DMX was designed for use with standard DMX512 control systems. The Storm Form 
DMX occupies a single DMX channel and can be given any DMX starting address from 1-512. Please note 
that the Storm Form DMX does not feature any RDM functionality. 

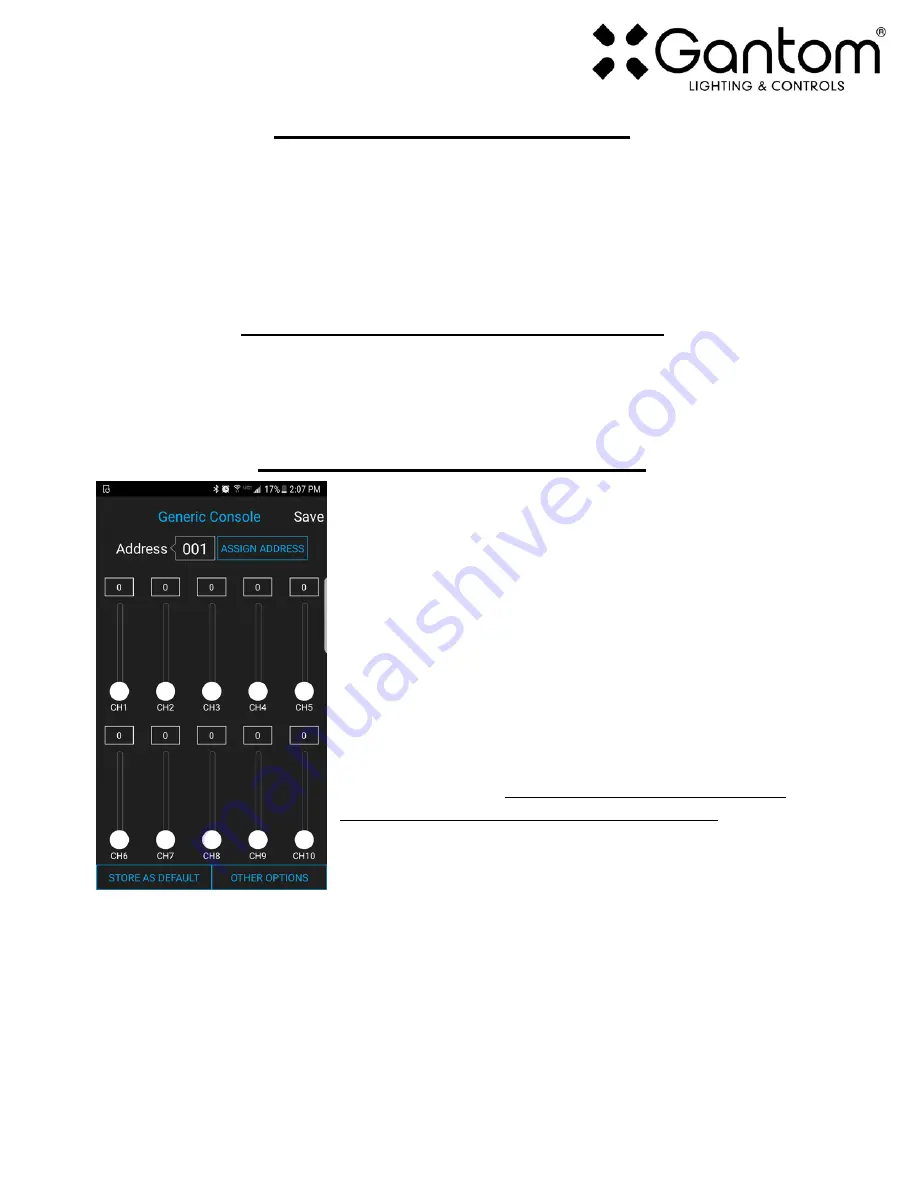
ADDRESSING YOUR FIXTURE 


To set the DMX address, first connect the Storm Form DMX to the 
DMX Programmer app by Gantom as was outlined earlier in this 
document. With the Generic Console control screen open, you should 
have full control of the fixture using the CH1 slider. If the light fixture 
is connected to the app but is not responding, try power cycling the 
light fixture. 


Once you have verified that the light fixture is responding to control 
signal from the app, tap the number field next to the word “Address”. 
A new screen will pop up, prompting you to enter a DMX address. 
After you enter your desired DMX address, the app will return to the 
Generic Console screen. Finally, you must hit the ASSIGN ADDRESS 
button in order to save the new address into the fixture. Hitting the 
“Save” button will not save anything to the light fixture’s memory. 


Summary of Contents for Storm Form

Page 1: ...ramming device Features o Adjustable zoom and focus o 16 27 beam angle o Accepts 19mm steel or glass gobo up to 2mm thick o Warm White 90 CRI or Cool White LED o 9 Watt LED o Class 2 low voltage 12 24...

Page 2: ...com accessories gantom pro cable Note all fixtures must be installed with the low voltage supply power OFF Hot plugging connecting to a live power supply is not supported Hot plugging a fixture into a...

Page 3: ...within the fixtures If the lenses must be cleaned use a microfiber cloth and glasses cleaning solution Make sure that the locking cable connectors are fully tightened when the product is installed Che...

Page 4: ...21 AIMING INSTRUCTIONS Once the fixture has been mounted you can complete the aiming of the fixture The fixture is adjustable in the following ways When you have the light pointed in the correct orien...

Page 5: ...um image size for patterns is 15mm and the maximum image size for text is 10mm Both stainless steel and full color glass gobos are available to fit the Gantom Form Custom stainless steel and full colo...

Page 6: ...lider rails To do this you will need to loosen the set screws on the Primary and Secondary Optic as shown in the previous picture Pro Tip Don t touch the lenses A small fingerprint can distort your pr...

Page 7: ...the hole until it begins to resist Once it begins to resist continue turning it one quarter of a turn and then stop This will give enough tension to hold the gobo but will not over tighten the retenti...

Page 8: ...r from the LED as possible on the optic slider rails You may need to loosen the set screws on the primary and secondary optics in order to slide them along the rails Slowly begin sliding the secondary...

Page 9: ...ou would like tighten down the set screws on the primary and secondary optics Complete the adjustment by screwing the barrel back onto the fixture INSTALLING ACCESSORIES A removable cutaway snoot for...

Page 10: ...e Programming Adapter o An Android or iOS device for running the Gantom Programmer app Please note that a headphone port is required to connect to the device to the fixture The iPhone7 does work with...

Page 11: ...l allow you to save a settings profile into the app Use this if you need to configure many fixtures to have the exact same settings Please note that this button DOES NOT save the current profile or ad...

Page 12: ...st receives power before it enters normal operation it will first report its channel mapping profile and second report its DMX address through a sequence of flashes By default the DMX starting address...

Page 13: ...dard DMX512 control systems The Storm Form DMX occupies a single DMX channel and can be given any DMX starting address from 1 512 Please note that the Storm Form DMX does not feature any RDM functiona...

Page 14: ...en effective for learning how to use your Storm Form or Storm Form DMX light fixture However if you run into a wiring issue a bug in the software or just a light that doesn t seem to want to cooperate...

Reviews: