page 3
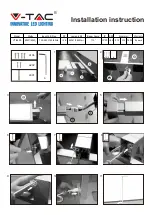
1. First you need to select the light mounting option you
desire: Side mount / Center mount / Corner mount
Turn over the top (A) like in Fig 2 and locate the bracket
position that creates the mounting option you like.
2. Once you picked the location, remove the screws from
the lens and use to secure the bracket (B)
3. Insert section (C1) on top of the bracket (B) and secure
it with a screw (S).
4. Insert the second section (C2) to the first section and
secure it with a screw (S).
5. Insert the bottom section (D) to the second section (C2)
and secure it with a screw (S).
6. Next, connect the stake (E) to the base section (D) by
screwing the stake clockwise.
7. Insert the completed lamp assembly into the ground
in your desired location. Make sure the stake is fully
inserted into the ground.
NOTE: If you are having trouble inserting the stake into
the ground, try moistening the ground with water.
1. Turn the operation switch to Low or High position
(Fig.3) according your preferences:
a. LO (Low) For softer light and longer duration.
b. HI (High) For brighter light output.
2. Chose the color output temperature
a. WARM For Warm White (2700K)
b. COOL For Bright White (6000K)
3. The solar lamp will automatically operate at dusk.
3. Operation Instructions
2. Assembly instructions:
(Fig. 2)
(Fig. 3)
Side mount
Corner mount
Center mount