background image

26

E-Z SWIVEL

30°C / 85°F

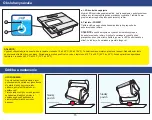
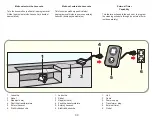
Maintenance and adjustment
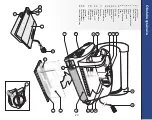
Filter bag

label

Screws

outlet top

propeller

Cable Assy

Core

Handle Cover

E-Z swivel location

patent pending

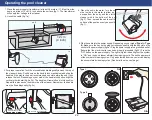
(continued from the previous page)

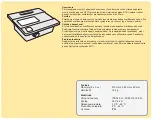
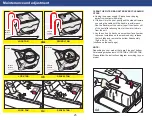
d. Remove the filter bag from the support bars, turn it inside out and wash off all 

the dirt with a garden hose or in a sink. Squeeze the bag gently until the rinse 

water is clear. If necessary, machine wash the bag using only cold water with NO 

DETERGENT! (fig.5)

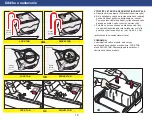
e. Re-install the bag on the support bars with the label in the center of one of the 

long sides of the bottom lid (5a)

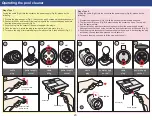
f. Re-install the bottom lid assembly in the body. Push down on it until lock tabs will 

snap into place properly.

IMPORTANT TIPS:

•  Shut off and unplug the power supply every time you remove the cleaner from 

the water.

•  Clean the filter bag after every cycle.

•  Reverse the handle after every cleaning cycle to avoid tangling the cable.

•  Periodically straighten out the floating cable.

•  Replace worn brushes to ensure maximum cleaning performance

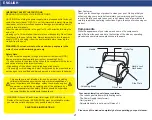
•  Make sure that your pool cleaner positions itself properly on the wall. The 

machine handle must rest parallel to the water line upon reaching the surface of 

the water.

•  Save your cleaner‘s packaging for off-season storage or for shipping the unit to 

your dealer if service is required.

•  Leave your pool cleaner in the water for 15 to 20 minutes after every cleaning 

cycle.

• 

Do not leave your cleaner in direct sunlight when not in use.

• 

Never leave the power supply in direct sunlight and avoid leaving it in the rain.

•  Occasionally, you should rinse your cleaner in clean, fresh water. This will 

lengthen the service life of the drive belts, drive tracks and scrubbing brushes.

• 

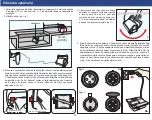
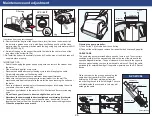
Clean the propeller once a month

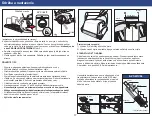
Cleaning the pump propeller:

1) Take out the 2 (4) screws from the outlet top

2) Take out the outlet top and remove hair and other debris around propeller
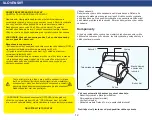
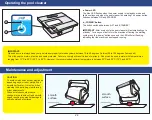
CABLE CARE

The cable may become twisted after a period of time in use. To correct this 

condition, simply lock the moveable handle on the top of the cleaner in the 

opposite diagonal direction. The pool cleaner will now travel in the opposite 

direction while cleaning your pool and the cable will uncoil. Check the cable 

periodically for external damage If the problem persists, use the E-Z Swivel 

device.

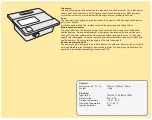
Place the robot on the ground and unplug the 

cable from the transformer. With one hand, 

holding the E-Z Swivel, walk away from the 

robot, pulling the cable to its full length. The core 

will rotate inside the cover and in this way will 

untangle the cable.

Summary of Contents for MED

Page 1: ...1 BK0019013 PD Pokyny k pou it N vod na obsluhu Operating Instructions Robotick baz nov vysava Robotick baz nov vys va Robotic Pool Cleaner...

Page 2: ...znam pre iarknutej n doby na odpadky Nelikvidujte elektrick zariadenia spolo ne s be n m komun lnym odpadom pou ite pr slu n zbern syst my Kontaktujte miestnu spr vu pre inform cie t kaj ce sa dostupn...

Page 3: ...t se sn en mi fyzick mi senzorick mi nebo ment ln mi schopnostmi anebo bez dostate n ch zku enost a znalost pokud nejsou pod dozoremosobyodpov dn zajejichbezpe nost Nedovolted tem hr t si s t mto za z...

Page 4: ...t la vysava e ve vod ot ejte ze strany na stranu a pot nechte vysava klesnout na dno baz nu obr 3 N sledn rozprost ete kabel po hladin baz nu co nejrovnom rn ji obr 1 5 P ipojte kabel ke zdroji nap j...

Page 5: ...upujte n sledovn 1 P ipravte z str ku obr C se zar kou a v kem 2 Zar ka mus b t sm rem nahoru obr E pro umo n n otev en v ka V ko zajist kabel na m st 3 Nasm rujte v stupek s otvorem na z suvce I kdy...

Page 6: ...likat co indikuje e za zen p estalo fungovat D LE IT Vysava v dy skladujte na m st kde je teplota v rozsahu 10 a 40 C 50 a 104 F To zajist ochranu motor plast a t sn n Nedodr en m tohoto upozorn n ztr...

Page 7: ...b za kabel dokud nedos hnete na rukoje Pomoc rukojeti nikoliv kabelu vyt hn te vysava z baz nu a nechte z n j vyt ct co nejv ce vody c Polo te ho horn stranou na hladk povrch abyste zabr nili po kr b...

Page 8: ...s m um st na st nu Rukoje za zen mus pro dos hnut hladiny vody z stat paraleln k linii vody Odlo te si obal od vysava e pro p pad p epravy Vysava nechte ve vod 15 a 20 minut po ka d m istic m cyklu N...

Page 9: ...hnac ch emenech 6 nebo pohonu 7 nebo jestli nen kabel zamotan kabel V p pad pot eby vy ist te b Zkontrolujte jestli nesklouzly z m sta hnac emeny 6 Rovn zkontrolujte spr vn napnut emen 6 Pokud je nutn...

Page 10: ...bn kvalifikovan osoba U ivatel nesm vykon vat dn intern nastaven nebo v m nu komponent P ed sejmut m krytu mus te odpojit nap jec kabel Je li nap jec kabel po kozen mus b t vym n n kvalifikovan m serv...

Page 11: ...otor 4 Uzamyk n rukojeti 5 Pohon 6 Hnac emen 7 Pohon 8 T lo za zen 9 Filtr 10 Bo n kryt 11 PVA kart e 12 Filtra n s ek 13 Spodn kryt 14 Rukoje 15 Kabel 16 Nap jen transform tor 17 Z suvka transform to...

Page 12: ...re pou itie osobami vr tane det so zn en mi fyzick mi senzorick mi alebo ment lnymi schopnos ami alebo bez dostato n ch sk senost a znalost pok mnies poddozoromosobyzodpovednejzaichbezpe nos Nedovo te...

Page 13: ...lne obr 2c zariadenie 4 Vlo te vys va do vody Oto te zo strany na stranu vo vode pre uvo nenie vzduchu z tela vys va a a potom nechajte vys va klesn na dno baz na obr 3 Potom rozprestrite k bel po hl...

Page 14: ...a obr B postupujte nasledovne 1 Pripravte z str ku obr C so zar kou a v kom 2 Zar ka mus by smerom hore obr E pre umo nenie otvoren ho v ka V ko zaist k be na mieste 3 Nasmerujte v stupok s otvorom na...

Page 15: ...indikuje e zariadenie prestalo fungova D LE IT Vys va v dy skladujte na mieste kde je teplota v rozsahu 10 a 40 C 50 a 104 F To zaist ochranu motorov plastov a tesnen Nedodr an m tohto upozornenia str...

Page 16: ...e za k bel pok m nedosiahnete na rukov Pomocou rukov ti nie za k bel vytiahnite vys va z baz na a nechte z neho vytiec o najviac vody c Polo te ho hornou stranou na hladk povrch aby ste zabr nili po k...

Page 17: ...tni na stenu Rukov zariadenia mus zosta paralelne k l nii vody pre dosiahnutie hladiny vody Odlo te si obal od vys va a pre pr pad prepravy Nechajte vys va vo vode 15 a 20 min t po ka dom istiacom cyk...

Page 18: ...e 7 alebo nie je zamotan k bel V pr pade potreby vy istite b Skontrolujte i nesk zli z miesta hnacie remene 6 Taktie skontrolujte spr vne napnutie reme ov 6 Ak je to potrebn remene vyme te c Skontrolu...

Page 19: ...osoba Pou vate nesmie vykon va iadne intern nastavenia alebo v meny komponentov Pred zlo en m krytu mus te odpoji nap jac k bel Ak je nap jac k bel po koden mus ho vymeni kvalifikovan servisn technik...

Page 20: ...otor 4 Uzamykanie rukov ti 5 Pohon 6 Hnac reme 7 Pohon 8 Telo zariadenia 9 Filter 10 Bo n kryt 11 PVA kefy 12 13 Spodn kryt 14 Rukov 15 K bel 16 Nap janie transform tor 17 Z suvka transform tora 18 Tr...

Page 21: ...ce is not intended for use by persons including children with reduced physical sensory or mental capabilities or lack of experience and knowledge unless they have been given supervision or instruction...

Page 22: ...diagonally fig 2c unit 4 Place the unit in the water Turn the unit side to side in the water to allow air to escape from the body and then let the cleaner sink to the bottom of the pool fig 3 Then spr...

Page 23: ...ly Fig B please do the following 1 Prepare the plug as seen in Fig C with the key and the riser exactly as shown 2 The riser should face up Fig E in order to keep the socket cap open The cap will lock...

Page 24: ...s keep your pool cleaner properly stored anywhere between 10 to 40 degrees Celsius 50 to 104 degrees Fahrenheit This will keep the motors plastics and seals protected Failure to comply will result in...

Page 25: ...ing the cable until the handle is within reach Use the handle not the cable to pull the cleaner out of the pool after allowing most of the water to drain from the unit c Lay the unit on its back on a...

Page 26: ...rface of the water Save your cleaner s packaging for off season storage or for shipping the unit to your dealer if service is required Leave your pool cleaner in the water for 15 to 20 minutes after e...

Page 27: ...nt with the power cord Clean as necessary b Check if drive belts 6 have slipped out of place Also check for proper tension of drive belts 6 If necessary replace belts c Check for loose drive motor 3 c...

Page 28: ...on No internal adjustment or component replacement can be carried out by the user The power cable must be disconnected before removing the cover If the power supply cord is damaged it must be replaced...

Page 29: ...acket 5 Pulley Assembly 6 Drive Belt 7 Drive Track 8 Body Assembly 9 Filter Screen and propeller 10 Side Plate 11 PVA Brushes 12 Filter Bag 13 Bottom Lid Assembly 14 Handle Assembly 15 Cable Assembly...

Page 30: ...nie pomocou extern asova dostupn samostatne Mo nost extern ho asova e Tato funkce umo uje u ivateli naprogramovat i t n pomoc extern ho asova e k dost n samostatn 1 Unit 2 Cable 3 Power supply 4 Trans...

Page 31: ...danie EN Cleaning cycle duration Filter capacity Volume of water filtered Recommended temperature of water Cabel length Cleans walls Remote control Galeon FL 2 5 h 20 m 16 m3 h 18 32 C 17 m Galeon ME...

Reviews: