Galanz GLOMJB17S2ASWZ-10 User Manual Download Page 13

13

OPERATION INSTRUCTION

Press Number

Number Pad

Menu

Weight

1

Onion Rings

2

3

Chicken Wings

4

Chicken Nuggets

5

Popcorn Chicken 

6

Mozzarella Sticks 

7

10oz
12oz
14oz
16oz

8oz

8oz

8oz

16oz

12oz

20oz

8oz

16oz

12oz

20oz

6oz

10oz

 8oz

12oz

8oz

12oz

10oz

6oz
8oz

16oz

24oz

1

1

1

3

2

4

1

3

2

4

1

3

2

4

1

3

2

4

5

1

3

2

4

6

5

Cooking Time

26:00

24:00

30:00

27:00

33:00

23:00

29:00

26:00

32:00

16:00

20:00

18:00

22:00

22:00

26:00

24:00

16:00
17:00
18:00
19:00
20:00
21:00

18:00

28:00

36:00

Chicken Drumsticks

French Fries 

During the cooking, press 

CONV

 button once to check the temperature.

Notes

Convection

With Preheat

         In standby mode, press 

CONV

 button once, the display will show “ SELECT TEMPERATURE”.

         Press number pad to choose the temperature, the display will show “PRESS START OR PRESS CONV”
         Press 

START 

button to start preheat, the display will show “PREHEAT”.

         When meet the temperature, “PREHEAT DONE, PLACE FOOD IN OVEN” will display and beeps will 
         sound to remind you place the food.
        Open the door and place food in oven, “CLOSE THE DOOR AND ENTER COOK TIME”.
        Use the number pad to enter the cook time, press 

START

 button to start cooking. 

1
2
3
4

5
6

Without Preheat

         In standby mode, press 

CONV

 button once, the display will show “ SELECT TEMPERATURE”.

         Press number pad to choose the temperature, the display will show “PRESS START OR PRESS CONV”
         Press 

CONV 

button to confirm the temperature, and use the number pad to enter the cooking time.

         Press 

START

 button to start cooking. 

1
2
3
4

Summary of Contents for GLOMJB17S2ASWZ-10

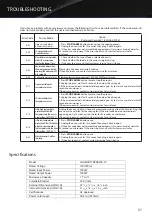
Page 1: ...2020 Galanz Americas Limited Company Thank you for purchasing a Galanz product Please read this manual carefully for correct usage and safety and keep for future reference For service support and warr...

Page 2: ...g 10 9 9 10 SETTING UP YOUR MICROWAVE OVEN OPERATION INSTRUCTION 11 Setting up your microwave oven 10 Setting the Clock Setting the Timer Express Cooking Microwave Cooking Roast Cook Sensor Cook AirFr...

Page 3: ...signed for industrial or laboratory use 7 As with any appliance close supervision is necessary when used by children 8 To reduce the risk of fire in the oven cavity a Do not overcook food Carefully mo...

Page 4: ...it may make installation easier 1 Remove all packing materials from inside the oven cavity However DO NOT REMOVE THE WAVEGUIDE COVER which is located on the right side in the oven cavity Make sure tha...

Page 5: ...ent circuit Relocate the radio orTV as far away from the oven as feasible or check the position and signal of the receiving antenna GROUNDING INSTRUCTIONS This appliance must be grounded In the event...

Page 6: ...s jars are not heat resistant and may break Glassware Use heat resistant oven glassware only Make sure there is no metallic trim Do not use cracked or chipped dishes Oven cooking bags Follow the manuf...

Page 7: ...ing Child lock 12 8 inch glass turntable 1 7 Cu Ft over the range microwave oven Air Fry Kit Steam Kit Turntable with ring Installation Hardware Grease Filter Exhaust Damper Installation Guide User Gu...

Page 8: ...LB Defrost Number Pad 6 Timer Press once to temporarily stop cooking or twice to cancel cooking altogether and use to set child lock Press to set timer function 7 Clock Press to set clock time 8 Star...

Page 9: ...check all the components Please do not use if any component is missing or damaged Please make sure the screw on the carry handle is tight before using Please tighten the screw if it is loose Please ma...

Page 10: ...able ring must always be used during cooking Always place all food and containers of food on the glass tray for cooking If the glass tray or turntable ring cracks or breaks contact your nearest author...

Page 11: ...Press START button to confirm Once you have set the timer function the timer countdown will always be displayed in standby mode and you can press STOP CANCEL to cancel the timer function You can pres...

Page 12: ...rature Notes Menu Weight Serving Maximum Time CASSEROLE 4 32 oz 8 45 PIZZA 5 16 oz 3 00 POTATO 1 3 servings 6 8 oz serving 15 00 FRESH VEGETABLE 5 24 oz 10 00 FROZEN VEGETABLE 5 24 oz 15 00 1 2 In sta...

Page 13: ...ess CONV button once the display will show SELECT TEMPERATURE Press number pad to choose the temperature the display will show PRESS START OR PRESS CONV Press START button to start preheat the display...

Page 14: ...1 2 3 1LB Defrost This feature allows you to defrost food quickly In standby mode press 1LB DEFROST button once Press START button to confirm 1 2 Notes During defrost the oven will sound beep and paus...

Page 15: ...n to confirm 1 2 3 Press the SOFTEN MELT button once the display will show PRESS 1 SOFTEN BUTTER 2 MELT BUTTER 3 SOFTEN ICE CREAM 4 SOFTEN CHEESE Use number pad to select food type the display shows P...

Page 16: ...press TURNTABLE ON OFF button to set the state of the turntable during setup Notes When you turn on the fan on the boost wind and start cooking it has five gears Boost High Medium Low Off can be switc...

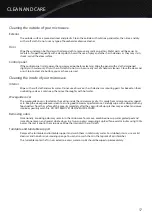
Page 17: ...r baked on food use baking soda or a mild soap then rinse thoroughly with hot water Waveguide cover The waveguide cover is located on the ceiling inside the microwave cavity It is made from mica so re...

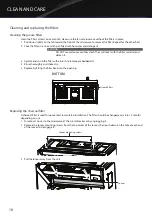
Page 18: ...erial and darken it 3 Agitate and scrub the filter with a brush to remove embedded dirt 4 Rinse thoroughly and shake dry 5 Replace by fitting the filter back into the opening Grease filters BOTTOM Rep...

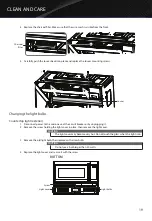
Page 19: ...exterior 1 Disconnect power to the microwave at the circuit breaker or by unplugging it 2 Remove the screw holding the light cover in place then remove the light cover CAUTION The light cover may beco...

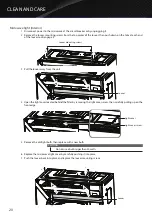
Page 20: ...unting screws 3 Pull the louver away from the unit Louver 4 Open the light cover located behind the filter by removing the light cover screw then carefully pulling up on the front edge Light cover scr...

Page 21: ...n microwave If the error re occurrs contact customer service for assistance E 13 Ultra hightemperature protection Whenthe temperatureintheovenis greaterthan452 F 250 C Unplug the oven and allow it to...

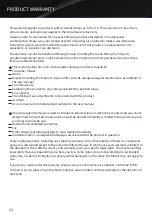
Page 22: ...ing of any attachments not provided with the product Accident Use in a manner not intended and outlined in the user manual Any subsequent damages caused by the above listed exclusions will not be cove...

Page 23: ...ess below within 30 days of purchase Galanz Americas 55 Challenger Road Suite 503 Ridgefield Park NJ 07660 Name Address City State ZIP Phone Email Model Number Purchase Location PLEASE PRINT CLEARLY S...

Page 24: ...2020 Galanz Americas Limited Company...

Reviews: