background image

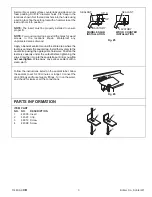
SEALANT

3/8” D.

5/8”

LAVATORY

MARBLE SLAB
INSTALLATION

WOOD COUNTER
INSTALLATION

LAVATORY

SEALANT

NOTE: WATERPROOF UNPROTECTED OVERHANG
AREA ON THE UNDERSIDE OF WOOD COUNTER

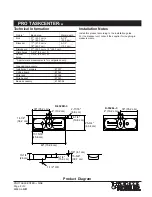
4”

3/8” COLD

1-1/4” OUTLET

3/8” HOT

(S)

(T)

19”

7-7/8”

28”

1/2”

4”

14”

7-5/8”

2-5/16”

4”

4”

.9<116

114408-2-

CB

2000 Kohler Co.

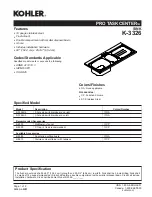
MAN’S LAV

 ENAMELED CAST IRON

 UNDERCOUNTER LAVATORY

PRODUCT INFORMATION

Fixture*:

basin area

water depth

Lavatory

24” x 13”

4-1/4”

Outlet

1-11/16” D.

* Approximate measurements for comparison only.

BEFORE YOU BEGIN

NOTES

These instructions contain important care, cleaning,
and warranty information – please leave instructions
for the consumer.

Due to the nature of the installation, undercounter
lavatories should be installed by trained and
experienced installers.

Prior to installation, unpack the new lavatory and
carefully inspect it for damage. Return the lavatory
to its protective carton until you are ready to install
it.

Do not use adhesives or adhesive sealants with this
product.

TOOLS AND MATERIALS REQUIRED

Safety glasses

Safety shoes

Pencil

Scissors

Tape measure

Putty knife

Screwdriver

Hole saw

Keyhole saw or saber saw

Drill (1/2” dia. drill bit or larger)

Sealant

Roughing-In Notes

Fixture dimensions are nominal and conform to toler-
ances in ASME/ANSI Standard A112.19.1M.

( T ) Pop-up drain 13-1/2”.

( S ) 10” (Based on 12” riser which may require cutting).

Holes in undercounter fixture are oversized. Drill fitting
holes in counter according to fitting rough-in.

Summary of Contents for VV 200-000

Page 1: ...ies 125 VD 201 010 Shot blasted aluminum appliance cover Cast iron grates must be removed before cover can be closed 50 VV 200 000 Connecting strip for combination with other appliances with integrated control panel Order cover separately Planning notes The gas cooktop is equipped with a connecting cable and a shock proof plug 55 When used with downdraft VL 051 swivel range is not going over the g...

Page 2: ...nnecting strip for combination with other appliances with integrated control panel 125 VD 201 010 Shot blasted aluminum appliance cover 125 SH 230 001 Hinge holder required for fitting the appliance cover Planning notes Appliance clicks into place when inserted in the countertop from above The cooktop is equipped with a 67 connecting cable hardware required Total rating 3 0 kW Total Amps 13 Vario ...

Page 3: ...e descent mode the swivel arm automatically returns to the middle position 5 pipe connection Optional accessories _ 45 VV 200 000 Connecting strip for combination with other appliances with integrated control panels Planning notes Minimum countertop height 36 Recess the base area in the base cabinet underneath the VL see sketch For combination with remote fan motor GB 031 707 Plan an Aluflex exhau...

Page 4: ... Montageaanwijzing Istruzione per il montaggio Instrucciones de montaje VV 200 000 Monteringsanvisning Monteringsvejledning Monteringsanvisning Asennusohjeet Οδηγίες εγκατάστασης Инструкция по монтажу Instrukcja instalacyjna Instruções de montagem Montaj talimatları ...

Page 5: ...re Vario apparaten naast elkaar inbouwen Ga dan als volgt te werk Maak de uitsparing in het werkblad voor de desbetreffende apparaten Markeer de afstand tot het midden van het apparaat en monteer de profielen afbeelding 1 Plaats het eerste apparaat in het werkblad Leg het tweede apparaat op de klemveren en controleer de afstand tussen de bedieningspanelen Deze dient 4 5 tot 5 0 mm te zijn afbeeldi...

Page 6: ...6 1 2 3 4 ...

Page 7: ......

Page 8: ......

Page 9: ......

Page 10: ......

Page 11: ......

Page 12: ......

Page 13: ......

Page 14: ......

Page 15: ......

Page 16: ...r with four fold glazing Child and vacation lock Glass door opening through 180 Optional accessories KB 110 046 Glass tray 200 PS 026 001 Baking stone with pizza spatula without heating element 270 BT 026 001 Cast roaster without heating element 75 HZ 026 001 Heating element for baking stone and cast roaster See page 13 for accessories Single oven Gaggenau 200 Series Pyrolytic self cleaning system...

Page 17: ......

Page 18: ... wired individual 120V A C 60Hz approved electrical circuit Use required fuse 15 amp or comparable circuit breaker NOTES Style of product may vary from picture Front View G H J Top View A B D C E F PRODUCT DIMENSIONS INCHES CENTIMETERS MODEL SKUs A B1 C D2 E3 F4 G5 H6 J7 35 5 8 90 5 28 7 8 73 3 24 61 0 26 3 4 67 9 43 1 4 109 9 40 1 8 101 9 68 5 8 174 3 70 1 8 178 1 N A N A JFC2089HES Important Bec...

Page 19: ...326L 3 3 hole sink with drainboard on left NA Recommended Accessories K 6330 ProMasterTM faucet CP K 9000 P Trap 2 traps recommended CP Available Accessories K 2989 Countertop cutting board NA K 8813 Stainless steel strainer with tailpiece CP Product Specification The flush mount sink shall be 60 152 4 cm in length and 25 3 4 65 4 cm in width Sink shall be 3 hole drilling Sink shall be made of 18 ...

Page 20: ...7357 Cutting board 87365 Wire rack 87366 Wire basket 87360 Basin accessory 87367 96 Installation Notes Install this product according to the installation guide For the disposal unit consult the supplier for roughing in measurements 14 1 4 36 2 cm 1 1 2 OD K 3326R 3 K 3326L 3 4 10 2 cm 30 76 2 cm 1 5 8 4 1 cm 60 152 4 cm 4 10 2 cm 30 76 2 cm 17 15 16 45 6 cm 10 1 4 26 cm 6 1 4 15 9 cm 15 5 8 39 7 c...

Page 21: ...ional colors finishes Specified Model Model Description Colors Finishes K 3334 Undercounter sink NA Optional Accessories K 2989 Countertop cutting board NA K 3277 Wire basket 0 White Other K 8801 Duostrainer sink strainer CP Other Product Specification The undercounter sink shall be 14 35 6 cm in length and 18 5 8 47 3 cm in width Sink shall be made of 18 gauge stainless steel Sink shall be single...

Page 22: ...kit 91915 Cut out template 113195 7 Installation Notes Install this product according to the installation guide Allow a minimum of 2 5 1 cm clearance around sink rim for clip attachment 7 8 2 2 cm 15 3 4 40 cm 1 1 2 OD Countertop Sink Clip 2 5 1 cm Min 20 3 8 51 8 cm 7 7 8 20 cm 7 5 8 20 cm 13 33 cm 1 3 4 4 4 cm R Product Diagram UNDERTONETM UNDERTONETM UNDERCOUNTER SINK Page 2 of 2 111138 4 AB ...

Page 23: ...e to the nature of the installation undercounter lavatories should be installed by trained and experienced installers Prior to installation unpack the new lavatory and carefully inspect it for damage Return the lavatory to its protective carton until you are ready to install it Do not use adhesives or adhesive sealants with this product TOOLS AND MATERIALS REQUIRED Safety glasses Safety shoes Penc...

Page 24: ... 114408 2 CB Kohler Co Kohler WI 2 INSTALLATION NOTE Cut out the template and mounting hole locations with a scissors inside the cutting line as shown Fig 1 Fig 2 Fig 3 Fig 4 ...

Page 25: ...For wood countertops pre drill the holes for wood screws in the locations shown Waterproof any unprotected areas of wood SEALANT 3 8 D 5 8 LAVATORY MARBLE SLAB INSTALLATION WOOD COUNTER INSTALLATION LAVATORY SEALANT Fig 5 Follow the instructions listed on the sealant label Allow the sealant to set for 30 minutes or longer Connect the drain fittings and faucet supply fittings Turn on the water and ...

Page 26: ...propriate adjustment Damage caused by accident misuse or abuse is not covered by this warranty Improper care and cleaning will void the warranty Proof of purchase original sales receipt must be provided to Kohler with all warranty claims Kohler Co is not responsible for labor charges installation or other consequential costs In no event shall the responsibility of Kohler exceed the purchase price ...

Page 27: ...city The top of the laundry tub must be at least 30 76 2 cm above the floor Floor drain system view B The floor drain system requires a siphon break that may be purchased separately The siphon break must be a minimum of 28 71 cm from the bottom of the washer Additional hoses might be needed Stacked Washer and Dryer Recommended installation spacing for cabinet installation For cabinet installation ...

Page 28: ... 20 m 36 ft 11 m 58 ft 17 7 m 28 ft 8 5 m 1 Rigid metal Flexible metal 54 ft 16 5 m 31 ft 9 4 m 48 ft 14 6 m 23 ft 7 m 2 Rigid metal Flexible metal 44 ft 13 4 m 27 ft 8 2 m 38 ft 11 6 m 19 ft 5 8 m 3 Rigid metal Flexible metal 35 ft 10 7 m 25 ft 7 6 m 29 ft 8 8 m 17 ft 5 2 m 4 Rigid metal Flexible metal 27 ft 8 2 m 23 ft 7 m 21 ft 6 4 m 15 ft 4 6 m A Louvered hood style B Box hood style 4 10 2 cm ...

Page 29: ...riously injured if you don t follow All safety messages will tell you what the potential hazard is tell you how to reduce the chance of injury and tell you what can happen if the instructions are not followed Your safety and the safety of others are very important We have provided many important safety messages in this manual and on your appliance Always read and obey all safety messages This is t...

Page 30: ... that have been previously cleaned in washed in soaked in or spotted with gasoline dry cleaning solvents or other flammable or explosive substances as they give off vapors that could ignite or explode Do not allow children to play on or in the dryer Close supervision of children is necessary when the dryer is used near children Before the dryer is removed from service or discarded remove the door ...

Page 31: ...room can also cause damage to walls floors and picture hangers and cause condensation on windows and walls in cold weather Lint Even though the dryer is equipped with a lint screen fine particles of lint can get through the screen and be exhausted out of the dryer Proper venting of the dryer will keep lint from accumulating in the laundry area Heat In order to remove moisture from the garments in ...

Page 32: ...o 90 bends and the installation requires three 90 bends the total allowable vent length would be reduced by 10 ft 3 0 m from 40 ft 12 2 m to 30 ft 9 1 m Multiple Dryer Venting Systems Multiple dryer venting systems must be designed specifically for each application NOTE It is recommended that an architectural or HVAC engineering firm be consulted for designing the dryer venting system Connecting a...

Page 33: ...the exhaust system Inspecting the Exhaust System 1 Disconnect the exhaust duct from the dryer and from the exhaust hood at the exhaust outlet 2 Inspect the interior of the duct and remove any lint accumulation Be sure that lint is removed from the exhaust hood Lint may collect in the exhaust hood so that the flappers or louvers if installed as part of the exhaust system will not open or close comp...

Reviews: