background image

27

 Noise      

en

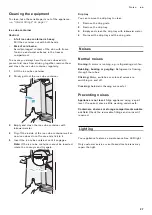
Cleaning the equipment

To clean, take the variable parts out of the appliance. 

~

 "Interior fittings" on page 11

Ice cube container

Caution!

A full ice cube container is heavy:

Pull the container out with both hands.

Risk of cold burns:

Avoid prolonged contact of the skin with frozen 
food, ice and metal surfaces in the freezer 
compartment.

To ensure you always have fresh ice cubes and to 
prevent old ones from sticking together, remove them 
and clean the ice cube container regularly.

1

Lift the ice cube container.

2

Slowly pull out the ice cube container.

3

Empty and clean the ice cube container with 
lukewarm water.

4

Dry off the inside of the ice cube container well so 
new ice cubes do not freeze and stick to it.

5

Insert the ice cube container until it engages.

Note: 

If the ice cube container cannot be inserted, 

rotate the conveyor and try again.

Drip tray

You can remove the drip tray to clean.

1

Remove the drip grate.

2

Remove the drip tray.

3

Empty and clean the drip tray with lukewarm water.

4

Re-insert the drip tray and the drip grate.

>

 Noises

Noise

Normal noises

Droning:

 A motor is running, e.g. refrigerating unit, fan.

Bubbling, buzzing or gurgling:

 Refrigerant is flowing 

through the tubes.

Clicking:

 Motor, switches or solenoid valves are 

switching on and off.

Cracking:

 Automatic thawing successful.

Preventing noises

Appliance is not level:

 Align appliance using a spirit 

level. If required, place a little packing underneath.

Containers, shelves or storage compartments wobble 
or stick:

 Check the removable fittings and re-insert if 

required.

9

 Lighting

Lighting

Your appliance features a maintenance-free LED light.

Only customer service or authorised technicians may 
repair the light.

Summary of Contents for RF463304

Page 1: ...en User manual RF463304 RF463305 RF463505 Freezer...

Page 2: ...ior fittings 11 1 Operating the appliance 13 Switching on the appliance 13 Switching off and disconnecting the appliance 13 Setting the temperature 13 Fast freezing 13 Display lock for cleaning 14 Swi...

Page 3: ...g products 23 Freezing fresh food 23 Thawing frozen food 24 Ice and water dispenser 25 Before using the appliance for the first time 25 Observing drinking water quality 25 Information on operation of...

Page 4: ...propellants e g spray cans or explosive substances in the appliance Store high percentage alcohol tightly closed and standing up Risk of electric shock Improper installations and repairs may put the...

Page 5: ...te knowledge concerning safe operation of the appliance Measures Ensure that children and vulnerable people have understood the hazards Children or vulnerable people must be supervised by a responsibl...

Page 6: ...es of the refrigerant circuit and insulation 1 Remove the mains plug 2 Sever the power cord 3 Have the appliance disposed of professionally This appliance is labelled in accordance with European Direc...

Page 7: ...sh installation 635 mm rectangular stable the side panels and the top must be min 16 mm thick and securely attached to the bottom or wall Depth of shortest side panels min 100 mm Side by side installa...

Page 8: ...lling the appliance wait at least 1 hour before connecting it to prevent damaging the compressor 2 Connect the appliance via a correctly installed socket The socket must comply with the following data...

Page 9: ...e appliance on page 13 H Controls P Main switch on off X Ice maker Ice cube container h Rating plate Frozen food container Automatic door opening 2 Ventilation opening Particle filter B 1 Ice and wate...

Page 10: ...imming when door is opened and closed Ice and water dispenser light Ice and water dispenser proximity sensor Temperature unit Language Factory settings Demo mode Rest mode Automatic door opening Home...

Page 11: ...power failure or a fault The ice pack delays the warming of the stored frozen food Note The longest storage time is obtained by placing the ice pack on the food in the top compartment You can take out...

Page 12: ...ote The holder on the cap must be horizontal here 7 Turn the particle filter clockwise to the stop 8 When using a water filter Reset water filter counter Reset water filter counter on page 14 Note Whe...

Page 13: ...appliance no longer cools Disconnecting the appliance Caution Deterioration in water quality The water supply must be turned off 3 hours before disconnecting This prevents mould forming with any unuse...

Page 14: ...cube container is full Switching ice maker on or off 1 Press button to open the main menu 2 Use C button to move to the menu item Ice cube production 3 Press button Eco mode Eco mode switches the app...

Page 15: ...utton to exit the menu Setting the touch field colour 1 Press button to open the main menu 2 Press B button to move to the Basic settings menu item 3 Press button 4 Press C button to move to the Touch...

Page 16: ...d closing the door 1 Press button to open the main menu 2 Press B button to move to the menu item Basic settings 3 Press button 4 Press C button to move to the menu item Dimming when opening and closi...

Page 17: ...he start screen is displayed Resetting to factory settings 1 Press button to open the main menu 2 Press B button to move to the Basic settings menu item 3 Press button 4 Press B button to move to the...

Page 18: ...pening function supports you in opening the door As soon as you activate this function automatic door opening moves out and supports you in opening the door Caution Repeatedly closing the door too ear...

Page 19: ...automatic door opening 1 Open the menu item Automatic door opening 2 Select menu item Off Automatic display lock for cleaning You can use this function to select whether the clean lock is switched on...

Page 20: ...u item 3 Press button to open the menu item 4 Press B button to move to the Home network menu item 5 Press button to open the menu item Note The first time you open the menu you will be automatically...

Page 21: ...ntervals whether updates are available for the Home Connect software If an update is available a small exclamation mark appears on button Installing the update 1 Press button The Home network note win...

Page 22: ...Home Connect functionality conforms to the basic requirements and other relevant provisions of the directive 1999 5 EC A comprehensive R TTE declaration of conformity can be found on the Internet unde...

Page 23: ...ers Important for unrestricted air circulation in the appliance push in frozen food container all the way Freezing fresh food Freeze only fresh and undamaged food Food which is boiled fried or baked i...

Page 24: ...and used shopping bags Shelf life of frozen food at 18 C Thawing frozen food The thawing method must be adjusted to the food and application in order to retain the best possible product quality Thawin...

Page 25: ...time it may taste stale In this case discard the first 15 glasses You will obtain the best water quality if you dispense a little water regularly The particle filter supplied will only filter particle...

Page 26: ...ewarm water and a little pH neutral washing up liquid Caution The rinsing water must not run into the light or through the drainage hole into the evaporation area 4 Wipe the door seal with clean water...

Page 27: ...container until it engages Note If the ice cube container cannot be inserted rotate the conveyor and try again Drip tray You can remove the drip tray to clean 1 Remove the drip grate 2 Remove the drip...

Page 28: ...and for longer The appliance has been opened frequently Do not open the appliance unnecessarily The ventilation openings are covered up Remove obstructions Appliance is not cooling display and lighti...

Page 29: ...particle filter The ice maker is not functioning Ice cube production is switched off Switch on ice cube production Freezer compartment is too warm Set the temperature lower Operating the appliance on...

Page 30: ...domestic appliances Appliance self test Your appliance features a self test programme which displays the fault which your customer service can rectify 1 Press button to open the main menu 2 Press C b...

Page 31: ...8001040966 8001040966 9711 en...

Reviews: