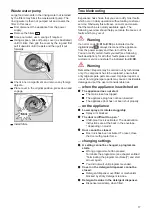
Gaggenau DI 460-131 Operating Instructions Manual Download Page 17

17

Waste water pump

Large food remnants in the rinsing water not retained
by the filters may block the waste water pump. The
rinsing water is then not pumped out and covers the
filter. In this case:

First disconnect the appliance from the power
supply.
Remove the filters 

29

.

Scoop out water, use a sponge if required.
Using a spoon, prise off pump cover (as illustrated)
until it clicks, then grip the cover by the lug and first
pull it upwards until it resists and then pull it out
forwards.

Check inner compartment and remove any foreign
objects.
Place cover in the original position, press down and
engage.

Install filters.

Troubleshooting

Experience has shown that you can rectify most faults
which occur in daily operation without calling customer
service. Obviously this will save on costs and ensure
that the machine is quickly available again. The
following overview should help you locate the causes of
faults which may occur.

Warning

If an error code (E:01 to E:30) is indicated on the
digital display 

3

, always disconnect the appliance

from the power supply and then turn off the tap.
You can rectify certain faults yourself (see following
fault description), for all other faults please contact
customer service and state the indicated fault E:XX.

Warning

Remember: Repairs may be carried out by technicians
only. If a component has to be replaced, ensure that
only original spare parts are used. Improper repairs or
use of non-original spare parts may cause considerable
damage and put the user at considerable risk.

... when the appliance is switched on

The appliance does not start.

The mains fuse has tripped.
The appliance plug has not been inserted.
The appliance door has not been shut properly.

... on the appliance

Lower spray arm rotates sluggishly.

Spray arm blocked.

The door is difficult to open. *

Child-proof lock is activated. The deactivation
instructions are at the back in the envelope.
* depending on model

Door cannot be closed.

Door lock has been activated. To reset, close
the door with greater force.

... changing settings

A setting cannot be changed, a programme
starts.

Wrong programme button pressed.
Terminate the programme (see chapter entitled
“Terminating the programme (Reset)”) and start
all over again.
You did not wait until programme ended.

Cover on the detergent dispenser cannot be
closed.

Detergent dispenser overfilled or mechanism
blocked by sticky detergent residue.

Detergent residue in the detergent dispenser.

Dispenser was damp when filled.

Summary of Contents for DI 460-131

Page 1: ...Gaggenau Operating instructions Dishwasher DI 460 131 DI 461 131 W3128_A AU Ref 9000 407 108 8811 en ...

Page 2: ......

Page 3: ...rmation about comparability tests 12 Additional options 13 Turbo 13 Energy Save 13 Half load 13 Hygiene 13 IntensiveZone 13 Extra drying 13 Washing the dishes 13 Programme data 13 Aqua sensor 13 Zeolith drying 13 Switching on the appliance 14 Remaining running time display 14 Display window 14 Timer programming 14 End of programme 14 Switching off the appliance 15 Interrupting the programme 15 Ter...

Page 4: ...hroat and eyes or asphyxiation Keep children away from open dishwasher The water in the rinsing compartment is not drinking water and could contain detergent residue Ensure that children do not place fingers in the tablet collecting tray 24 Small fingers could become caught in the slots If the appliance is installed at eye level ensure when opening and closing the door that children are not caught...

Page 5: ... 33 Detergent dispenser 34 Lock for detergent dispenser 35 Rating plate depending on model Selecting language The language in the display window 12 can be set from to Deutsch is the factory setting Language Setting Deutsch L 01 English L 02 Français L 03 Nederlands L 04 Italiano L 05 ÅËËÇÍÉÊÁ L 06 Español L 07 Português L 08 Svenska L 09 Norsk L 10 Suomi L 11 Dansk L 12 Türkçe L 13 PYCC Å L 14 Pol...

Page 6: ...n 10 The chosen setting has now been stored Close the door Water hardness table Salt Using salt Always refill with salt immediately before switching on the appliance This ensures that overrun salt solution is immediately washed out and does not corrode the rinsing tank Open the screw type cap of the compartment 28 Fill the tank with water only required when switching on the appliance for the first...

Page 7: ...hange the amount of rinse aid unless streaks select lower setting or water stains select higher setting are left on the utensils Open the door Switch on ON OFF switch 1 Hold down programme button A and press START button 10 until on the digital display is indicated Release both buttons The LED for button A flashes and the digital display displays the factory setting Press programme button A until ...

Page 8: ...lass and cutlery out of the dishwasher as soon as possible after the programme ends Loading the dishwasher Remove large food remnants It is not necessary to prerinse utensils under running water Place the utensils so that D they are secure and cannot tip over D all utensils with their openings face down D parts with curves or indentations are at an angle thereby allowing water to drain D does not ...

Page 9: ...n the upper or lower basket Appliance height 81 5 cm Top basket Bottom basket Setting 1 max 16 cm 30 cm Setting 2 max 18 5 cm 27 5 cm Setting 3 max 21 cm 25 cm Appliance height 86 5 cm Top basket Bottom basket Setting 1 max 18 cm 33 cm Setting 2 max 20 5 cm 30 5 cm Setting 3 max 23 cm 28 cm Pull out the top basket 21 To lower the basket press in the left and then the right lever on the outside of ...

Page 10: ...s such as glass protection or stainless steel cleaner If tablets contain rinse aid and salt it is usually not necessary to add additional rinse aid and salt up to a specific degree of hardness If the degree of hardness is higher and if using solo detergents powder or liquid detergents or tablets without rinse aid and salt rinse aid and salt must be added The appliance doses these automatically acc...

Page 11: ...the partially dissolved tablet Note You will obtain optimum rinsing and drying results by using solo detergents and applying salt and rinse aid separately f programmes are short tablets may not have full cleaning effect due to different dissolving properties and there may even be undissolved detergent residue It is recommended to use washing powder for these programmes The Intensive programme on s...

Page 12: ...cutlery Normally soiled Prerinse Clean 50 Intermediate rinse Final rinse 65 Dry all Auto 35 45 Utensils and cutlery Lightly soiled Is optimised according to the soiling with the aid of sensors Turbo Energy Save Half load Extra drying Quick 45 Utensils and cutlery Lightly soiled Clean 45 Intermediate rinse Final rinse 55 Extra drying Prerinse Lightly soiled Prerinse none Programme selection You can...

Page 13: ...gramme data consumption values can be found in the summary of instructions They refer to normal conditions and the water hardness set value Different influencing factors such as water temperature or line pressure may result in deviations Aqua sensor depending on model The Aqua sensor is an optical measuring device light barrier which measures the turbidity of the rinsing water The Aqua sensor is u...

Page 14: ... To change the setting By pressing the C button you can switch the onboard computer additional programme information off or on Press START button 10 The set value is saved Close the door Timer programming You can delay the start of the programme in 1 hour steps up to 24 hours Open the door Switch on ON OFF switch 1 Press 8 button until the timer programming display 7 jumps to Press 8 or button unt...

Page 15: ...nnot be changed The only way a programme can be changed is by Cancel programme reset Intensive drying The final rinse uses a higher temperature which improves the drying result The running time may increase slightly Caution if utensils are delicate Open the door Switch on ON OFF switch 1 Hold down programme button A and press START button 10 until on the digital display is indicated Release both b...

Page 16: ... avoid using sponge cloths or wash them out thoroughly several times before using for the first time Warning Never use other chlorinated household detergents Health hazard Salt and rinse aid Check the refill indicators 5 and 6 If required refill salt and or rinse aid Filters The filters 29 keep large foreign objects in the rinsing water away from the pump These foreign objects may occasionally blo...

Page 17: ...lf see following fault description for all other faults please contact customer service and state the indicated fault E XX Warning Remember Repairs may be carried out by technicians only If a component has to be replaced ensure that only original spare parts are used Improper repairs or use of non original spare parts may cause considerable damage and put the user at considerable risk when the app...

Page 18: ... Remedial action is not possible on the utensils Food residue on the utensils Utensils placed too closely together utensils basket overfilled Too little detergent Rinse programme too weak Spray arm rotation obstructed Spray arm nozzles blocked Filters blocked Filters incorrectly inserted Waste water pump blocked Top basket on right and left not set to same height Tea or lipstick residue is not com...

Page 19: ...ctions Install and connect the appliance according to the installation and assembly instructions Prior to installation disconnect the dishwasher from the power supply Ensure that the protective conductor system of the domestic supply has been correctly installed The electrical connection conditions must correspond with the specifications on the dishwasher rating plate If the power cord of this app...

Page 20: ...re that the drainage hose is not kinked crushed or twisted and that there is no cover plate in the drainage to prevent the waste water from flowing out Fresh water connection Connect the fresh water connection to the tap according to the installation instructions with the enclosed parts Ensure that the fresh water connection is not kinked crushed or twisted When replacing the appliance always use ...

Page 21: ...here is a risk of frost e g holiday home empty the appliance completely see Transportation Turn off the tap disconnect supply hose and drain water Waste disposal Both the packaging of new appliances and the old appliances themselves contain valuable raw materials and recyclable materials Please dispose of the individual parts separated according to type Please ask your dealer or inquire at your lo...

Page 22: ...22 en Subjekt to modification ...

Page 23: ... sheets or grilles and plates which have a diameter greater than 30 cm gourmet plates pasta plates dinner plates can be cleaned with the aid of the spray head To do this remove the top basket and insert the spray head as illustrated in the diagram To ensure that the spray jet can reach all parts arrange the baking sheets as illustrated max 4 baking sheets and 2 grilles Never operate the dishwasher...

Page 24: ...ected to the power supply 2 This liability warranty is valid for the service life of the appliance 3 The warranty claim is subject to correct installation and connection of the appliance in accordance with our instructions This also includes correct installation of the Aqua Stop extension original accessory Our warranty does not cover defective supply lines or fittings up to the Aqua Stop connecti...

Reviews: