background image

15

Detergent

Adding detergent

1

If the detergent dispenser 

9"

 is still closed, 

press the lock 

9*

 to open the detergent 

dispenser.

Pour detergent into the dry detergent 
dispenser 

9"

 only (insert tablet flat, not on its 

edge). Dosage: see manufacturer’s instructions 
on the packaging. 

The graduated detergent dispenser 

9"

 helps 

you add the correct amount of powder or liquid 
detergent.

Usually 20 ml–25 ml are adequate for normal 
soiling. If using tablets, one tablet is adequate.

2

Close the cover on the detergent dispenser 
by sliding it up until the lock engages without 
difficulty.

The detergent dispenser opens automatically 
at the optimum time depending on the 
programme. The powder or liquid detergent 
is distributed in the appliance and is dissolved, 
the tablet falls into the tablet collecting tray 
where it dissolves in doses.

Tip

If the utensils are only lightly soiled, slightly less than 
the indicated amount of detergent is usually adequate. 

Suitable detergents and care products can be 
purchased online via our website or via customer 
service (see back page). 

Combination detergent

Apart from conventional detergents (Solo), a number 
of products are offered with additional functions. 
These products contain not only the detergent but 
also rinse-aid and salt replacement substances (3in1) 
and, depending on the combination (4in1, 5in1, etc.), 
additional components such as glass protection 
or stainless steel cleaner. Combination detergents 
function only up to a specific degree of hardness 
(usually 26° Clarke). Over this limit salt and rinse-aid 
must be added. 

As soon as combined detergents are used, the rinse 
programme is adjusted automatically to ensure 
the best possible rinsing and drying result.

Warnings

Do 

not

 place small parts for washing in the tablet 

collecting tray 

1B

; this prevents the tablet from 

dissolving evenly.

If you want to add more utensils after 
the programme has started, do 

not

 use the tablet 

collecting tray 

1B

 as a handle for the upper 

basket. The tablet could already be there and 
you will touch the partially dissolved tablet.

Notes

You will obtain optimum rinsing and drying results 
by using solo detergents and applying salt and 
rinse aid separately.

If programmes are short, tablets may not have full 
cleaning effect due to different dissolving 
properties and there may even be undissolved 
detergent residue. It is recommended to use 
washing powder for these programmes.

The Intensive programme (on some models) 
requires one tab only. When using washing 
powder, you can apply some of this cleaning 
agent to the inside of the appliance’s door.

Even if the rinse-aid and/or salt refill indicator is 
lit, the rinse programme will run correctly with 
combined detergents.

If using detergents in a water-soluble protective 
cover: Take hold of the cover with dry hands only 
and put the detergent into an absolutely 
dry detergent dispenser only, otherwise 
the detergent may stick.

If you switch from combined detergents to solo 
detergents, ensure that the water softening 
system and amount of rinse aid have been set to 
the correct value.

PO

PO

PO

&/,&.

Summary of Contents for DF260142

Page 1: ... DJJHQDX 2SHUDWLQJ LQVWUXFWLRQV LVKZDVKHU DF260142 ...

Page 2: ...6WDUW 5HVHW VHF ...

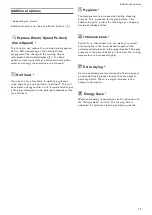
Page 3: ...gramme selection 16 Information for test institutes 16 Additional options 17 Express Wash Speed Perfect VarioSpeed 17 Half load 17 Hygiene 17 Intensive zone 17 Extra drying 17 Energy Save 17 Operating the appliance 18 Programme data 18 Aqua sensor 18 Switching on the appliance 18 Optical display while the programme is running 19 Remaining running time display 19 Timer programming 19 End of program...

Page 4: ...nce or carry out general maintenance unless they are at least 8 years old and are being supervised Keep children below the age of 8 years old at a safe distance from the appliance and power cable Before you switch ON the appliance Please read the instructions for use and installation carefully They contain important information on how to install use and maintain the appliance Retain all documents ...

Page 5: ...If there is no information or if the installation instructions do not include the appropriate information contact the manufacturer of these appliances to ensure that the dishwasher can be installed above or below these appliances If you cannot obtain any information from the manufacturer you must not install the dishwasher above or below these appliances If you install a microwave oven above the d...

Page 6: ...vent subsequent accidents 2 Dispose of the appliance in an environmentally friendly manner m Warning Risk of injury To prevent injuries e g caused by stumbling open the dishwasher only briefly in order to load and unload the dishwasher Knives and other utensils with sharp points must be placed horizontally in the cutlery drawer Do not lean or sit on the open door In the case of free standing appli...

Page 7: ...er dangerous situation Redundant appliances Pull out the mains plug sever and dispose of the power cord Destroy the door lock so that the door can no longer be closed Protection of the environment Both the packaging of new appliances and the old appliances themselves contain valuable raw materials and recyclable materials Please dispose of the individual parts separated according to type Please as...

Page 8: ...F switch 0Programme buttons 8Display Check water supply Salt refill indicator HRinse aid refill indicator PTimer programming XAdditional options START button hDigital display Door opener 1 Interior light 1 Cutlery drawer 12Top basket 1 Upper spray arms 1BTablet collecting tray 1JBottom spray arm 1RDispenser for special salt 1ZFilters 1bBottom basket 1jDispenser for rinse aid 9 Detergent dispenser ...

Page 9: ... the digital display 6 Release both buttons The LED for button flashes and the digital display h displays the factory setting To change the setting 1 Press programme button 3 Each time the button is pressed the set value increases by one level when the value of ˆ has been reached the display jumps back to off 2 Press START button The chosen setting has now been stored 3 Close the door Water hardne...

Page 10: ...ed off m Caution Never fill the salt dispenser with detergent You will destroy the water softening system Rinse aid As soon as the rinse aid refill indicator H is lit on the fascia there is still a rinse aid reserve of 1 2 rinsing processes Refill with rinse aid The rinse aid is required for stain free utensils and clear glasses Use only rinse aid for domestic dishwashers Combined detergents with ...

Page 11: ...ill indicator If the rinse aid refill indicator H is impaired e g when using combined detergents containing rinse aid component it can be switched off Proceed as described under Setting amount of rinse aid and set the value to The rinse aid refill indicator H is now switched off Utensils Not suitable Cutlery and utensils made of wood Delicate decorative glasses craft and antique utensils These dec...

Page 12: ...of the baskets Unloading the dishwasher To prevent water from dripping off the upper basket onto the utensils in the lower basket it is recommended to empty the appliance from the bottom up Hot utensils are sensitive to shock Therefore when the programme ends leave the utensils to cool down in the dishwasher until they can be handled Note When the programme ends water droplets can still be seen in...

Page 13: ... can be found on the back page of these instructions for use Cutlery drawer Arrange the cutlery in the cutlery drawer 1 as illustrated Separately arranged cutlery is easier to remove after washing The drawer can be taken out FoldingspikesFolding spikes depending on model The spikes can be folded down to improve arrangement of pans bowls and glasses Small accessories holder Smallaccessoriesholder d...

Page 14: ...blets as well as powder or liquid detergents for dishwashers but never use washing up liquid The dosage can be individually adjusted with powder or a liquid detergent according to the degree of soiling Tablets contain an adequately large amount of active ingredients for all cleaning tasks Modern powerful detergents predominantly use a low alkaline formulation with enzymes Enzymes break down starch...

Page 15: ...nts function only up to a specific degree of hardness usually 26 Clarke Over this limit salt and rinse aid must be added As soon as combined detergents are used the rinse programme is adjusted automatically to ensure the best possible rinsing and drying result m Warnings Do not place small parts for washing in the tablet collecting tray 1B this prevents the tablet from dissolving evenly If you wan...

Page 16: ...rating plate 92 on the appliance door Type of utensils Type of soiling Programme Possible additional options Programme sequence pots and pans non sensi tive utensils and cutlery very adhesive burned in or dried on food remnants containing starch or protein Auto 65 75 all Is optimised according to the soiling with the aid of sensors Á Auto 45 65 mixed utensils and cutlery part dried common househol...

Page 17: ...tergent dispenser than for a full load Hygiene Hygiene The temperature is increased during the cleaning process This increases the hygiene status This additional option is ideal for cleaning e g chopping boards and baby bottles Ï Intensive zone Intensivezone Perfect for a mixed load You can wash very soiled pots and pans in the lower basket together with normally soiled utensils in the upper baske...

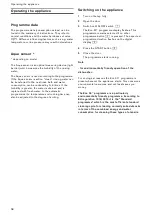
Page 18: ...ogrammes the temperature and running time can also be adjusted to the degree of soiling Switching on the appliance 1 Turn on the tap fully 2 Open the door 3 Switch on ON OFF switch The Eco 50 programme display flashes This programme remains selected if no other programme button 0 is pressed The expected programme duration flashes on the digital display h 4 Press the START button 5 Close the door T...

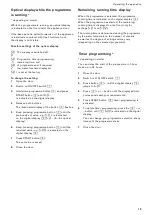
Page 19: ...e is saved 8 Close the door Remaining running time display When the programme is selected the programme running time is indicated on the digital display h When the programme has started the remaining running time is displayed on the floor only for settings and ƒ The running time is determined during the programme by the water temperature the number of utensils as well as the degree of soiling and ...

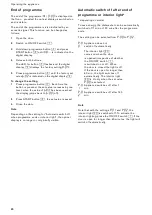
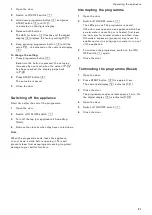
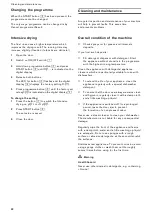
Page 20: ... Depending on the setting for Automatic switch off when programme ends or interior light the optical display is no longer or only briefly visible Automatic switch off after end of programme or interior light Automaticswitchoff interiorlight depending on model To save energy the dishwasher can be automatically switched off 1 min or 120 min after the programme ends The setting can be selected from t...

Page 21: ...move the utensils when they have cooled down Note When the programme ends leave the appliance to cool down a while before opening it This will prevent steam from escaping and causing long term damage to your built in furniture Interrupting the programme 1 Open the door 2 Switch off ON OFF switch The LEDs go out The programme is saved If the door was opened on an appliance which has a warm water co...

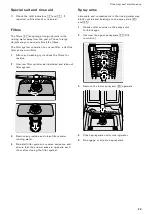
Page 22: ... arm for grease and limescale deposits If you find such deposits Fill detergent dispenser with detergent Start the appliance without utensils in the programme with the highest rinsing temperature Clean the appliance with detergents appliance cleaners which are particularly suitable for use with dishwashers To extend the life of your appliance clean the appliance regularly with a special dishwasher...

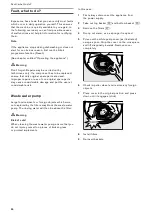
Page 23: ...for residue 2 Unscrew filter cylinder as illustrated and take out filter system 3 Remove any residue and clean filters under running water 4 Re install filter system in reverse sequence and ensure that the arrow marks are opposite each other after closing the filter system Spray arms Limescale and contaminants in the rinsing water may block nozzles and bearings on the spray arms 1 and 1J 1 Check o...

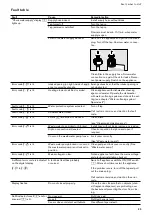
Page 24: ... may cause considerable damage and put the user at considerable risk Waste water pump Large food remnants or foreign objects which were not captured by the filters may block the waste water pump The rinsing water will then be above the filter m Warning Risk of cuts When cleaning the waste water pump ensure that you do not injure yourself on pieces of broken glass or pointed implements In this case...

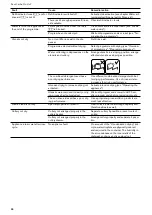
Page 25: ...rror code ƒƒ is lit Filters 1Z are soiled or blocked Clean filters see Cleaning and maintenance Error code ƒ is lit Waste water hose kinked or blocked Install hose without kinks remove any residue Siphon connection still sealed Check connection to siphon and open if required Cover on the waste water pump loose Lock cover correctly See Waste water pump Error code ƒ is lit Waste water pump blocked o...

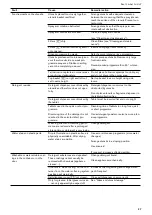
Page 26: ...nt combination detergent with bet ter drying performance Use of rinse aid also increases the drying performance Intensive drying to increase drying not activated Activate intensive drying see Operating the appliance Utensils were removed too early or dry ing process had not ended yet Wait until program ends or wait until 30 min after program ends before removing utensils The eco rinse aid used has...

Page 27: ... cover must not be obstructed by utensils Do not place utensils or fragrance dispenser in the tablet collecting tray Detergent dispenser cover blocked by the tablet Tablet must be inserted flat and not upright Tablets used in the quick or short pro gramme Dissolving time of the detergent is not reached in the selected short pro gramme Dissolving time of tablets too long for a quick or short progra...

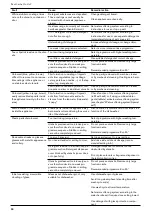
Page 28: ...on consisting of ingredi ents from food remnants and sub stances from the tap water limescale soapy Check function of the water softening system refill with salt or if using combined deter gents tablets activate water softening system see chapter Water softening system Special salt Discolouration of the plastic parts inside the appliance Plastic parts inside the appliance may become discoloured du...

Page 29: ... residue Remove detergent residue Detergent residue in the deter gent dispenser or in the tablet col lecting tray Spray arms blocked by utensils there fore detergent is not rinsed out Ensure that the spray arms can rotate freely The detergent dispenser was damp when filled Pour detergent into the dry detergent dis penser only Appliance stops in the pro gramme or programme is inter rupted Door not ...

Page 30: ...our domestic appliances Installation and connection The dishwasher must be connected correctly otherwise it will not function properly The specifications for the inlet and outlet as well as the electrical connected loads must correspond with the required criteria as specified in the following paragraphs or in the installation instructions Install the appliance in the correct sequence 1 Checking ap...

Page 31: ...model Installation The required installation dimensions can be found in the installation instructions Level the appliance with the aid of the height adjustable feet Ensure that the appliance is situated securely on the floor A built under or integrated appliance which is installed subsequently as a free standing appliance must be secured to prevent it from overturning e g by screwing it to the wal...

Page 32: ...ally favourable means and from a suitable installation e g solar heating system with circulation line This will save energy and time The hot water setting allows you to adjust your appliance optimally to operation with hot water It is recommended to have a water temperature temperature of the incoming water of at least 40 C and no more than 60 C It is not recommended to connect the appliance to ho...

Page 33: ...ion may be modified by technicians only A power cord extension may be purchased from customer service only Use only a residual current operated circuit breaker which features the symbol Only this extension guarantees compliance with the currently valid regulations The appliance features a water damage protection system Please note the system will not function unless the power supply is connected R...

Page 34: ...er approx 4 minutes 8 Press START button until is indicated on the digital display 9 Close the door 10 Open door after approx 1 minute The numerical display indicates 11 Switch off ON OFF switch 12 Turn off the tap disconnect supply hose and drain water Transport appliance upright only This prevents residual water from running into the machine control and damaging the programme sequence Protection...

Page 35: ...QJ VKHHW VSUD KHDG DUJH VKHHWV RU JULOOHV DQG SODWHV ZKLFK KDYH D GLDPHWHU JUHDWHU WKDQ FP JRXUPHW SODWHV SDVWD SODWHV GLQQHU SODWHV FDQ EH FOHDQHG ZLWK WKH DLG RI WKH VSUD KHDG 7R GR WKLV UHPRYH WKH WRS EDVNHW DQG LQVHUW WKH VSUD KHDG DV LOOXVWUDWHG LQ WKH GLDJUDP VRPH PRGHOV 1HYHU RSHUDWH WKH GLVKZDVKHU ZLWKRXW WKH WRS EDVNHW RU EDNLQJ VKHHW VSUD KHDG 7R HQVXUH WKDW WKH VSUD MHW FDQ UHDFK DOO SD...

Page 36: ...G FRQQHFWHG ZLWK TXD 6WRS DFFRUGLQJ WR RXU LQVWUXFWLRQV 7KLV DOVR LQFOXGHV WKH FRUUHFW LQVWDOODWLRQ RI WKH TXD 6WRS H WHQVLRQ RULJLQDO DFFHVVRU 2XU ZDUUDQW GRHV QRW H WHQG WR GHIHFWLYH IHHG OLQHV RU ILWWLQJV XS WR WKH TXD 6WRS FRQQHFWLRQ RQ WKH WDS 7KLV OLDELOLW JXDUDQWHH LV YDOLG IRU WKH VHUYLFH OLIH RI WKH DSSOLDQFH I RXU TXD 6WRS V VWHP LV GHIHFWLYH DQG FDXVHV ZDWHU GDPDJH ZH ZLOO PDNH JRRG WKH...

Reviews: