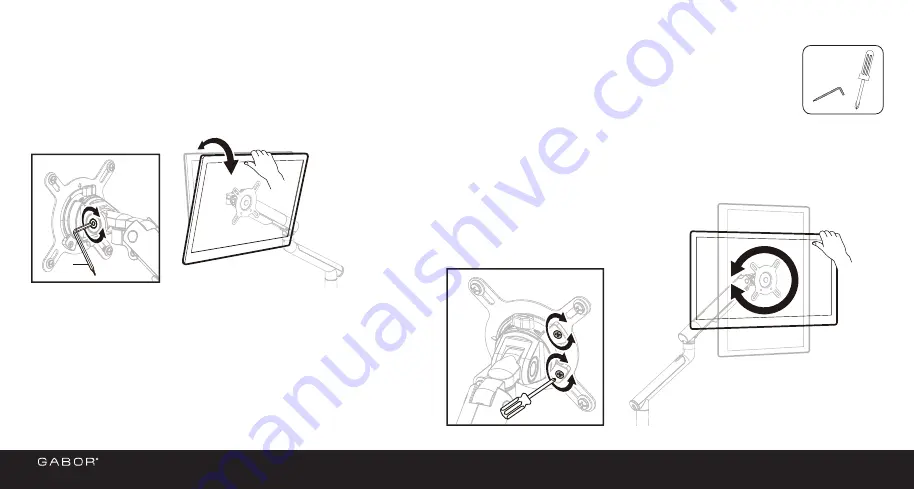
Tilt and rotation adjustments determine how easily and smoothly you can adjust the screen’s position.
Adjusting Tilt and Rotation
13
If the monitor doesn’t stay at the desired tilt angle,
adjust the tilt tension screw with hex key (N).
Turn clockwise to increase the tension, and
counterclockwise to decrease the tension.
Rotation
Tilt
The monitor should rotate easily, but
once it’s set at the proper orientation
it should stay there.
If the monitor rotates too easily,
adjust the rotation tension screws
with a Phillips screwdriver.
N
N
1X
1.
Once the VESA plate is securely attached to the
monitor, slide it into the VESA receiver.
2.
Turn the VESA lock to the locked position.
Important!
The VESA lock secures the VESA plate
inside the VESA mount and ensures the monitor won’t
lift out of the mount when you adjust the monitor
height.
To remove the monitor, unlock the VESA lock and lift
the monitor off the mount.
You can adjust the arm tension to balance the arm according to the weight of your monitor.
1.
Remove the end cap from the arm to expose
the arm tension screw.
2.
With the monitor attached, hold the arm
horizontally so it’s parallel with the desktop.
•
If the arm drops, tighten the arm tension screw by
turning it clockwise with hex key (O) until the monitor
stays in the horizontal position.
•
If the arm rises, loosen the arm tension screw by
turning it counterclockwise with hex key (O) until the
monitor stays in the horizontal position.
Important!
Do not overtighten the tension screws.
To prevent damage to the tension indicator, never let the
red indicator line move beyond the + and – signs at the
ends of the indicator.
Tip:
Always use one hand to support the monitor from
below while adjusting the arm tension.
3.
When the arm is balanced, replace the end cap.


