background image


13 


EN 

SWITCHING ON THE HEATER AND SETTING THE TIME 

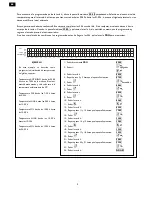
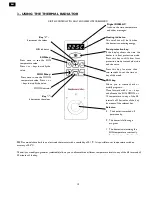
Turn the mode selector dial to P position and press the 

 key more than two seconds. The display will show the time 

intermittently. Set the hours by pressing 

+

 and 

-


keys and press the  . Set the minutes the same way. Press once more the 


key to store the time. If at any time it is necessary to set the time press the 

 key and repeat the above steps. 


FROST PROTECTION MODE  


With this mode on, if the room temperature drops below 3ºC the heater will connect itself automatically. 
If the display shows the time the heater is in frost protection mode. Press the 

 key to shift from frost protection mode (time 

is shown in the display) to standard mode (temperature is shown in the display) and vice versa. 


SELECTOR “O”, “P”, “I”.


Position “0”:


The heater is switched off permanently. The display is switched off.  


Position “P”: 


The heater is following a program. It will maintain the SUN, MOON or 

 temperatures as per the introduced 

program. At this position if the display shows the time the heater is frost protection mode. 


Position “I”:


The heater is maintaining the SUN temperature constantly both luminous indicators SUN and MOON will be 
lit. This could be useful when SUN temperature is required and we do not want to modify the program. At 
this position  if the display shows the time the heater is in frost protection mode. Press the 

 key to shift 

from  frost  protection  mode  (time  is  shown  in  the  display)  to  standard  mode  (temperature  is  shown  in  the 
display) and vice versa. 


SUN, MOON AND 

 TEMPERATURES 

The electronic programmer is able to handle three temperature levels during the 24h of the day. 

Press the 

 key to set the SUN temperature. The display will show the SUN temperature value blinking. 

Set the SUN temperature value by means of the 

+

 o 


keys and press the 

 key to store the value. If the display shows the 

time the heater is in frost protection mode. Press the 


key to shift from frost protection mode (time is shown in the display) 

to standard mode (temperature is shown in the display) and vice versa. 

Repeat the above steps with the key 

 to set the MOON temperature. 

The 

  temperature  level  is  3ºC  and  it  is  a  fix  value.  This  temperature  level  can  be  used  as  off  selection  when  setting  the 

temperatures during curtain times of the day. 
SUN, MOON, or 

 temperatures can be allocated to any of the 48 intervals of 30 minutes of the day. 


DAILY PROGRAMMES 

It is basic to visualize the day split into 48 intervals of 30 minutes each; SUN, MOON, or 

 temperatures can be allocated to 

any of them. 
 
The  default  settings  include  daily  mode  so  that  the  heater  will  repeat  the  program  every  day.  If  different  programmes  are 
required along  a week, please see the next step WEEKLY PROGRAMMES. To  check a programme or to make  a  new one, 
follow these steps: 

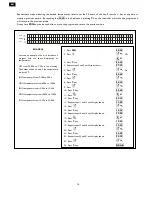
Press the 

PRG

 key and the display will show 

00:00

 intermittently.  Press one of the three keys 


 to allocate SUN, 

MOON or OFF (frost protection) from 00:00h to 00:30h. If SUN or MOON temperatures are selected the relevant luminous 
indicator will be lit. If OFF temperature 


is selected both luminous indicators will be off.


Press the 

+

 key to go to the next interval. The display will show 

00:30

 intermittently and, again, press one of the three keys 


 to allocate SUN, MOON or OFF (frost protection) from 00:30h to 01:00h or press 

+

 key directly if the existing 

temperature level is ok. 

Summary of Contents for RF10E Plus

Page 1: ...ma fallo o da o ocasionado por la no observancia de estas instrucciones no ser cubierto por la garant a del fabricante Este manual debe ser guardado con el aparato por el usuario para futuras consulta...

Page 2: ...l radiador cubriendo la rejilla u obstruyendo el flujo de aire Ni el cable de conexi n ni otros objetos deben entrar en contacto con el radiador Este radiador debe ser desconectado de la red el ctrica...

Page 3: ...elgue el radiador de los soportes Al girar el tornillo la pieza de seguridad ser empujada hacia abajo Atornille hasta sentir que se hace tope con el radiador y repita la operaci n con el otro soporte...

Page 4: ...normal y viceversa Indicador de consumo Este puntito se ilumina cuando el emisor est calentando Indicador de modo SOL Pulse esta tecla durante m s de dos segundos para poner en hora el reloj o el d a...

Page 5: ...MPERATURA SOL LUNA Y ANTIHIELO El programador electr nico es capaz de manejar tres niveles de temperatura durante las 24 horas del d a Pulse la tecla para ajustar la temperatura SOL La pantalla digita...

Page 6: ...a 00 30 4 Repetir pasos 2 y 3 hasta que la pantalla muestre 07 30 5 Pulsar encendido 6 Pulsar la tecla 08 00 7 Pulsar 8 Pulsar la tecla 08 30 9 Pulsar 10 Pulsar la tecla 09 00 11 Pulsar 12 Pulsar la t...

Page 7: ...o semanal puede ser devuelto a modo diario pulsando la tecla PRG durante seis segundos Esto tambi n restaura todos los ajustes a los valores originales de f brica BLOQUEO DE TECLADO Es posible bloquea...

Page 8: ...a la tecla PRG durante 4 segundos el display mostrar InIC para indicar que el reseteo se ha producido 6 MANTENIMIENTO Y LIMPIEZA Este emisor t rmico no precisa de ning n tipo de mantenimiento especial...

Page 9: ...250 1500 2000 9 LISTA COMPONENTES PRINCIPALES Carcasa lateral derecha ref 30100900 500 W Resistencia ref 30100142 Carcasa lateral izquierda ref 30100910 750 W Resistencia ref 30100152 Placa electr nic...

Page 10: ...icidad En modo de espera elSB 0 68 0 68 0 68 0 68 0 68 0 68 W Informaci n Valor Todos los modelos Tipo de control de potencia calor fica de temperatura interior Control electr nico de temperatura inte...

Page 11: ...on of the appliance They also protect the heater from overheating therefore it is essential that at no time are they covered This heater should be switched off at the isolating switch before any repai...

Page 12: ...on the hooks of the brackets By turning the screws the metallic square will go downwards retaining the heater Repeat this on the other bracket Mark the fixing points on the wall using a pencil through...

Page 13: ...versa Heating indicator This small dot will be lit when the heater is consuming energy SUN indicator Press this key for more than two seconds to set the time or day of the week PRG key Allows you to c...

Page 14: ...three temperature levels during the 24h of the day Press the key to set the SUN temperature The display will show the SUN temperature value blinking Set the SUN temperature value by means of the o ke...

Page 15: ...00 14 Press 15 Press key 13 30 16 Repeat steps 14 and 15 until display shows 15 00 17 Press 18 Press key 15 30 19 Repeat steps 17 and 18 until display shows 19 30 20 Press 21 Press key 20 00 22 Repeat...

Page 16: ...t key until an audible signal is heard To turn back a controller from 24hr 7days to a single 24hr press PRG key more than six seconds This will restore the factory default settings KEYBOARD LOCK Press...

Page 17: ...advanced functions To reset the unit hold the PRG key for 4 seconds the display will show InIC to indicate the heater has been reset 6 CLEANING AND MAINTENANCE The radiators do not precise any special...

Page 18: ...50 1500 2000 9 MAIN COMPONENTS LIST Right side plastic case ref 30100900 500 W Heating Element ref 30100142 Left side plastic case ref 30100910 750 W Heating Element ref 30100152 Main PCB ref 30100084...

Page 19: ...1250 1500 2000 W Auxiliary electricity consumption In standby mode elSB 0 68 0 68 0 68 0 68 0 68 0 68 W Item Value All models Type of heat output room temperature control Electronic room temperature c...

Page 20: ...ve consequences for the environment and human health which could otherwise be caused by inappropriate waste handling of this product For more detailed information about recycling of this product pleas...

Reviews: