background image

20 


8. Ne débranchez pas les éléments de chauffage électriques. Retirez le carton d'emballage. Soulevez et basculez les éléments vers 

l'extérieur en prenant garde à ne pas endommager l'isolation en bas du radiateur. 


9. - Placez soigneusement les briques d'accumulation avec le côté plat orienté face à l'arrière du radiateur. Disposez deux 

rangées de briques. 


10. Remettez les éléments de chauffage dans leur position initiale. Positionnez les deux autres rangées de briques d'accumulation 

avec le côté plat orienté vers l'extérieur et toujours sur les languettes de support des éléments de chauffage. 


Summary of Contents for ECOMBI ECO158

Page 1: ...TTENTIVEMEN ECOMB LECTRIC S À ACCUMU ECO158 ECO208 ECO308 ECO408 HOURS CH ARGE DE 8 H N MANUAL LATION ET ULLY before inst NT avant d insta BI STORAGE H ULATION M 8 8 8 8 HARGE HEURES AND USE T GUIDE D talling or using t aller ou d utiliser HEATER MURAL R GUIDE UTILISATIO this appliance fo r cet appareil po ON or the first time our la première fois ...

Page 2: ...rmal operating position and they have been given supervision or instruction concerning use of the appliance in a safe way and understand the hazards involved Children aged from 3 years and less than 8 years shall not plug in regulate and clean the appliance or perform user maintenance Children of less than 3 years should be kept away unless continuously supervised Do not operate any heater after i...

Page 3: ...nsulation shows any sign of damage it must be replaced This heater should be switched off at the circuit breaker before any repair work is carried out This should also be done during times of the year when heat is not required This appliance is only for permanent connection to a fix installation After installation a survey of the first charging cycle should be carried out to ensure that the main i...

Page 4: ...the heater fixing holes as a template and mark the wall through the fixing holes with a pencil Drill the required holes into the wall Place the dowels and screws into the holes before the appliance installation but do not fasten them tightly 5 Attach ECOMBI to the dowels with the crews IT MUST NOT BE HUNG ON THE SCREWS these are used only to prevent the device from overturning and not to support i...

Page 5: ...rminal on each end of the element WARNING Steel edges can cut Next unscrew the inner panel and remove it CAUTION In the interior part of this inner panel there is a very delicate thermal insulation MICROTHERM panel It has to be handled with extreme care AVOID TOUCHING IT ...

Page 6: ...the insulation on the bottom of the heater 9 Place the storage bricks carefully with the flat side facing the back of the heater Arrange two row levels of bricks 10 Place the heating elements back into their original position Place the other two rows of storage bricks with the flat side facing out and always on the heating elements supporting tabs ...

Page 7: ...ation must be carried out by an experienced technician If during reinstallation the thermal insulation shows any sign of damage it must be removed and replaced by an identical part MANUALLY RESET TEMPERATURE LIMITER This heater employs a manually reset temperature limiter see LR in the connection diagram This safety device operates when high temperatures are reached at the top of the heater It req...

Page 8: ...nnect EC k the keyboar n is pressed d si the appliance with the ones for 8 secon ceed to change on is enabled i for different d anged come b matically fro these two t 8 RUCTI TO DRY CL the COMBI rd holding the display will sho imultaneously to follow cor established in nds The Hour e the minute s n the GENER days in a week back to Syste om summer imings ONS LOTHES Do n keys ow y again for sev rect...

Page 9: ...Spanish 4 ped with a 5 arge the reduced ra consumption optimizing the ge at 50 thi d This means ption please g S OF TEMPE ings and avoid s the temperat in the room 9 ay be selected UTOMATIC until the mess hrough convec until the mes 0 would be t position charg ate time a small red d energy manag s is 4 hours t that ECOMB go to Genera ERATURE IN d unnecessary ture set up in decreases by FROST PRO s...

Page 10: ...play will d tween this sen s in the room me temperatur the Storage H f AUTOMAT re ECOMBI m several times I e ure by using t orking a small ed dot will app work at the sa with charge c ned way Stor room if nece C CHARGE CO 10 at the room te reaches 21 5º ture by using will show tha isplay room te nsor and a nor The one at t re For this yo Heater and the TIC STORAG may operate t s until in the d Thi...

Page 11: ...m the very righ d when storag combi Manual a certain value xceed this valu the real therm the Storage H TER MODE a I will work an this option wi for 8 se key the ek day if neces ys of the week n be seen here N permanent m st mode select h keys 11 mes until the m t of the scree ge heater is o Mode but the e storage hea ue storage he mal needs allow Heater level of nd changing t d which days ll be e...

Page 12: ...TEMPERATURE time period has been programmed it will be repeated every day If WEEKLY PROGRAMMING is activated it is possible to override the ECO TEMPERATURE time period on Saturday and or Sunday Under clock settings and only for days number 6 and 7 Saturday and Sunday we can programme the following options FROST PROTECTION MODE will be represented by one small vertical bar SELECTED MODE will be rep...

Page 13: ...eak ed rate electr second reduce econd reduced correction v N charge ends F charge start g ON OFF er operation m 0 10 0 15 0 2 atic charge re re protection he charge is in Fahrenheit Va ECO TEMPER CO TEMPERA key to ent all of them to e mains Softw of the reduced NG nected and swit is not covered his case it is nec ate temperatur is sized correc trouble please display is block r with the pow rate e...

Page 14: ...ther servicing should be performed by an authorized technician ECOMBI has been manufactured under a fully assured quality system and using environmentally friendly processes Once its useful life is finished please take the device to a recycling depot so that its components can be recycled in an appropriate way 6 CONNECTION DIAGRAMS i TEMPERATURE SENSOR I Mains switch R1 R2 R3 R4 Storage heater hea...

Page 15: ...EIGHT 57kg 126 lbs 76kg 168 lbs 111kg 245 lbs 147kg 324 lbs CONNECTION 240V 60Hz 240V 60Hz 240V 60Hz 240V 60Hz CONVECTOR POWER 450W 600W 900W 1200W STORAGE HEATER POWER 985W 1310W 1960W 2620W CHARGING 8h 7 9 kWh 10 5 kWh 15 7 kWh 21 0 kWh INSULATION Class I Class I Class I Class I NUM OF BRICKS 7 5kg 16 5lbs 8 12 16 NUM OF BRICKS 11 3kg 25lbs 4 BRICK PACKAGE 11072 11016 11016 11016 ...

Page 16: ...urveillés ou ont été renseignés sur l utilisation sûre de l appareil et comprennent les risques encourus Les enfants entre 3 ans et 8 ans ne doivent pas brancher régler et nettoyer l appareil ou réaliser un entretien d utilisateur Les enfants de moins de 3 ans doivent être tenus à l écart à moins d être constamment surveillés N utilisez pas un radiateur défaillant Débranchez l alimentation au nive...

Page 17: ...dommagement pendant une installation elle doit être remplacée Ce radiateur doit être éteint avec le coupe circuit avant toute tâche de réparation Les tâches de réparation doivent en outre être réalisées à des époques de l année ne nécessitant pas de chauffage Cet appareil est prévu uniquement pour un raccordement permanent à une installation fixe Après l installation il convient de réaliser un con...

Page 18: ...fixation du radiateur comme masque et marquez le mur à travers ces orifices à l aide d un stylo Percez les trous requis dans le mur Placez les goujons et vis dans les trous avant l installation de l appareil mais ne les serrez pas complètement 5 Fixez ECOMBI aux goujons avec les vis L APPAREIL NE DOIT PAS ÊTRE SUSPENDU AUX VIS elles sont utilisées uniquement pour éviter qu il se retourne et non po...

Page 19: ... l élément AVERTISSEMENT Les bords en acier peuvent couper Dévissez ensuite le panneau intérieur et retirez le ATTENTION Un panneau d isolation thermique MICROTHERM très sensible se trouve dans la partie intérieure de ce panneau intérieur Il doit être manipulé avec grande précaution ÉVITEZ DE LE TOUCHER ...

Page 20: ... bas du radiateur 9 Placez soigneusement les briques d accumulation avec le côté plat orienté face à l arrière du radiateur Disposez deux rangées de briques 10 Remettez les éléments de chauffage dans leur position initiale Positionnez les deux autres rangées de briques d accumulation avec le côté plat orienté vers l extérieur et toujours sur les languettes de support des éléments de chauffage ...

Page 21: ...il vers un autre emplacement doit être réalisé par un technicien expérimenté Si l isolation thermique présente des signes d endommagement pendant une réinstallation elle doit être retirée et remplacée par une pièce identique RÉINITIALISATION MANUELLE DU LIMITEUR DE TEMPÉRATURE Ce radiateur utilise un limiteur de température à réinitialisation manuelle voir LR sur le schéma de raccordement Ce dispo...

Page 22: ...yez su e pour t passer à la m GES GÉNÉRA NS D U PAS CE RADIA NT èles sont équi Il sert à bran il est possible s ton est action ouveau simult ME r que l appare euses doivent er Réglages g ur la touche enregistrer e modification d AUX 22 UTILI ATEUR POU pés d un cher et e de verrouill né l affichage tanément sur il suive la bon t correspondr généraux pendant et passer à la m du jour de la s SATIO R ...

Page 23: ...urs fois sur la UMULATION tion standard m à 5 charge ensemble des ommation élec t d optimiser l e de charger q eures creuses ages généraux S TEMPÉRA nomies possib e la températu squ à ce que l 23 érents jours d VÉ Une fois lidez e l heure d é espondre à c nement en app ÉMETTEUR E a touche cette tempéra a touche en espagnol équipé d une maximum s heures creus ctrique un pe a gestion et la qu à 50 s...

Page 24: ...ans la e différents the et modifier la fonctionneme n des réglages t de baisse de librer la temp touche E ne s affich ar défaut consigne en ut droite de l af côté gauche d ur ne fonction E avec corre ctionnements teur pour four UTOMATIQU 24 auffer tempora que le messag ns la pièce att e de consigne hage indique q pour affic pteur et un th pièce La tem ermomètres i mesure du ca ent du radiateu s du...

Page 25: ... mode Ec teur sont supé verse si les he on est réduit n aux besoins nte du niveau modifiée en pa IRE s desquels EC P7 dans RÉG appuyez sur Appuyez sur la affichage du pr et nner les jours nement PROT r 1 t PROTECTIO LECTIONNÉ ouches 25 he ju araît lorsque l diateur à accum combi Manuel érieures à une eures de fonct de ce même s thermiques r de charge du assant en MOD COMBI doit fo LAGES GÉNÉ la to...

Page 26: ...de la journée La période TEMPÉRATURE ÉCO se répète tous les jours une fois qu elle est réglée Il est possible d annuler la période TEMPÉRATURE ÉCO samedi et ou dimanche si la PROGRAMMATION HEBDOMADAIRE est activée Il est possible de programmer les options suivantes dans les réglages de l heure uniquement pour les jours 6 et 7 samedi et dimanche Le MODE PROTECTION ANTIGEL est représenté par une pet...

Page 27: ...e est bloqué rs secondes po 27 vent être mod la touche atéral droit e de tarif rédu tarif réduit e période de t ériode de tarif mpérature va a charge se te charge comme e MARCHE A fonctionneme 0 15 0 20 de charge auto atures excess est interrom t valeurs ºC e TEMPÉRATU EMPÉRATURE ur la touche de toutes les p sur la touche firmer ce choi tion erronée d otre facture d é est branché et a pareil n est...

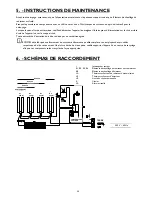
Page 28: ... être réalisée par un technicien agréé ECOMBI a été fabriqué conformément à un système d assurance qualité complet et en employant des procédés respectueux de l environnement Une fois sa durée de vie expirée veuillez apporter l appareil à un centre de recyclage afin que ses composants soient recyclés de façon appropriée 6 SCHÉMAS DE RACCORDEMENT i TEMPÉRATURE CAPTEUR I Interrupteur secteur R1 R2 R...

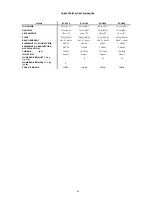
Page 29: ...lb 76 kg 168 lb 111 kg 245 lb 147 kg 324 lb RACCORDEMENT 240 V 60 Hz 240 V 60 Hz 240 V 60 Hz 240 V 60 Hz PUISSANCE DU CONVECTEUR 450 W 600 W 900 W 1 200 W PUISSANCE DU RADIATEUR À ACCUMULATION 985 W 1 310 W 1 960 W 2 620 W CHARGE 8 h 7 9 kWh 10 5 kWh 15 7 kWh 21 0 kWh ISOLATION Classe I Classe I Classe I Classe I NOMBRE DE BRIQUES 7 5 kg 16 5 lb 8 12 16 NOMBRE DE BRIQUES 11 3 kg 25 lb 4 PACK DE BR...

Page 30: ...30 NOTES COMMENTARIES ...

Page 31: ...e que cerné et en ch rectement vou anipulation inap age de ce prod ers dont vous d au sein des Éta not cover the h fe ne couvrez that this produ int for the rec elp prevent pot inappropriate w ct your local cit ctions are only e ce produit ne arge du recycla us contribuez à ppropriée de ce duit veuillez c dépendez ou le ats membres de heater pas le radiateu ct may not be cycling of elect tential n...

Page 32: ...ni Fournisseur Electric Suppl ok Village Par Nova Scotia R 1B9 02 679 1065 679 1940 bi northamer bi northameri ured by Ma Villa Esther GETE Madrid global com nur global com cal modifications po r ly Company rk Drive rica com ica com nufacturé pa 11 d m ossible without prio 32 ar or notice Modifica ations techniques po ossibles sans préavis s Cod 151900 018 rev 3 ...

Reviews: