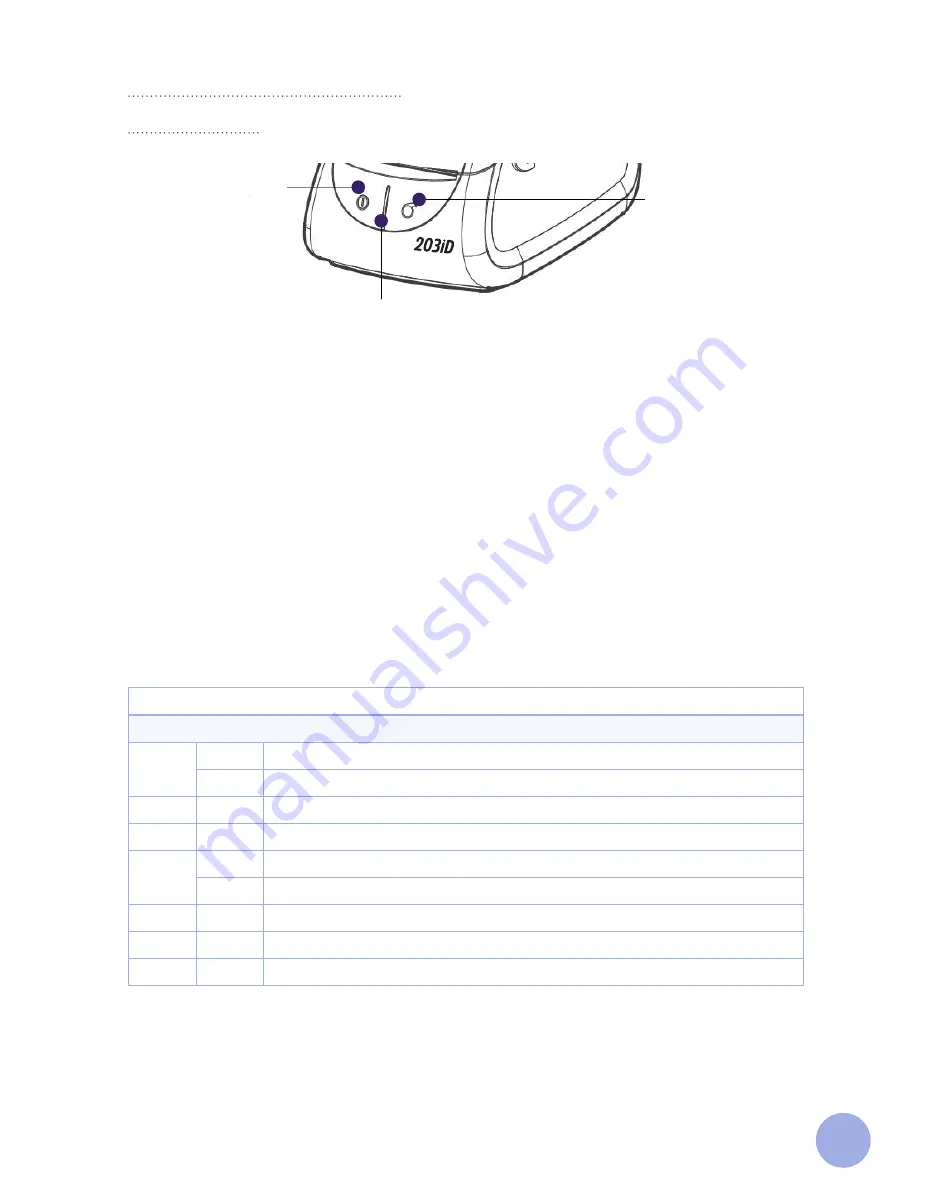
background image

Power Button

LED Indicator

Feed Button

LED Indicator

Color

Status

Remarks

BLUE

ON

The printer is ready

FLASH

Did not pass the RAM test

GREEN

ON

The printer is feeding/printing

RED

ON

Limit switch not in place

CYAN

ON

The printer is ready to print on continuous media

FLASH

Out of media

YELLOW

ON

The printer is ready to print on continuous media

PURPLE

ON

The print head is overheated

WHITE

ON

The printer is ready to print on labels with black mark

10

Printer Settings and Control

Operation Panel

Power Button

This button is used to turn the printer on/off. If you want to power on the printer, please hold and press the 

power button for approx. 1-2 seconds and the LED indicator turns blue. If you want to power off the printer, 

please press and hold the power button for approx. 1-2 seconds. The LED indicator is green if the printer 

works normally. The LED indicator is red if the printer is out of media or in case of any other error.

Feed Button

This button is used to feed media manually and for self-test printing. When the printer is ready, press the 

feed button for approx. 1 sec to feed one label. When using continuous media, press the feed button once to 

send out a predetermined length of media.

1. Make sure media is loaded properly.

2. Make sure the printer is powered off and the top cover is closed properly.

3. Press the feed button and power on the printer simultaneously. 


 The printer will now print the self-test page.

Summary of Contents for DiTi 203iD

Page 1: ...Direct Thermal Label Printer www Labtag com www industritag com User Manual ...

Page 2: ...ment 4 Specifications 5 Print Specifications 5 Media Size 5 Product Introduction 6 What s in the Box 6 Printer Components 7 Installation 8 Installing the Printer 8 Installing the Media 9 Printer Settings and Control 10 Operation Panel 10 Cleaning the printer 11 Cleaning Media Sensor 11 Cleaning Print Head 11 Cleaning the Roller or Media path 11 ...

Page 3: ...ld be limited to only those actions outlined in the user manual Work beyond this may only be performed by trained personnel or certified service technicians The printer should always be stored and operated under the recommended environmental conditions Please see page 5 of this manual This product may cause radio interference and users may need to take adequate preventive measures The user must ta...

Page 4: ... 180 270 Can Print text Barcodes and Pictures Supported Barcodes Supported Picture Formats 1D Barcodes 2D Barcodes PNG JPG UPC A UPC E UPC Supplemental EAN8 EAN13 JAN13 CODE39 CODE39 Extended CODE39 Mod43 ITF CODEBAR PostNet Bookland CODE11 CODE128 CODE128A CODE128B CODE128C CODE93 Logmars MSI Mod10 Interleaved 2of5 Standard 2of5 Telepen FIM Pharmacode GS1_128 PDF417 Datamatrix code QR code Micro ...

Page 5: ...l Core Diameter 1 25 4mm and other sizes too Label Length 0 59 11 8 15 300mm Media Gap Height Min 0 118 3mm Model DiTi Printer Size Length 7 4 188mm Height 5 9 150mm Width 5 27 134mm Printer Weight 1 94lbs 0 88Kg Power Supply Input AC 100 240V 50 60Hz 1 5A Output 12V 2A Operating Conditions Work environment 41 F to 122 F 5 C to 50 C 25 85 RH non condensing Storage environment 40 F to 140 F 40 C to...

Page 6: ...duct Introduction What s in the Box 1 DiTi Direct Thermal Printer 2 Power adapter 3 Power cord 4 USB cable 5 Cable retention clip 6 Flash drive with software and driver installation instructions 1 4 5 2 3 6 ...

Page 7: ... 9 4 5 Power Button LED Indicator Feed Button Cover Open Lever Top Cover Media Sensor Movable Thermal Print Head Media Roll Shaft Media Guides Movable Cables Retention Clip Cash Draw Interface Power Interface USB Interface Serial Interface 7 Printer Components ...

Page 8: ...nstallation Installing the Printer 1 Place the printer on a stable surface 2 Make sure the power is turned off Do not plug in the power cord when the printer is turned on 3 Connect an USB or serial cable to the printer and PC 4 Connect the power cord to the power supply socket ...

Page 9: ...dia roll holder 3 Insert the media roll into the holder and then lock the holder 4 Pull some media out adjust the media guide to fix the media 5 Close the cover and tear off the excess media Note Please position the sensor in the middle when not printing on labels with a black mark Caution the tear bar of this printer contains a sharp edge Please do NOT touch it ...

Page 10: ...d press the power button for approx 1 2 seconds and the LED indicator turns blue If you want to power off the printer please press and hold the power button for approx 1 2 seconds The LED indicator is green if the printer works normally The LED indicator is red if the printer is out of media or in case of any other error Feed Button This button is used to feed media manually and for self test prin...

Page 11: ...of the label gap Clean with a cotton swap dampened with alcohol Cleaning Print Head Clean the print head with ethanol or isopropyl alcohol and a cotton swap Do not touch the heating elements with your fingers 1 Open the Printer Cover and then use the cotton swap to clean the head from the center of the head towards the outside 2 After cleaning the head do not use the printer until the alcohol used...

Page 12: ...smitted in any form or by any means electronic mechanical photocopying recording or otherwise without the prior written permission of GA International Inc info ga international com ga international com Labtag com Industritag com USA CANADA INTERNATIONAL 1 800 518 0364 1 450 973 9420 INTERNATIONAL V1 0 02AUG2022 ...

Reviews: