Fecha:
2020 - 07 - 16
FV - ÁREA ANDINA S.A. se re ser va el de re cho de mo di fi car, cam biar, me jo rar y/o anu lar ma te ria les, pro duc tos y/o di se ños sin pre vio avi so.
FV Responde
Centro de atención al usuario
ECUADOR
1-800 FV FV FV (1-800 38 38 38)
COLOMBIA
PERÚ
CENTROAMÉRICA
Encuentre
Repuestos Legítimos FV
y
la
Garantía Total FV
en:
www.fvandina.com
Encuentre
Repuestos Legítimos FV
y
la
Garantía Total FV
en:
www.fvandina.com
NTE INEN 3123
Sello de Calidad
Instituto Ecuatoriano de Normalización
NTE INEN 3082
Sello de Calidad
Sanitarios
Instituto Ecuatoriano de Normalización
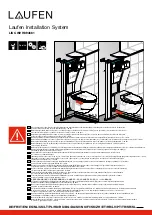
6.
Instale el herraje en el tanque. Utilice una llave angular FV con manguera flexible
(ref.:
E266.02 DH CR
) para conectar la válvula de ingreso a la acometida de agua
en la pared.
Install the tank fitting in the toilet. Use a FV angle valve with flexible hose (ref.:
E266.02 DH CR
) to connect the entry valve to the water supply on the wall.
90º
15 cm
30 cm
15 cm
llave angular FV
con manguera flexible /
FV angle stop
with flexible hose
acometida
de agua /
water supply
10
9
8
7
6
5
4
3
2
1
perno de
anclaje /
screw
empaque /
gasket
tanque /
tank
arandela /
washer
tuerca “A” /
“A” washer
tapa del tanque /
tank lid
válvula de descarga /
flush valve
A
C
D
D
B
E
G
válvula de ingreso /
entry valve
empaque
/
gasket
taza del inodoro /
toilet bowl
Conecte las válvulas (de ingreso y descarga) con la manguera “M”. /
Connect both valves (entry and discharge) with the hose “M”.
1- Instale la válvula
de ingreso y fíjela
al tanque con la
tuerca “A”.
Install the entry
valve to the tank
and secure it with
the nut “A”.
A
2- Instale la válvula
de descarga y
asegúrela con la
tuerca “B”.
Install the flush valve
and secure it with
the nut “B”.
B
3- Cubra la tuerca y las
roscas de la válvula
de descarga con el
empaque espumoso.
Cover the nut and
the threads of the
discharge valve with
the foamy gasket.
C
6- Con el tornillo de
regulación “F”
coloque el sistema
de accionamiento
a la altura adecuada.
Fije su posición con
la contratuerca “G”.
With regulating screw
"F" set the action
mechanism to the
right height. Fix its
position with the
locknut "G".
10
9
8
7
6
5
4
3
G
F
4- Coloque el tanque
sobre la taza y
asegúrelo con los
pernos de anclaje y
las tuercas “D”.
Place the tank on the
bowl and secure it
with the anchor bolts
and the nuts “D”.
D
5- Instale el botón de
accionamiento en
la tapa del tanque.
Asegúrelo con la
tuerca “E”.
Install the functioning
button on the top of
the tank. Secure it
with the nut “E”.
E
M (manguera /
hose)
Vista superior del
herraje instalado
en el tanque. /
Top view of the fitting
installed in the tank.
INSTALACIÓN DEL HERRAJE (E102.18-CR) /
FITTING TANK (E102.18-CR) INSTALLATION:
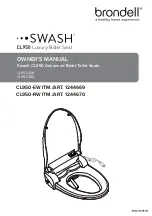
Calibración general de la válvula de ingreso:
Destrabe el cuerpo superior (CS) de la válvula de ingreso gi
-
rándolo 45° hacia la derecha. Suba o baje el cuerpo superior
(CS) a la altura deseada y trábelo.
Calibración fina:
Regule el nivel del agua girando el tornillo “T” para subir o
bajar la boya.
5.
Instale el herraje en el tanque. Por debajo del tanque inserte el empaque espu
-
moso en la salida de la válvula de descarga. Ubique el tanque sobre el inodoro,
alineando las dos piezas. Sujételas con los pernos de anclaje.
Install the fitting in the tank. Under the tank, insert the foamy gasket in the bottom
of the discharge valve. Place the tank on the toilet, aligning the two pieces. Fasten
with anchor bolts.
90º
15 cm
30 cm
15 cm
llave angular FV
con manguera flexible /
FV angle stop
with flexible hose
acometida
de agua /
water supply
perno de anclaje /
anchor bolt
empaque espumoso
foamy gasket
tuerca /
nut
nivel de agua /
water level
nivel de agua /
water level
boya /
float
CS
tanque /
tank
T
trabar /
lock
destrabar /
unlock
45°
General calibration of the entry valve:
Unlock the upper body (CS) of the entry valve by turning
45° to the right. Raise or lower the upper body (CS) to
the desired height and then lock it.
Fine calibration:
Adjust the water level by turning the screw “T” to raise or
lower the float.
Nota:
el exceso de ajuste de la tuerca
B
puede causar la ruptura de la válvula de
ingreso
A
.
Note:
Over tightening of nut
B
may cause
rupture of inlet valve
A.
A
B
Nota:
No es recomendable usar cemento mortero en la base del inodoro.
La
Garantía FV no cubre inodoros instalados con mortero.
Antes de instalar el tanque verifique que la tubería de alimentación este limpia y libre
de impurezas y residuos de construcción.
Note:
It is not advisable to use cement in the base of the toilet.
The warranty doesn't
cover toilets installed with cement.
Before installing the tank, verify that the feeding pipe is clean and free of sludge and
construction residuals.