background image

019

SP

ECS

 &

 L

ICE

NS

IN

G

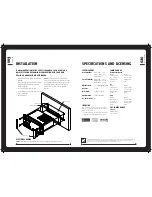
Allow at least 37mm 

(1-7/16”) for cables at 

rear of unit.

Rear support holes

004

IN

ST

AL

LA

TIO

N

In some cases a rear support strap (not supplied) 
may be required. Please use the two holes indicated 
above, to attach the strap using two 8 gauge x 8mm 
self-tapping screws (not supplied).

INSTALLATION WARNING

Ensure the marine v12V lead is removed  

  from the battery before any equipment is  


  connected

Investigate the marine vessels fuel tanks and  

  electrical wiring locations before you begin  


  installation

Ensure all wiring is protected to avoid damage

When wiring the MS-RA200, ensure that the wires are 
away from sharp objects and that rubber grommets 
and insulated bungs are used when routing the 
wiring. Ensure that when connecting the wires to 
the speakers and audio system, the terminals and 
connections are protected from shorting to each other. 

»

»

»

Note:

 Ensure the Aerial cable is routed away from any 

power cables, and is the minimal length, as long cable 
runs will affect AM reception performance.

Summary of Contents for MS-RA200

Page 1: ...USION Electronics New Zealand Ph 64 9 369 2900 FUSION Electronics Australia Ph 61 1300 736 012 FUSION Electronics Europe Ph 44 845 299 7586 FUSION Electronics USA Ph 1 623 580 9000 USER INSTALLATION MANUAL MARINE STEREO MS RA200 ...

Page 2: ...ted for extended periods metal surfaces may become hot Take care when handling FCC COMPLIANCE STATEMENT This device complies with part 15 of the FCC rules Operation is subject to the following two conditions This device may not cause harmful interference and This device must accept any interference received including interference that may cause undesired operation RECORD YOUR PRODUCT DETAILS HERE ...

Page 3: ...Media Device Dock MS DKIPUSB to provide an integrated housing for your iPod or iPhone protecting them from the harsh marine environment Video playback from your iPod iPhone and two USB ports for portable flash drive playback The dock can be flush or wall mounted MARINE 2 CHANNEL AMPLIFIER FM 402 Add more power and increase the bass level of your music of your FUSION Marine Audio System by connecti...

Page 4: ...hange without notice YOU CAN HELP PROTECT THE ENVIRONMENT Please remember to respect the local regulations Hand in the non working electrical equipment to an appropriate waste disposal centre v4 2 SPECIFICATIONS CHASSIS DIMENSIONS Depth 93mm 3 5 8 Width 130mm 5 1 16 Height 50mm 2 FACE PLATE DIMENSIONS Depth 29mm 1 1 8 Width 157mm 6 3 16 Height 68mm 2 11 16 OPERATING VOLTAGE 10 16VDC Negative groun...

Page 5: ...nnected Investigate the marine vessels fuel tanks and electrical wiring locations before you begin installation Ensure all wiring is protected to avoid damage When wiring the MS RA200 ensure that the wires are away from sharp objects and that rubber grommets and insulated bungs are used when routing the wiring Ensure that when connecting the wires to the speakers and audio system the terminals and...

Page 6: ...ONE 2 L GREEN BLACK STRIPE SPEAKER ZONE 2 L PURPLE SPEAKER ZONE 2 R PURPLE BLACK STRIPE SPEAKER ZONE 2 R ORANGE 2 WIRE REMOTE ORANGE WHITE STRIPE 2 WIRE REMOTE BROWN DIM 12V switched BLUE WHITE STRIPE AMPLIFIER ON BROWN WHITE STRIPE TEL MUTE INTERUPT Note Sub Lineout volume control is linked to Zone 1 A B 018TROUBLESHOOTING TROUBLESHOOTING RESET Should the stereo become unresponsive Follow the bel...

Page 7: ...d Black Remote Amplifier Turn On Blue White DIM 12V switched Brown Mute Tele Interupt 12V switched Brown White DIM Connect to vessel lighting sytem to dim LCD and button illumination when vessel lights are turned on 2 WIRE REMOTE Connect to FUSION 2 Wire Remote not included TELE MUTE INTERUPT Connect to handsfree kit to either mute the stereo or switch to AUX to hear call Note If turn on from igni...

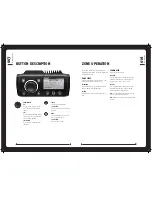
Page 8: ... which enables 2 Zones with independent balance volume control ZONE SETUP Press the Menu button and select Settings Select Zones then the Zone you wish to setup VOLUME LIMIT Select Volume Limit to set the desired maximum output volume for each individual Zone BALANCE Select Balance to adjust the balance from left to right ZONE OPERATION SUBWOOFER Adjust the sub limit and filter SUB FILTER Press th...

Page 9: ...your favourites list by selecting Add Favourite Maximum 15 channels Remove channels by selecting Remove Favourite Select All or the individual channel Exit by pressing the Menu button Alternatively Press and hold the Play button to store favourite PARENTAL MODE ENABLE ON OFF Select to enable channels to be locked unlocked PIN Turn the Rotary Encoder to select number and press to enter repeat to en...

Page 10: ...to cycle between bass and treble selection LCD Press the Rotary Encoder to cycle between Contrast and Brightness Turn to adjust KEY SOUND Press the Rotary Encoder to cycle between On and Off ADJUSTING THE VOLUME Turn the Rotary Encoder to adjust the volume ZONE VOLUME Press the Rotary Encoder to step through zones All zones Zones 1 Zone 2 009GENERAL OPERATION VIDEO PLAYBACK Note Requires the optio...

Page 11: ...ms you can use F A S T to quickly navigate by letter or number Example Press the Menu button and select Artists Select D and the first Artist beginning with D will automatically highlight Using the Rotary Encoder you can then scroll up or down from this selection F A S T THRESHOLD The threshold number of items at which point the Alpha Search screen appears for iPod menus can be changed To change t...

Page 12: ...eive all SCAN Press Menu and select Scan The Marine Stereo will scan the VHF preset stations for an active channel It remains on the channel until the transmission ends then resumes scanning Note If the Squelch control is adjusted so you can constantly hear a hissing sound the unit will not scan correctly 012USB MP3 AUX OPERATION AUX OPERATION CONNECTING AN AUXILIARY AUDIO DEVICE The Left Right AU...

Reviews: