Page 3
Getting Started Guide
www.fusionbroadband.com.au
Troubleshooting Connectivity
1300 523 526
Check Connectivity
The simplest way to test your connection is to ensure your computers connected to your LAN have Internet connectivity. If not, please refer
to Installation Troubleshooting below.
Alternatively, you can login to the Fusion Bonding Administration Portal using the account details provided to you when the Bonder was
ordered. There is further information in this Getting Started Guide about the Admin Portal on page 4.
If you have connected the Bonder correctly and have connectivity, contact Fusion Broadband to advise that your Bonder is up and running.
Fusion will run some tests to ensure your Bonder is operating efficiently. This will most likely be done out of hours so as not to interrupt your
Internet connection.
Installation Troubleshooting
The most common problem is that your modem is not in the correct port on the Bonder – double check this using the
Service ID
Form
as your guide. The
Service ID Form
is also available in the Bonding Administration Portal (see page 4)
Another common problem is that the modem is not in Full Bridge Mode. If you have used your own modems, please read the man-
ual to ensure the modem is correctly configured in Full Bridge Mode.
Check the lights on your modem.
On a successful connection you will see (
Power
– power is getting to the modem,
Ethernet
– your modem is connected to the
Bonder,
DSL
– your modem has detected a DSL signal,
Internet
– this will be flashing if the Bonder has successfully established a
connection to the ADSL line).
Check the operation of your ADSL line. This can be done easily by configuring your modem to connect independently to the ADSL
line (the same way you would if you did not have a Bonder). Plug a PC directly into the modem and verify that you have internet
connectivity. Once you have this change the settings to take the modem back to ‘Full Bridge Mode’.
If you see that any of the modems have flashing Internet lights and that the Ethernet WAN port lights on the Bonder are flashing,
this means that the Bonder is connected. The next step would be to verify the settings on your router. Check your WAN IP address
is correct as well as the DNS server IP addresses as advised on the
Service ID Form
.
To verify that you have full connectivity, directly connect a laptop to the Bonding system using your specific WAN details (be sure to
set a static IP address and the correct DNS IP addresses). Once you have verified this check the configuration details on your
router.
Lodging a Support Ticket
Before lodging a support ticket, please review the Troubleshooting steps above. Nine times out of ten a connectivity problem is due to an
ISP’s broadband service being unavailable or a modem failing - something that is out of our control!
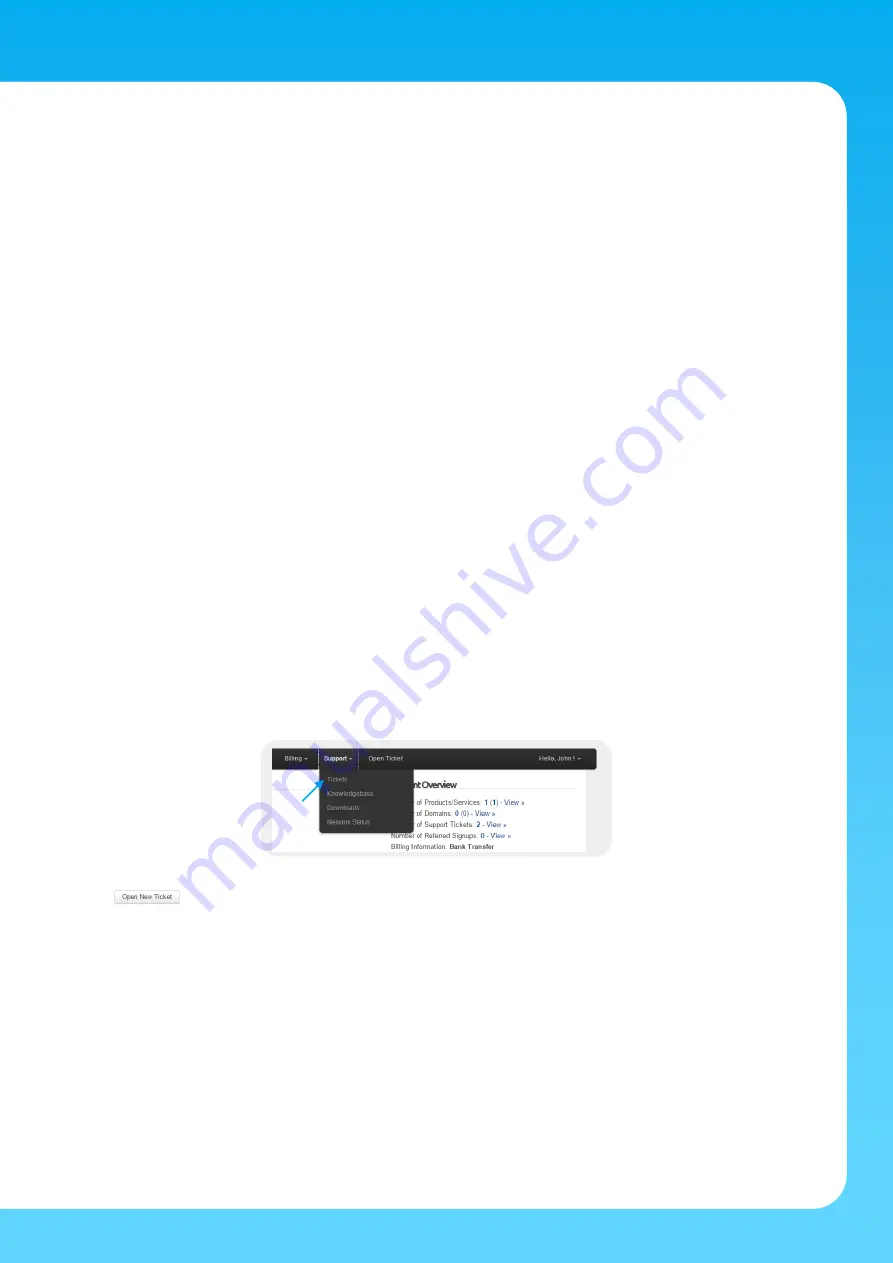
If you are still having connectivity problems, please lodge a Support Ticket by logging on to the Bonding Administration Portal and choosing
Tickets
from the
Support
menu.
Click the button and after choosing the department to submit your support request to, complete the details of your problem
and click
Submit
.
If you cannot connect at all in order to submit a ticket, please call us on
1300 553 526
and choose the Support option.
© 2015 Fusion Broadband Pty Ltd


