background image

1.  OPERATION

5

1.4.4

User 1 and 2 displays

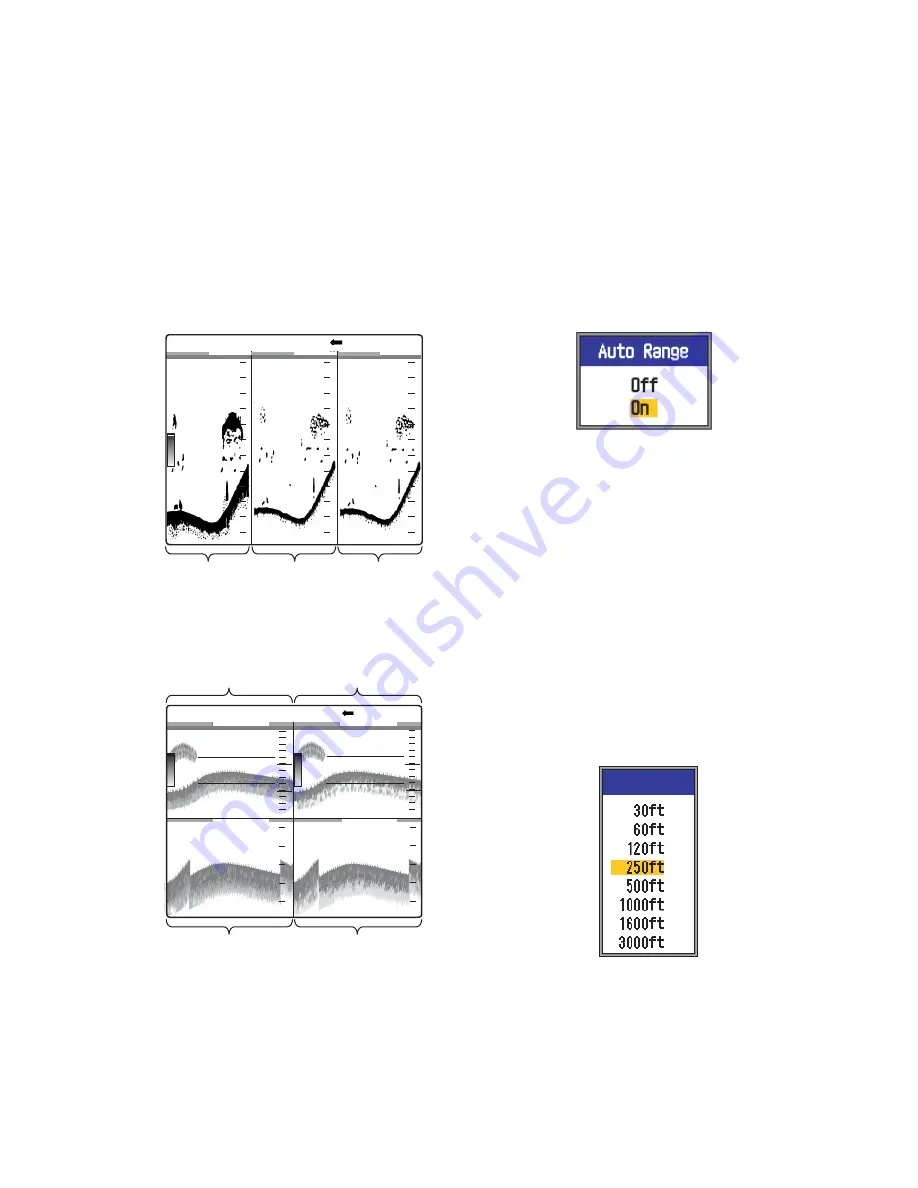
The user displays let you customize displays 
as desired. Two displays are provided and the 
default settings for each are

User 1 display:

 This screen is split vertically 

three ways and is comprised of LF, HF and 
MIX displays.

User 2 display:

 This display is split in fourths 

and is comprised of LF, HF, LF bottom zoom 
and HF bottom zoom displays.

Default user 1 display

Default user 2 display

1.5

Selecting a Range

1.5.1

Range adjustment meth-
od

Range can be adjusted manually or automat-
ically. Automatic adjustment is useful when 
you are preoccupied with other tasks and do 
not have the time to adjust the display.

1.

Push the 

RANGE

 control to open the auto 

range setting window.

2.

Use 

S

 or 

T

 to select Off or On as appro-

priate.

On:

 The range is automatically changed 

to keep the bottom echo on the lower half 
of the screen. Range shift and gain are in-
operative in the Auto mode. "AUTO_R" is 
shown at the top left corner on the screen.

Off:

 The range may be chosen from eight 

basic ranges. MANUAL is shown at the 
top left corner on the screen.

1.5.2

Manual range adjust-
ment

1.

Rotate the 

RANGE

 control to show the 

range selection window.

Note: 

If you are using the dual frequency 

display, and are set up for independent 
range adjustment, push the 

RANGE

 con-

trol to switch between low and high fre-
quencies alternately. For details see Split 
Range on page 31.

Mix display

Low 

frequency 

display

49.6

m

MANUAL L:2.0/H:2.0 LF/HF/MIX

1/2

0.0

20

40

60

0

20

40

60

0

20

40

60

0

High 

frequency 

display

High freq. display

Low freq. display

MANUAL L:2.0/H:2.0 BZ-LF/BZ-HF

Bottom zoom 

display (LF)

Bottom zoom  

display (HF)

1/2

0.0

30.2

ft

20

40

60

0

20

40

60

0

40

30

40

30

Range[LF]

Summary of Contents for FCV-1150

Page 1: ...COLOR LCD SOUNDER FCV 1150 OPERATOR S MANUAL www furuno com MODEL ...

Page 2: ...Distributor Dealer 9 52 Ashihara cho Nishinomiya 662 8580 JAPAN Telephone 81 0 798 65 2111 Fax 81 0 798 65 4200 A DEC 2007 Printed in Japan All rights reserved C NOV 16 2011 Pub No OME 23780 C 00016772912 00016772912 REFU FCV 1150 00016772912 00016772912 0 0 0 1 6 7 7 2 9 1 2 ...

Page 3: ...his product according to local regulations for the disposal of industrial waste For disposal in the USA see the homepage of the Electronics Industries Alliance http www eiae org for the correct method of disposal How to discard a used battery Some FURUNO products have a battery ies To see if your product has a battery ies see the chapter on Maintenance Follow the instructions below if a battery ie...

Page 4: ...If you feel that the equipment is acting abnormally immediately turn off the power at the switchboard If the equipment is excessively warm or making strange noises immediately turn off the equipment at the switch board Keep the equipment away from rain and water splash Fire electrical shock or injury can result if water leaks into the equipment Use the proper fuse Use of an incorrect fuse can dama...

Page 5: ...ile the picture advance speed is set to stop The depth indication is not refreshed while the picture is stopped Use of depth data for navigation in this case could lead to grounding or other dangerous situation Do not handle the LCD s panel roughly it is made of glass Injury can result if the glass breaks CAUTION CAUTION WARNING To avoid electrical shock do not remove cover No user serviceable par...

Page 6: ...17 1 18 3 Erasing waypoints 17 1 18 4 Setting destination waypoint 18 1 19 Fish Information Accu Fish 18 1 19 1 Principle 18 1 19 2 Turning on Accu Fish 18 1 19 3 Displaying fish symbols 19 1 19 4 Displaying fish info 19 1 19 5 Selecting the display where to show the fish symbols 19 1 19 6 Applying offset to measured fish size 20 1 20 Menu Description 20 1 20 1 Sounder menu 20 1 20 2 Tx Rx menu 24...

Page 7: ...e FCV 1150 are FURUNO Free Synthesizer FFS trans ceiver design allows use of user selectable operating frequencies Bright LCD gives excellent readability even in broad daylight 64 color including background presenta tion provides detailed information on fish density and bottom composition Automatic operation selects correct range and gain to show fish echoes and bottom in both shallow and deep wat...

Page 8: ...Navigation Equipment DISPLAY UNIT CV 1150 Power 12 24 VDC Rectifier PR 62 100 110 115 220 230 VAC 1φ 50 60Hz Optional supply Local supply external equipment Standard supply Water Temp Sensor T 02MSB etc Water Temp Speed Sensor ST 02MSB etc Satellite Compass NavNet 3D ...

Page 9: ...in Inoperative when auto gain is active 7 ENTER STWX Cursor pad Select items on menus Change settings Move VRM Push ENTER key to confirm setting 8 MENU ESC Open close menu Escape from current operation 9 BRILL Turn power on momentary push and off long push Open display brilliance setting window with power turned on 10 MARK Record position of an important echo as a waypoint Output latitude and long...

Page 10: ... frequency zoom high frequency zoom user 1 display and user 2 display Select one with the MODE control as shown in the procedure below Note This function is inoperative if Gain Mode on the Navnet menu is set for NavNet See 1 20 6 for details 1 Rotate the MODE control to open the mode selection window 2 Rotate the MODE control to select a dis play 1 4 1 Single frequency display Low frequency The lo...

Page 11: ... for detecting bottom fish Note 1 The range of the zoom display can be adjusted on the Range menu Note 2 The zoom marker can be turned on or off on the Display menu Depth Display mode Picture advance speed Color bar Alarm icon 1 2 P R AUTO Minute marker two different color bars in 1 min Range Depth scale 0 0 Zero line 20 40 60 36 8ft 11 1kt SOG 8 2 C Bottom Fish echo Data box Gain Left Low freq Ri...

Page 12: ... screen The bot tom discrimination display shows the bottom as a straight line which is useful for determin ing bottom hardness Bottom discrimination 1 3 display This display is similar to the bottom discrimi nation 1 2 display except the bottom discrimi nator display occupies the bottom one third of the left half of the screen as below Zoom marker Zoom marker automatically follows change in depth...

Page 13: ...or On as appro priate On The range is automatically changed to keep the bottom echo on the lower half of the screen Range shift and gain are in operative in the Auto mode AUTO_R is shown at the top left corner on the screen Off The range may be chosen from eight basic ranges MANUAL is shown at the top left corner on the screen 1 5 2 Manual range adjust ment 1 Rotate the RANGE control to show the r...

Page 14: ...ow into the water column and range shifting as moving the window to the desired depth Note This function is inoperative when the Auto mode is active 1 Press S or T on the SHIFT key to show the Shift setting window 2 Use S or T on the SHIFT key to select the amount of shift desired 3 Press the MENU ESC key to close the window or wait six seconds to automati cally close it Note 1 The bottom echo may...

Page 15: ...ner on the screen Crusing This mode clearly displays stronger echoes for example bottom and suppresses weak echoes Use it for general cruising H L AC is shown at the top left corner on the screen Off Select to manually adjust gain 3 For automatic operation Fishing or Cruis ing use the auto gain offset range 5 to 5 with W or X 4 Press the ENTER key 1 7 2 Manual gain adjustment The GAIN HF and GAIN ...

Page 16: ... right and the color of the bar at the top of the menu item window changes from gray to blue to indicate that the menu item window is ac tive 4 Use S or T to select a menu item and press the ENTER key The menu item s setting box or setting window appears 5 Use S or T to select an option 6 Press the ENTER key to save the setting The setting box or window disappears To escape without changing settin...

Page 17: ...ENTER key The fractions in the window indicate the number of scan lines produced per trans mission 1 16 is the slowest speed and 4 1 is the fastest speed 1 16 means one scan line is produced every 16 transmis sions Stop freezes the display and is useful for taking a photo of the display 5 Press the MENU ESC key twice to finish 1 11 Rejecting Interfer ence Interference from other acoustic equipment...

Page 18: ...feature 1 Press the MENU ESC key to open the menu 2 Use S or T to select Sounder and press the ENTER key 3 Use S or T to select Color Erase and press the ENTER key 4 Use S or T to select the color to erase and press the ENTER key The setting range is 0 to 50 in intervals of 5 The larger the setting value the greater the number of colors that are erased 5 Press the MENU ESC key twice to close the m...

Page 19: ...mes to close the window 1 14 Adjusting TVG A fish school at a deep depth is displayed in weak colors even if it is equal in strength to one in shallow waters This is due to propaga tion attenuation of the ultrasonic wave To compensate for this difference use TVG TVG automatically adjusts the gain with depth so that echoes of the same strength and dif ferent depths are shown in the same colors rega...

Page 20: ...mis sion with amplitudes and tone proportional to their intensities on the right side of the screen It is useful for estimating the type of fish school and bottom composition Note In the horizontal split dual frequency display the a scope display appears on both high and low frequency displays In the verti cal split dual frequency display the a scope display only appears on the high frequency disp...

Page 21: ...n distance from the bottom Note that the bottom lock and bottom discrimination 1 2 or 1 3 displays must be turned on to use this alarm Water temperature alarm The water tem perature alarm alerts you when the water tem perature is within inside alarm the alarm range set or under over outside alarm the range set Speed alarm The speed alarm alerts you when the speed is within inside alarm or un der o...

Page 22: ... or T to set the range of depth temperature speed or distance as appro priate To shorten the alarm range mark er use S and to lengthen it use T 12 For the bottom alarm temperature alarm speed alarm or arrival alarm press the ENTER key to finish and then go to step 16 For a fish alarm press the ENTER key and go to step 13 13 Use T to select Fish Level and press the ENTER key 14 Use S or T to select...

Page 23: ... cally set to TVG when the Gain Mode func tion is active and the NavNet connection is Off 1 17 1 Using the FUNCTION control 1 Press the FUNCTION control to open the setting window registered This window can also be opened by rotating the con trol 2 Change setting as applicable 1 17 2 Programming the FUNC TION control 1 Push and hold down the FUNCTION con trol until the FUNC key setting window ap p...

Page 24: ...ap pears at the position The waypoint is named automatically with the next se quential waypoint number If you want to change the waypoint name go to step 4 Otherwise go to step 6 Note 1 When TLL or FURUNO TLL is selected at TLL Output on the NMEA menu of the System menu the latitude and longitude position at the cursor posi tion is output to a chart plotter Note 2 Up to 20 waypoints can be regis t...

Page 25: ...y to open the menu 2 Use S or T to select Data and press the ENTER key 3 Use S or T to select WPT List and press the ENTER key 4 Use S or T to select the waypoint to edit and press the ENTER key The waypoint setting window appears 5 Use S or T to select the item to edit 6 Edit item as appropriate 7 Press the MENU ESC key several times to close the window 1 18 3 Erasing waypoints A waypoint current...

Page 26: ...sh is different from the ac tual fish size you can compensate for this on the Accu Fish menu When Accu Fish is enabled 50 kHz and 200 kHz frequencies are transmitted alter nately even if a single frequency mode is in use Fish within the zero line area are not mea sured To reduce error the detection area should be approx 6 to 330 feet from the surface With the inside hull transducer signal at tenua...

Page 27: ... the fish info value alone without fish symbol by turning off Fish Symbols on the Accu Fish menu 5 Press the MENU ESC key twice to close the menu Note 1 Character size can be selected to large or small with Info Size Note 2 The unit of measurement can be se lected to inch or cm with Fish Size Unit 1 19 5 Selecting the display where to show the fish symbols You can select Dual HF and LF display to ...

Page 28: ... the menu 1 20 Menu Description This section describes menu items not previ ously mentioned For the System menu see chapter 2 1 20 1 Sounder menu Zoom mode Select the zoom display to show among bottom lock bottom zoom and marker zoom when zoom is selected with the MODE control Note This function is inoperative if Gain Mode on the Navnet menu is set for NavNet See 1 20 6 for details Free shift Turn...

Page 29: ...for each frequency may be different depending on in stallation characteristics For example for a 200 kHz frequency transducer the default fre quencies are 200 kHz 196 kHz 198 kHz and 204 kHz If those frequencies are not suitable for your use you can change them Further in case of a wide bandwidth transducer fre quencies may be chosen from the available frequency range This allows you to have mul t...

Page 30: ...his setting White Line The white line helps you distin guish bottom fish from the bottom by tracing a line in white or color desired just above the bottom contour This function is not only use ful discriminating bottom fish but is also valu able for judging fish school density The setting range is 0 100 in intervals of 10 The higher the value the thicker the line Select White Line and press the EN...

Page 31: ...nwanted echoes from the surface to about 16 ft Avoid setting the STC too high fish echoes near the surface may be erased Smoothing If echoes appear like patch work turn this feature on to smooth them Bottom Zone Select the area where to show the bottom echo when Auto Range is active 1 Choose Bottom Zone and press the EN TER key 2 Use W or X to select the boundary line to adjust 3 Use S or T to adj...

Page 32: ...alues When long range detection is your objective select a long pulse length For better resolution choose a shorter pulse Short 1 raises the detection resolution however detection range is short er pulse length is about 1 4 of Std than the Std setting Short 2 raises the detection reso lution however detection range is shorter pulse length is about 1 2 of Std than the Std setting Std is the standar...

Page 33: ...lustration below Color Bar Turn the color bar on or off Hue Change the color arrangement The choices are Std Hue1 thru Hue6 and Cus tom As you move through the selections you can see the color arrangement at the right side of the screen Background Change the background to suit your current environment The choices are white light blue blue dark blue and black This feature is inoperative when Hue is...

Page 34: ...abilization is restart ed and the stabilizer icon reappears 1 Press the MENU key to display the main menu 2 Press T or S to select Stabi and then press the ENTER key 3 Press T or S to select Stabilization and then press the ENTER key 4 Press T to select On and then press the ENTER key 5 Press T to select Stabi Area and then press the ENTER key 6 Press T or S to select desired Stabi Area and then p...

Page 35: ...e of mul tiple navigators The order is GPS followed by Loran C Wind Spd Dir Display wind speed and direc tion data in True or Apparent The apparent wind is the actual flow of air acting upon a sail or the wind as it appears to the sailor The true wind is the wind seen by a stationary ob server in velocity and direction Trip Source Select source for trip data cal culation The choices are Own intern...

Page 36: ...tor s manual If you set up for NavNet mode connection at installation the NavNet menu appears Gain Mode Select FCV 1150 or Navnet to switch control of gain and display between the FCV 1150 and NavNet The NavNet feature has five operating char acteristics Certain functions are only operative from the unit selected here Certain functions are operative from both FCV 1150 and NavNet Certain functions ...

Page 37: ... select the color to adjust and press the ENTER key The RGB ad justment window appears 3 Press S or T to select the color to adjust 4 Press W or X to adjust color 5 Press the ENTER key to finish setting 6 To enable user colors press T several times to select Custom at the bottom of the color bar and then press the ENTER key 7 Press S to select Yes and then press the ENTER key Hue on the Display me...

Page 38: ...ct the displays to show The choices depend on the setting of Screen Layout Key HF High Frequency LF Low Frequency Zm Zoom Mix Mix display H1 H2 L1 L2 1 and 2 show the same dis play Gain can be adjusted independently for each If you want to then set emphasize strong colors reddish brown red Strong color Color 6 Large value Color 5 to Color 1 Small value emphasize middle colors yellow green Color 7 ...

Page 39: ... indicate the amount of space the discrimination occupies on the left half of the screen Target Echo Set fishing objective Normal is for general purpose fishing Surface is for de tecting surface fish Pulse repetition rate is higher than Normal on the 1kW and 2kW transducers that are programmed into the menu Squid detects squid and other individ ual fish These items are automatically set Tx Pulse S...

Page 40: ...meter water temperature air pressure time to go to destination waypoint XTE speed SOG Items displayable in 4 9 depth position speed SOG speed STW course range and bearing trip meter odometer water temperature heading wind speed wind direction air pressure time to go to destination waypoint XTE Graphic display XTE XTE 0 20nm 27 3nm Rng PORT SPEED SOG SPEED STW WIND WPT COMPASS HEADING SOG Speed ove...

Page 41: ...maximum ranges available are shown on the range setting window 3 Press the ENTER key to set confirm set ting Zoom Range Zoom range sets the range for the marker zoom and bottom zoom displays Press S or T to set zoom range as desired For the hor izontal split screen the range is one half the value set B L Range Set display range for bottom lock and bottom discrimination displays Use S or T to set B...

Page 42: ...select language 2 6 Units Menu The Units menu lets you select the unit of measurement for depth temperature speed wind and distance from the choices shown below Depth m ft fa HR pb Temperature C F Speed kt km h mph Wind kt km h mph m s Distance nm km sm 2 7 Calib Menu The Calib menu mainly lets you apply offsets to speed water temperature and bottom lev el Not adjustable when NavNet mode is active...

Page 43: ...he bottom echo in the bottom lock display lower the bottom level to erase the vertical lines If the level is too low however it may be difficult to distinguish bottom fish from the bottom echo Zero Line Turn the zero line transmission line on or off When turned off the transmission line disap pears which allows you to better watch fish echoes near the surface The length of the transmission line ch...

Page 44: ...he distance from the transducer If you would rather show the distance from the sea sur face set your ship s draft Gain ADJ If the gain is too high or too low or there is a difference in the gain between the low and high frequencies you can compen sate for it here ...

Page 45: ...f wood or fine grade sandpaper 3 4 Fuse Replacement The two fuses Type FGMB 125V 7A PBF Code No 000 157 493 10 inside the display unit protect the system from reverse polarity of the power supply and equipment fault If a fuse blows find the cause before replacing it If it blows again after replacement contact your dealer for advice WARNING ELECTRICAL SHOCK HAZARD Do not open the equipment Hazardou...

Page 46: ...ltage goes higher than 33 V the equip ment automatically shuts it self off Symptom Remedy Neither echo nor fixed range scale appears Check battery voltage Check if fuse has blown Check power cable No echo appears but fixed range scale appears Check if display ad vance is set to Stop Check transducer plug Check transducer cable Echo appears but no zero line Check if range shifting is set to 0 Check...

Page 47: ...screen location turns red or white alter nately and a beep sounds with each push FUNCTION GAIN and RANGE con trols Rotate the control while observing its on screen location Clockwise rotation increases the value counterclockwise rotation decreases it Next push the con trol Its on screen location turns red or white alternately and a beep sounds with each push MODE control Rotate the control The nam...

Page 48: ... the MENU ESC key twice to close the menu 3 9 Restoring Default Settings You may wish to restore default settings to start afresh 1 Press the MENU ESC key to open the menu 2 Press T to select Reset at the bottom of the menu bar to show the Reset menu 3 Press X to select Factory Reset and press the ENTER key The confirmation window appears 4 Press S to select Yes and then press the ENTER key A beep...

Page 49: ...f On Bottom Zone Select are where to show bottom echo Bottom Search Auto LF HF Echo Stretch Off On 1 HF Clutter 0 100 HF Curve Std Linear H L S Custom LF Clutter 0 100 LF Curve Std Linear H L S Custom White Line Color White RGB adjustable Default Yes No HF TVG Level 1 8 HF TVG Distance 100 3000 ft LF TVG Level 1 8 LF TVG Distance 100 3000 ft HF STC 0 10 LF STC 0 10 TxRx Tx Pulse Edge Off On Tx Pul...

Page 50: ...0 ft Fish B L Off On From 0 0 30 0 ft Span 0 1 30 0 ft Fish Level Weak Medium Strong Temperature Off Inside Outside From 20 0 110 0 F Span 0 1 30 0 F Speed Off Inside Outside From 0 0 99 0 kt Span 1 0 50 0 kt Arrival Alarm Off Inside Outside Radius 0 01 99 99 nm Accu Fish 1 Accu Fish Off On Fish Info Fish Size Depth Info Size Small Large Fish Symbols Off Solid Striped Symbols Area Dual HF LF Fish ...

Page 51: ...ange for each color is 0 63 User Clutter Color 1 8 1 50 User1 User2 Screen Layout Disp Mode HF LF HZm LZm Mix HZm HF LZm LF LF HF LZm HZm HF Mix LF Mix HF2 HF1 LF2 LF1 LF HZm HF LZm LF HF LF HF Mix LZm LF HZm HF HZm HF LZm LF Zoom Mode Bottom Lock Bottom Zoom Marker Zoom Discrim1 2 Discrim1 3 Target Echo Normal Surface Squid Deep Sea Nav Data Disp Off Small Large Nav Data Screen Layout Same choice...

Page 52: ...A0183 Ver 1 5 Ver 2 0 Ver 3 0 Special NMEA Port In Out In In NMEA Output Off On WAAS Setup Off WAAS 00 WAAS 27 TLL Output Off TLL FURUNO TLL Port Monitor Set up data ports by installer Calib Sound Speed 200 0 2000 0 m s 2 Temp 20 0 F 20 0 F Speed STW 50 50 Bottom Level 100 100 Zero Line Off On Zero Line Area 4 5 9 8 ft HF LF Tests Test LCD Test Reset Factory Reset Yes No 3 Draft 15 0 50 0 ft 2 Gai...

Page 53: ...APPENDIX 2 SCREEN LAYOUT The screen may be divided as desired with Screen Layout on the User menu No split HIGH NORMAL LOW NORMAL HIGH ZOOM HF Normal LF Normal HF Zoom LOW ZOOM MIX NORMAL LF Zoom MIX Normal ...

Page 54: ...t and 2 3 right HF Zm Nor LF Zm Nor LF HF LF Zm HF Zm HF MIX LF MIX H Z O O M H N O R M A L HIGH NORMAL HIGH ZOOM L Z O O M L N O R M A L LOW NORMAL LOW ZOOM L N O R M A L H N O R M A L HIGH NORMAL LOW NORMAL L Z O O M H Z O O M HIGH ZOOM LOW ZOOM H N O R M A L M I X N O R HIGH NORMAL MIX NORMAL L N O R M A L M I X N O R LOW NORMAL MIX NORMAL H2 H1 H NORMAL1 H NORMAL2 L2 L1 L NORMAL1 L NORMAL2 H N...

Page 55: ... HF LF HF MIX L N O R M A L H N O R M A L H Z O O M HIGH NORMAL HIGH ZOOM LOW NORMAL L N O R M A L H N O R M A L L Z O O M HIGH NORMAL LOW NORMAL LOW ZOOM L N O R M A L H N O R M A L M I X N O R MIX NORMAL HIGH NORMAL LOW NORMAL LF Zm Nor HF Zm Nor LOW NOR HIGH NOR LOW ZOOM HIGH ZOOM ...

Page 56: ...menu Horizontal division Vertical division LOW HIGH LF or HF DUAL HIGH LOW ZOOM ZOOM LOW HIGH LOW HIGH LOW HIGH HIGH LOW ZOOM NORMAL A SCOPE ON A S C O P E A S C P A S C P A S C P A S C P LOW HIGH LF or HF DUAL LOW HIGH ZOOM ZOOM LOW HIGH NORMAL LOW HIGH A SCOPE ON LOW HIGH Z O O M H I G H L O W A S C O P E A S C O P E A S C O P E ...

Page 57: ...n Calib No No Yes No No Shift No Yes No No No Auto Shift 2 No No Yes No No Picture Advance No Yes No No No Zoom Mode 3 No Yes No No No Interference Rejection No Yes No No No Frequency Control No Yes No No No Color Erase No No No Yes No Clutter No No Yes No No White Marker No No No Yes No TVG No No Yes No No STC No No Yes No No Smoothing 4 High Reso lution No Yes No No No Bottom Zone Bottom Range S...

Page 58: ...round Color No No No Yes No Colors Echo Color Levels No No No Yes No ACCU FISH No Yes No No No Fish Info Info Size No No No Yes No Fish Symbols No No No Yes No Fish Size No Yes No No No Stabilization Heaving No Yes No No No Fish Alarm Fish B L Alarm rela tionship No Yes No No No Fish Alarm Level No Yes No No No Zoom Range Zoom Range Span No Yes No No No Split Range No Yes No No No Depth Unit Depth...

Page 59: ...1 2 1 4 1 Synchronize w ship s speed 2 9 Alarm Fish Normal Bottom Water temperature Bottom Ship s speed arrival 2 10 Noise limiter Frequency range depends on transducer in use 2 11 Automatic indication Automatic gain adjust fishing cruising Automatic range shift Water temperature graph 2 12 Additional function Heaving adjustment Fish length indication 50 200 1T required Optional sensor required 3 ...

Page 60: ...26 Default settings 40 Depth indication size 25 Depth measurement 8 Depth scale 25 Display division 25 Display selection 2 Draft 36 Dual frequency display 3 E Echo stretch 23 F Fish bottom alarm 13 Fish normal alarm 13 Free shift 20 Frequency control 21 Frequency preset 21 FUNCTION control 15 Fuse replacement 37 G Gain adjustment 7 area 22 Gain adjustment 36 GAIN control 7 H Header info 25 I Inter...

Page 61: ...r 24 Tx pulse 24 Tx rate 24 U Unit menu 34 User 1 and 2 displays 30 description 5 User clutter 30 User color 29 User menu 29 V VRM 8 W Water temperature alarm 13 Water temperature graph 25 Water temperature graph color 25 Water temperature offset 35 Water temperature source 27 Waypoints destination waypoint 18 editing 17 entering 16 erasing 17 White line 22 White marker 23 Wind speed indication 27...

Reviews: