background image

1.  OPERATIONAL OVERVIEW

1-5

1.5

How to Select a Display Mode

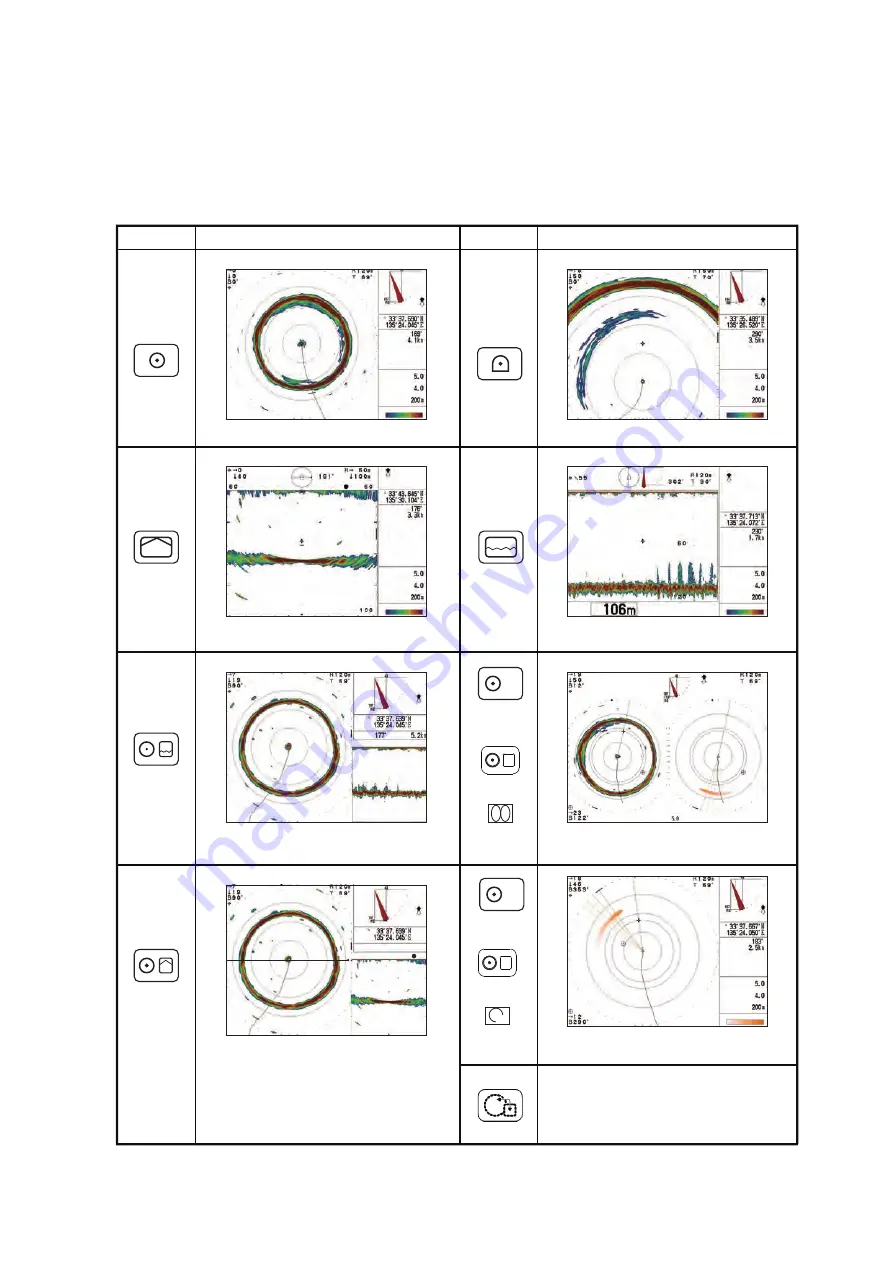
The CH-500/CH-600 has multiple display modes, all available at the push of a button. 
The figure below shows examples of the display mode buttons and their use.

To select a display mode, press the appropriate button.

A

GAIN

CSE
SPD

TVG LEVEL

DISTANCE

COLOR

CSE

SPD

177°

5. 2kn

PORT

6 0

6 0

1 2 0

STBD

GAIN

CSE
SPD

TVG LEVEL

DISTANCE

COLOR

Key

Display mode example

Key

Display mode example

CSE
SPD

GAIN

PORT

STBD

TVG LEVEL

DISTANCE

COLOR

GAIN

CSE
SPD

TVG LEVEL

DISTANCE

COLOR

GAIN

GAIN

CSE
SPD

TVG LEVEL

DISTANCE

COLOR

CSE

SPD

Full-circle A-Scope

Full-circle A-Scope + Horizontal

Hoi History

Hori Vertical

Echo Sounder (Fish finder)

Vertical

Horizontal

Horizontal (zoomed)

Window Control. Used only with 
Hori Vertical & Hori 
History display modes. No use  in 
other modes.

(CH-500 
only)

(CH-500)

(CH-500 
only)

+

Choose

+

Choose

(CH-600)

(CH-600)

A

(CH-500)

Summary of Contents for CH-500

Page 1: ...CH 500 CH 600 OPERATOR S MANUAL www furuno com Model SEARCHLIGHT SONAR DUAL FREQUENCY SEARCHLIGHT SONAR ...

Page 2: ... is elemental chlorine free FURUNO Authorized Distributor Dealer 9 52 Ashihara cho Nishinomiya 662 8580 JAPAN A MAR 2017 Printed in Japan All rights reserved D APR 06 2018 Pub No OME 13540 D TAYA CH 500 CH 600 0 0 0 1 9 2 2 0 8 1 3 ...

Page 3: ... or service marks of their respective holders How to discard this product Discard this product according to local regulations for the disposal of industrial waste For disposal in the USA see the homepage of the Electronics Industries Alliance http www eiae org for the correct method of disposal How to discard a used battery Some FURUNO products have a battery ies To see if your product has a batte...

Page 4: ... Make sure no rain or water splash leaks into the equipment Fire or electrical shock can result if water leaks into the equipment Do not operate the equipment with wet hands Electrical shock can result Use the proper fuse Use of the wrong fuse can cause fire or electrical shock If you feel the equipment is acting abnormally or giving off strange noises immediately turn off the power at the switchb...

Page 5: ...ervicing No user serviceable parts inside And wait until charge lamp green Do not remove cover Electrical shock hazard Name Warning Label Type 10 079 6144 Code No 100 310 880 Name Warning Label 2 Type 03 129 1001 1 Code No 100 236 741 To avoid electrical shock do not remove cover No user serviceable parts inside Warning Label s Warning label s is are attached to the equipment Do not remove the lab...

Page 6: ...2 1 9 How to Use the Cursor 1 12 1 10 How to Adjust the Range 1 13 1 11 How to Use the Train Controls 1 14 1 11 1 How to change the train direction 1 14 1 11 2 Train controls for horizontal mode 1 14 1 11 3 Train controls for vertical mode 1 15 1 11 4 Train control for echo sounder mode 1 15 1 12 How to Use the Tilt Controls 1 16 1 12 1 Tilt control for horizontal modes 1 16 1 12 2 Tilt control fo...

Page 7: ...l Menu Overview 3 2 3 3 How to Interpret the Vertical Scan Display 3 3 3 4 How to Toggle Full Half Range Scans 3 4 3 5 How to Select the Training Speed 3 4 3 6 How to Adjust the Picture 3 4 4 ECHO SOUNDER MODE 4 1 4 1 Typical Echo Sounder Display 4 1 4 2 Echo Sounder Menu Overview 4 2 4 3 How to Adjust the Range 4 3 4 4 How to Adjust the Tilt 4 3 4 5 How to Select the Picture Advance Speed 4 3 4 6...

Page 8: ... TROUBLESHOOTING 6 1 6 1 Preventative Maintenance 6 1 6 2 How to Clean the Equipment 6 1 6 3 Hull Unit Maintenance 6 2 6 3 1 Hull unit lubrication 6 2 6 3 2 Manually raise lower the transducer 6 3 6 4 Transducer Maintenance 6 4 6 5 How to Replace the Fuses 6 4 6 6 Troubleshooting 6 5 6 7 Error Messages 6 6 6 8 Diagnostics 6 7 6 8 1 How to perform a full system test 6 7 6 8 2 How to test the LCD 6 ...

Page 9: ...splay of various data such as own ship location depth etc with connection to the appropri ate sensors The hull unit automatically raises the transducer when ship s speed exceeds the pre set speed requires input of speed data CH 600 can mix the echo of the high frequency and the low frequency This is useful to identify the small seabed fish which are difficult to identify Usage precautions If the e...

Page 10: ...and controls on the Control Units CH 502 CH 602 CH 256 are shown in bold face for example the MENU key Menu items and pop up dialog box names are shown in brackets for example BRILLIANCE dialog box CE declaration With regards to CE declarations please refer to our website www furuno com for further infor mation about RoHS conformity declarations ...

Page 11: ...ational Equipment Fish Finder Heading Sensor Current Indicator Water Temp Sensor Sonar Fish Finder Current Sensor 100 110 220 230 VAC 1ø 50 60 Hz 12 24 VDC Rectifier Unit RU 1746B 2 Hull Unit CH 504 505 Standard supply Option or local supply 100 110 220 230 VAC 1ø 50 60 Hz 12 24 V DC Remote Controller CH 256 Remote Controller CH 256 KP signal NMEA0183 2 Control Unit CH 502 CH 602 NMEA2000 Equipmen...

Page 12: ...SYSTEM CONFIGURATION x This page is intentionally left blank ...

Page 13: ...ction 1 3 3 GAIN PUSH knob Adjusts receiver sensitivity gain See section 1 6 4 SECTOR knob Selects training sector width See section 1 13 5 TRAIN knob Selects the center bearing for the training sector See section 1 11 6 RANGE knob Selects detection range See section 1 10 7 TILT knob Controls scanning center direction See section 1 12 8 Cursorpad Moves the cursor Selects menu items and menu option...

Page 14: ...ction window appears refer to the How to Change the Displayed Language on page 5 2 10 Scan track keys Toggle between full range scan 360 and half range scan 168 See section 1 13 Reverse the scanning direction See section 1 11 1 Change the train speed See section 2 11 Activate deactivate the tracking function See section 1 16 11 Function keys Performs custom operations or functions See section 5 6 ...

Page 15: ... message Retracting appears and the system au tomatically raises the transducer When the transducer is fully retracted the power down process is completed Note 2 For configurations with two CH 502 CH 602 control units check that the con trol unit which turned the power on is used to turn the power off If wrong controller is used the system will not turn off Note 3 To avoid any damage to the transd...

Page 16: ... sound For further details see section 5 15 1 4 How to Adjust the Brilliance You can adjust the brilliance for the display and the key panel backlights To adjust the brilliance do the following 1 Press the brilliance key The BRILLIANCE dialog box appears 2 Press W or X on the Cursorpad to adjust the screen brilliance The setting range is 0 to 9 default 9 3 Press S or T on the Cursorpad to adjust t...

Page 17: ... GAIN CSE SPD TVG LEVEL DISTANCE COLOR Key Display mode example Key Display mode example CSE SPD GAIN PORT STBD TVG LEVEL DISTANCE COLOR GAIN CSE SPD TVG LEVEL DISTANCE COLOR GAIN GAIN CSE SPD TVG LEVEL DISTANCE COLOR CSE SPD Full circle A Scope Full circle A Scope Horizontal Hoizontal History Horizontal Vertical Echo Sounder Fish finder Vertical Horizontal Horizontal zoomed Window Control Used on...

Page 18: ...y mode example Key Display mode example NAV DATA HORIZONTAL HISTORY The horizontal picture appears in the main window the history picture in the sub window Useful for showing history of fish movement distribution NAV DATA HORIZONTAL VERTICAL SCAN HORIZONTAL VERTICAL ZOOM The horizontal picture appears in the main window vertical zoom picture in the sub window The horizontal picture appears in the ...

Page 19: ...erate the GAIN knob and the gain setting dialog box appears at the bottom of the screen 2 Turn the GAIN knob counter clockwise to reduce the gain Turn the GAIN knob clockwise to increase the gain Note If Gain Setting Protect in the System Setting 2 menu is set to ON and the GAIN knob is operated the message Press the gain knob to adjust the gain ap pears Press the GAIN knob then adjust the gain as...

Page 20: ... and the operations allowed for the selected menu item The selected item is also highlighted in the same manner as described in step 3 5 Press W or X to show the settings for the select menu item 6 Press W or X to adjust or change the settings for the selected menu item 7 To save and apply changes press the MENU key Note If you change a setting then select a different menu item the changes made to...

Page 21: ...ections set the tilt angle to 5 or higher so that the upper edge of the sonar beam does not hit the surface or adjust the TVG 1 8 2 Wake Noise Horizontal Mode The wake from own ship or other ships can cause noise which is shown as a dark reflection on screen when the tilt is at a low angle The wake appears as a thick con tinuous line and is easily distinguished from a fish school However because t...

Page 22: ... rel atively shallow and the seabed is hard strong echoes are detected by the sidelobes These false echoes appear on the display in a manner similar to that shown in the figure below 1 8 4 False Echo Vertical Mode In shallow water less than 100 m unwanted echoes may appear This phenomenon is caused by false echoes from the previous transmission Reducing TX Rate on the COM1 menu may lessen this eff...

Page 23: ...nu 2 Press S to select the menu bar 3 Press X or W to select COM1 4 Press T to select Interference then press X to show the Interference settings 5 Press X to select On The interference rejector is now active The IR indicator is shown in the following location depending on the display mode in use All Horizontal modes Top right of the screen Vertical and Echo Sounder modes Top left of the screen 6 ...

Page 24: ...n with caution An excessively high setting can erase sea bed echoes which can lead to grounding and other safety problems 6 Press the MENU key to close the menu and apply the changes 1 9 How to Use the Cursor Use the Cursorpad to move the cursor The cursor indication shows information for the location of the cursor at all times and appears at the top left corner of the display Depending on the dis...

Page 25: ...e bottom of the screen Range setting 60 kHz 88 kHz 150 kHz 180 kHz 240 kHz m ft m ft m ft m ft m ft 1 10 40 10 40 10 40 10 40 10 30 2 20 80 20 80 20 80 20 80 20 60 3 40 120 40 120 40 120 40 120 30 90 4 80 200 80 200 60 200 60 200 40 120 5 120 300 120 300 80 300 80 300 60 150 6 160 400 160 400 120 400 100 400 80 200 7 200 500 200 500 160 500 120 500 100 250 8 250 600 250 600 200 600 160 600 120 300...

Page 26: ...ation REVERSE appears for approximately three seconds at the top of the echo display area and the train is reversed Note The train reverse function is not available for Echo Sounder mode 1 11 2 Train controls for horizontal mode You can change the center direction or bearing for the horizontal scanning beam If you have a scanning sector set see section 1 13 the center of the sector moves ac cordin...

Page 27: ...t in the direction set with the TRAIN knob The train angle moves in 6 steps and can be adjusted in the full 360 spectrum To move the scanning beam clockwise in relation to your ship turn the TRAIN knob clockwise To move the scanning beam counter clockwise in relation to your ship turn the TRAIN knob counter clockwise Train angle indication Train angle indication PORT Train direction indicator FORE...

Page 28: ...en for a few seconds The selected angle is always visible at the top right of the echo screen 1 12 2 Tilt control for vertical mode The tile angle in vertical mode adjusts the angle for the beam center A tilt angle of 0 is vertical and an angle of 90 is horizontal You can change the tilt angle depending on your needs by using the TILT knob When the tilt angle is changed the selected angle appears ...

Page 29: ...e horizon tally scanned sector The setting range is 6 to 360 in 16 steps as shown in the table below To increase the width turn the SECTOR knob clockwise To decrease the width turn the SECTOR knob counter clockwise You can also alternate between full range scan and half range scan with the FULL HALF SECTOR key The full range scan shows 360 degree coverage around your ship and the half range scan s...

Page 30: ... SECTOR knob clockwise To decrease the width turn the SECTOR knob counter clockwise You can also alternate between full range scan and half range scan with the FULL HALF SECTOR key The full range scan shows 180 degree coverage around your ship and the half range scan shows a 84 area in the train direction see section 1 11 3 for details on vertical train Sector width Sector Width 6 12 24 36 48 60 7...

Page 31: ... in relation to the direction of the sector center The directional indications for FORE AFT STBD and PORT are hidden when the own ship indicator is in that direction as shown below Sector center set between 0 and 60 Own position shifted to port aft indication for port aft is hidden Sector center set between 66 and 114 Own position shifted to center all direc tional indications visible Sector cente...

Page 32: ...Note 1 For Horizontal and Full circle A scope display modes the range and bearing for the latest event mark is displayed at the bottom left of the screen Note 2 Where Horizontal Cross Section display mode is in use event marks can only be inscribed in the main window 1 14 2 How to delete event marks To delete all event markers do the following 1 Move the cursor outside the echo display area 2 Pres...

Page 33: ...ed Depending on the display mode in use the range mark is displayed in a different man ner and measurements also differ Horizontal display mode The cursor location indicator shows the range horizontal depth and bearing to the cursor location The train indication also shows the range horizontal and range to the cursor as a dashed line The range ring and bearing line move with the cursor CSE SPD GAI...

Page 34: ...location indication shows horizontal range and depth to cursor location Cursor location indication shows horizontal range and depth to cursor location Depth mark shown as a horiztontal dashed line Depth mark shown as a horiztontal dashed line Range and depth displayed numerically at cursor position Range and depth displayed numerically at cursor position Range mark shown as a vertical dashed line ...

Page 35: ...lable for all Horizontal modes 1 Referring to section 1 16 1 set the tracking method to Position 2 Place the cursor at the location to track then press the Tracking button The sys tem now tracks the selected location Note 1 When Position tracking is in use the following controls are disabled If one of the disabled controls is operated the notification Target tracking on Stop tracking appears Note ...

Page 36: ... Press S or T to adjust the outer boundary area Fish detected between the inner boundary and outer boundary are tracked automati cally When fish are detected the system release a notification sound the tracking in dicator flashes and the train direction changes to rescan the area The area is re painted where the echoes were detected The detection area is affected by both sector and train direction...

Page 37: ...le for all Horizontal modes and the Vertical mode 1 Referring to section 1 16 1 set the tracking method to Reverse 2 To reverse the train direction press the Tracking button The train now moves in reverse Each time the button is pressed the indication REVERSE appears for approximately three seconds at the top of the echo display area and the train is reversed Note You can also change the train dir...

Page 38: ...1 OPERATIONAL OVERVIEW 1 26 This page is intentionally left blank ...

Page 39: ...nding on your requirements select the appropriate Horizontal display mode For CH 600 Three types of Horizontal display mode available Number Display mode 1 Full circle A Scope Horizontal Full circle 2 Horizontal History 3 Horizontal Vertical 4 Horizontal 5 Horizontal zoomed Number Display mode 1 Combination key 2 Swiching the Frequency LF or HF 3 Mix Display 4 Horizontal 5 Horizontal zoomed MIX LF...

Page 40: ...J Adjust the level of gain 10 to 10 default 0 RES Color Sets the color scheme for echo display based on echo strength LOG Weak to strong echoes are dis played in colors respective to their echo strength Linear Downplays weak echoes compared to LOG Effective for sup pressing weak echoes such as plank ton Square Strong echoes are empha sized more than in Linear Cube Strong echoes are emphasized even...

Page 41: ...as whitebait When the mix display is active the indication MX ap pears at the top of the display To use the mix display effectively it is important that the gain for both the low and high frequencies is set properly When searching for young fish such as whitebait follow the procedure below For detailed information about gain adjustment see the next section Tracking Key Set the function for the tra...

Page 42: ...humb For whitebait low frequency gain is set 3 4 steps lower than high frequency gain Single frequency display or combination display other than vertical scan com bination Use the MIX key to switch between the mix display and the single frequen cy display alternately Dual frequency display Use the MIX key to switch between the mix display and the dual frequency display alternately How the MIX key ...

Page 43: ...enabled Number Description 1 Indications for cursor position Horizontal distance depth and bearing 2 Indications for range and tilt 3 Indications for tilt angle interference rejection target lock and transducer raise lower status 4 Own ship or cursor position latitude longitude Note Requires connection to appropriate sensors 5 Navigational data Heading speed depth water temperature tidal current i...

Page 44: ...the kind of fish school and seabed composition When using the CH 500 press to view this display mode When using the CH 600 press and select Full A Scope to view this dis play mode Number Description 1 Indications for cursor position Horizontal distance depth and bearing 2 Indications for range and tilt 3 Indications for tilt angle interference rejection target lock and transducer raise lower statu...

Page 45: ...ontal Full circle A Scope mode display When using the CH 600 press and select HOR Full A Scope 2 6 Horizontal Mode Zoomed Fish echoes may be enlarged by 1 5 times by using the Horizontal zoomed mode To view this display mode press Depending on the training direction when this display mode is activated the train cen ter is automatically moved as shown in the table below Training direction Position ...

Page 46: ...s and select HOR Full A Scope to view this display mode Number Description 1 Indications for cursor position Horizontal distance depth and bearing 2 Indications for range and tilt 3 Indications for tilt angle interference rejection target lock and transducer raise lower status 4 Own ship or cursor position latitude longitude Note Requires connection to appropriate sensors 5 Navigational data Headi...

Page 47: ... for cursor position Horizontal distance depth and bearing 2 Indications for range and tilt 3 Indications for tilt angle interference rejection target lock and transducer raise lower status 4 Own ship or cursor position latitude longitude Note Requires connection to appropriate sensors 5 Navigational data Heading speed depth water temperature tidal current information Note Requires connection to a...

Page 48: ...cy horizontal expansion display Dual frequency echo sounder display Item Low frequency High frequency Detection range Longer range comparing with the high frequency Attenuation loss is small on low frequency Shorter range comparing with the low frequency Attenuation loss is great on high frequency Detection depth Deeper than the high frequency Bottom echo is prominent be cause of wide beam width s...

Page 49: ...ause switching the dual frequency is available on the CH 600 Choosing the combination display 1 Press key on the DISPLAY MODE key selection of the control unit Combination selection window appears for four seconds Note The selection window shows the combination display set as ON in the System Setting 3 menu 2 Press T or S to select the required display Or you can select the required display by pre...

Page 50: ...rget echoes obtained by this beam is dis played in sectors at 6 increments on the screen Thus all directions around the boat are sounded in 60 transmissions The train speed can be adjusted to suit your needs see section 2 11 How the Horizontal mode picture is displayed on the screen The appearance of echoes on the screen varies depending on factors such as trans mission frequency gain and TVG sett...

Page 51: ... beam width captures the bottom Bottom echo displayed narrower and in stronger colors when compared to A Bottom echo Shallow bottom is displayed in a strong color and with a short tail The deeper bottom echo is displayed in a weak color and with a long tail The deeper bottom echo is displayed in a weak color and with a long tail The deeper bottom echo is displayed in a weak color and with a long t...

Page 52: ...m the seabed is weaker This makes the fish echoes from the seabed easier to find A Sea surface fish Tilt angle 0 to 10 B Midwater bottom fish Tilt angle 30 or more B Midwater bottom fish Tilt angle 0 to 20 Fish echoes which appear together with or after the seabed can be detected School of fish Large midwater a school of fish is present Bottom Bottom School of fish School of fish School of fish Sc...

Page 53: ...horizontal scan it may be difficult to estimate the distance of the school from the seabed or the distribution of fish within the school Unlike the fan shaped beam used in Vertical mode the VERT Search feature fo cuses on the selected area and instantly changes the display mode to allow you a clearer view of the school location in relation to the seabed and your ship This feature requires a functi...

Page 54: ... press X to show the TX Power settings 5 Press X to select Low For long range detection this setting should be set to High 6 Press the MENU key to close the menu and apply the changes 2 13 2 How to suppress bottom tail with pulselength Fish schools near the bottom are sometimes difficult to detect because you have to discriminate fish echoes from the seabed reflections To help discriminate fish ec...

Page 55: ...gradually increased as range increases so that similar targets are displayed in similar intensities irrespective of the ranges to them The TVG also functions to suppress unwanted echoes and noise which appears in a certain range area on the screen Note Use this function with caution excessive TVG may eliminate short range echoes How to adjust the TVG 1 Press the MENU key to open the menu 2 Press S...

Page 56: ...0 then press X to show the TVG Distance settings 7 Press X or W to adjust the TVG level Ideally a setting between 3 0 and 5 0 130 m to 320 m is sufficient As the setting is adjusted the current setting is shown in a dashed line and the level indication changes to show the new setting Current setting New setting TVG Level indication changes to show the new setting 200m TVG Level Gain Hi Lo 4 0 200m...

Page 57: ...20 660 820 1160 1300 1470 1640 1840 2070 2320 2600 2920 3280 1040 2 5 10 20 40 60 80 100 110 140 200 220 250 280 300 340 390 430 490 550 170 2 5 10 20 40 60 80 100 130 170 230 260 300 330 370 420 470 520 590 660 210 2 5 10 20 40 60 80 100 120 150 210 240 270 300 340 380 430 480 540 600 180 5 5 6 0 6 5 7 0 7 5 8 0 8 5 9 0 9 5 10 0 Unit of measurement TVG Distance setting Meters m Feet ft Passi braz...

Page 58: ...2 HORIZONTAL MODE 2 20 This page is intentionally left blank ...

Page 59: ...izontal distance depth and bearing 2 Indications for range and tilt 3 Indications for transducer raise lower status 4 Own ship or cursor position latitude longitude Note Requires connection to appropriate sensors 5 Navigational data Heading speed depth water temperature tidal current information Note Requires connection to appropriate sensors 6 Echo display settings Gain TVG level distance 7 Verti...

Page 60: ...cheme for echo display based on echo strength LOG Weak to strong echoes are displayed in colors respective to their echo strength Linear Downplays weak echoes compared to LOG Effective for suppressing weak echoes such as plankton Square Strong echoes are emphasized more than in Linear Cube Strong echoes are emphasized even more than in Square LOG Linear Square Cube default LOG Clutter Suppresses l...

Page 61: ...he seabed echo is displayed wider as the distance from the ship in creases This can make it difficult to see fish near the seabed Fore aft scan passing over a school of fish In this example you can see the echoes of a fish school in front of the ship fore Note that the seabed echo is displayed wider as the distance from the ship increases Sounding beam s bearing Bow Scanned area shaded STBD PORT G...

Page 62: ...transducer in order of the distance to them and when their intensities are compared at the transducer face those from nearer targets are generally stronger when their reflecting properties are nearly equal If these echoes are displayed directly on the screen the size of the displayed echo from the same school of fish may change with distance making it difficult to judge the actual size of the scho...

Page 63: ...ce As the setting is adjusted the current setting is shown in a dashed line and the level indication changes to show the new setting 6 Press T to select TVG Distance TVG Distance LF TVG Distance HF on CH 600 then press X to show the TVG Distance settings 7 Press X or W to adjust the TVG level Ideally a setting between 3 0 and 5 0 130 m to 320 m is sufficient 200m TVG Level Gain Hi Lo 4 0 Current s...

Page 64: ... 0 0 5 1 0 1 5 2 0 2 5 3 0 3 5 4 0 4 5 5 0 3 8 20 40 60 100 130 160 200 250 360 400 450 500 560 630 710 790 890 1000 320 10 30 70 130 210 330 410 520 660 820 1160 1300 1470 1640 1840 2070 2320 2600 2920 3280 1040 2 5 10 20 40 60 80 100 110 140 200 220 250 280 300 340 390 430 490 550 170 2 5 10 20 40 60 80 100 130 170 230 260 300 330 370 420 470 520 590 660 210 2 5 10 20 40 60 80 100 120 150 210 24...

Page 65: ...rection tilt angle and train bearing 3 Indications for range and tilt 4 Indications for transducer raise lower status 5 Own ship or cursor position latitude longitude Note Requires connection to appropriate sensors 6 Navigational data Heading speed depth water temperature tidal current information Note Requires connection to appropriate sensors 7 Echo display settings Gain TVG level distance 8 Dep...

Page 66: ...Adjust the level of gain 10 to 10 default 0 RES Color Sets the color scheme for echo display based on echo strength LOG Weak to strong echoes are displayed in col ors respective to their echo strength Linear Downplays weak echoes compared to LOG Effective for suppressing weak echoes such as plankton Square Strong echoes are emphasized more than in Linear Cube Strong echoes are emphasized even more...

Page 67: ...p in mind that a fast speed will expand the echoes horizontally while a slow speed will contract the echoes 1 With the Echo Sounder display mode active press the FAST SCAN key The Pic Advance popup window appears 2 Press the FAST SCAN key to cycle through the settings or press the Cursor Pad to select the appropriate speed setting The FAST SCAN key cycles though the settings in the following order...

Page 68: ...that similar targets are displayed in similar intensities irrespective of the ranges to them The TVG also functions to suppress unwanted echoes and noise which appears in a certain range area on the screen 4 6 1 How to adjust the TVG for echo sounder mode 1 Press the MENU key to open the menu 2 Press S to select the menu bar 3 Press X or W to select ES 4 To reduce reflections from the sea surface ...

Page 69: ...g New setting Indications for distance setting and actual distance change to show the new setting 320m Gain Hi Lo 6 0 TVG Distance 0 0 5 1 0 1 5 2 0 2 5 3 0 3 5 4 0 4 5 5 0 3 8 20 40 60 100 130 160 200 250 360 400 450 500 560 630 710 790 890 1000 320 10 30 70 130 210 330 410 520 660 820 1160 1300 1470 1640 1840 2070 2320 2600 2920 3280 1040 2 5 10 20 40 60 80 100 110 140 200 220 250 280 300 340 39...

Page 70: ...ng the type of fish school or seabed composition How to enable disable the A Scope display To activate the A Scope display in Horizontal mode do the following 1 Referring to section 4 2 access the ES menu 2 Press T to select A Scope then press X to show the A Scope settings 3 Press X or W to select the appropriate setting Select On to show the A Scope or select Off to hide the A Scope 4 Press the ...

Page 71: ...menu 4 Press T or S to move the cursor inside the menu and select a menu item The guidance box at the bottom of the screen shows a brief explanation for the selected item and the operations allowed for the selected menu item 5 Press W or X to show the settings for the select menu item 6 Press W or X to adjust or change the settings for the selected menu item 7 To save and apply changes press the M...

Page 72: ...High TX Pulselength Sets the transmission pulselength Long Short default Long TX Rate Sets the transmission rate number of transmissions per scan EXT 1 to 10 default 10 For external video sounder or sonar select EXT Interference Enable disable the interference rejector Off On default Off AGC Automatic Gain Compensation Auto matically adjusts the sensitivity against strong echoes such as those from...

Page 73: ...16 colors Off 1 to 14 default Off 8 colors Off 1 to 6 default Off Echo Colors Sets the number of colors used to paint the picture 32 16 8 default 32 BCKD Colors Selects the color scheme for the display these colors can be adjusted from the Color Settings menu in the System menu see section 5 8 1 2 3 default 2 Bearing Sets the reference to use for bearing Relative True default Rela tive Heading Adj...

Page 74: ...The menu window appears 2 Press S to select the menu bar 3 Press W or X to select System 4 Press T to select Go to SYS Menu 5 Press W to select Yes The System menu appears Select System Menu System Settings Range Settings Train Speed Setting Set at installation See the installation manual See Chapter 6 Color Settings Language Settings System Backup Load Backup Data Preset Backup Load Preset Data D...

Page 75: ...pears 3 Press to show the System Setting 2 menu 4 Press to select FUNC Key1 FUNC Key2 or FUNC Key3 as required 5 Press or to select Preset Key or Short Cut Key as required 6 Press the MENU key twice to close the menu 5 6 2 Short cut keys You can select the function for each shortcut key as follows 1 Referring to section 5 6 1 access the FUNC Key menu 2 Press or to select the appropriate key 3 Pres...

Page 76: ...r Delete Mark menu short cuts are deleted To re register a menu function as a short cut repeat the above procedure 5 6 3 Preset keys You can adjust the preset keys suit your needs To adjust the presets do the following 1 Set the display mode sector train angle scan range tilt angle scan speed and gain to the settings you want to store This will become the preset 2 Referring to section 5 6 1 access...

Page 77: ...e changes in five meter increments between 10 m and 100 m Between 100 m and the maximum range the range changes in ten meter increments 6 Press the MENU key several times to close the menu How to restore the default range presets You can restore the default preset ranges for each mode individually 1 Referring to section 5 5 open the System menu 2 Press T to select Range Settings then press X to op...

Page 78: ...lors You can customize the color settings for echoes the display color scheme back ground menu and text colors and the Full circle A Scope display mode To customize the colors do the following 1 Referring to section 5 5 open the System menu 2 Press S or T to select Color Settings The Color Palette window appears Train Speed Setting 6 1 2 1 5 1 8 2 1 2 4 Off Off On On Off On Off On Off On Off On Se...

Page 79: ...ial backup then press X A confirmation window appears The example below shows the full backup confirmation window Note that the title at the top of the win dow changes depending on your selection 3 Press X or W to select No or Internal as appropriate No Backup is stopped no settings are saved Internal System settings are saved in the Transceiver Unit s internal memory Note Previous backup data wil...

Page 80: ...ace the current settings 4 Press the MENU key to load the system settings The system releases a series of beeps to indicate that the data is saved then the System menu appears 5 Press the MENU key to close the menu 5 11 How to Adjust the Transmission Frequency If the system is receiving interference from a video sounder to other sonar on your ship adjust the frequency to reduce interference 1 Refe...

Page 81: ...0 90 kHz to 1 20 kHz 4 Press the MENU key twice to close the menu 5 12 2 How to select the speaker bandwidth You can customize the sound bandwidth to suit your preferences To set the output bandwidth do the following 1 Referring to section 5 5 open the System menu 2 Press T or S to select Audio then press X The Audio settings window ap pears 3 Press S or T to select Bandwidth 4 Press X or W to sel...

Page 82: ... To enable or disable the auto filter do the following 1 Referring to section 5 5 open the System menu 2 Press T or S to select Audio then press X The Audio settings window ap pears 3 Press S or T to select Auto Filter 4 Press X or W to select Off disable the filter or On enable the filter The output sound is affected in the following manner Off Doppler shift is not compensated Detected echoes are...

Page 83: ...active the indication SIM appears at the top of the screen To start or stop the simulation mode do the following 1 Referring to section 5 5 open the System menu 2 Press T or S to select Simulation then press X The Simulation settings win dow appears 3 Press X or W to select the appropriate option No Simulation is stopped normal operations and functions are all available Load Internal Data Start th...

Page 84: ...C Key menus are not affected To restore the default settings do the following 1 Referring to section 5 5 open the System menu 2 Press T or S to select Restore Initial Settings then press X The confirmation window shown below appears 3 Press X or W to select the appropriate option No Current settings remain unchanged Yes Restores the System menu and all sub menus to factory default set tings Restor...

Page 85: ...on Sets the reference for heading display Select either True or Azimuth as appropriate Display Range Ring Show or hide the range rings Select Off to hide or On to show the rings North Mark Show or hide the NORTH mark Select Off to hide or On to show the mark CSE Data Sets the source for course data Select Nav to show course data from a navigator NAVpilot etc or Gyro to show course data from a gyro...

Page 86: ...used by excessive speed This function enables or disables the speed alarm Select Off to disable the alarm and message or On to enable the alarm and message When this setting is enabled lowering or retracting the hull unit at speeds over 15 knots will trigger the alarm and display a an alarm message Sweep Indicator Sets the display method for the train position tilt angle Select either Dot hashed l...

Page 87: ... replace if necessary Check the voltage of the ship s mains to make sure it is within range of the equip ment s power rating 6 2 How to Clean the Equipment Dust or dirt can be removed from the equipment with a soft dry cloth Do not use chemical cleaners to clean the equipment they can remove paint and markings The LCD will in time accumulate a coating of dust which tends to dim the picture Wipe LC...

Page 88: ...with Daphne Eponex Grease No 2 IDEMITSU KOSAN CO LTD 1 once a year Raise transducer and coat main shaft with Daphne Eponex Grease No 2 IDEMITSU KOSAN CO LTD 1 every six months Dry dock the ship and clean the transducer face yearly Do not paint metallic parts such as the transducer flange 2 Apply MOLYTONE grease 2 once a year 1 Equivalent greases SHOWA SHELL OIL Shell Albania Grease S No 2 EXXON MO...

Page 89: ...er limit to the lower limit positions If the transducer cannot be raised lowered smoothly do not use excessive force the shaft may bend causing damage to other components 4 Check the soundome and tank Remove any marine life with fine sandpaper or a piece of wood The motor can cause injury when rotating Turn off the power at the ship s mains switchboard before conducting the procedure below WARNING...

Page 90: ...sceiver unit and the display unit is firmly con nected If the power still cannot be applied the fuse in the transceiver unit may have blown Have a qualified technician check and change the fuse Unit Fuse type Code No Transceiver Unit FGMB 125V 8A 000 191 004 10 Hull Unit 0287010 U 000 193 054 10 FGMB 125V 6A 000 157 492 10 NOTICE Do not paint the transducer face with sunbstances other than anti fo...

Page 91: ...k echoes Output power is set to Low Change the output power to High from the COM1 menu TVG setting is excessively high Adjust the TVG setting from the appropriate display mode menu Also note that TVG requires readjustment when the gain setting is changed Screen color appears strange The brilliance setting may be too low Adjust the bril liance referring to section 1 4 Picture contains noise The equ...

Page 92: ...l unit The breaker may be tripped or the fuse inside the hull unit is blown Check that the power is on If the hull unit is not turned on turn the power on then press the EVENT MARK key If the hull unit power is on turn the power off then consult your local dealer Power cable is loose or disconnected Check the power cable connections Fasten or reconnect as necessary Hull unit power off Check hull u...

Page 93: ... items show the result as NG Not Good If any item shows NG contact your local dealer for advice 4 Press each key on the panel and remote control The indication for each key should change from 0 to 1 when the key is pressed When the key is released the indication should change back to 0 If the indication does not change there may be a problem with the control panel Contact your dealer for advice 5 ...

Page 94: ... Pattern then press X The LCD test starts and the message Press X to change test pattern Press MENU key to exit appears at the bottom of the screen 3 Press X to cycle through the screens in the order shown below Red gradation Red gradation Green gradation Green gradation Blue gradation Blue gradation White White Red Red Green Green Blue Blue Black Black Crosshairs Crosshairs Black white checkered ...

Page 95: ...ape cable ends with a plastic bag sealed at the cable with vinyl tape to prevent water intrusion 3 Unfasten the knobs on the display unit one per side 4 Remove the display unit from the hanger 6 9 2 How to re install the display unit 1 Place the display unit in the hanger Make sure that the display unit is facing in the correct direction 2 Fasten the knobs to the hanger one per side 3 Uncover the ...

Page 96: ...6 MAINTENANCE TROUBLESHOOTING 6 10 This page is intentionally left blank ...

Page 97: ...olors 32 16 8 BKGD Colors 1 2 3 Bearing Relative True Heading 180 to 179º default 0º Roll Offset 10 0 to 10 0 default 0 0º Pitch Offset 10 0 to 10 0 default 0 0º Sensor Correct 180 to 179º default 0º 3 HOR TVG Level 0 0 to 10 0 default 4 0 TVG Distance 0 0 to 10 0 default 4 0 Gain ADJ 10 to 10 default 0 RES Color LOG Linear Square Cube Clutter 0 1 2 3 Tracking Key Position Echo Reverse Tracking Mo...

Page 98: ...nge Ring Off On North Mark Off On CSE Data Nav Gyro Nav Data GPS Other NMEA1 Baudrate 4800 9600 19200 38400 NMEA2 Baudrate 4800 9600 19200 38400 TVG Correction Off 1 2 1 1 Units m ft fm HR pb Temp Display ºC ºF Temp Graph Off 20min 60min TLL Output Off On System Setting 2 Gain Setting Protect Off On Emphasis Mode Off Normal Red Stabilizer Off On Std On Gyro Auto Retract Off 5 to 15 default Off Spe...

Page 99: ...0 30 40 50 60 80 100 120 140 160 200 250 300 400 HR 10 20 30 40 50 60 80 100 120 140 160 200 250 300 400 pb 10 20 30 40 50 60 80 100 120 140 160 200 250 300 400 Train Speed Setting 6º Off On 12º Off On 15º Off On 18º Off On 21º Off On 24º Off On Color Settings Opens Color Palette System Backup No Internal Load Backup Data No Load Internal Data Preset Backup No Internal Load Preset Data No Load Int...

Page 100: ... 180 to 179º default 0º 3 HOR TVG Level LF 0 0 to 10 0 default 4 0 TVG Level HF 0 0 to 10 0 default 4 0 TVG Distance LF 0 0 to 10 0 default 4 0 TVG Distance HF 0 0 to 10 0 default 4 0 Gain ADJ LF 10 to 10 default 0 Gain ADJ HF 10 to 10 default 0 RES Color LF LOG Linear Square Cube RES Color HF LOG Linear Square Cube Clutter LF 0 1 2 3 Clutter HF 0 1 2 3 Tracking Key Position Echo Reverse Tracking ...

Page 101: ...imuth Display Range Ring Off On North Mark Off On CSE Data Nav Gyro Nav Data GPS Other NMEA1 Baudrate 4800 9600 19200 38400 NMEA2 Baudrate 4800 9600 19200 38400 TVG Correction Off 1 2 1 1 Units m ft fm HR pb Temp Display ºC ºF Temp Graph Off 20min 60min TLL Output Off On System Setting 2 Gain Setting Protect Off On Emphasis Mode Off Normal Red Stabilizer Off On Std On Gyro Auto Retract Off 5 to 15...

Page 102: ...20 30 40 50 60 80 100 120 140 160 200 250 300 400 HR 10 20 30 40 50 60 80 100 120 140 160 200 250 300 400 pb 10 20 30 40 50 60 80 100 120 140 160 200 250 300 400 Train Speed Setting 6º Off On 12º Off On 15º Off On 18º Off On 21º Off On 24º Off On Color Settings Opens Color Palette System Backup No Internal Load Backup Data No Load Internal Data Preset Backup No Internal Load Preset Data No Load In...

Page 103: ...al Normal Zoomed Vertical or History combined Split horizontal Vertical A Scope combined Vertical scan Echo sounder Normal A Scope combined Full circle A Scope Normal Horizontal dual CH 600 only Dual horizontal Normal Zoomed Vertical Echo sounder High low or mixed frequency mode selected from control unit 2 6 Echo information Range Sensitivity TVG Tilt angle Interference rejection 2 7 Sensor infor...

Page 104: ...ntal 3dB 6dB Vertical 3dB 6dB 60 kHz 15 20 12 17 88 kHz 12 16 10 13 150 kHz 7 9 7 9 180 kHz 7 9 8 10 240 kHz 6 8 6 8 CH 600 Frequency Horizontal 3dB 6dB Vertical 3dB 6dB 60 kHz 16 22 14 20 153 kHz 7 9 5 8 85 kHz 11 15 10 14 215 kHz 5 6 4 6 3 9 Allowable ship s speed 20 kn or less 15 kn during raise lower operation 3 10 Stabilization Built in motion sensor standard supply 4 INTERFACE 4 1 Number of ...

Page 105: ... 115 220 230 VAC 1 phase 50 60 Hz 13 A max 6 ENVIRONMENTAL CONDITION 6 1 Ambient temperature Display Transceiver Control unit 15 C to 55 C Hull unit 0 C to 55 C Transducer 0 to 35 C 6 2 Relative humidity 95 or less at 40 C 6 3 Degree of protection Display Control unit IP55 Transceiver Hull unit IP22 Raise lower control unit IP55 6 4 Vibration IEC60945 Ed 4 7 UNIT COLOR 7 1 Display Control Transcei...

Page 106: ...FURUNO CH 500 600 SP 4 E1354S01C M 180319 This page is intentionally left blank ...

Page 107: ...lay 2 12 menu overview 2 2 operational overview 2 1 seabed surface reflection suppression 2 16 TVG 2 17 zoomed example 2 7 Horzontal mode display example 2 5 Hull unit maintenance 6 2 lubrication 6 2 raising lowering manually 6 3 M Maintenance cleaning 6 1 fuses 6 4 hull unit 6 2 transducer 6 4 Maintenance Troubleshooting 6 1 Menu operations 5 1 acessing the menus 5 1 changing the language 5 2 COM...

Page 108: ... 23 position tracking 1 23 selecting a tracking mode 1 23 Train 1 14 control for echo sounder 1 15 control for horizontal 1 14 control for vertical 1 15 how to change direction 1 14 Transducer 1 3 how to lower 1 3 how to raise 1 4 Transducer maintenance 6 4 Troubleshooting 6 5 TVG how to adjust TVG for echo sounder mode 4 4 how to adjust TVG in horizontal mode 2 17 V Vertical mode 3 1 adjusting th...

Page 109: ......

Reviews: