Furrion FGL200A-SS Instruction Manual Download Page 6

5

English

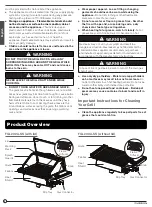
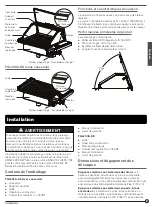
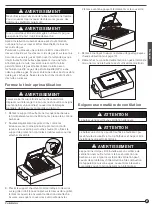
Front Facing Installation

H

H

J

L

H

H

I

NOTE:

 All dimensions in the 

Side Facing

 and the 

Front 

Facing

 illustrations apply for any grill installation.

A

Min. 61/2” (165.1mm) thickness of the drawer for grill 
install

B

The depth of cut out size: 13” (330.2mm)

C

The width of cut out size: 19” (482.6mm)

D

Min. 2” (50.8mm) from the drawer counter surface to 
the top of the drawer opening

E

Min. 2” (50.8mm) distance to the front and rear sides 
of the cut out to support the grill

F

Min. 30” (1016mm) distance from drawer counter top 
surface to the overhang material above. Temperature 
requirement minimum is 149

o

F (65

o

C)

G

Min. 31/2” (88.9mm) distance to the left and right 
sides of the cut out to support the grill

H

Min. 3” (76.2mm) clearance around the grill to the 
combustible material above the counter top surface

I

Min. 12” (305mm) clearance from bottom of the grill 
to any combustible material below the drawer (if you 
install something below the drawer)

J

Min. 2” (50.8mm) distance from the front and rear 
heat shield surfaces to the combustible material on 
the inner front and rear surfaces of the drawer

K

Min. 5” (127.0mm) distance from the left side heat 
shield surface to the combustible material on the 
inner left side surface of the drawer

L

Min. 61/2” (165.1mm) distance from the right side heat 
shield surface to the combustible material on the 
inner right side surface of the drawer


WARNING

For outdoor use only.

You grill is designed to be installed into an exterior counter 
top and a pull-out drawer that extends away from the RV. It is 
not designed to be installed in an enclosed cabinet.
When in use, the bottom of the grill must be free and clear 

from all combustibles.
The grill must only be installed in a pull-out drawer.
Combustible wall and overhead clearances must be 
maintained.
A safety shut off valve must be installed for easy accessibility 
to turn off the gas to the grill.

  WARNING

After the installation is completed, the grill and gas 
connection must be checked for any leaks.
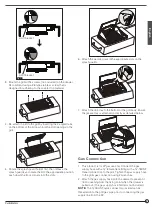
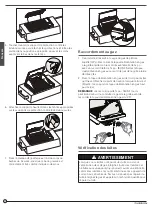
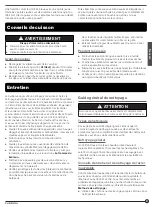
Install the Grill

1.  Lift up the front of the lid (a), hold both sides of the lid and 

push it a little to make the lid hinges separate from  the grill 
base (b), then take the lid off (only for model FGL202A-SS).

a

b

2.  Place the grill into the cutout at a 30 degree angle as 

shown in illustration Fig. A, Fig. B, and Fig. C.
a.  Place the grill knob side into the cabinet (Fig. A).

Fig. A

b.  Push down on the left side to seat the grill into the    
      cutout (Fig. B).

Fig. B

c.  Pull back the grill to the left until the limit bracket hits  
      the cabinet cutout (Fig. C).

Summary of Contents for FGL200A-SS

Page 1: ...e instrucciones Model Mod le Modelo FGL200A SS FGL202A SS 5014612 Conforms to ANSI STD Z21 58 2018 Certified to CSA STD 1 6 2018 Outdoor Cooking Gas Appliances Conforme ANSI STD Z21 58 2018 Certifi CS...

Page 2: ...d 4 If odor continues keep away from the appliance and immediately call your gas supplier or your fire department WARNING 1 Do not store or use gasoline or other flammable liquids or vapors in the vic...

Page 3: ...allow children to play with packaging material Be sure your appliance is properly installed by a qualified technician in accordance with state or other codes Install only per installation instruction...

Page 4: ...and surfaces near these openings warming rack and lid Wear proper apparel Loose fitting or hanging garments should never be worn while using the appliance Do not let clothing or other flammable mater...

Page 5: ...he absence of local codes with either the National Fuel Gas Code ANSI Z223 1 NFPA 54 or the Standard for Recreational Vehicles ANSI A119 2 NFPA 1192 and CSA Z240 RV Series Recreational Vehicle Code as...

Page 6: ...the combustible material on the inner left side surface of the drawer L Min 61 2 165 1mm distance from the right side heat shield surface to the combustible material on the inner right side surface o...

Page 7: ...rming rack in the appropriate slots on the splash guards 7 Attach the drip tray to the bottom of the grill body Ensure the grease tray is attached correctly as detailed below Gas Connection 1 This pro...

Page 8: ...get a qualified service technician to repair the leak Liquefied Petroleum LP has an odorant added to the gas If you smell an odor you may have a gas leak Follow the leak check instructions above Close...

Page 9: ...es after grill is turned off to allow unit to cool Remove and clean the drip pan underneath of the grill after each use WARNING Never use rocks coal charcoal or anything else on or below the grate WAR...

Page 10: ...ake longer in comparison to your home grill Maintenance Your grill requires occasional cleaning Always apply a Stainless Shine Cleaner to all external parts of your grill after cleaning this will keep...

Page 11: ...Cleaning with chloride containing detergents must be avoided On polished finishes rubbing or wiping should be done in the direction of the polish lines NOT across them Care must be taken when cleaning...

Page 12: ...4 Si l odeur persiste loignez vous de l appareil et appelez imm diatement votre fournisseur de gaz ou votre service d incendie AVERTISSEMENT 1 N entreposez ni n utilisez pas d essence ou d autres liqu...

Page 13: ...tels codes au code national d lectricit am ricain NEC ANSI NFPA 70 Ne tentez pas de r gler de r parer de r viser ou de remplacer une pi ce de votre appareil sauf recommandation expresse dans le pr se...

Page 14: ...LAISSEZ JAMAIS LE BARBECUE SANS SURVEILLANCE PENDANT LA CUISSON NE TOUCHEZ PAS LA GRILLE OU LES ZONES PROCHES DE LA GRILLE La grille peut tre chaude m me si les flammes ne sont pas visibles Les endro...

Page 15: ...gences relatives aux mat riaux en surplomb ci dessous Le non respect de cette consigne peut entra ner un incendie ou des blessures corporelles L installation doit tre conforme aux normes locales ou en...

Page 16: ...temp rature minimale requise est de 149 o F 65 o C G Distance minimale de 31 2 po 88 9 mm gauche et droite de la d coupe pour supporter le barbecue H D gagement minimal de 3 po 76 2 mm autour du barb...

Page 17: ...ercle a tenez les deux c t s du couvercle et poussez le l g rement pour s parer les charni res du couvercle de la base du barbecue b puis retirez le couvercle uniquement pour le mod le FGL202A SS a b...

Page 18: ...d filet de po 18UNF Serrez le tuyau d alimentation en gaz au raccord de gaz de la grille l aide de deux cl s 2 Fixez le tuyau d alimentation en gaz sur le tiroir pour viter qu il ne se d tache du poin...

Page 19: ...rez le support chauffant une fois que le barbecue a refroidi pendant au moins 30 minutes placez le c t du barbecue 2 Soulevez l g rement les protections contre les claboussures tournez d abord la prot...

Page 20: ...roles des po les ou tout autre mat riel de cuisine pour cuisiner Le d passement de cette valeur peut endommager les mat riaux du tiroir Instructions d allumage AVERTISSEMENT Ne placez pas vos bras et...

Page 21: ...les avertissements du fabricant lorsque vous utilisez des nettoyants et des d graissants La grille de cuisson doit tre nettoy e apr s chaque utilisation Au besoin il faut la nettoyer l eau et au savo...

Page 22: ...son peuvent tre nettoy s dans le lave vaisselle N utilisez que des nettoyants ou d graissants non abrasifs con us pour l acier inoxydable Il est sugg r d utiliser une ponge r curer non abrasive avec d...

Page 23: ...se alejado del electrodom stico y llame de inmediato a su proveedor de gas o al destacamento de bomberos ADVERTENCIA 1 No almacene ni utilice gasolina u otros l quidos o vapores inflamables cerca de e...

Page 24: ...o reemplazar ninguna pieza de su electrodom stico a menos que se recomiende espec ficamente en esta gu a Todas las dem s reparaciones deben ser realizadas por un t cnico de servicio cualificado Instr...

Page 25: ...INA Pueden calentarse y causar quemaduras en la piel ADVERTENCIA NUNCA DEJE LA PARRILLA DESATENDIDA MIENTRAS COCINA NO TOQUE LA REJILLA NI LAS REAS CERCANAS A LA REJILLA La rejilla puede estar calient...

Page 26: ...stema de encendido piezoel ctrico El ngulo de apertura m ximo es 70o 70o Instalaci n ADVERTENCIA Si este electrodom stico se utiliza bajo un voladizo prolongado deje como m nimo 30 762 mm de distancia...

Page 27: ...la encimera del caj n hasta la parte superior de la abertura del caj n E M n 2 50 8 mm de distancia a la parte delantera y trasera del corte para sostener la parrilla F M n 30 1016 mm de distancia des...

Page 28: ...n de gas Instalaci n de la parrilla 1 Levante la parte delantera de la tapa a sostenga ambos lados de la tapa y emp jela un poco para separar las bisagras de la tapa de la base de la parrilla b luego...

Page 29: ...roscada de 5 8 18UNF a la parrilla Ajuste la manguera de suministro de gas a la conexi n de gas de la parrilla usando 2 llaves 2 Sujete la manguera de suministro de gas al caj n para evitar que se af...

Page 30: ...1 Retire la rejilla de calentamiento despu s de que la parrilla se haya enfriado por lo menos 30 minutos col quela al lado de la parrilla 2 Levante un poco los protectores de salpicaduras gire primero...

Page 31: ...sible que se da en los materiales del caj n Instrucciones de encendido ADVERTENCIA Mantenga los brazos y la cara alejados de la parte directamente encima del rea de cocci n Abra la tapa y asegure los...

Page 32: ...n Debajo de la parrilla hay una bandeja de goteo de grasa que se debe limpiar despu s de cada uso Mantenga el rea de los electrodom sticos a gas para cocinar al aire libre despejada de materiales comb...

Page 33: ...su uso en acero inoxidable Se sugiere utilizar una esponja para fregar antirayas con agua y jab n para limpiar la parrilla antes de cada uso Consejos de limpieza para el quemador 1 Levante para retir...

Page 34: ...logo are trademarks licensed for use by Furrion Ltd and registered in the U S and other countries 2007 2020 Furrion Ltd Furrion et le logo Furrion sont des marques d pos es par Furrion Ltd et enregist...

Reviews: