background image

22

TV Settings

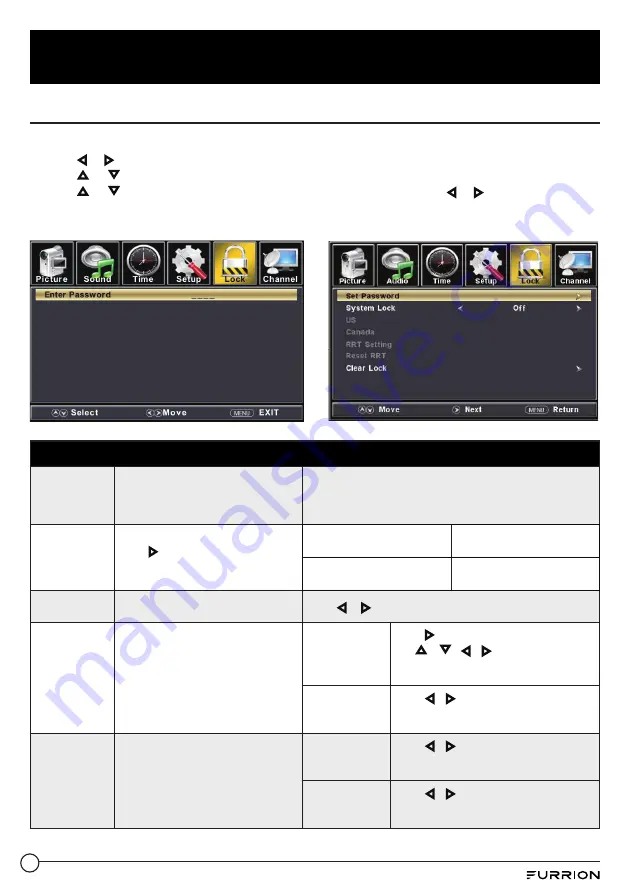
Lock Setting

1.  Press

 MENU

 button to remote control to enter the main menu.

2.  Use 


or


 to highlight 

Lock

 mode.

3.  Use   or   to highlight “

Enter Password

” and input “

0000

” to enter the setup window.

4.  Use   or   to highlight the item you would like to reset, then press 


or


 to select the 

settings.

5.  Press 

MENU

 to return to the previous menu or press 

EXIT

 at any time to exit the setting.

Lock Menu

Enter
Password

Input the password to access the 
Lock menu.  

Use the Number Buttons (0~9) to enter the password.
* Default password is 0000.
* If you forgot the password, use 8888 to enter any locked 
menu.

Set Password

Change the User Password. 
Press   to enter your new password, 
then input it again to confirm the 
password.

Set Password

Use Number buttons (0-9) to 
enter a new password.

Confirm Password

Repeat the password to 
confirm.

System Lock

Change the parental controls.

Press   or   to set as 

On

 or 

Off

 .

US

Set up parental locks based on US 
rating system .
* Only available when 

System Lock

 is 

set as 

On

 mode.

TV

Press   to enter the TV Ratings menu and 
use 

 /  / 


 to select your TV 

rating preference. (Refer to the following 
tables of Age and Genre)

MPAA

Press   

 buttons to select your movie 

rating preference based on US Rating 
System .

Canada 

Set up parental locks based on 
Canadian rating system .
* Only available when 

System Lock


was set as 

On

 mode.

Canada 
English

Press   

 buttons to select your ratings 

preference based on Canadian Rating 
System (English) .  

Canada French

Press   

 buttons to select your ratings 

preference based on Canadian Rating 
System (French) .

Summary of Contents for FDHS39Y1A

Page 1: ...Product picture is for reference only 39 HD LED TV User Manual Model FDHS39Y1A...

Page 2: ...urrion com Supplier s Declaration of Conformity 47 CFR 2 1077 Compliance Information Unique Identifier Trade Name Furrion Model No FDHS39Y1A Responsible Party U S Contact Information Furrion Innovatio...

Page 3: ...el 10 Unimote 11 About Your HD LED TV 13 Features 13 Power Source 13 Before Operation 14 What s in the Box 14 Prepare your Remote Control 14 Getting Started 15 TV Settings 16 Setup Setting 16 Picture...

Page 4: ...install near any heat sources such as radiators heat registers stoves or other apparatus including amplifiers that produce heat 9 Do not defeat the safety purpose of the polarized or grounding type pl...

Page 5: ...E GROUNDING CONDUCTORS NEC SECTION 810 21 ELECTRIC SERVICE EQUIPMENT 20 NOTE TO CABLE TV INSTALLER This reminder is provided to call the CATV system installer s attention to Article 820 40 of the Nati...

Page 6: ...ge is NOT COVERED BY YOUR WARRANTY Never leave your LED panel on for long periods of time while it is displaying the following formats or images Fixed images such as stock tickers video game patterns...

Page 7: ...nd receiver Connect the equipment into an outlet on a circuit different from that to which the receiver is connected Consult the dealer or an experienced radio TV technician for help WARNING Changes o...

Page 8: ...LED TV for advice and have the equipment professionally installed Incomplete or improper installation may cause injury to you and or damage to the LED TV WARNING Do not use this TV with wall mounts t...

Page 9: ...H Press to skip to the next channel 4 CH Press to skip to the previous channel 5 MENU Press to enter the main menu 6 SOURCE Press to select the input source 7 POWER Press to switch the TV on off Pleas...

Page 10: ...ports of a DVD Player Cable Box or other compatible device Pb Pr 6 HDMI 1 IN ARC Connect to the HDMI OUT port of a DVD Player Games Console Cable Box or other HDMI device ARC Audio Return Channel Whe...

Page 11: ...through sound modes 6 P MODE Cycles through picture modes 7 INFO OSD In TV mode press to display information on the selected TV channel In Stereo mode press to display DVD playback status 8 F LIST Di...

Page 12: ...unction 31 A B Press to start the A B repeat function playback loop of a segment of track 32 SETUP Enters the Setup menu for the entertainment system Item Button Function 33 CC Closed Captions On Off...

Page 13: ...er satellite receiver or other audio video component can be connected to this unit Power Source NOTE Please make sure to insert the cord securely at both the LED TV and the wall outlet WARNING DO NOT...

Page 14: ...different types BATTERY PRECAUTIONS These precautions should be followed when using batteries in this device Use only the size and type of batteries specified Be sure to follow the correct polarity wh...

Page 15: ...t antenna options and perform channel Auto Scan Channels found will be stored into the TV tuner memory 1 Press buttons to highlight Menu Language and then use buttons to select desired language 2 Pres...

Page 16: ...transparency of the OSD on screen display menu Press or button to select On Off Zoom Mode Adjustthedisplaywidthonscreen Press or button to select Wide Normal Cinema Zoom Noise Reduction Adjusttheleve...

Page 17: ...Font Size Press or buttonto select Default Normal Large or Small Font Edge Style Press or buttonto select Default None Raised Depressed Uniform Left Shadow or Right Shadow Font Edge Color Press or but...

Page 18: ...when the connected CEC device is turned on HDMI ARC Press or button to select Auto TV On and then press or buttonto select On Off If you select On it enables the ARC function with a connected 5 1 7 1...

Page 19: ...Control the contrast level of the picture Press or button to increase or decrease contrast intensity Brightness Control the brightness level of the picture Press or button to increase or decrease the...

Page 20: ...ass level Press or button to increase or decrease low frequency intensity Treble Control the treble level Press or button to increase or decrease high frequency intensity Balance Control the balance l...

Page 21: ...ss or button to select 5min 10min 15min 30min 45min 60min 90min 120min 180min 240min Off Time Zone Set the time zone Press or buttons to select Eastern Central Mountain Pacific Alaska Hawaii Atlantic...

Page 22: ...d then input it again to confirm the password Set Password Use Number buttons 0 9 to enter a new password Confirm Password Repeat the password to confirm System Lock Change the parental controls Press...

Page 23: ...ff All Ages G General Audience PG Parental Guidance PG 13 Parental Guidance below 13 years R Parental Guidance below 17 years NC 17 Suitable for 17 years old or above X Adults Only Canadian Rating Sys...

Page 24: ...to highlight Start to Scan directly then press OK button to start Auto Scan Favorite Add or delete a channel in the favorite list Press or button to select a channel then press ENTER button to add or...

Page 25: ...o Press or to view the next photo Press to return main menu Select Move mblog jpg Play File 1 Total size 2 0GB Unused size 1 8GB 001 001534 x 80034 3KB Repeat mblog jpg Music C C USB Photo Music Press...

Page 26: ...e the antenna amplifier is turned on for Antenna TV Adjust the antenna position to a stronger signal receiving angle Check if the Antenna connection is tight to the TV Check if there is power supplied...

Page 27: ...W H D Max Resolution FDHS39Y1A 351 16 x 201 4 x 27 8 890 x 515 x 73mm 351 16 x 217 8 x 79 16 890 x 556 x 192mm 1366 768 60Hz HD INPUT OUTPUT CONNECTIONS Model EARPHONE OPTICAL OUT VIDEO IN L AUDIO IN...

Page 28: ...28 Specifications 139 16 345 mm 77 8 200 mm 139 16 345 mm 61 16 153mm 63 8 162 mm 77 8 200 mm VESA MOUNTING PATTERN Model Width mm Height mm Screw Size Quantity FDHS39Y1A 200 200 M6 10 mm 4...

Page 29: ...chnology 52567 Independence Ct Elkhart IN 46514 USA Toll free 1 800 789 3341 Email support furrion com 2007 2020 Furrion Ltd Furrion and the Furrion logo are trademarks licensed for use by Furrion Ltd...

Reviews: