background image

English

CCD-0005506 Rev: 08-16-22 

- 13 -

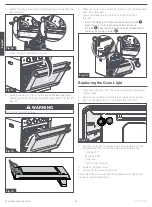
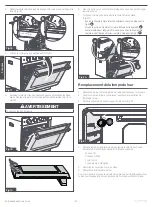
3.  Rotate the Hinge (one on each side) toward you to buckle  the 

lever. (Fig. 16)

c

b

b

a

a

Fig. 16

Hinge

Lever

4.  Close the door un

til it stops. (Fig. 17)

Fig. 17

5.  Holding the door firmly on the left and right sides using both 

hands, pull the door straight out of the hinge slots. (Fig. 18 and 
Fig. 19) 

  WARNING

Hold firmly, the door is heavy.

Fig. 18

Fig. 19

6.  Place the door on a protected flat place so that the glass door 

will not be damaged.

7.  Follow

 the steps below to re-attach to the oven door  

(Fig. 20):


Insert the hinge into the top slot as shown in Fig 20 

a

.


Open the door to its fully open position as shown  
in Fig 20 

b

. Ensure the hinge buckle has released from 

the lever as shown in Fig 20 

c

.

c

b

b

a

a

Fig. 20

HingeLever

Replacing the Oven Light

1. 

Disconnect the oven from the power supply by the electrical 
mains or fuse.

2.  Ensure the oven has cooled before servicing the oven light.
3.  Remove the glass cover of the lamp-hol

der. (Fig. 21)

Fig. 21

4.  Remove the lamp and replace with a lamp resistant to high 

temperatures (572

o

F) with the following characteristics:

-  Voltage: 12V
-  Wattage: 20W
-  Type: G4
-  Lamp Type: Halogen

5.  Replace the glass cover.
6.  Reconnect the power to the oven.
To reorder the Furrion oven light bulb replacement, please call 
Furrion service for assistance.

Summary of Contents for 2021135689

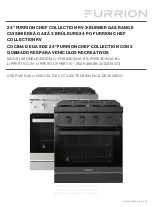
Page 1: ...3 QUEMADORES PARA VEH CULOS RECREATIVOS MODEL MOD LE MODELO FGR24D3A1A SS FGR24D3A1A BL LIPPERT NO N LIPPERT LIPPERT N 2021135689 2022119473 USER MANUAL MANUEL DE L UTILISATEUR MANUAL DE USUARIO Pict...
Page 2: ...s WARNING If the information in this manual is not followed exactly a fire or explosion may result causing property damage personal injury or death Do not store or use gasoline or other flammable vapo...

Page 3: ...Cabinet Cutout Instructions 6 Oven Installation 7 Grate Installation 9 Front Decorative Panel Installation 9 Operation 10 Lighting Instructions 10 Cooking Advice 11 Cleaning and Maintenance 11 How to...

Page 4: ...uish any open flames including cigarettes and evacuate all persons from the vehicle Shut off gas supply at LP gas bottle If the user of this appliance fails to maintain it in the condition in which it...

Page 5: ...ay of people walking past cooktop and or out of the reach of children Do not turn handles to where they are over the burners Do not use water on grease fires Never pick up a flaming pan Smother a flam...

Page 6: ...ings and surfaces near these openings oven doors and windows of oven doors DO NOT touch the outer surface of the oven door or the oven vent while the oven is in use These areas may become hot enough t...

Page 7: ...nal Fuel Gas Code ANSI Z223 1 NFPA 54 In Canada the installation must conform with a Standard CAN CSA Z 240 4 2 08 Installation Requirements for Propane Appliances and Equipment in Recreational Vehicl...

Page 8: ...e gas supply pipe in case of bend or damage during installation Make sure the gas supply pipe cannot contact any moving parts after installed Be sure all openings in the cabinet around the gas line ar...

Page 9: ...e down the pressure reading on the gauge and wait 5 min Recheck to see if the reading on the gauge has decreased If the gauge reading has decreased there is a potential leak Please check the various g...

Page 10: ...ooktop and leave a gap of 3 to 4 mm Fig 9 3 4mm Fig 9 2 Align the 2 plastic guides located on the each side of the vent cover and insert them into the groove of the rear decorative panel Fig 10 3 Plac...

Page 11: ...ghts You will hear a clicking sound when the knob is pushed in 5 If ignition does not occur in 5 seconds turn gas control knob off wait 5 minutes and repeat the lighting procedure 6 Once the pilot fla...

Page 12: ...use a wire brush or metallic item for cleaning burner ports or orifices Brush may shed bristles that may lodge in the orifice or burner ports and cause a fire or explosion Clean all surfaces as soon...

Page 13: ...k Position Rack Rack Diffuser Tray Guide The diffuser tray is removable for cleaning it is integrated with an anti tip locking feature To remove the diffuser tray Pull the diffuser tray outward until...

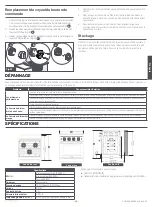
Page 14: ...o the top slot as shown in Fig 20 a Open the door to its fully open position as shown in Fig 20 b Ensure the hinge buckle has released from the lever as shown in Fig 20 c c b b a Fig 20 Hinge Lever Re...

Page 15: ...ghly Burner ports or slots are clogged With the burner off clean ports with a small gauge wire or needle to clean ports or slots Burner flame is orange Dust particles in main line Allow the burner to...

Page 16: ...ntenuesdanscemanuelnesontpassuivies lalettre unincendie ouuneexplosionpeutseproduireetentra nerdesdommagesmat riels desblessuresoulamort Ne stockez pas et n utilisez pas d essence ou d autres vapeurs...

Page 17: ...d coupe des armoires 20 Installation du four 21 Installation de la grille 23 Installation du panneau d coratif avant 23 Fonctionnement 24 Instructions d clairage 24 Conseils de cuisson 25 Nettoyage et...

Page 18: ...GPL Si l utilisateur de cet appareil ne le maintient pas dans l tat dans lequel il a t exp di de l usine ou si l appareil n est pas utilis uniquement pour l usage auquel il est destin ou si l apparei...

Page 19: ...serole enfeu touffezunecasseroleenflamm eavecuncouvercleouunecasserole plate Lagraisseenflamm e l ext rieurdelacasserolepeut tre teinteavec dubicarbonatedesoudeouunextincteur poudrepolyvalent Ne laiss...

Page 20: ...pr s de ces ouvertures les portes du four et les fen tres des portes du four NE touchez PAS la surface ext rieure de la porte du four ou de l vent du four lorsque le four est en cours d utilisation Ce...

Page 21: ...A 1192 b National Fuel Gas Code ANSI Z223 1 NFPA 54 Au Canada l installation doit tre conforme a La norme CAN CSA Z 240 4 2 08 Exigences d installation des appareils et quipements au propane dans les...

Page 22: ...ue le tuyau d alimentation en gaz ne peut pas entrer en contact avec des pi ces mobiles apr s son installation Assurez vous que toutes les ouvertures dans l armoire autour de la conduite de gaz sont s...

Page 23: ...manom tre et attendez 5 minutes V rifiez nouveau si la lecture du manom tre a diminu Si la lecture de la jauge a diminu il y a une fuite potentielle Veuillez v rifier les diff rents raccords de gaz l...

Page 24: ...les 2 guides en plastique situ s de chaque c t du couvercle de ventilation et ins rez les dans la rainure du panneau d coratif arri re Fig 10 3 Placez le panneau d a ration sur le panneau d coratif ar...

Page 25: ...ifier que le br leur du four est allum 4 Poussez et tournez le bouton de r glage du gaz dans le sens inverse des aiguilles d une montre jusqu ce que la veilleuse s allume Vous entendrez un cliquetis l...

Page 26: ...ou d objet m tallique pour nettoyer les orifices des br leurs La brosse pourrait perdre des poils qui pourraient se loger dans l orifice ou les ports du br leur et provoquer un incendie ou une explos...

Page 27: ...Pour retirer le plateau du diffuseur Tirez le plateau du diffuseur vers l ext rieur jusqu ce que la languette arri re et la languette avant du syst me de verrouillage soient align es avec les 2 ouvert...

Page 28: ...teaumaximumcommeindiqu surlafigure20 b commeindiqu surlafigure20 Assurez vousquelaboucledela charni res estlib r eduleviercommeindiqu surlaFig20 c c b b a Fig 20 Charni re Levier Remplacement de la la...

Page 29: ...du br leur sont obstru s Le br leur tant teint nettoyez les orifices avec un fil de petit calibre ou une aiguille pour nettoyer les orifices ou les fentes La flamme du br leur est orange Des particul...

Page 30: ...ormaci n de este manual puede producirse un incendio o una explosi n que cause da os materiales lesiones personales o la muerte No almacene ni utilice gasolina u otros vapores y l quidos inflamables c...

Page 31: ...orte del gabinete 34 Instalaci n del horno 35 Instalaci n de la rejilla 37 Instalaci n del panel decorativo frontal 37 Funcionamiento 38 Instrucciones de iluminaci n 38 Consejo para la cocci n 39 Limp...

Page 32: ...ositivo no lo mantiene en las condiciones en las que fue enviado desde la f brica o si el dispositivo no se utiliza exclusivamente para el fin previsto o si no se mantiene de acuerdo con las instrucci...

Page 33: ...as Apague una olla en llamas con una tapa o una sart n plana La grasa que se prende fuego fuera de la olla puede extinguirse con bicarbonato de sodio o con un extintor qu mico seco de usos m ltiples N...

Page 34: ...rcanas a estas aberturas las puertas del horno y las ventanas de las puertas del horno NO toque la superficie exterior de la puerta del horno ni la rejilla de ventilaci n mientras est en uso Estas zon...

Page 35: ...223 1 NFPA 54 En Canad la instalaci n debe cumplir con a La norma CAN CSA Z 240 4 2 08 Requisitos de instalaci n para dispositivos y equipos de propano en veh culos recreativos b Todos los c digos y r...

Page 36: ...a edurantelainstalaci n Aseg resedeque latuber adesuministrodegasnopuedaentrarencontactoconningunapiezam vil despu sdelainstalaci n Aseg resedequetodaslasaberturasdelosgabinetes alrededordelal neadega...

Page 37: ...i la lectura del man metro ha disminuido Si la lectura del man metro ha disminuido hay una posible fuga Compruebe las distintas conexiones de gas mediante la prueba de la burbuja Si no se encuentra la...

Page 38: ...de pl stico situadas a cada lado de la cubierta de la ventilaci n e ins rtelas en la ranura del panel decorativo trasero Fig 10 3 Coloque el panel de ventilaci n en el panel decorativo trasero con las...

Page 39: ...y saber si el quemador del horno se encendi 4 Empuje y gire la perilla de control de gas en sentido contrario a las agujas del reloj hasta la posici n hasta que se encienda el piloto Se oir un chasqu...

Page 40: ...y l quidos inflamables Nunca utilice un cepillo de alambre o un elemento met lico para limpiar los orificios o puertos de los quemadores Es posible que el cepillo desprenda cerdas que pueden alojarse...

Page 41: ...limpieza y est integrada con un dispositivo de bloqueo antivuelco Para retirar la bandeja del difusor Tire de la bandeja del difusor hacia fuera hasta que la leng eta trasera y la delantera del sistem...

Page 42: ...nlaFig 20 a Abralapuertahastasuposici ndeaperturatotalcomosemuestra enlaFig 20 b Aseg resedequeelbrochedelabisagrasehaya soltadodelapalanca comosemuestraenlaFig 20 c c b b a Fig 20 Bisagra Palanca Sus...

Page 43: ...idos Con el quemador apagado limpie los puertos con un alambre de calibre peque o o una aguja para limpiar los puertos o las ranuras La llama del quemador es naranja Hay part culas de polvo en la l ne...

Page 44: ...entation has been provided Any unauthorized use shall void any applicable warranty The information contained in this manual is subject to change without notice and at the sole discretion of Lippert Re...

Reviews: