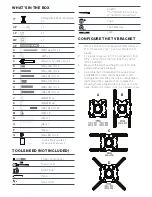
WHAT'S IN THE BOX
IT
A
a
c
b
d
BC
D
Ceiling Plate Paper Template
x 1
UP
x 1
LP
x 1
MP
x 1
AP
x 4
A
(M8 x 63mm) x 4
B
(M9) x 4
C
Metal Anchor (M8 x 40) x 4
D
(M6 x 16mm) x 4
E
(M6 x 18mm) x 4
F
(M6 x 25mm) x 4
G
(M8 x 10mm) x 8
H
(M8 x 18mm) x 4
I
(M8 x 25mm) x 4
J
(M6/M8) x 4
K
(M6/M8) x 8
L
(M8 x 55mm) x 2
M
(M8) x 2
N
(S10) x 1
O
(S6) x 1
P
(S13) x 1
Q
(M6 x 8mm) x 2
Warranty Manual
Quick Start Guide
- Quick Start Guide x 1
- Warranty Manual x 1
TOOLS NEED (NOT INCLUDED)
Phillips Screwdriver
Screwdriver
Stud Finder
Pencil
Power Drill
Drill Bit
15⁄32" (12 mm) for Concrete
¼" (6 mm) for wood stud
Tape
Tape Measure
Level
CONFIGURE THE TV BRACKET
1.
Choose one kind of configuration from below A,
B, C, D based on your TV and assemble the TV
bracket.
2.
TV bracket expands to fit TV hole patterns from
315∕16" x 315∕16" (100 x 100mm) to 1515∕16" x 1515∕16"
(400 x
400mm).
3.
Measure the width and height of your TV hole
pattern with a tape measure.
4.
Assemble the TV bracket with 4 adaptor bars
and 8 M8x10 screws (G) for below B, C or D
configuration and keep the screws untightened,
slight adjust the 4 adaptor bars to make the
mounting holes aligned with the one
s on the TV
back, tighten the screws to fix the 4 adaptor bars.
A
B
C
D
Summary of Contents for 2021132185
Page 14: ...www furrion com...

