background image

4

15DIJ3SS

ASSEMBLY INSTRUCTIONS

Step1: Please prepare work area as instructed in page 2:
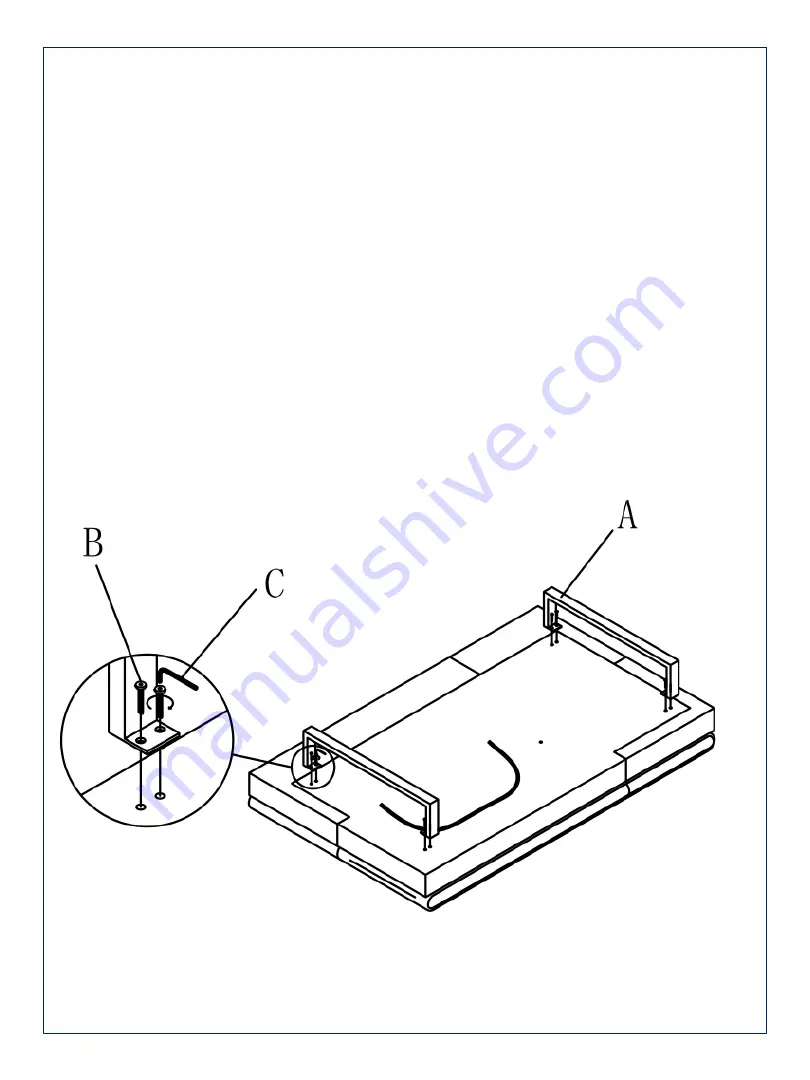
As indicated in diagram below lay front of sofa face down.
You will see a zipper in dust cover, inside you will find legs and hardware pack. 
Once all items are checked against list on previous page, you may start assembly.
Please locate the threaded holes towards the ends of sofa. 
Then take leg [A] and place as shown in diagram below, aline holes in leg with 
threaded holes in base of sofa. Once aligned take bolt [B] insert thru hole in leg 
and into thread hole in sofa base and by hand seat the thread correctly by turning 
bolt 2-3 times, once thread has gripped, fit other 3 bolts. Once all seated correctly 
take Allen Key [C] and tighten all bolts until firm. Do not over tighten. Repeat for 
second leg. 
Move to step 2

Summary of Contents for 15DIJ3SS

Page 1: ...e contact Place of purchase or Furniture Solutions on below Customer Service Australia Phone 1300 794 188 Email customerservice furnituresolutions com au INSTRUCTION MANUAL DIJON 3 SEAT SOFA BED ITEM CODE 15DIJ3SS 1 15DIJ3SS Imported by Furniture Solutions Aust Pty Ltd 10 16 Daisy St Revesby NSW 2212 www furnituresolutions com au ...

Page 2: ...point of use 3 Ensure that you have all required contents for complete assembly 4 Always read the assembly instructions carefully before beginning assembly 5 Keep all hardware parts and packaging out of reach of small children 6 Do not over tighten the screws and bolts as this may damage the threads 2 15DIJ3SS 20 MINUTES ALLOW TIME PEOPLE REQUIRED X2 Special Notice Parts are located in zipper pock...

Page 3: ...PARTS LIST PART QTY CODE IMAGE A STEEL LEG 2 P410513L B BOLT M6 x25mm 16 P410513B C TOOL 4MM 1 P410513K D SUPPORT LEG 1 P410513SL 3 15DIJ3SS ...

Page 4: ...t assembly Please locate the threaded holes towards the ends of sofa Then take leg A and place as shown in diagram below aline holes in leg with threaded holes in base of sofa Once aligned take bolt B insert thru hole in leg and into thread hole in sofa base and by hand seat the thread correctly by turning bolt 2 3 times once thread has gripped fit other 3 bolts Once all seated correctly take Alle...

Page 5: ...NS Step2 Fit Support Leg As indicated in diagram below support leg is fitted in centre of sofa Locate threaded hole and insert threaded end of support leg D and by hand seat thread correctly and tighten till firm Do not over tighten ...

Page 6: ...required to gently push back arm fully forward till you hear a clack sound then you can lower back arm to go flat Click Clack has a 3 stage mechanism which uses a ratchets system First position is flat for use as a bed This model has added armrest function Second position is Lounger when back is mid way up in locked position Third position is as a Sofa full upright locked position Please view Imag...

Page 7: ...go back to flat or Bed position you will need to release locking mechanism This done by lifting and pushing backrest forward till you here clack Once you here the clack lower backrest till flat Starting from flat position go to side of sofa and lift using same instruction above Note Warning The ratchet mechanism is designed only to work one way you can only lock the 2 upright positions from flat s...

Page 8: ... with a soft colourfast cloth dampened with plain water This should be done as often as necessary or at least every 2 weeks Do not rub excessively Special note salts and body oils which occur naturally in human skin can build up in fabric please consider having a professional clean done depending on use once a year In areas of high humidity more frequent cleaning will be required Do Not Expose dir...

Page 9: ...at fitting bolts nuts and or screws should be checked periodically to ensure they have not loosened over time Remember do not overtighten DO NOT Place in direct sunlight Place in close proximity to open flame or heaters Place in direct line of air conditioning ducting Leave spills or food on sofa clean off immediately Pull loose thread cut them instead Safety warnings DO NOT drop drag always with ...

Page 10: ... attempt is made to supply product using quality components there is always a need from consumer to help ensure long life of use for product Instruction manuals are designed with the nature of materials used in construction of the product Proper use of item only what it is designed to do Regular maintenance and cleaning In areas of high content of salt air pollution moisture require more frequent ...

Reviews: