FUNKY MONKEY BARS MONKEY BAR ADD-ON Assembly Instructions Manual Download Page 3

Page 2

LOCATION

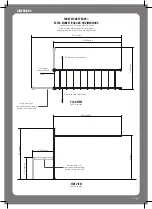
1.  A safe fall zone around your Funky Monkey Bars® is essential. A minimum distance of 1.5m to 2m (5 ft to  
 

6.5ft) is recommended around the elevated hanging points of your Funky Monkey Bars®.

2.  Place your Funky Monkey Bars® on level ground, away from any structure or obstruction such as a fence,  
 

garage, house, overhanging branches, laundry lines or electrical wires and remove any obstructions  


beneath your Funky Monkey Bars®.

3.  Ensure your Funky Monkey Bars® are positioned away from retaining walls, pool fences, structures and  
 

other play equipment. Maintain a clear space around the whole perimeter of your Funky Monkey Bars®.

4.  Place your Funky Monkey Bars® on the most level surface available.

MAINTENANCE

1.  At the beginning of each heavy play session we recommend the following maintenance processes be  


performed on your Funky Monkey Bars®:


• 

Tighten all bolts, grub screws and applicable hardware (as per page 3)


• 

Lubricate all metallic moving parts as per instructions (flying fox, swing hooks etc)


• 

Check all protective coverings on bolts, pipes, edges and corners. Replace if they are loose,  


cracked or missing.


• 

Check all moving parts including swing seats, shackels, snap hooks, chains and trolleys for wear,  


rust, or other deterioration. Replace as needed.

2.  Twice a month during play season we would recommend the following maintenance processes be  


performed on your Funky Monkey Bars®:


• 

Tighten all connections and hardware


• 

Check all protective coverings on bolts, pipes, edges and corners. Replace if they are loose,  


cracked or missing.

3.  Once a month during play season we would recommend the following maintenance processes be   


performed on your Funky Monkey Bars®:


• 

Lubricate all metallic moving parts as per instructions (flying fox, swing hooks etc). If swings start  


to squeek then lubricate swing hooks.


• 

Check all moving parts including swing seats, ropes, chains and trolleys for wear, rust, or other  


deterioration. Replace as needed.


• 

Owners shall be responsible for maintaining the legibility of any warning labels.

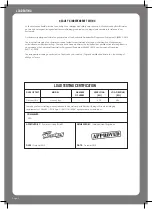
For additional information concerning your Funky Monkey Bars®, please contact our customer service team 

or check our website for any important updates. Phone:


1300 912 198 or www.funkymonkeybars.com

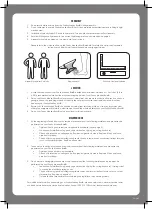
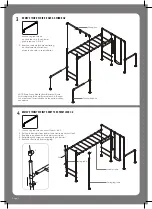
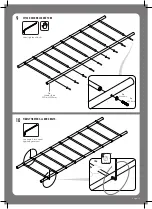
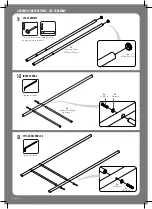
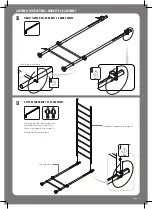
Assembly requires 2 adults.

Heavy items !

Work on flat level surface.
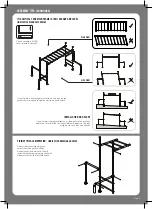
ASSEMBLY

1.  Keep small children away from the Funky Monkey Bars® during assembly.
2.  Do not attempt to use the Funky Monkey Bars®  until it is completely assembled and every fitting is tight 
 

and secured.

3.  Installation typically takes 2-3 hours to complete. Two people are recommended for assembly.
4.  Ensure all fittings are tightened to the correct tightening method as described on page 4.
5.  Assembly should be carried out on clean, dry, level surface

Please refer to the video section on the Funky Monkey Bars® website for more handy tips and assembly 

instructions at 

http://www.funkymonkeybars.com/pages/videos

Summary of Contents for MONKEY BAR ADD-ON

Page 1: ...MONKEY BAR ADD ON ASSEMBLY INSTRUCTIONS...

Page 2: ...ildren should be supervised by an adult at all times 9 Installing a gym crash mat under the fall zone area of your Funky Monkey Bars would be recommended for children learning this new skill This will...

Page 3: ...cesses be performed on your Funky Monkey Bars Tighten all connections and hardware Check all protective coverings on bolts pipes edges and corners Replace if they are loose cracked or missing 3 Once a...

Page 4: ...he tests have been performed by independent certified structural engineers in accordance with Australian Standard for Playground Equipment AS4685 1 2014 and European Standards EN1176 1 2008 The indepe...

Page 5: ...UNKY MONKEY BARS EXTRA MONKEY BAR ADD ON DIMENSIONS 4 0 Metres 1 9 Metres 2 0 Metres clear fall zone A mimimum of 2 0 Metres clear fall zone is recommended around the elevated hanging points of your F...

Page 6: ...of allen key hand tighten grub screw as much as possible 2 Using other end of the allen key do one full 360 degree turn as a minimum use muscles ASSEMBLY TIPS o 360 CORRECT TIGHTENING METHOD OF RUNG B...

Page 7: ...being installed on a slope ensure the monkey ladder bar is level Either install at different heights on the legs or dig down at one end until level IT IS CRITICAL YOUR MAIN FRAME IS 100 SQUARE AND LE...

Page 8: ...TOOLS REQUIRED FOR INSTALLATION FITTINGS 1x Spirit Level Not included Page 7 INVENTORY 50Dia x 2950mm 50Dia x 2300mm 25Dia x 850mm 2x Adj Leg Tube 2x Ladder Tube 11x Rung Tube 2x Height Sticker 2x Pla...

Page 9: ...s model and configuration select an existing monkey bar end for the add on monkey bar to be installed 1 Remove base plate pegs from twirly whirly bars on selected end 2 Remove any accessories from the...

Page 10: ...from swing leg Ladder tube Swing leg tube A F A F Leg tube Pull 1 Loosen all grub screws on short tees A B and lower grub screws on C D E 2 Remove twirly whirly bars and swing bar from selected insta...

Page 11: ...Ensure the frame is level and square 3 Fully tighten all grub screws 6 PRE INSTALLATION CHECKS 1 Attach leg tube back onto ladder tube at short tee A 2 Slide 2 x short tees onto leg tube ends 3 With...

Page 12: ...1x Ladder Tube 50Dia x 2950mm 9x Rung tube Hand tighten all bolts MONKEY BAR LADDER ASSEMBLY 8 Page 11 ASSEMBLY INSTRUCTIONS LADDER BAR ASSEMBLY 1 Assemble plastic rung inserts as shown above 2 Push i...

Page 13: ...IRMLY TIGHTEN ALL RUNG BOLTS 1x Ladder Tube 50Dia x 2950mm 9 10 Hand tighten all bolts Page 12 ATTACH SECOND LADDER TUBE 9x M10 Bolts 9x Washers See page 5 for correct tightening method o 3 4 turns 18...

Page 14: ...2300mm 2x Assembled Rungs from step 1 Tighten all bolts Tighten all bolts 13 Page 13 ASSEMBLY INSTRUCTIONS LEG ASSEMBLY INSERT RUNGS ATTACH SECOND LEG 2x M10 Bolts 2x Washers 2x M10 Bolts 2x Washers O...

Page 15: ...14 15 Tighten all grub screws Hand tighten grub screws Temporary location 2x 2x Base Plate D 125 2x Short Tee D 101 Page 14 ATTACH BASE PLATES SLIDE ON SHORT TEES 2x...

Page 16: ...et top 2x short tees at same height as top short tees set in step 6 Position Short Tee measured height from step 6 2x Height Sticker 2x 2x Short Tee D 101 Page 15 APPLY HEIGHT STICKERS SET LADDER BAR...

Page 17: ...G ASSEMBLY 360 o Fully Tighten rung bolts o 3 4 turns Leg assembly Ladder bar assembly from step 10 Fully tighten all grub screws Using two people insert ladder bar assembly from step 10 into short te...

Page 18: ...SQUARE AND LEVEL AS PER PAGE 6 BEFORE MOVING ONTO THE REST OF THE ASSEMBLY 14 ATTACH MONKEY BAR ASSEMBLY TO EXISTING FRAME LEGS Fully tighten all grub screws Using two people flip the monkey bar assem...

Page 19: ...ly whirly bars reused from step 3 Tighten all grub screws 16 2x Pegs SECURE TO GROUND 360 o Adjust height of short tees A B to align with horizontal twirly whirly bars Attach 2x twirly whirly bars re...

Page 20: ...evel and square swing leg is pegged down 2 Loosen the grub screw fixing the short tee to the swing leg 6 Tighten grub screw fixing the short tee to the swing leg tube Apply to all twirly whirlys 3 Pul...

Page 21: ...eck all grub screws are firmly tightened 3 Check all base plates are pegged down Page 20 Re install any accessories removed in step 2 Check swing hook bolts are tight with rachet Add on accessory not...

Page 22: ...have fun At the beginning of each heavy play session especially a party and twice a month during play season ensure 1 Tighten all hardware grub screws nuts and bolts 2 Pegs are in place and fully sec...

Page 23: ...NOTES Page 22...

Page 24: ...funkymonkeybars com www funkymonkeybars com 9 Cutting Way Yangebup WA 6164 we are social monkeys AUSTRALIAN MADE AND OWNED ABN IP Australia All Funky Monkey Bars designs are registered and protected u...

Reviews: