background image

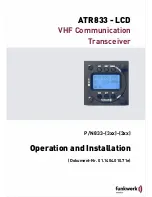
ATR833-LCD / P/N 833-(3xx)-(3xx)  

Operation and Installation 


 3

Document-No.: 01.1404.010.71e / Revision: 1.01

CONTENTS 

1


GENERAL ..................................................................................................................................... 5


1.1


S

YMBOLS

 ................................................................................................................................... 5


1.2


A

BBREVIATIONS

 .......................................................................................................................... 5


1.3


C

USTOMER 

S

UPPORT

 ................................................................................................................. 6


1.4


F

EATURES

 .................................................................................................................................. 6


2


OPERATION ................................................................................................................................. 7


2.1


C

ONTROLS

 ................................................................................................................................. 7


2.2


ON/OFF .................................................................................................................................... 9


2.3


D

ISPLAY

 ..................................................................................................................................... 9


2.4


B

ASIC 

S

ETTINGS

 ....................................................................................................................... 11


2.4.1


VOL - Volume ............................................................................................................... 12


2.4.2


SQL - Squelch .............................................................................................................. 12


2.4.3


DIM – Backlight ON/OFF ............................................................................................. 13


2.4.4


VOX – Voice Detection (Speech Threshold for Voice Activated Intercom) ................. 13


2.4.5


DWM – Dual Watch Volume Reduction ....................................................................... 14


2.4.6


INT - Intercom-Volume ................................................................................................. 14


2.4.7


EXT - Volume of the External Audio Input ................................................................... 15


2.5


F

REQUENCY 

S

ETTING

 ............................................................................................................... 16


2.5.1


Automatic 8.33 / 25 kHz Channel Width Selection ...................................................... 16


2.5.2


Manual Frequency Input .............................................................................................. 16


2.5.3


Recall a Frequency from the User Memory ................................................................. 17


2.5.4


Recall a Frequency from the List of the 10 Last Used ................................................. 18


2.5.5


Store a Frequency into the User Memory .................................................................... 18


2.6


D

UAL 

W

ATCH 

O

PERATION

 ......................................................................................................... 20


2.7


T

RANSMISSION

 ......................................................................................................................... 22


2.8


R

ECEPTION

 .............................................................................................................................. 22


3


CONFIGURATION ...................................................................................................................... 23


3.1


SPC


C

HANNEL 

S

PACING

 ........................................................................................................ 23


3.2


CON


-


C

ONTRAST

 .................................................................................................................... 24


3.3


DPY


E

NERGY 

S

AVING 

M

ODE 

(A

UT

.


D

ISPLAY 

D

ARKENING

) ....................................................... 24


3.4


PTT-B

UTTON 

S

ELECTION

 ......................................................................................................... 25


3.5


EXT


E

XTERNAL 

A

UDIO 

I

NPUT

B

EHAVIOR

 .............................................................................. 26


3.6


M

ICROPHONE 

I

NPUT 

S

ENSITIVITY

 .............................................................................................. 27


3.6.1


MLS – Standard Microphone Pilot/Left ........................................................................ 27


3.6.2


MLD – Dynamic Microphone Pilot/Left ......................................................................... 27


3.6.3


MRS – Standard Microphone Copilot/Right ................................................................. 27


3.6.4


MRD – Dynamic Microphone Copilot/Right ................................................................. 27


3.7


TST


T

EST 

M

ODE

 ................................................................................................................... 29


3.8


M

ASTER 

R

ESET

 ........................................................................................................................ 29


4


INSTALLATION .......................................................................................................................... 30


4.1


A

DVICES AND 

T

IPS

 .................................................................................................................... 30


4.2


T

ELECOMMUNICATION 

D

ATA

 ...................................................................................................... 30


4.3


S

COPE OF DELIVERY

 ................................................................................................................. 30


4.4


U

NPACKING AND 

I

NSPECTING THE 

E

QUIPMENT

 ........................................................................... 31


4.5


M

OUNTING

 ............................................................................................................................... 31


4.6


E

QUIPMENT 

C

ONNECTIONS

 ....................................................................................................... 32


4.6.1


Microphone-Connection ............................................................................................... 32


4.6.2


Headset-Connection .................................................................................................... 32


4.6.3


Audio-Input ................................................................................................................... 33


4.6.4


Remote Control Panel .................................................................................................. 33 

Summary of Contents for ATR833-LCD

Page 1: ...Operation and Installation Dokument Nr 01 1404 010 71e P N 833 3xx 3xx ATR833 LCD VHF Communication Transceiver...

Page 2: ......

Page 3: ...HMI Extended control menue Sw V7 0 1 01 10 06 2013 Information about dual watch operation List of the Service Bulletins SB Services bulletins are to be inserted in the manual and to be put down in thi...

Page 4: ...a Frequency from the List of the 10 Last Used 18 2 5 5 Store a Frequency into the User Memory 18 2 6 DUAL WATCH OPERATION 20 2 7 TRANSMISSION 22 2 8 RECEPTION 22 3 CONFIGURATION 23 3 1 SPC CHANNEL SP...

Page 5: ...tion 34 4 7 3 Wiring with Cable Harness BSKS833S BSKS833D 36 4 8 ANTENNA 38 4 8 1 Antenna Selection 38 4 8 2 Installation Recommendation 38 4 9 MICROPHONE INTERCOM SETTINGS 39 4 10 POST INSTALLATION C...

Page 6: ...to the human body or ignition of combustible materials Advices whose non observance can cause damage to the device or other parts of the equipment Information 1 2 Abbreviations Abb Name subject Defini...

Page 7: ...n 57 mm format Frequency range 118 000 to 136 975 MHz Automatic selection of 8 33 25 kHz channel spacing 4 microphone inputs 2 x standard 2 x dynamic Voice controlled intercom for up to 4 microphones...

Page 8: ...value VOL SEL Rotary knob Adjust value or select item given within the display s lower left corner Chosen with SET adjust VOLume squelch etc Chosen with MEM SELect item from list of frequencies CURSOR...

Page 9: ...1 Move underline within standby frequency to be adjusted by press button shortly 2 Add name to frequency within memory press button for at least 1 5 seconds CHANGE Swap active and standby frequency M...

Page 10: ...ts with the same frequencies and settings from before being switched off 2 3 Display ATR833 v7 0 118 000 124 910 ACT SBY VOL 03 RX ABCDEFGH BAT RX Cursor marking Set position with adjust value with Us...

Page 11: ...dby frequency May be monitored in dual watch mode RX Receiving on this frequency Usually on active frequency can also happen on standby frequency when dual watch activated TX Transmitting on active fr...

Page 12: ...e selecting from user memory when the user has provided a name for this specific memory entry BAT Very low supply voltage Transmission only with reduced power possible decreased radio range F1 F7 Inte...

Page 13: ...reshold that has to be exceeded by radio signal levels from other transmitters in order to activate the reception circuitry The higher the number the stronger the radio signals have to be in order to...

Page 14: ...ny way to radio reception or squelch VOX defines the crew s speech volume that is required to activate the intercom functionality The higher the value the louder you need to speak in order to activate...

Page 15: ...g the SET key five times with help from the rotary knob the intercom volume level can be controlled The intercom functionality is the on board crew internal communication for multiple seated powered a...

Page 16: ...Warning tones music etc can be set The higher the value the higher the volume of the external audio signal A value of 00 deactivates the external audio input ACT 123 450 SBY 118 910 EXT 03 When no ot...

Page 17: ...n of the two channel widths is internationally standardised by the ICAO and consistently used in official documents like e g VFR navigation charts as well as in the voice phraseology used by ATC radio...

Page 18: ...the number of the memory entry selected is indicated by MEM xx with xx 00 99 if a name has been provided by the user for this memory entry it is displayed next to the memory entry number ACT 123 450...

Page 19: ...display s lower row ACT 123 450 SBY 118 700 LST 01 Key interchanges the newly set standby frequency and the former active frequency and leaves the last used list menu If no input is done for 12 Second...

Page 20: ...with ACT 124 350 SBY 121 270 MEM 07 HAMBURG 4 Overwrite the selected memory entry with a long press of MEM ACT 124 350 SBY 124 350 MEM 07 You can now leave the user memory access by pressing MEM twic...

Page 21: ...two frequencies is implemented by alternating automatically between the active and the standby frequency With dual watch mode active basically the standby frequency is tuned in shortly interrupted in...

Page 22: ...W DW is shown As soon as no reception is determined on the active frequency the mutual monitoring between active and standby frequency starts In order to deactivate dual watch press DW once more or ch...

Page 23: ...ng the PTT button stuck stuck mic the transmitter automatically stops after two minutes of transmission and TX is substituted by Te In order to re enable transmission in this case release PTT and push...

Page 24: ...dynamic microphone input 10 TST Activation deactivation of the test mode for maintenance Leaving configuration menu back to VOL can also be reached by long press of SET The chosen setting can be adju...

Page 25: ...llowing options can be selected always on No display darkening at all xx min off Automatic darkening after xx minutes of user inactivity xx range 1 30 Reactivation of the darkened display is done by p...

Page 26: ...on was pressed single mic According to the PTT button pressed the associated microphone is activated left only Only the left PTT button and the left microphone s are used for transmissions right only...

Page 27: ...e external audio input is always on even during radio receptions and transmit mode Use this setting only for very high priority acoustic warnings e g collision warning beep tones auto off The external...

Page 28: ...onfiguration menu the access to it is described in the beginning of section 3 3 6 1 MLS Standard Microphone Pilot Left 3 6 2 MLD Dynamic Microphone Pilot Left 3 6 3 MRS Standard Microphone Copilot Rig...

Page 29: ...normal volume into the selected microphone and use the rotary knob to adjust the sensitivity so that the bar reaches the middle of the scale as depictured above Per microphone input a maximum of two...

Page 30: ...normal operation of the radio the lower display line contains some internal parameters as shown below ACT 123 450 SBY 118 910 VOL 03 H423 V56 E22 Any press of SET exits the configuration menu 3 8 Mas...

Page 31: ...pplying for the aircraft radio station license Manufacturer Funkwerk Avionics GmbH Type Designation ATR833 EASA Number EASA 21O 0193 Transmitter Power Output 6 W Frequency 118 000 136 975 MHz Emission...

Page 32: ...sources Care for adequate convection cooling Leave sufficient space for the installation of cables and connectors Avoid sharp bends and wiring close to control cables Leave sufficient lead length for...

Page 33: ...phones are appropriate for input voltages of 5 mVpp to 10 mVpp These inputs have no bias In general standard microphones headsets MLS MRS and dynamic microphones hand gooseneck MLD MRD can be used sim...

Page 34: ...dio input If the external input is not used it needs to be short circuited with GND in order to avoid the pickup of electrical noise 4 6 4 Remote Control Panel In tandem seated aircrafts it is possibl...

Page 35: ...at the ATR833 View from aircraft s side Pin Names Functionality 1 LSP LSP Output external Loudspeaker Positive 2 HEAD HSP Output Headset Speaker Positive 3 HEAD HSP Output Headset Speaker Negative 4...

Page 36: ...PTT R PTTR Push to Talk Copilot Right connect to ground for transmitting 18 MIC R STD MRS Input standard Microphone in headset Copilot Right 19 MIC L STD MLS Input standard Microphone in headset Pilot...

Page 37: ...ATR833 LCD P N 833 3xx 3xx Operation and Installation 36 Document No 01 1404 010 71e Revision 1 01 4 7 3 Wiring with Cable Harness BSKS833S BSKS833D 4 7 3 1 Overview...

Page 38: ...g for acoustic traffic warnings for radio navigation receiver s acoustic identifiers or for input of music into the headsets The priority of radio reception in relation to this input can be configured...

Page 39: ...foil min 80 cm x 80 cm shall be used as electrical counterweight on the inside of the belly To avoid a mutual interference of the radios the antenna isolation between a voice transmission and a navig...

Page 40: ...background noise is only possible using differential microphones as they are usual with modern headsets Normal electret microphones are not suitable 4 10 Post Installation Check When installation is...

Page 41: ...n 1 01 4 11 Drawings 4 11 1 Dimensions 4 11 2 Mounting Advices For mounting in panel with a thickness of 3 5 mm longer screws are available Order No ZUB5 Connector Area Panel Cut out 57 5 mm 47 0 mm 2...

Page 42: ...nt No 01 1404 010 71e Revision 1 01 No screws may be turned in more than max 15mm into the device even if no hard limit is noticeable The D Sub Connector plug has to be clamped with both spring locks...

Page 43: ...ency MHz Channel Width kHz Displayed Frequency in 8 33 25 kHz Mode Displayed Frequency in 25 kHz Mode 118 0000 25 118 000 118 000 118 0000 8 33 118 005 118 0083 8 33 118 010 118 0166 8 33 118 015 118...

Page 44: ...in at 70 C 55 C 85 C MAX HEIGHT 50000ft VIBRATION DO 160D Cat S Vibration Curve M HUMIDITY RTCA DO 160D Cat A SHOCK 6 G operation 20 G crash safety RTCA DO 160D ENV CAT C1Z CAA SM XXXXXXZBAAA YY M B3F...

Page 45: ...ION 1kHz at m 70 1kHz DUTY CYCLE 2 minutes on 4 minutes off automatic turn off after 2 minutes of continuous transmit operation RECEIVER SENSITIVITY 105 dBm 6dB S N N m 30 1 kHz BANDWIDTH 25 KHZ 6 dB...

Page 46: ...iary cooling required Altitude 4 6 1 C1 35 000 ft Temperature Variation 5 0 C 2 C change rate minimum per minute Humidity 6 0 A Shock 7 0 A 6 G operational shocks 20 G Crash Safety Test Type R in all...

Page 47: ...istic DO 160D Section Cat Condition Induced Signal Susceptibility 19 0 A Radio Frequency Susceptibility 20 0 YY Emission of RF Energy 21 0 M Lightning Induced Transient Susceptibility 22 0 B3 F3 Light...

Page 48: ...ATR833 LCD P N 833 3xx 3xx Operation and Installation 47 Document No 01 1404 010 71e Revision 1 01 Notes...

Page 49: ...ATR833 LCD P N 833 3xx 3xx Operation and Installation 48 Document No 01 1404 010 71e Revision 1 01 Notes...

Page 50: ...Funkwerk Avionics GmbH Heinz Strachowitz Str 4 DE 86807 Buchloe Germany phone 49 8241 80066 0 fax 49 8241 80066 99 E mail service funkwerk avionics com www funkwerk avionics com...

Reviews: