44
EN
1
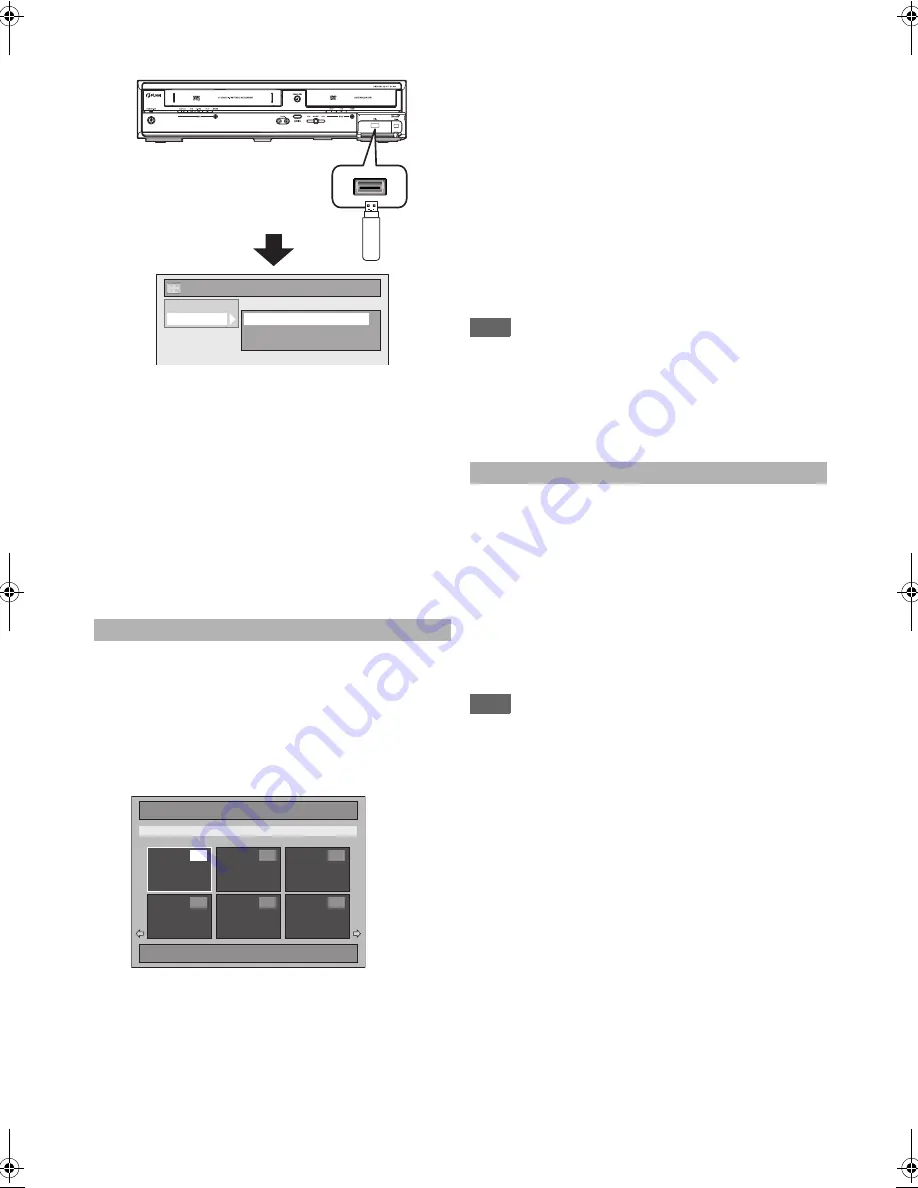
In stop mode, plug your USB flash memory.
File type selection screen will appear.
2
Select the desired file type using [
K
\
L
], then
press [ENTER
\
OK].
If you want to change the media type, press
[
0
]
. Select
the desired media type using
[
K
\
L
]
, then press
[ENTER
\
OK]
. (You can also access the media type
selection screen from the “Title List” in the “Setup” menu
in stop mode.)
• Video Files: The DivX
®
File List will appear (not
guaranteed).
• Music: The MP3 File List will appear.
• Photo: The JPEG File List will appear.
3
Follow the step
4
in “Playing Back an Audio CD
or a Disc with MP3 / JPEG / DivX
®
Files” on
pages 42-43.
The Picture CD is a service to convert photographs taken by a
conventional film camera into digital data and write the data
on a CD. You can enjoy picture images on the TV set by
playing back the Picture CDs.
For details of Kodak Picture CD, contact a shop that provides
developing service of Kodak Inc.
Press [DVD] first.
1
Press [TOP MENU].
• To exit the Picture CD thumbnail List, press
[TOP MENU]
,
[STOP
C
]
or
[RETURN
\
BACK]
.
If all menu items cannot be displayed in the screen scope,
the
A
appears at the right bottom and the
R
appears at
the left bottom of the screen and you can view other items
on the next or previous page. The track number of the
items currently played back is highlighted.
If the
A
is shown at the right bottom, use
[SKIP
G
]
to
view the next page. If the
R
is shown at the left bottom,
use
[SKIP
H
]
to view the previous page.
It may take some time until all menu items are displayed
on the menu screen.
2
Press [
K
\
L
\
0
\
1
] to select a desired track to
be played back, then press [PLAY
B
] or
[ENTER
\
OK].
An image will be played back from the selected track and
go to the next one in turn.
3
Press [STOP
C
] to stop playback.
Note
• After a track is displayed for 5 seconds or 10 seconds (set in
the “Slide Show” on page 52), the display moves to the next
file.
• During JPEG or Kodak Picture CD playback, press
[
1
]
or
[
0
]
to rotate a picture 90 degrees clockwise or counterclockwise
respectively.
(Not available when the display menu appears.)
The subtitle created by the user can be displayed during
DivX
®
playback.
1
After the DivX
®
file is selected, “Subtitle List”
will appear.
2
Select the desired extension of the subtitle file
you want to display using [
K
\
L
], then press
[ENTER
\
OK]. DivX
®
with the subtitle starts
playback. The subtitle cannot be displayed
when the setting is “OFF”.
• If there is more than one extension, the extension
selection will appear in “Subtitle List”.
Note
• “DivX Subtitle” must be activated in the DivX
®
menu. (Refer
to “
B
DivX Subtitle (Default: OFF)” on page 68.)
• Playback file and the subtitle file must have the same name.
• Playback file and the subtitle file must locate in the same
folder.
• Only the subtitle files with the following extensions are
supported; .smi (.SMI), .srt (.SRT), .sub (.SUB), .ass (.ASS),
.ssa (.SSA), .txt (.TXT). (.sub (.SUB) and .txt (.TXT) files
may not be recognised.)
• The subtitles that exceed the playback time of the DivX
®
file
will not be displayed.
Kodak Picture CD
front of this unit
DISC
USB
Title List
Video Files
Music
Photo
Picture CD
1 / 2
4
5
6
1
2
3
Image 1
DivX
®
Subtitle
E9TF0ED_EN.book Page 44 Wednesday, March 17, 2010 1:32 PM


