background image

9

CHOOSING AN OPERATION MODE

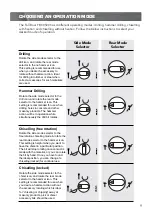
The Full Boar FBT-0500 has 4 different operating modes: drilling, hammer drilling, chiselling 

with fixation and chiselling without fixation. Follow the below instructions to select your 

desired mode of operation.
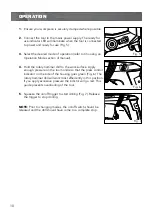
Hammer Drilling 

Rotate the side mode selector to the 

drill icon, and rotate the rear mode 

selector to the hammer icon. This 

setting is recommended for use when 

drilling holes in concrete and other 

masonry products. The hammer 

action will be in operation while 

simultaneously the drill bit rotates.

Chiselling (free rotation)

Rotate the side mode selector to the 

free rotation chiselling mode & rotate the 

rear mode selector to the hammer icon. 

This setting is helpful when you want to 

have the chisel in a particular position. 

The bit will stop rotating once contact is 

made with the material, or you can rotate 

the bit by hand. Once you have found 

the ideal position, you can change to 

chiselling (locked) for continual use.

Drilling 

Rotate the side mode selector to the 

drill icon, and rotate the rear mode 

selector to the no hammer icon. 

This setting is recommended for use 

when you desire  the accessory to 

rotate without hammer action. Ideal 

 for drilling into timber or steel when 

correct accessories  for such materials 

are used.

Side Mode 

Selector

Rear Mode 

Selector

Chiselling (locked)

Rotate the side mode selector to the 

chisel icon,  and rotate the rear mode 

selector to the hammer icon. This 

setting is recommended for use when 

you desire  a hammer action without 

the accessory rotating which is ideal 

for “chiseling or chipping” away at 

masonry products, pick  or chisel 

accessory bits should be used.

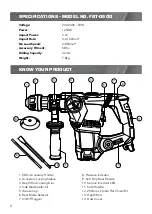
Summary of Contents for FBT-0500

Page 1: ...gs and all instructions Failure to follow the warnings and instructions may result in electric shock fire and or serious injury Save all warnings and instructions for future reference 09 15 ROTARY HAM...

Page 2: ...ATIONS MODEL NO FBT 0500 KNOW YOUR PRODUCT 1 SDS Accessory Holder 2 Accessory Locking Sleeve 3 Depth Rod Locking Dial 4 Side Mode Selector 5 Grease Cap 6 Rear Mode Selector 7 On Off Trigger 8 Pressure...

Page 3: ...02 INTRODUCTION Page 04 SAFETY INSTRUCTIONS Page 04 SET UP Page 08 CHOOSING AN OPERATION MODE Page 09 OPERATION Page 10 MAINTENANCE Page 11 TROUBLE SHOOTING Page 12 DESCRIPTION OF SYMBOLS Page 13 CONT...

Page 4: ...ge on the rating plate Note The supply of 230V and 240V is interchangeable for Australia and New Zealand This tool is double insulated in accordance with AS NZS 60745 1 therefore no earth wire is requ...

Page 5: ...a residual current device RCD protected supply Use of an RCD reduces the risk of electric shock 3 Personal safety a Stay alert watch what you are doing and use common sense when operating a power too...

Page 6: ...e the side handle this gives you greater control if the accessory should become jammed Keep the cord clear of the accessory being used do not wrap the cord around your arm or wrist Hold the tool by th...

Page 7: ...from bricks cement and other masonry products and Arsenic and chromium from chemically treated timber The risk from such exposures vary depending on how often you do this type of work To reduce your...

Page 8: ...ccessory 2 Pull and hold the locking sleeve back Insert the SDS accessory Fig 3 3 Rotate the accessory and continue to insert as far as possible into the chuck Release the locking sleeve 4 Check the S...

Page 9: ...to have the chisel in a particular position The bit will stop rotating once contact is made with the material or you can rotate the bit by hand Once you have found the ideal position you can change t...

Page 10: ...the work surface Apply enough pressure on the rear handle so that the press control indicator on the side of the housing goes green Fig 6 The rotary hammer drill will work most effieciently in this po...

Page 11: ...d the grease through this hole Ensure the grease cap is secured back into position prior to operation Carbon Brushes The service indicator LED 10 will illuminate when the carbon brushes need to be rep...

Page 12: ...rill section in the manual Hammer Function Not Engaging Excess grease has been packed Insert SDS accessory and then set both the modes to hammer function Turn the drill on firmly tap the accessory bit...

Page 13: ...ed for landfill and raw materials Reuse of recycled material decreases pollution in the environment Please recycle packaging where facilities exist Check with your local council authority for recyclin...

Page 14: ...75 Telephone 1800 069 486 Note The manufacturer s liability shall be deemed void if the machine is modified in any way and the manufacturer shall therefore accept no liability for any damages arising...

Page 15: ...15...

Page 16: ...ilable to you under law The warranty covers manufacturer defects in materials workmanship and finish under normal use 1 YEAR WARRANTY Your product is guaranteed for a period of 12 months from the orig...

Reviews: