background image

Fujitsu TE988G Color Monitor 


Monitor Connection


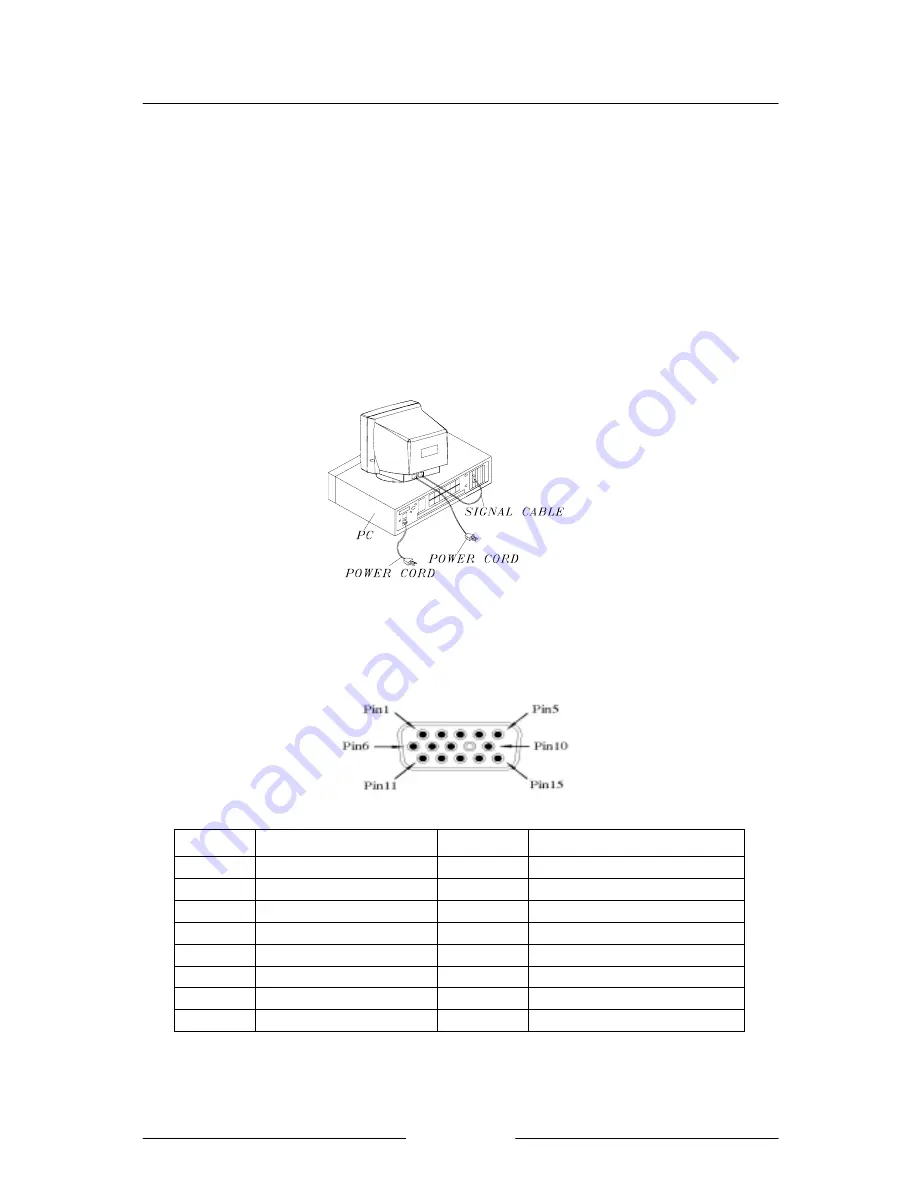
        To attach the monitor to your system, follow the steps as described below: 

    1. Turn off the monitor and computer.     

2. Connect one end of the power cable to your monitor and the other end to the power outlet. 
3. Connect the 15-pin D-Sub signal cable to the video adapter output on your personal computer. 
 

        4. Turn on the monitor and the computer. Wait about 30 seconds to adjust the picture with     
      the adjustment controls to obtain optimum picture. 

5. If the signal cable is not connected to the PC, then the screen will display the Color Bar Pattern. 


Figure 3 :Connecting the monitor 


Pin Assignment 


 Pin 

 Signal 

 Pin 

     Signal 

    R 

  9 

          No Pin 

  G 

 10 

     Digital Ground 

  B 

 11 

     D-Sub Test 

  Ground 

 12 

     SDA 

  D-Sub Test 

 13 

     H-Sync 

  Video Return 

 14 

     V-Sync 

  Video Return 

 15 

     SCL 

    Video Return 


Summary of Contents for TE988G

Page 1: ...Table of Contents FCC Information 1 Energy Declaration 1 Important Safeguards 2 Installation 3 Monitor Connection 4 Pin Assignment 4 Operation and User Adjustment 5 On Screen Display Guide 6 Specifications 13 Trouble Shooting 14 ...

Page 2: ...3 Connect the equipment into an outlet on a circuit different from that to which the receiver is connected 4 Consult the dealer or an experienced radio TV technician for help Notice 1 The changes or modifications not expressly approved by the party responsible for compliance could void the user s authority to operate the equipment 2 Shielded interference cables must be used in order to comply with...

Page 3: ...re or electric shock 8 This video monitor is equipped with a 3 wire grounding type plug This plug will only fit into a grounding type power outlet This is a safety feature If you are unable to insert the plug into the outlet contact your electrician to replace your obsolete Do not defeat the safety purpose of the grounding type plug 9 Do not overload wall outlets extension cords as this can result...

Page 4: ...Fujitsu TE988G Color Monitor 3 change without notice ...

Page 5: ...de down 2 Turn the base upside down Insert its four hooks into the four slots on the bottom of the monitor Point the hooks on the base toward the front of the monitor Figure 1 3 Push the tilt swivel and base in the direction of arrow as indicated in Figure 2 to lock the hooks Figure 2 ...

Page 6: ...o adapter output on your personal computer 4 Turn on the monitor and the computer Wait about 30 seconds to adjust the picture with the adjustment controls to obtain optimum picture 5 If the signal cable is not connected to the PC then the screen will display the Color Bar Pattern Figure 3 Connecting the monitor Pin Assignment Pin Signal Pin Signal 1 R 9 No Pin 2 G 10 Digital Ground 3 B 11 D Sub Te...

Page 7: ...ration and User Adjustment Control Panel Figure 4 shows the position of following operating units 1 Power ON OFF Switch 2 Power LED 3 Menu Displays OSD menu Scrolls through OSD menu 4 Function Control Key Adjust level of selected items ...

Page 8: ...own by the OSD parameter The parameter moves rightward indicating brightness increase and leftward indicating brightness decrease 32 Figure6 Brightness Adjustment Parameter 2 OSD Function Menu 1 Press Menu key to enter the OSD menu containing 10 functions as shown in figure 7 2 Select adjustment function Please scroll the preferred function from left right sequence by pressing Menu key You may ret...

Page 9: ...osition Language Tool and Exit B Hand shaped pointer indicates the current function selected C There are four adjustments for each function selected The icon being selected will turn into a different color D The setting value will appear during adjustment E Displaying the message of current function selected F The number in the right corner indicates how long the OSD will last for displaying H Pha...

Page 10: ...ase refer to the figure 7 2 H size V size function window Press 3 key to reduce the H size and press 4 key to enlarge the H size Press 5 to enlarge the V size and press 6 key to reduce the V size 3 Pincushion Trapezoid function window Press key 3 and 4 on the control panel to alter pincushion and barrel Press key 5 and 6 on the control panel to alter trapezoid H Size V Size Pincushion Trapezoid ...

Page 11: ...ner function window Press either 3or 4 to adjust pin balance Press eitheru ort to adjust corner distortion 5 Parallelogram Tilt function window Press either 3or4to adjust parallelogram Press eitheru or t to adjust tilt PinBalance Corner Parallel Tilt ...

Page 12: ...r personal preference you may directly adjust the RGB values separately either in the User s mode or in 65000 K 75000 K and 93000 K mode The values will be stored in the User s mode after leaving the user s function window NOTE If you previously set 65000 K 75000 K or 93000 K to be stored in the User s mode then the OSD will display these three default settings instead of the User s mode as moving...

Page 13: ... you select None 9 Tools function window Recall None 1 Recall factory setting if monitor H V frequency is in preset mode including Phase Size and Pincushion Key stone 2 Adjust OSD countdown timer whose duration ranges from 5 to 240 seconds 3 Activate the degauss function of CRT 4 Enable or disable power saving 5 Select the video input level 6 Adjust tea time whose duration ranges from 0 to 255 min...

Page 14: ... you to take a break 3 The duration for displaying tea time is about 20 seconds You may also set the duration For displaying tea time according to personal needs To terminate displaying tea time Please press any one of the keys or set the duration to None 10 Exit OSD menu function window H 31 5KHz Leave The OSD Preset Mode V 60 3 Hz 6500 X On 0 7V k None The information of current settings such as...

Page 15: ...e Vertical 262 mm adjustable Resolution 1600x1200 1280x1024 1024x768 800x600 640x480 Pixel Rate 202 MHz maximum Power Consumption 120 W Max Power Supply Line voltage 100 VAC 240 VAC Frequency 50 3 Hz 60 3Hz X Radiation Meets DHHS requirements Power Management Meets EPA NUTEK requirements Plug Play Satisfies DDC1 and DDC2B specifications Ambient Temperature 0 35 operating 10 60 storage Humidity 10 ...

Page 16: ...he monitor and your video card LED on the monitor is not lit 1 Power switch should be in the ON position and the power cord should be connected 2 Check if the system is in the power saving mode Check by pressing any one of keys on the keyboard or moving the mouse Picture is fuzzy 1 Adjust the Contrast and Brightness Controls Picture bounces or wave pattern is present in the picture 1 Move electric...

Reviews: