background image

91

W I r e l e s s   L A N   U s e r ’ s   G u i d e  

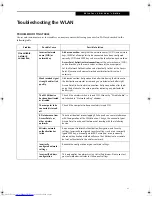
Troubleshooting the WLAN

TROUBLESHOOTING TABLE

Causes and countermeasures for troubles you may encounter while using your wireless LAN are described in the 
following table. 

Problem

Possible Cause

Possible Solution

Unavailable 
network 
connection

Incorrect network 
name (SSID) or 
network key

Ad hoc connection:

 verify that the network names (SSID’s) and network 

keys (WEP) of all computers to be connected have been configured 
correctly. SSID’s and WEP key values must be identical on each machine.

Access Point (Infrastructure) connection:

 set the network name (SSID) 

and network key to the same values as those of the access point. 

Set the Network Authentication value identically to that of the Access 
Point. Please consult your network administrator for this value, if 
necessary. 

Weak received signal 
strength and/or link 
quality

Ad hoc connection: Retry connection after shortening the distance to 
the destination computer or removing any obstacles for better sight.

Access Point (Infrastructure) connection: Retry connection after short-
ening the distance to the access point or removing any obstacles for 
better sight.

The WLAN device 
has been deactivated 
or disabled

Check if the wireless switch is turned ON. Also verify “Disable Radio” is 
not checked in “Network setting” window. 

The computer to be 
connected is turned 
off

Check if the computer to be connected is turned ON.

RF interference from 
Access Points or 
other wireless 
networks

The use of identical or overlapping RF channels can cause interference 
with the operation of the WLAN device. Change the channel of your 
Access Point to a channel that does not overlap with the interfering 
device.

Wireless network 
authentication has 
failed

Re-check your Network Authentication, Encryption, and Security 
settings. Incorrectly configured security settings such as an incorrectly 
typed WEP key, a misconfigured LEAP username, or an incorrectly 
chosen authentication method will cause the LAN device to associate 
but not authenticate to the wireless network.

Incorrectly 
configured network 
settings

Recheck the configuration of your network settings.

Incorrect IP address 
configuration

This only applies to networks using static IP addresses. Please contact 
your network administrator for the correct settings.

N6460-Baikal.book  Page 91  Friday, June 1, 2007  2:50 PM

Summary of Contents for N6460 - LifeBook

Page 1: ...C o p y r i g h t Fujitsu LifeBook N6460 Notebook User s Guide ...

Page 2: ...C o p y r i g h t ...

Page 3: ...ered trade marks or trademarks of Adobe Systems Incorporated in the United States and or other countries Quicken is a registered trademark and or registered service mark of Intuit Inc or one of its subsidiaries in the United States and other countries Roxio is a trademark of Roxio a division of Sonic Solutions Norton Internet Security is a trademark of Symantec Corpora tion in the United States an...

Page 4: ... for a shorter amount of time this is a natural occurrence for all batteries When this occurs you may want to replace the battery with a fresh one If you replace it it is important that you dispose of the old battery properly because batteries contain mate rials that could cause environmental damage if disposed of improperly Fujitsu is very concerned with envi ronmental protection and has enlisted...

Page 5: ...d 16 Windows Keys 16 Cursor Keys 16 Function Keys 17 Volume Control Controlling the Volume 18 Touchpad Pointing Device Clicking 19 Double Clicking 19 Dragging 20 Scrolling 20 Touchpad Control Adjustment 20 Application Media Player Panel Mode Button 21 Application Launch Media Player Buttons 21 Configuring your Application Panel 21 Using the Media Player Buttons 22 Using the Visual Optimizer 22 3 G...

Page 6: ... Disk Drive Formatting the Hard Disk Drive 42 PC Cards ExpressCards Installing PC Cards 43 Removing PC Cards 43 Installing ExpressCards 44 Removing ExpressCards 44 Memory Upgrade Module Installing a Memory Module 45 Removing a Memory Upgrade Module 46 Checking the Memory Capacity 46 Enabling Disabling Turbo Memory 46 Device Ports Communications Ports 47 LAN Port 47 IEEE 1394 Jack 47 HDMI Port 47 U...

Page 7: ... GUIDE Before Using the Wireless LAN Wireless LAN Modes Using this Device 88 Deactivating the WLAN Device 89 Activating the WLAN Device 89 Configuring the WLAN 90 Connecting to a Network 90 Troubleshooting the WLAN Troubleshooting Table 91 Wireless LAN Glossary Glossary 92 IP address information About IP Addresses 94 WLAN Specifications Specifications 95 APPENDIX A USING THE FINGERPRINT SENSOR Int...

Page 8: ...L i f e B o o k N 6 4 0 0 S e r i e s U s e r s G u i d e ...

Page 9: ...1 1 Preface ...

Page 10: ...2 L i f e B o o k N 6 4 0 0 S e r i e s U s e r s G u i d e ...

Page 11: ...sentative can provide you with the fastest possible solution Product name Product configuration number Product serial number Purchase date Conditions under which the problem occurred Any error messages that have occurred Type of device connected if any Fujitsu Online You can go directly to the online Fujitsu Product catalog for your LifeBook notebook by going to www shopfujitsu com To ensure that ...

Page 12: ...4 L i f e B o o k N 6 4 0 0 S e r i e s U s e r s G u i d e ...

Page 13: ...5 2 Getting to Know Your LifeBook Notebook ...

Page 14: ...6 L i f e B o o k N 6 4 0 0 S e r i e s U s e r s G u i d e ...
Page 15: ...Book N6460 notebook computer Lithium ion battery pre installed AC adapter with AC power cord Figure 2 2 Phone Modem RJ 11 telephone cable Drivers and Applications Restore CD Recovery and Utility Disc Getting Started Guide User s Guide this guide International Limited Warranty Brochure Microsoft associated materials Depending upon the configuration of your system one or more of the following items ...

Page 16: ...ond with a specific component of your LifeBook note book See Status Indicator Panel on page 15 for more information Visual Optimizer Button Enriches colors while in video mode and enhances text when viewing static web pages See Using the Visual Optimizer on page 22 for more information Internet Mail Mode Visual Optimizer Volume 1 2 3 4 5 6 10 11 12 7 8 9 Figure 2 3 LifeBook notebook display open 1...

Page 17: ...the Volume on page 18 for more information Wireless LAN Switch The Wireless LAN On Off Switch turns the wireless LAN on and off See Integrated Wireless LAN User s Guide on page 85 for more information Stereo Speakers The built in boxless dual speakers provide stereo sound Additionally there is a subwoofer located on the bottom of the system See Bottom Components on page 14 for more information Tou...

Page 18: ...nding upon the configuration of your system See Optical Drive on page 39 for more information Optical Drive Eject Button The optical drive eject button is used to eject the media tray DC Power Jack The DC power jack allows you to plug in the AC adapter to power your LifeBook notebook and charge the internal Lithium ion battery Figure 2 4 LifeBook notebook left side panel 1 2 3 Optical Drive Optica...

Page 19: ...panel allow you to connect Universal Serial Bus USB 2 0 or USB 1 1 devices See Universal Serial Bus USB 2 0 Ports on page 48 for more information Windows Vista Users All USB ports can be used to connect an infrared remote control receiver that is required when using the optional Media Center Edition remote control If you have Windows Vista installed please change the setting of Wake up by USB devi...

Page 20: ...nternal 56K modem See Communications Ports on page 47 for more information HDMI Port The HDMI port is used to connect compatible digital devices with your computer such as video game console set top box or AV receiver See HDMI Inter face on page 48 for more information External Video Port The external video port allows you to connect an external monitor or LCD projector See External Video Port on ...

Page 21: ...CR See S Video Out Port on page 48 for more information To protect your notebook from damage and to optimize system performance be sure to keep all air all vents unobstructed clean and clear of debris This may require periodic cleaning depending upon the environment in which the system is used Do not operate the notebook in areas where the air vents can be obstructed such as in tight enclosures or...

Page 22: ... notebook thus improving overall performance See Memory Upgrade Module on page 45 for more information Subwoofer The subwoofer speaker provides bass range sound to supplement the stereo speakers resulting in high quality audio Air Flow Vents The air flow vents assist in proper cooling of the system Figure 2 7 LifeBook notebook bottom panel 1 2 3 4 5 Lithium ion Battery Bay Configuration Label appr...

Page 23: ...e Email indicator shows that you have received new email NUMLOCK INDICATOR The NumLock indicator shows that the internal keyboard is set in ten key numeric keypad mode CAPSLOCK INDICATOR The CapsLock indicator shows that your keyboard is set to type in all capital letters SCRLOCK INDICATOR The ScrLock indicator shows that your scroll lock is active 1 3 5 2 4 6 7 1 Battery Charging 2 Battery Status...

Page 24: ...ight hand section of the keyboard serves as a numeric keypad To activate the keypad functions press the NumLk button Using the keypad keys you can enter numerals 0 through 9 perform addition subtraction multiplication or division and enter decimal points using the keys designated as ten key function keys When NumLk is not active you can use the numeric keypad to navigate Home End Page Up Page Down...

Page 25: ...on only works if the BIOS setting for Advanced Keyboard Mouse Features Internal Pointing Device is set to Manual Setting Fn F6 Pressing F6 repeatedly while holding Fn will lower the brightness of your display Fn F7 Pressing F7 repeatedly while holding Fn will increase the brightness of the display Fn F8 Pressing F8 repeatedly while holding Fn will lower the volume of your system Fn F9 Pressing F9 ...

Page 26: ...cations Certain external audio devices you might connect to your system may have hardware volume controls Each source discussed above puts an upper limit on the volume level that must then be followed by the other sources We recommend that you experiment with the various volume controls to discover the optimal sound level Any software that contains audio files will also contain a volume control of...

Page 27: ...ove the cursor to the item you wish to select press the left button once and then immediately release it To right click move the mouse cursor to the item you wish to select press the right button once and then immediately release it You also have the option to perform the clicking operation by tapping lightly on the Touchpad once Figure 2 12 Figure 2 12 Clicking DOUBLE CLICKING Double clicking mea...

Page 28: ...d across the button to scroll up or down a page When you have reached the desired section of the page raise your finger Note that you can also scroll by sliding your finger up and down the right side of the touchpad This feature is disabled by default but you can enable it by going to Start Control Panel Mouse The scrolling sensor is also used as a fingerprint sensor See Fingerprint Sensor Device ...

Page 29: ...ton that allows you to activate a number of functions and actions If Application Launcher mode is selected the labels on the outside of the button indi cate which area of the button should be pressed to acti vate the application associated with the label Figure 2 17 If Media Player mode is selected the indicators within the button will light up Figure 2 18 Figure 2 17 LifeBook Application Launch i...

Page 30: ...rward one track USING THE VISUAL OPTIMIZER Visual Optimizer is a new feature which allows you to optimize your video viewing experience The Visual Optimizer image quality enhancer delivers rich image quality by employing cutting edge technologies such as a 3D color management system auto contrast correction black and white stretch and edge enhancement The Visual Optimizer button is located adjacen...

Page 31: ...23 3 Getting Started ...

Page 32: ...24 L i f e B o o k N 6 4 0 0 S e r i e s U s e r s G u i d e ...
Page 33: ...able into an AC electrical outlet Figure 3 1 Switching from AC Adapter Power to Battery Power 1 Be sure that you have a charged battery installed 2 Unplug the AC adapter Figure 3 1 Connecting the AC Adapter 1 2 DC Power Jack DC Output Cable 3 4 AC Adapter AC Cable 1 2 3 4 When you run the N6460 LifeBook on battery power by default the CPU will slow down approximately by half in order to optimize b...

Page 34: ...n keys on the keyboard Using the Keyboard to Change Display Brightness Fn F6 Pressing this key combination repeatedly will lower the brightness of your display Fn F7 Pressing this key combination repeatedly will increase the brightness of the display CLOSING THE DISPLAY PANEL 1 Holding the edge of your display panel pull it forward until it is flush with the body of your LifeBook notebook 2 Push d...

Page 35: ...ogo until the operating system is loaded During booting your notebook is performing a standard boot sequence including a Power On Self Test POST When the boot sequence is completed without a failure and without a request for the BIOS Setup Utility the system displays the operating system s opening screen The boot sequence is executed when You turn on the power to your LifeBook notebook You restart...

Page 36: ...IME In order to ensure that you receive the most benefits from the Windows Vista operating system it should be registered the first time you use it 1 First of all you will need to read and accept the End User License Agreements EULAs 2 You will be prompted to enter your User Name and Password and you will be given a chance to select an icon for your account 3 The next screen asks for a Computer Na...

Page 37: ... the installations which will be performed by the Click Me utility If you click Execute Click Me will begin installing If after clicking the button you receive a User Account Control window you will be asked for your permission to continue Click Yes to continue If you cancel the operation the Click Me icon will appear on your desktop for later installation FUJITSU DRIVER UPDATE UTILITY Your system...

Page 38: ...mponents except those necessary to maintain system memory and allow for restarting Your LifeBook notebook can be put in Sleep mode by Pressing the Power Suspend Resume button when your system is turned on Clicking the power icon on the lock menu Selecting Sleep from the Windows Shut Down menu Timing out from lack of activity Allowing the battery to reach the Dead Battery Warning condition Your Lif...

Page 39: ...he following procedure 1 Click the Start button and then move the mouse over the right arrow 2 Select the desired action from the list POWER OFF Before turning off the power check that the hard drive optical drive access indicator is off If you turn off the power while accessing a disk there is a risk of data loss To ensure that your notebook shuts down without error use the Windows shut down proc...

Page 40: ...32 L i f e B o o k N 6 4 0 0 S e r i e s U s e r s G u i d e ...
Page 41: ...33 4 User Installable Features ...

Page 42: ...34 L i f e B o o k N 6 4 0 0 S e r i e s U s e r s G u i d e ...
Page 43: ...ke the memory stick it uses flash memory architecture Figure 4 2 Memory Stick Secure Digital and xD Cards INSERTING MEMORY STICK SD XD CARDS Memory Sticks SD Cards and xD Cards are inserted in the Memory Stick SD xD Card slot Figure 4 1 To insert a Memory Stick SD Card or xD Card follow these steps 1 See your Memory Stick SD Card or xD Card manual for instructions on the insertion of your card 2 M...

Page 44: ...xD Card adapter in until it unlatches It will then eject from the slot for removal When removing cards from your note book be sure to click the Safely Remove Hardware icon in the system tray and select the item you want to remove See your card manual for specific instructions on the removal of your card Some cards may require your LifeBook notebook to be in Sleep Mode or Off while removing them ...

Page 45: ...rmation on Sleep mode and shutdown procedure Low Battery State When the battery is running low a low battery notifica tion message will appear If you do not respond to the low battery message the batteries will continue to discharge until they are too low to operate When this happens your LifeBook notebook will go into Sleep mode There is no guarantee that your data will not be lost once the noteb...

Page 46: ...tteries The Status Indicator panel displays the battery status via the Battery Status indicator to show the charge level available in that battery If the display is flashing red it means that the battery is damaged and must be replaced so it does not damage any other parts of your LifeBook notebook REPLACING THE BATTERY With the purchase of an additional battery you can have a fully charged spare ...

Page 47: ...ntil you hear a click Figure 4 6 REMOVING MEDIA 1 Push and release the eject button on the front of the optical drive This will stop the drive and the holder tray will come out of the notebook a short distance 2 Gently pull the tray out until the disc can easily be removed from the tray 3 Carefully remove the media disc from the holder tray 4 Gently push the holder tray back in until you hear a cl...

Page 48: ...VD ROMs you have the option of altering how the movie should play and what you wish to view You can do this by using the DVD CD RW Combo Drive control panel and the mouse To open a dropdown menu for options right click on the movie screen Using the Optical Drive Control Panel The PowerDVD optical drive software allows you to watch the movie much like a VCR player You have the option to pause rewin...

Page 49: ...r notebook will begin playing an audio DVD CD or will start an application if the DVD CD includes an auto run file To prevent a CD from playing automatically as soon as it is inserted refer to the related help file for your specific operating system Prolonged use of the optical drive such as watching a DVD movie will substantially reduce your battery life Many movie run times are longer than your ...

Page 50: ...to your operating system documentation for the correct procedure Before you reformat your hard disk drive please note Any data that currently resides on your hard disk drive must be backed up to floppy disks or other data storage media or it will be permanently lost These back up disks can then be used to reinstall and restore your data See your operating system manual for more information on back...

Page 51: ...ctor REMOVING PC CARDS See your PC Card manual for specific instructions on removing your card Some cards may require your note book to be in Sleep Mode or Off during removal 2 Unlock the card from the slot by pressing the eject button When pressed the button will pop out 3 Firmly press the button again until it is flush with the notebook This will eject the card slightly out of the slot allowing ...

Page 52: ...l cause the card to be ejected slightly out of the slot allowing you to remove the card Installing or removing an ExpressCard during your notebook s shutdown or bootup process may damage the card and or your notebook Do not insert an ExpressCard into a slot if there is water or any other substance on the card as you may permanently damage the card your notebook or both 34 mm 54 mm 1 ExpressCard Ej...

Page 53: ...into the connector until it lodges under the retaining clip You will hear a click when it is prop erly in place Figure 4 12 Figure 4 12 Installing a Memory Upgrade Module 9 Replace the cover by hooking the tabs under the rear edge of the compartment opening and tilting down until flush with the bottom of your notebook 10 Replace the screws Systems with Microsoft Windows Vista installed require a m...

Page 54: ...your system it can be enabled or disabled as follows Enabling Windows ReadyBoost To enable Windows ReadyBoost for Intel Turbo Mem ory perform the following simple steps 1 Click on Start All Programs 2 Locate the Intel Turbo Memory program group 3 Select Intel Turbo Memory Console 4 Select Continue when you see the Microsoft Windows User Account Control prompt that says A program needs your permiss...

Page 55: ...1394 JACK The 4 pin IEEE 1394 Firewire jack is a high speed interface 400 Mbps that can be used to transfer large amounts of data between your notebook and a Firewire peripheral such as a digital camera external hard drive or video camera Hot swappable and plug n play it is much faster than USB 1 1 CardBus or parallel port To connect a 1394 device follow these steps Figure 4 16 Figure 4 16 IEEE 13...

Page 56: ...ow these easy steps 1 Align the connector with the port opening 2 Push the connector into the port until it is seated HEADPHONE SPDIF JACK The headphone jack allows you to connect headphones or powered external speakers to your LifeBook note book Your headphones or speakers must be equipped with a 1 8 3 5 mm stereo mini plug The SPDIF function of the jack allows you to download digital audio to Mi...

Page 57: ... the two hold down screws located on each end of the connector Figure 4 20 External Video Connection If you plug headphones into the headphone jack you will disable the built in stereo speakers Pressing the Fn F10 keys allows you to change your selection of where to send your display video Each time you press the key combination you will step to the next choice starting with the built in display p...

Page 58: ...50 L i f e B o o k N 6 4 0 0 S e r i e s U s e r s G u i d e ...
Page 59: ...51 5 Troubleshooting ...

Page 60: ...52 L i f e B o o k N 6 4 0 0 S e r i e s U s e r s G u i d e ...
Page 61: ... notebook Make sure it has been off at least 10 seconds before you turn it on 6 Go through the boot sequence 7 If the problem has not been resolved refer to the Troubleshooting Table that follows for more detailed troubleshooting information 8 If you have tried the solutions suggested in the Trou bleshooting Table without success contact your support representative Toll free 1 800 8Fujitsu 1 800 8...

Page 62: ...s are incorrect Set the BIOS setup utility to the default values within the Multimedia Device Configuration menu See BIOS Setup Utility page 27 for more information Software driver is not config ured correctly Refer to your application and operating system documentation for help Sound may be set to Mute Click on the Volume icon in the notification area and verify that the Mute checkbox is not set ...

Page 63: ...your password and security settings The hard disk drive has crashed Contact Fujitsu or your local authorized reseller for a replacement hard disk drive Keyboard or Mouse Problems The built in keyboard does not seem to work Your application has locked out your keyboard Try to use your integrated pointing device to restart your system If this fails turn your notebook off using the power suspend resu...

Page 64: ...or more information The device may have been installed while an application was running so your notebook is not aware of its installation Close the application and restart your LifeBook notebook Your software may not have correct software driver active See your software documentation and activate the correct driver You may have the wrong I O address selected for your device See your device documen...

Page 65: ...age 25 for more information The Power adapter has no power from the AC outlet Move the AC cord to different outlet check for a line switch or tripped circuit breaker for the AC outlet The AC adapter is faulty Try a different Power adapter Your LifeBook notebook turns off all by itself The power management parameters are set for auto timeouts which are too short for your operating needs Press any b...

Page 66: ...k The Power and Suspend Resume button is disabled from the Power Advanced submenu of the setup utility Enable the button from the setup utility You did not hold the button in long enough Hold the button longer This may need to be a few seconds if your application is preventing the CPU from checking for button pushes There may be a conflict with the application software Close all applications and t...

Page 67: ...intervals and you failed to notice the display come on and go off again Press any button or key on the keyboard or move the mouse to restore operation If that fails push the Power and Suspend Resume button The display may be shut off by Sleep mode Auto Suspend or Video Timeout The notebook turned on with a series of beeps and your display is blank Power On Self Test POST has detected a failure whi...

Page 68: ...nal video device and it does not display any information Your BIOS setup is not set to enable your external device Toggle the video destination by pressing Fn and F10 together or check the BIOS setup and enable your external video device See Video Features submenu located within the Advanced Menu of the BIOS See BIOS Setup Utility page 27 for more information Your external video device is not prop...

Page 69: ...ppears when you restart the system there may be a serious fault which might cause you to lose data if you continue Contact your support representative Incorrect Drive A type run SETUP Type of floppy drive A not correctly identified in Setup This means that the floppy disk drive type identified in your setup utility does not agree with the type detected by the Power On Self Test Run the setup utili...

Page 70: ...ok notebook This battery has an expected life of 2 to 3 years System BIOS shadowed System BIOS copied to shadow RAM System CMOS checksum bad run SETUP BIOS CMOS RAM has been corrupted or modified incorrectly perhaps by an application program that changes data stored in BIOS memory Run Setup and reconfigure the system System RAM Failed at offset nnnn System memory failed at offset nnnn of in the 64...

Page 71: ...OT Priority Change Before restoring an image you must first verify that your system is set up to boot from the DVD drive To verify change the boot up priority rather than booting up from the hard drive or an external floppy disk drive perform one of the following procedures Changing priority from BOOT Menu 1 Start your system and press the F12 key when the Fujitsu logo appears You will open the Bo...

Page 72: ...ad DVDs either installed in your system or attached exter nally to it 3 Insert the Recovery and Utility Disc into the drive tray 4 Reboot your system 5 After the system reboots follow the instructions that appear to either restore your system image or erase all data from your hard disk AUTOMATICALLY DOWNLOADING DRIVER UPDATES Your system has a convenient tool called the Fujitsu Driver Update FDU u...

Page 73: ...65 6 Care and Maintenance ...

Page 74: ...66 L i f e B o o k N 6 4 0 0 S e r i e s U s e r s G u i d e ...
Page 75: ...ng your LifeBook notebook Always disconnect the power plug Pull the plug not the cord Clean your LifeBook notebook with a damp lint free cloth Do not use abrasives or solvents Use a soft cloth to remove dust from the screen Never use glass cleaners Storing your LifeBook notebook If storing your LifeBook notebook for a month or longer turn your LifeBook off and remove all Lithium ion batteries Stor...

Page 76: ...ect PCMCIA cards when not in use FLOPPY DISKS AND DRIVES Caring for your Floppy Disks Avoid using floppy disks in damp or dusty locations Never store floppy disks near a magnet or magnetic field Do not use a pencil or an eraser on a disk or disk label Avoid storing the floppy disks in extremely hot or cold locations or in locations subject to severe temperature changes Store at temperatures betwee...

Page 77: ...compact disk at a very high speed Do not carry it around or subject it to shock or vibration with the power on Avoid using or storing the drive where it will be exposed to extreme temperatures Avoid using or storing the drive where it is damp or dusty Avoid using or storing the drive near magnets or devices that generate strong magnetic fields Avoid using or storing the drive where it will be subj...

Page 78: ...70 L i f e B o o k N 6 4 0 0 S e r i e s U s e r s G u i d e ...

Page 79: ...71 7 System Specifications ...

Page 80: ...72 L i f e B o o k N 6 4 0 0 S e r i e s U s e r s G u i d e ...
Page 81: ...ges for optimal quality Video Color and Resolution Internal WXGA 1440 x 900 pixel resolution 16M colors max External 1600 x 1200 pixel resolution 16M colors Simultaneous 1024 x 768 pixel resolution 16M colors max Graphics Accelerator Card ATI Mobility Radeon HD 2600 graphics with 512 MB of HyperMemory 256 MB dedicated video memory and 256 MB shared memory AUDIO The Intel PM965 controller supports ...

Page 82: ... Combination Memory Stick Secure Digital SD xD Card slot One mini DIN 7 pin S Video Out port Five connectors for USB 2 0 Universal Serial Bus input output devices One HDMI port One 4 pin IEEE 1394 jack One stereo microphone line in jack See Audio specifications One stereo headphone line out jack See Audio specifications One modular modem RJ 11 connector One modular LAN RJ 45 connector KEYBOARD Bui...

Page 83: ...video and audio playback on your system EverNote EverNote allows you to easily capture store and access a variety of documents such as typed and handwritten memos webpage excerpts emails phone messages addresses passwords sketches and documents Fujitsu Driver Update Utility The Fujitsu Driver Update FDU utility is pre installed on your system With FDU you can choose to automati cally or manually g...

Page 84: ...ite letters and reports track family and friends with address books manage home finances and create a home inventory Microsoft Office Home and Student Edition 2007 Optional with Microsoft Windows Vista Home Premium Edition Microsoft Office Home and Student 2007 is easy to use software to make you more productive in a home and or school environ ment Microsoft Office Home and Student 2007 includes M...

Page 85: ...77 8 Glossary ...

Page 86: ...78 L i f e B o o k N 6 4 0 0 S e r i e s U s e r s G u i d e ...
Page 87: ...it version of the PC Card interface which offers performance similar to the 32 bit PCI architecture Command An instruction which you give your operating system Example run a particular application or format a floppy disk Configuration The combination of hardware and software that makes up your system and how it is allocated for use CRT Cathode Ray Tube A display device which uses a beam of electro...

Page 88: ... Federal Communication Commission Floppy Disk A spinning platter of magnetic data storage media which is highly flexible GB Gigabyte Hard drive A spinning platter of magnetic data storage media where the platter is very stiff Hexadecimal A decimal notation for the value of a 4 bit binary number 0 9 A B C D E F Example 2F in hexa decimal 00101111 in binary 47 in decimal I O Input Output Data enteri...

Page 89: ...ory Card International Association The Personal Computer Memory Card International Association is an organization that sets standards for add in cards for personal computers Peripheral Device A piece of equipment which performs a specific function associated with but not integral to a computer Examples a printer a modem a CD ROM Pitch keyboard The distance between the centers of the letter keys of...

Page 90: ... above the keyboard Stereo audio A system using two channels to process sound from two different sources Stroke keyboard The amount of travel of a key when it is pressed from resting to fully depressed Suspend To make inoperative for a period of time Your LifeBook notebook uses various suspension states to reduce power consumption and prolong the charge of your battery SVGA Super VGA S Video Super...

Page 91: ...phone line Exces sive RENs on a telephone may result in the devices not ringing in response to an incoming call In most but not all areas the sum of RENs should not exceed five 5 0 To be certain of the number of devices that may be connected to a line as determined by the total RENs contact the local telephone company For products approved after July 23 2001 the REN for this product is part of the...

Page 92: ...ormité est confirmée par le numéro d enregistrement Le sigle IC placé devant le numéro d enregistrement signifie que l enregistrement s est effectué conformément à une déclaration de conformité et indique que les spécifications techniques d Industrie Canada ont été respectées Il n implique pas qu Industrie Canada a approuvé le matériel Avant de connecter cet équipement à une ligne télépho nique l ...

Page 93: ...85 Appendix A Integrated Wireless LAN User s Guide Optional Device ...

Page 94: ...86 L i f e B o o k N 6 4 0 0 S e r i e s U s e r s G u i d e ...
Page 95: ...gned to provide reasonable protection against harmful interference in a residential installa tion This equipment generates uses and can radiate radio frequency energy If not installed and used in accordance with the instructions it may cause harmful interference to radio communications However there is no guarantee that interfer ence will not occur in a particular installation If this equipment do...

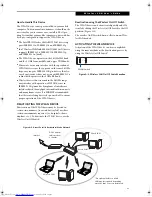
Page 96: ...maximum data rate of 540 Mbps theoretical in IEEE802 11n draft mode 54 Mbps in IEEE802 11a or IEEE802 11g mode and 11 Mbps in IEEE802 11b mode The WLAN device supports the following encryption methods WEP TKIP CKIP and AES encryption The Wireless LAN device is compliant with the follow ing standards WPA WPA2 CCX1 0 CCX2 0 CCX3 0 and CCX4 0 WIRELESS LAN MODES USING THIS DEVICE Ad Hoc Mode See Figur...

Page 97: ... 11b g n modes Symptoms of interference include reduced throughput intermittent disconnects and many frame errors It is HIGHLY recommended that these interfering devices be powered off to ensure proper operation of the WLAN device DEACTIVATING THE WLAN DEVICE Deactivation of the WLAN device may be desired in certain circumstances to extend battery life or where certain environments require it i e ...

Page 98: ...orks from the left panel 4 Click on the Add button 5 Depending upon what type of connection you would like to make make a selection For an infra structure network select Manually create a net work profile For ad hoc network select Create an ad hoc network 6 Enter the required information It may be necessary to consult with your network administrator for some of the information 7 In the event you r...

Page 99: ...etry connection after short ening the distance to the access point or removing any obstacles for better sight The WLAN device has been deactivated or disabled Check if the wireless switch is turned ON Also verify Disable Radio is not checked in Network setting window The computer to be connected is turned off Check if the computer to be connected is turned ON RF interference from Access Points or ...

Page 100: ...ess or IEEE MAC address is the 48 bit address typically written as twelve hexadecimal digits 0 through 9 and A through F or as six hexadecimal numbers separated by periods or colons e g 0080002012ef 0 80 0 2 20 ef which uniquely identifies a computer that has an Ethernet interface MTU Maximum Transmission Unit The maximum size of data which can be transmitted at one time in networks including the ...

Page 101: ...rom another so all access points and all devices attempting to connect to a specific WLAN must use the same SSID A device will not be permitted to join the BSS unless it can provide the unique SSID Because the SSID is broadcast in plain text it does not supply any security to the network Subnet mask TCP IP network is controlled by being divided into multiple smaller networks subnets IP address con...

Page 102: ... the network An IP address is expressed with four values in the range between 1 and 255 Set the each computer as follows The value in paren theses is a subnet mask Example Computer A 192 168 100 2 255 255 255 0 Computer B 192 168 100 3 255 255 255 0 Computer C 192 168 100 4 255 255 255 0 Computer X 192 168 100 254 255 255 255 0 IP addressing is much more complicated than can be briefly explained i...

Page 103: ... device conforms to IEEE 802 11a 802 11b g and 802 11n draft Wi Fi based Transfer rate Automatic switching 54 Mbps maximum data rate IEEE802 11n rates to be determined Active frequency 802 11n 2 4 GHz or 5 GHz 802 11b g 2400 2473 MHz 802 11a 4900 5850 MHz Number of channels 802 11a 8 independent channels 802 11b g 11 channels 3 non overlapping channels 802 11n 2 4 GHz 3 non overlapping channels wh...

Page 104: ...96 L i f e B o o k N 6 4 0 0 S e r i e s U s e r s G u i d e ...
Page 105: ...97 Appendix B Using the Fingerprint Sensor ...

Page 106: ...98 L i f e B o o k N 6 4 0 0 N o t e b o o k A p p e n d i x B ...

Page 107: ...ight of the screen The presence of the Softex program group in the Programs group of the Start menu System Requirements The OmniPass application requires space on your hard drive it also requires specific Operating Systems OS s The minimum requirements are as follows Windows XP Professional operating system At least 35 MB available hard disk space Installing the OmniPass Application If OmniPass is...

Page 108: ...l credentials as usual username John_02 and password lifebook but instead of clicking Submit he directs OmniPass to Remember Password Now whenever he returns to that site OmniPass will prompt him to supply access credentials John enters his OmniPass user credentials John_01 and freq14 in the OmniPass authentication prompt and he is allowed into his webmail account He can do this with as many websi...

Page 109: ... or pull your fingertip over the sensor starting at the second knuckle towards yourself Swiping too fast or too slow will result in a failed capture The Choose Finger screen has a Practice button click it to practice capturing your fingerprint When you are comfortable with how your fingerprint is captured proceed to enroll a finger 3 Once OmniPass has successfully acquired the finger print the Ver...

Page 110: ... location the credentials to access the site and the OmniPass authentication settings for the site are now stored in the OmniPass secure database The OmniPass authentication settings Settings for this Pass word Site can always be changed in Vault Management Logging in to a Remembered Site Whether or not OmniPass prompts you to authenticate when you return to a remembered site is determined by Sett...

Page 111: ...start remembering passwords To delete an identity highlight the identity you want to delete and click Delete Identity then click Apply To set the default identity highlight the identity you want as default and click Set as Default click Apply to ensure the settings are saved If you log in to OmniPass with a fingerprint device you will automati cally be logged in to the default identity for that Om...

Page 112: ...ng the Control Panel I create a user with the username Tom and the password Sun shine I can now successfully import the OmniPass user data to the new system If you export an OmniPass only user you can import that user to any computer running OmniPass pro vided that a user with that name is not already enrolled in OmniPass If you attempt to import a user profile who has the same name as a user alre...

Page 113: ...ed you can add that user to OmniPass using the same username and password Cannot add Windows users to OmniPass If you experience difficulties adding a Windows user to OmniPass you may need to adjust your local secu rity settings You can do this by going to Start Control Panel Administrative Tools and Local Security Settings Expand Local Policies expand Security Options and double click Network Acc...

Page 114: ...106 L i f e B o o k N 6 4 0 0 N o t e b o o k A p p e n d i x B ...

Page 115: ...107 Index ...

Page 116: ...108 L i f e B o o k N 6 4 0 0 S e r i e s U s e r s G u i d e ...
Page 117: ... Resolution 73 Communications Port 47 Cursor 19 Cursor Keys 16 D DC In Jack 13 25 DC Output Cable 25 Device Ports 47 74 Disk Care 68 Display Panel 8 59 adjusting 26 brightness 26 closing 26 latch 8 opening 26 Double Clicking 19 Dragging 20 Drivers and Application Restore CD 63 DVD CD ROM 39 69 E Error Messages 61 ExpressCards 43 Extended Memory 80 External Monitor Port 13 49 F Fingerprint Recognit...

Page 118: ...s 76 Modem Jack 13 47 Modem Result Codes 62 N Numeric Keypad 16 NumLk Indicator 15 O OmniPass 75 Optical Drive 10 39 73 Control Panel 40 loading 39 removing media 39 tray release 40 using 40 Optical Drive Eject Button 12 P Parallel Port 81 PC Card 56 57 care 69 removing 43 44 slot 11 PC Card Eject Button 11 POST 81 Power 74 AC adapter 25 failure 57 management 30 off 31 on 27 Power On Self Test 27 ...

Page 119: ...ting Device 10 Troubleshooting 53 U Universal Serial Bus Port 48 Unpacking 7 USB 14 48 56 Using the Media Player 22 V Video RAM 73 Visual Optimizer 22 Visual Optimizer Button 8 Volume Control 9 18 W Windows keys 16 Application key 16 Start keys 16 Wireless LAN Before Using the Wireless LAN 88 Connection using Wireless Zero Tool 90 IP address information 94 Specifications 95 Troubleshooting 91 Wire...

Page 120: ...112 L i f e B o o k N 6 4 0 0 S e r i e s U s e r s G u i d e ...
Reviews: