


11
G e t t i n g t o K n o w Y o u r L i f e B o o k
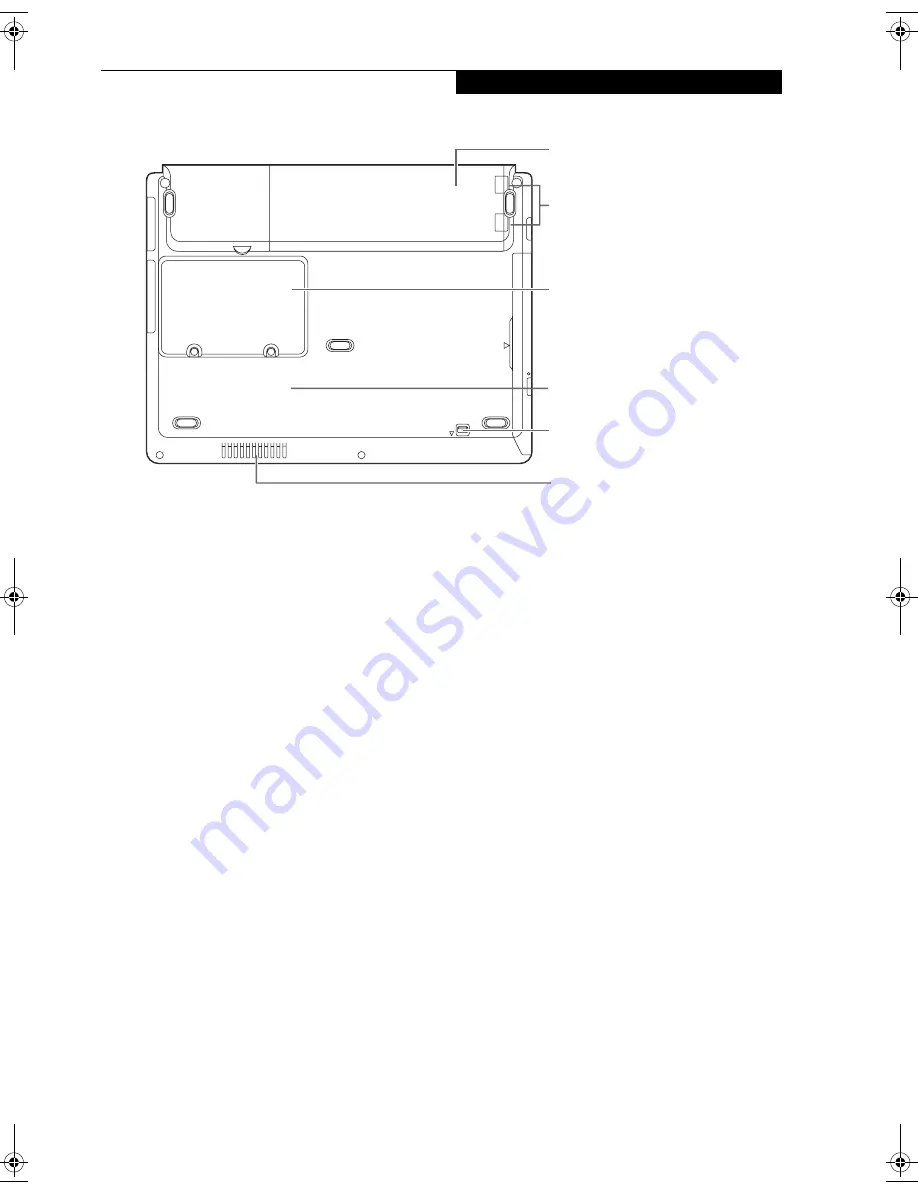
Figure 2-7 LifeBook notebook bottom panel
BOTTOM COMPONENTS
The following is a brief description of your LifeBook
notebook’s bottom panel components.
Lithium ion Battery
The internal Lithium ion battery can be installed in the
battery bay by aligning it with the slides and pushing it
into place. The battery can be removed when swapping
with a charged battery, or when the computer is to be
stored for a long period of time.
(See Lithium ion Battery
on page 31 for more information)
Battery Release Latches
Slide the battery releases to unlatch the battery.
Memory Module Cover
Removable cover over the memory modules.
(See
Removing a Memory Module on page 42 for more infor-
mation)
Flexible Bay Release Latch
The Flexible Bay Release Latch releases the flexible bay
device for removal.
(See Removing and Installing
Modular Devices on page 18 for more information)
Main Unit and Configuration Label
The configuration label shows the model number and
other information about your LifeBook notebook. In
addition, the configuration portion of the label has the
serial number and manufacturer information that you
will need to give your support representative. It identi-
fies the exact version of various components of your
notebook.
Air Vents
The air vents allow for proper cooling of the system
while it is operating.
Main Lithium ion Battery
Main Unit and
Configuration Label
(approximate location)
Memory Module Cover
Air Vents
Flexible Bay Release Latch
Battery Release Latches
P7010.book Page 11 Thursday, October 14, 2004 2:25 PM
Summary of Contents for Lifebook P7000 series
Page 6: ...L i f e B o o k P 7 0 0 0 N o t e b o o k ...
Page 7: ...1 Preface ...
Page 8: ...L i f e B o o k P 7 0 0 0 N o t e b o o k ...
Page 10: ...2 L i f e B o o k P 7 0 0 0 N o t e b o o k S e c t i o n O n e ...
Page 11: ...3 2 Getting to Know Your LifeBook Notebook ...
Page 12: ...4 L i f e B o o k P 7 0 0 0 N o t e b o o k S e c t i o n T w o ...
Page 28: ...20 L i f e B o o k P 7 0 0 0 N o t e b o o k S e c t i o n T w o ...
Page 29: ...21 3 Getting Started ...
Page 30: ...22 L i f e B o o k P 7 0 0 0 N o t e b o o k S e c t i o n T h r e e ...
Page 37: ...29 4 User Installable Features ...
Page 38: ...30 L i f e B o o k P 7 0 0 0 N o t e b o o k S e c t i o n F o u r ...
Page 55: ...47 5 Using the Integrated Wireless LAN ...
Page 56: ...48 L i f e B o o k P 7 0 0 0 N o t e b o o k S e c t i o n F I v e ...
Page 72: ...64 L i f e B o o k P 7 0 0 0 S e r i e s N o t e b o o k S e c t i o n F i v e ...
Page 73: ...65 6 Troubleshooting ...
Page 74: ...66 L i f e B o o k P 7 0 0 0 N o t e b o o k S e c t i o n S i x ...
Page 87: ...79 7 Care and Maintenance ...
Page 88: ...80 L i f e B o o k P 7 0 0 0 N o t e b o o k S e c t i o n S e v e n ...
Page 92: ...84 L i f e B o o k P 7 0 0 0 N o t e b o o k S e c t i o n S e v e n ...
Page 93: ...85 8 Specifications ...
Page 94: ...86 L i f e B o o k P 7 0 0 0 N o t e b o o k S e c t i o n E i g h t ...
Page 98: ...90 L i f e B o o k P 7 0 0 0 N o t e b o o k S e c t i o n E i g h t ...
Page 101: ...93 9 Glossary ...
Page 102: ...94 L i f e B o o k P 7 0 0 0 N o t e b o o k S e c t i o n N i n e ...
Page 107: ...99 Appendix A Using the Fingerprint Sensor Optional Device ...
Page 108: ...100 L i f e B o o k P 7 0 0 0 N o t e b o o k A p p e n d i x ...
Page 116: ...108 L i f e B o o k P 7 0 0 0 N o t e b o o k A p p e n d i x ...