36
L i f e B o o k N S e r i e s N o t e b o o k – S e c t i o n F o u r
Once your LifeBook notebook battery goes dead, you
will be unable to resume operation until you provide a
source of power either from an adapter or a charged
battery. Once you have provided power, you will need to
press the Power/Suspend/Resume button to resume
operation. If your battery dies, your data will be lost if a
power source is not provided promptly. Once you
provide power, you can continue to use your LifeBook
notebook while an adapter is charging the battery.
Damaged Batteries
The Battery Level indicator displays the operating level
available in that battery. (See “Battery Level Indicator”
on page 14). If this icon is red and blinking, it means
that the battery is damaged and must be replaced so it
does not damage any other parts of your notebook.
REPLACING THE BATTERY
With the purchase of an additional battery, you can have
a fully charged spare to swap with one that is not
charged.
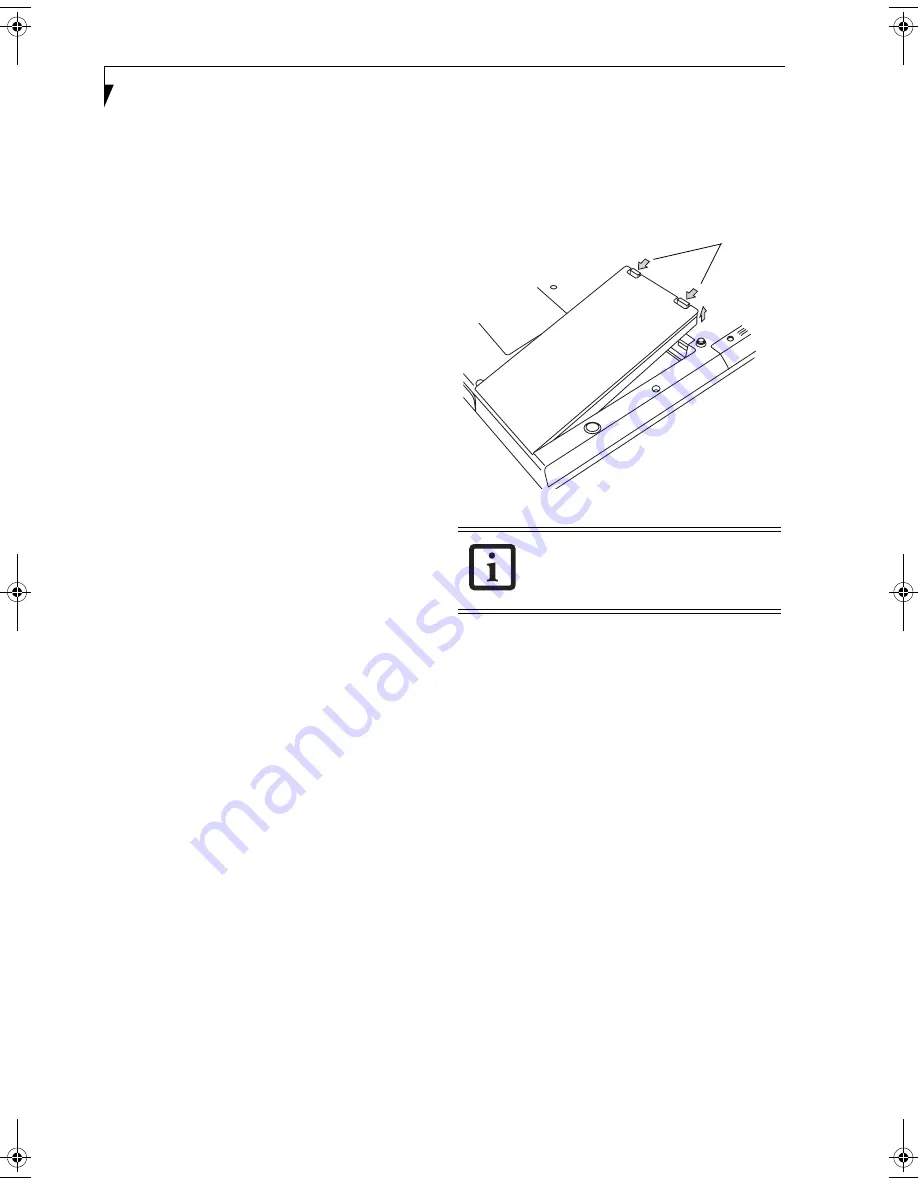
(Figure 4-1)
1. Have a charged battery ready to install.
2. Shut down your LifeBook notebook and disconnect
the AC adapter.
3. Press the battery release latches while lifting the
battery.
4. Remove the battery from the bay.
5. Insert the new battery into the bay. The pins will
automatically align with the connector.
6. Press the battery down until the battery release
latches snap into place.
7. Plug in the AC adapter and turn the power on.
Figure 4-1. Replacing the Battery
If the Lithium ion battery connector is not
fully seated, you may not be able to use
your LifeBook notebook or charge your
battery.
Battery
Release
Latches
N3510.book Page 36 Tuesday, January 18, 2005 11:05 AM
Summary of Contents for LifeBook N3500
Page 6: ...L i f e B o o k N S e r i e s N o t e b o o k 4 ...
Page 7: ...1 1 Preface ...
Page 8: ...2 L i f e B o o k N S e r i e s N o t e b o o k ...
Page 10: ...4 L i f e B o o k N S e r i e s N o t e b o o k S e c t i o n O n e ...
Page 11: ...5 2 Getting to Know Your Computer ...
Page 12: ...6 L i f e B o o k N S e r i e s N o t e b o o k S e c t i o n T w o ...
Page 30: ...24 L i f e B o o k N S e r i e s N o t e b o o k S e c t i o n T w o ...
Page 31: ...25 3 Getting Started ...
Page 32: ...26 L i f e B o o k N S e r i e s N o t e b o o k S e c t i o n T h r e e ...
Page 39: ...33 4 User Installable Devices and Media ...
Page 40: ...34 L i f e B o o k N S e r i e s N o t e b o o k S e c t i o n F o u r ...
Page 53: ...47 5 Using the Integrated Wireless LAN ...
Page 54: ...48 L i f e B o o k N S e r i e s N o t e b o o k S e c t i o n F i v e ...
Page 67: ...61 6 Troubleshooting ...
Page 68: ...62 L i f e B o o k N S e r i e s N o t e b o o k S e c t i o n S i x ...
Page 81: ...75 7 Care and Maintenance ...
Page 82: ...76 L i f e B o o k N S e r i e s N o t e b o o k S e c t i o n S e v e n ...
Page 85: ...79 8 Specifications ...
Page 86: ...80 L i f e B o o k N S e r i e s N o t e b o o k S e c t i o n E i g h t ...
Page 92: ...86 L i f e B o o k N S e r i e s N o t e b o o k ...
Page 93: ...87 9 Glossary ...
Page 94: ...88 L i f e B o o k N S e r i e s N o t e b o o k S e c t i o n N i n e ...
Page 100: ...94 L i f e B o o k N S e r i e s N o t e b o o k S e c t i o n N i n e ...
Page 104: ...98 L i f e B o o k N S e r i e s N o t e b o o k ...


