background image

64

Critical Point

When you load a multi-session CD, it may take much time for your computer to get ready to
start.
Loading a music CD while Windows is running causes CD Player to automatically start and
play the CD. You can continue the operation, using either one-touch buttons on the computer
or buttons on CD Player.

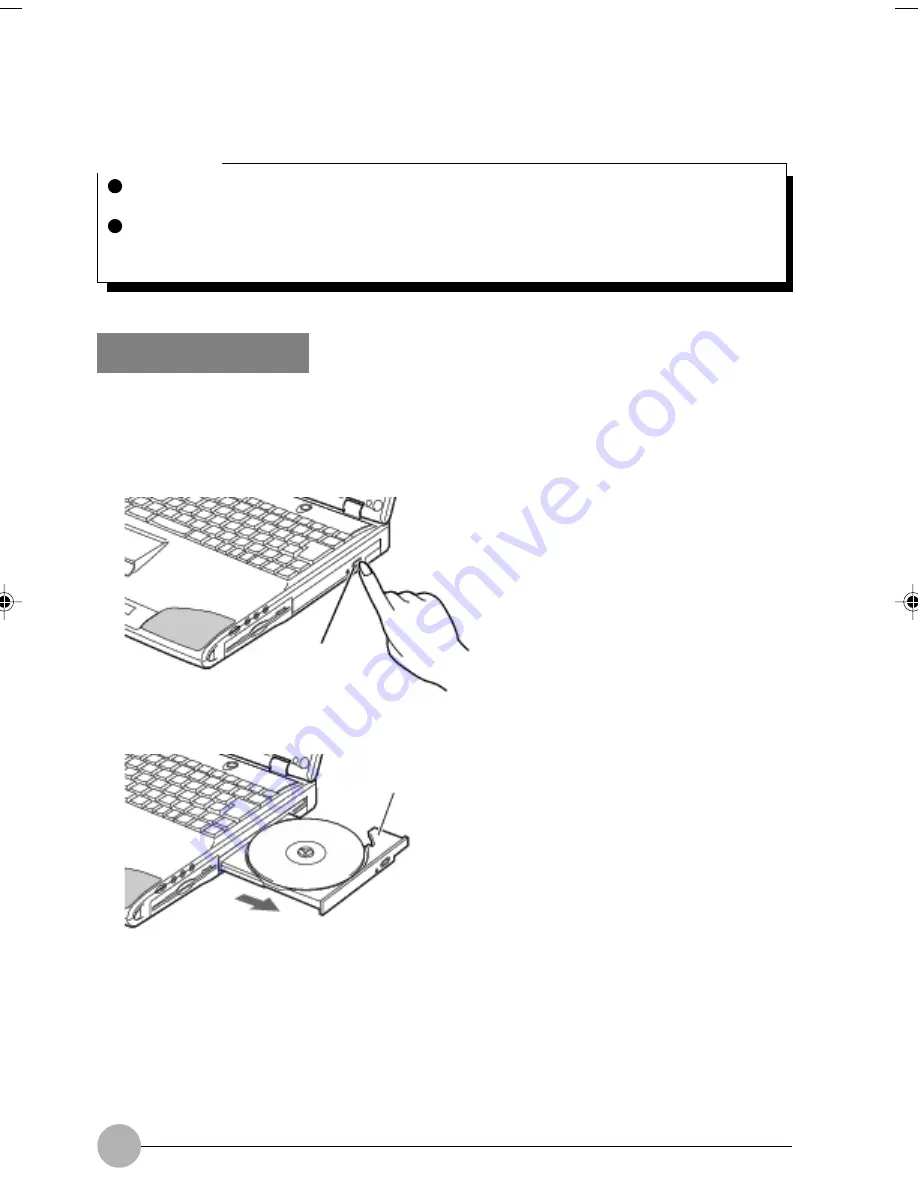
Ejecting the disc

1.

Exit the application you started from the disc.

2.

Press the EJECT button.
The tray pops out.

3.

Pull out the tray gently.

EJECT button

Disc tray

LB06_Erg14i (57-69)

24/01/02, 11:25 AM

64

Summary of Contents for LifeBook C6659

Page 1: ...oration and other rights owners Use of this copyright protection technology must be authorized by Macrovision Corporation and is intended for home and other limited viewing uses only unless otherwise authorized by Macrovision Corporation Reverse engineering or disassembly is prohibited Apparatus Claims of U S Patent Nos 4 631 603 4 577 216 4 819 098 and 4 907 093 licensed for limited viewing uses ...

Page 2: ...l rating of all products plugged into the wall outlet does not exceed 15 amperes 11 Never push objects of any kind into this product through cabinet slots as they may touch dangerous voltage points that could result in a fire or electric shock Never spill liquid of any kind on the product 12 Do not attempt to service this product yourself as opening or removing covers may expose you to dangerous v...

Page 3: ...ilar products must always be supervised by an adult Do not allow children access to the interior of any electrical products and do not permit them to handle any cables LIFEBOOK NOTEBOOK Caring for your LifeBook Notebook Your LifeBook notebook is a durable but sensitive electronic device Treat it with care Make a habit of transporting it in a suitable carrying case Do not attempt to service the com...

Page 4: ...s turned on Do not check your LifeBook notebook as baggage Carry it with you Always bring your System Recovery CD that came with your LifeBook notebook when you travel If you experience system software problems while travelling you may need it to correct any problems Never put your LifeBook notebook through a metal detector Have your notebook hand inspected by security personnel You can however pu...

Page 5: ... months without recharging it Increasing Battery Life Power your LifeBook notebook through the AC or optional auto airline adapater whenever possible If your LifeBook notebook is running on battery power all day connect it to the AC adapater overnight to recharge the battery Keep brightness to the lowest level comfortable Set the power management for maximum battery life Put your LifeBook notebook...

Page 6: ...isk drive in extremely hot or cold locations or in locations subject to severe temperature changes Store at temperatures between 50 F 10 C and 125 F 52 C Keep the floppy disk drive out of direct sunlight and away from hating equipment Avoid storing the floppy disk drive in locations subject to shock and vibration Never use the floppy disk drive with any liquid metal or other foreign matter inside ...

Page 7: ...he drive where it will be exposed to extreme temperatures Avoid using or storing the drive where it is damp or dusty Avoid using or storing the drive near magnets or devices that generate strong magnetic fields Avoid using or storing the drive where it will be subjected to shock or vibration Do not disassemble or dismantle the DVD CD RW D ROM drive PC CARDS Caring for your PC Cards PC Cards are du...

Page 8: ... used on any media or part of any Product returned to Fujitsu or its service providers for Warranty Service or other repair including but not limited to the costs of recovering such programs data or other information It is solely your responsibility as the Purchaser to back up any software programs data or information stored on any storage media or any part of a Product returned for Warranty Servi...

Page 9: ...ed below To do so would result in your modem being operated in a non compliant manner Call Attempts Retries Applications software shall be configured so that no more than 3 attempts are made to establish a connection to a given number Note if the modem can detect service tones up to 10 attempts can be made If the call sequence is unsuccessful there shall be a delay of at least 30 minutes before at...

Page 10: ...dialing while the New Zealand standard is DTMF tone dialing There is no guarantee that Telecom lines will always continue to support pulse dialing It is strongly recommended that pulse dialing is not used Some parameters required for compliance with Telecom s Telepermit requirements are dependent on the equipment PC associated with this device The associated equipment shall be set to operate withi...

Page 11: ...is not possible Please see below instruction for quick modem setup A If you are located in Australia 1 Go to Control panel select modem icon 2 Choose Australia in What country region are you in now 3 Select Phone system as Tone Dialing 4 Close B If you are located in New Zealand 1 Go to Control panel select modem icon 2 Choose New Zealand in What country region are you in now 3 Select Phone system...

Page 12: ...e system as Tone Dialing 5 Click OK and Apply Note The screens and illustrations shown in this examples may slightly vary depending on the operating environment that you have installed B If you are located in New Zealand 1 Click start select Control panel select Phone and Modem Options 2 Double click New Location 3 Choose New Zealand in Country region pull down menu bar 4 Select Phone system as To...

Page 13: ...indicates the concrete nature of the warning The example on the left is a caution for electric shock The circle and slash indicates prohibited behavior The symbol inside the circle indicates the concrete nature of the prohibition The example on the left indicates that disassembly is prohibited The indicates instructions that must be followed The symbol inside indicates the concrete nature of those...

Page 14: ...rs but uppercase letters may be used Product names The following product names are abbreviated as follows in this manual Microsoft Windows XP operating system is written as Windows XP Microsoft Windows 98 operating system is written as Windows 98 Microsoftt Millennium Edition operating system is written as Windows Me Microsoft MS DOS operating system Version 6 2 V is written as MS DOS Microsoft Wi...

Page 15: ...d their functions Flat point operation methods floppy disk unit handling and battery operation SECTION 2 This section explains installation of options for this computer SECTION 3 This section explains what to do when trouble occurs with this computer and when messages are displayed Read this section as the necessity arises SECTION 1 SECTION 2 SECTION 3 ...

Page 16: ...ng an application 22 Switching modes 22 Operating a music CD 23 6 LifeBook Application Panel 24 Application Launcher Buttons Disc Player Buttons 24 E Mail Notification LED 25 Configuring your LifeBook Application Panel 25 Configure your E mail Account Settings 29 To configure Email button setting 33 Using the CoolView Setting 38 Using the Disc Player 41 Desktop Control Panel 42 7 Power Saving Func...

Page 17: ...odem 69 12 Integrated Bluetooth 70 183 SECTION 2 1 PC Card 186 Caution in Using PC Cards 186 PC Cards that can be Used with your Computer 187 Preparing Necessary Items 187 Installing a PC Card 187 Ejecting a PC Card 188 2 LAN 191 Preparing Necessary Items 191 Connecting a LAN Cable 191 Installing memory 193 3 Expanding Memory 193 Preparing Necessary Items 193 4 Before Connecting Peripherals 200 Pr...

Page 18: ...necting a Mouse 206 Connecting a PS 2 mouse 206 Connecting a USB mouse 207 Disabling the Flat Point 207 9 Connecting an External Display 209 Preparing Necessary Items 209 Connecting an External Display 209 SECTION 3 1 When This Happens 212 2 Glossary 216 Index 224 ...

Page 19: ... using this computer including the names of the parts and their functions Flat point operation methods floppy disk unit handling and battery operation SECTION SECTION SECTION SECTION SECTION SECTION SECTION SECTION SECTION SECTION 1 1 1 1 1 1 1 1 1 1 SECTION 1 ...

Page 20: ...sists of more than 4 410 000 pixels dots if the resolution is 1400x1050 or 2 350 000 pixels if the resolution is 1024x768 which are arranged in rows and columns through the utilization of high level technology For technical reasons however some dots on your LCD display may not light up or be always lit but this does not mean that the display is defective There may be a slight difference in color b...

Page 21: ...l the mouse pointer 7 CoolView Panel Displays the operating status of the CoolView function 8 One touch buttons Used to start applications and to play music CDs 9 Speakers A sound output device of the computer 10 CoolScroll button Used to scroll up and down the active window By pressing the center you can start an application or operate Internet Explorer 11 Bluetooth TM status indicator For model ...

Page 22: ...e infrared communication 5 PC card slot Used to install optional PC cards The lower and upper slots are referred to as Slot 1 and Slot 2 respectively 6 PC card eject button Used to eject the PC card 7 Antitheft lock port Used to connect a commercially available antitheft cable 1 23 4 5 6 7 8 Critical Point The antitheft lock port supports the Kensington s Micro Saver Security System Trade name Mic...

Page 23: ...cting a device to the headphone jack Line In jack or microphone jack Failure to do so could cause damage to the device connected or result in hearing loss because of very loud sound produced Critical Point If no sound comes out from the speakers even if you adjust the volume press and hold down the key while holding the key down until you hear a beep Also check to see that Mute is not selected in ...

Page 24: ...es of microphones e g dynamic microphones cannot be used with your computer So before purchasing a microphone make sure it is compatible with your computer 5 Floppy disk drive Reads and writes information on floppy disks 6 CD DVD drive Reads information on CD ROMs and plays music CDs This drive is also capable of writing or rewriting data on CD R CD RW playing DVD VIDEOs and reading information on...

Page 25: ...ce 4 Modem Port Used to connect the computer to a telephone line via the supplied modular cable to browse the Internet or send and receive e mail across the Internet 5 Cooling fan Discharges heat from the computer The cooling fan automatically starts running when the temperature inside the computer rises to a specified temperature CAUTION FAILURE Don t block the vent for the cooling fan or heat wi...

Page 26: ...rt Used to connect the computer to a local area network LAN via LAN cable to browse the Internet or send and receive e mail across the Internet 7 USB port Used to connect a USB compliant peripheral device Some model come with three USB ports 8 External display port Used to connect an optional external display e g CRT display ...

Page 27: ...attery pack An internal battery pack is installed here 2 Built in Optical Drive An internal optical drive CD Rom DVD CD R RW or Combo Drive is installed here 3 Built in 1 44MB floppy drive An internal floppy drive is installed here 3 2 ...

Page 28: ...e window as pictorial data press the key while holding the and keys down Using painting software e g Paint you can edit save and print pictorial data To do so you need to import it to the painting software by selecting the Paste command from the Edit menu 5 Delete key Used to delete the character on the right of the cursor With this key you can also delete the file or icon you selected By pressing...

Page 29: ...t 12 Application key Used to open the pop up menu for the item selected This key has the same function as the right button of the Flat Point 13 Alt key Used in combination with other keys 14 Windows key Used to open the Start menu 15 Ctrl key Used in combination with other keys 16 Fn key This key specific to your computer is used in combination with other function keys as described below Turns on ...

Page 30: ...y again About the Ten key Mode The ten key mode refers to the mode that enables you to use certain character entry keys as ten keys a key arrangement that makes it easy to type in figures To activate the ten key mode simply press the key In the ten key mode is displayed on the CoolView Panel The figure you can enter with a ten key is marked on the front surface of the key If you connect an optiona...

Page 31: ... and right buttons of a mouse and their functions vary from application to application Pressing the CoolScroll forward or backward enables you to easily scroll a window up or down By pressing the center of the CoolScroll you can also start applications or operate Internet Explorer Critical Point The Flat Point may malfunction if condensation occurs or if it is moistened In addition if you operate ...

Page 32: ... you pointed has a submenu such items are marked with the submenu appears To drag an object move the mouse pointer onto the object move the object to the desired location by sliding the finger on the touch pad while holding the left button down and then move the finger off the pad Or move the mouse pointer onto the object and tap the touch pad twice in a row After that without moving the finger of...

Page 33: ...the mouse pointer speed When tapping the touch pad tap it quickly with the tip of a finger but not strongly The mouse pointer moves in the same direction as you slide a finger on the touch pad If the finger reaches one edge of the pad before you move the pointer to the desired location move the finger off the pad temporarily put it in an adequate place on the pad and start sliding the finger again...

Page 34: ...he CoolScroll button you can also start applications or operate Internet Explorer CoolScroll button Using the CoolScroll Button Feature 1 Click on the Windows Explorer you want to scroll 2 Press the CoolScroll button forward or backward The active window starts scrolling up or down To advance push this backward To return push this forward ...

Page 35: ... 2 You need to select this option only when you use the CoolScroll for the first time 3 Press the CoolScroll button forward or backward to select the application you want to open The default application are Screen Saver Calculator NotePad My Computer My Documents and Menu end 4 Press the center of the CoolScroll button The menu will disappears once you have selected the application and the applica...

Page 36: ...e It contains Back Next Reload Stop Home Add to Favorites and Menu end You can select this features for browsing Critical Point If another window is activated while the CoolScroll menu is open the window may scroll up or down as you move from one option to another in the menu using the CoolScroll button If you press the center of the CoolScroll when Internet Explorer is active the Internet Explore...

Page 37: ...attery Charge indicator This indicator appears when the battery is charged Remaining Battery Power indicator This indicator indicates the remaining battery power 4 Message display area Displays various messages according to the situation e g when the computer is in the process of starting or it receives e mail 5 Hard Disk Access indicator This indicator appears when the internal hard disk is acces...

Page 38: ...h Slide this switch down to activate the mode button and one touch buttons or slide it up to deactivate lock them 15 Mode button Used to switch the one touch buttons from one mode to another The one touch buttons are switched in the following sequence each time your press the Mode button One touch mode Disc mode activate One touch mode Launcher button activate 16 One touch buttons Allow you to qui...

Page 39: ...n and select Settings and Control Panel 2 If the System icon is not found in the Control Panel window click View all Control Panel options 3 Click the System icon 4 Click the Device Manager tab 5 Click the plus sign on the left of CD ROM The CD ROM device installed is displayed 6 Click the CD ROM device and then click the Properties button The CD ROM Device Properties dialog box appears 7 Click th...

Page 40: ...are switched accordingly as shown below Launcher mode Disc mode Setting Mode Button Setting or CoolView Setting Starting an application In One touch mode you can use the Quick Touch buttons to start the following applications Buttons Applications that start 1 A button NotePad 2 B button Calculator 3 Internet button 1 2 Internet Explorer Web browser 4 E main button 3 Outlook Express 1 After you hav...

Page 41: ... Start menu Doing so could make system operations unstable Don t use the one touch buttons to operate any types of CDs except music CDs Doing so may cause system operations unstable Always power your computer from the AC adapter when playing a music CD or a DVD VIDEO When Windows is terminated or on standby all volume control settings with Windows are ineffective and the volume is set to the highe...

Page 42: ... models of LifeBook notebook Pseudo off is the mode when Microsoft Windows has been shut down but the power switch on the notebook is still in the ON position On some LifeBook notebook models the panel also allows you to secure your notebook from unauthorized use Your notebook is pre installed with software utilities call LifeBook Application Panel that you use to operate and configure your LifeBo...

Page 43: ...ion Contact your service provider to determine if they support POP3 without Security password Authentication Configuring your LifeBook Application Panel When you start Windows the LifeBook Application Panel is automatically activated As an application launcher the LifeBook Application Panel is very flexible giving you a variety of options To set up the Panel to best suit your needs we have provide...

Page 44: ...he application buttons on the LifeBook Application Panel When you receive your notebook these buttons are configured to launch specific applications Below is the example of applications associated with each button To change an application associated with the Application A Application B or E mail buttons click on the tab for the button you would like to reconfigure for example Application A Click o...

Page 45: ...ess changed In order to reconfigure it to launch another program follow these easy steps 1 Select Internet and click on Specify a program to start 2 You can select Start a Program 3 Click either select a programs from Start Menu or Specify a program directly to select the program you wish to change on the Internet button ...

Page 46: ...ook Application Panel as often as you like Enabling disabling Application Launcher button Select Models Only At the bottom of each application setup page are two selectable options The first will Keep this button active even on Standby and the second will Keep this button active even on Turn Off You can enable disable either or both of these functions simply by check or unchecking the check Box Cr...

Page 47: ...he Mail check setting screen appears Critical Point The E mail Notification LED is available on select LifeBook notebook models only To use the E mail LED notification you must have access to a POP3 Server with no Security Password Authentication Contact your service provider to determine if they support POP3 without Security Password Authentication Configure your E mail Account Settings ...

Page 48: ...30 The Mail checking setting have 3 options for you to configure Checking time Interval check for new mail You can specific an interval to check for new mail Schedule check for new mail ...

Page 49: ...tification by changing the color of the control panel and the Ring when mail incoming notice Special recipient You can specify the day of week and time to schedule check for new mail It is no effect on Interval check After receiving mail Default setting ...

Page 50: ... special recipient can be added from the menu below it also allow you to change the color of the coolview panel and the ring pattern of the special recipient you have aded Important mail You can specify the important mail with the different color display on the coolview ...

Page 51: ...fter mail checking from pressing Application Panel on Standby or Power off To configure Email button setting 1 Click on All Programs 2 Click LifeBook Application Panel 3 Select LifeBook Application Panel 4 Application Panel properties menu pop up on the screen 5 Select Specify program to start ...

Page 52: ...34 6 Select Checking for a new mail 7 Click Next and select Specify a program directly You can specify other Email program to launch on this button ...

Page 53: ... select LAN connect or Dial up connection 9 If LAN Click on LAN Enter the POP3 Server name your account name and password for that account Consult your Service provider if you do not know or are unsure of the information requested ...

Page 54: ...P3 Server name your account name and password for that account The account name and password should be the same information you entered in the Dial Up configuration After all the information has been entered test the connection by clicking on Verify Connection If an error occurs check the settings and information on Dial Up Network and E mail setting ...

Page 55: ...ction and alert you of new mail To configure Password This allow you to configure the password when you power on the system from standby or power off using the Application Panel button This will protect the button from accidently activate the button application when you are not using the system To configure the password click on Set Password and Enable Password You can set the password by selectin...

Page 56: ...r on the taskbar 2 The CoolView Setting menu will pop up 3 You have three options for you to set Greeting Timer and Setting To configure Greeting This menu allow you to specify a message that show on the CoolView during start up You can specify a message to be show on the CoolView by selecting Show the message that you specified from the drop down menu and in the Messange box type in the message y...

Page 57: ...just add the message by clicking the message menu and type in your message and you can configure the backlight colour and the display time as well You can specify an interval time to notice a message on the CoolView The default interval time to display on the CoolView is every 10 minutes but you can modify the time The message menu allow you to specify a message to be display on the CoolView the b...

Page 58: ...lt the CoolView only show the clock If you want to show message or image on the CoolView you have to right click the CoolView manager on the taskbar and select message board It will show the message you specify on the CoolView Once you restart your system the message won t show on the CoolView and you have to select from the CoolView manager You can specify a message board that you want to show on...

Page 59: ...s button once to skip one track back Forward This is the second button to the right of the LCD Press this button once to skip forward one track Critical Point If you shut down from Windows while the Disc Player is playing an audio CD it will stop To continue to use the Disc Player press the play button The audio CD will start playing at Track 1 You can go into Suspend Mode or Save to Disk Mode whi...

Page 60: ...tically start over at the beginning as soon as it finishes the last track By default the Eject Button is disable from the CD Player Options Once you press the Eject button from the CoolView the drive will not eject If you want the Eject Button to be function uncheck this options Desktop Control Panel Your LifeBook notebook includes a desktop control panel You may use this panel to operate the Disc...

Page 61: ...lume on the LifeBook notebook The Disc Player desktop control panel is designed to be displayed in High Color 16 bit or in True Color 24 bit or more If you have your notebook s display set for 256 colors or less the Disc Player control panel will display in a basic mode You can change the CD Player design by selecting the setting from the pull down menu from the CD Player options by double click o...

Page 62: ...d it is powered from the AC adapter if the AC adapter is connected or from the internal battery if no AC adapter is connected Hibernation mode This mode shuts down the computer after saving all programs and data in memory into the hard disk As compared to standby mode it takes more time for the computer to suspend and resume system operation because the power is turned off automatically When the M...

Page 63: ...is being played A music CD or game software is being played Data is being written or rewritten on a CD R or CD RW No driver is installed yet for the peripheral device currently connected Don t connect or disconnect a peripheral device when the computer is in standby mode Always shut down the computer For some peripherals you don t need to turn off the compu ter before connecting or disconnecting t...

Page 64: ...e the icon blinks on the CoolView Panel and the LCD display goes off Using the SUS RES switch 1 Make sure that the or icon is not displayed on the CoolView Panel 2 Press the SUS RES switch After a while the icon blinks on the CoolView Panel and the LCD display goes off The illustration varies depending on the model and use conditions Critical Point Don t hold the SUS RES switch down for more than ...

Page 65: ... blinking on the CoolView Panel 2 Press the SUS RES switch After a while the system will resume at the same point as when you suspended operation The illustration varies depending on the model and use conditions Critical Point Don t hold the SUS RES switch down for more than 4 seconds If you do so the computer will be turned off and the data currently processed will be lost SUS RES switch Critical...

Page 66: ...y the computer consumes a small amount of power to keep data in the system RAM If power is supplied by the internal battery pay attention to the remaining battery life If the battery goes dead during standby all data being processed will be lost If you know you will not use the computer for a prolonged period of time don t put the computer into standby mode but save all data shut down Windows and ...

Page 67: ...er Options Hibernation Suspending operation There are two ways to put the computer into hibernation mode Using the SUS RES switch 1 Make sure that the or icon is not displayed on the CoolView Panel 2 Press the SUS RES switch The icon is displayed on the CoolView Panel and the power is turned off after a while The illustration varies depending on the model and use conditions SUS RES switch CoolView...

Page 68: ...h 1 Simply press the SUS RES switch A window appears on the screen showing the progress of the reloading of the saved data from the hard disk After a while the system will resume at the same point as when you suspended operation The illustration varies depending on the model and use conditions LCD display SUS RES switch Critical Point If pressing the SUS RES switch does not cause the computer to r...

Page 69: ...isplays a window showing the progress of the reloading of the saved data from the hard disk and after a while the system will resume at the same point as when you suspended operation Caution about the hibernation mode Your computer cannot be put into hibernation mode unless the hard disk has enough free space to store all data in memory In hibernation mode the reception of an incoming call will no...

Page 70: ...attery is fully charged When the remaining battery power is still 90 or more the unit does not start charging even if the AC adapter is connected Charging starts when the power is 89 or less When the MAIN switch is off the indication on the CoolView Panel disappears soon after charging is complete The battery charging cappaability deteriorates if the room temperature is too high or too low Battery...

Page 71: ...eans that the battery is completely exhausted The remaining battery power is 0 Critical Point If the Main switch is off turn it on When the room temperature is low the battery operation time becomes shorter When the battery has been used for a longer period the battery operation time duration becomes shorter because of the charging capability deterioration If you notice that the op eration time le...

Page 72: ...o not change the settings in the following items under Power Options Properties Low battery alarm Activate low battery alarm when power level reaches 10 is default setting Under Alarm Action you can set the setting of low battery alarm actions Critical battery alarm Activate critical battery alarm when power level reaches 3 is default setting Under Alarm Action you can set the setting of critical ...

Page 73: ...the computer with the battery power source The battery is a consumable product and the battery s charging capacity is reduced as the battery ages If your battery runs low quickly it is a sign that it is getting old Disposing of the battery When you dispose of a battery take measures so as to insulate the battery terminals with tape to prevent short circuiting Also check with your local government ...

Page 74: ...ll a new battery pack With the slit in the internal battery pack aligned with the projection on the computer push in the battery pack until the tabs click into place Internal battery pack Critical Point Battery exchange through the Bridge Battery function with intergrated Bluetooth models When the BIOS setting set to the following options Bluetooth Enable Wake on LAN Enable The battery exchange th...

Page 75: ...y object on top of it Never touch the magnetically coated disk behind the shutter Don t put a magnet or any magnetized object close to a floppy disk Don t stick more than one label to a floppy disk Sticking two or more labels could prevent the floppy disk from being ejected Floppy Disks that can be Used with your Computer The floppy disk drive of your computer supports floppy disks of the followin...

Page 76: ...ng a Floppy Disk 1 Insert a floppy disk in the floppy disk drive With the arrow marked surface up insert a floppy disk until the floppy disk eject button pops out Ejecting a Floppy Disk 1 Check to see that is not lit on the CoolView Panel and press the floppy disk eject button The floppy disk pops out Floppy disk eject button IMPORTANT If you press the floppy disk eject button while is lit on the ...

Page 77: ...a on a floppy disk from being erased by mistake slide the write protect tab up to open the hole the disk is write protected To write data on a write protected floppy disk slide the tab down to close the hole Not write protected Write protect tab Write protected ...

Page 78: ...ry it or don t let a wet disc dry naturally Don t use benzene thinner water record cleaner antistatic spray or silicone cloth to clean discs Always keep discs in their cases when they are not in use Don t bend a disc or put any heavy object on top of it Don t store discs in an extremely hot or cold place Discs that can be used with your computer 1 Video CDs and photo CDs can also be used with your...

Page 79: ...riting data click the Power Management icon in the Control Panel window and deactivate the System standby option Writing data on a CD R RW requires a large amount of electrical power So whenever writing data on a CD R RW connect the supplied AC adapter to your computer Slide the lock switch to the lower position Exit all running application programs When data is being written don t start any appli...

Page 80: ...the disc tray and drive or the disc itself When you are using a CD that starts automatically when it is loaded don t put your computer into standby mode If you place the computer into standby suspending operation mode while using an auto run CD the CD will start twice when you resume system operation when you restore the operation at the point at which you suspended operation and this could cause ...

Page 81: ...oolView Panel is blinking You can stop it from blinking if you want 3 Set a disc on the tray while holding the tray Align the hole of the disc with the projection at the center of the tray with the labeled surface up and push the disc down until it clicks into place Failure to fit a disc correctly onto the projection could prevent the disc from being ejected 4 Push the tray gently into the compute...

Page 82: ...e Windows is running causes CD Player to automatically start and play the CD You can continue the operation using either one touch buttons on the computer or buttons on CD Player Ejecting the disc 1 Exit the application you started from the disc 2 Press the EJECT button The tray pops out 3 Pull out the tray gently EJECT button Disc tray ...

Page 83: ...rn the power on and then press the EJECT button You may press the EJECT button even when the icon on the CoolView Panel is blinking You can stop it from blinking if you want 4 Take out the disc while holding the tray with a hand To detach the disc lift the edge of the disc while holding the projection with a finger as shown below 5 Push in the tray gently until it clicks into place Disc tray Proje...

Page 84: ...4 Select Eject from the menu that appears The tray pops out a little 5 Pull out the tray gently and take out the disc from it If you cannot eject the disc by this method follow these steps 1 Turn off your computer 2 Insert a straightened paper clip etc into the pinhole on the left of the EJECT button The tray will pop out 3 Pull out the tray gently and take out the disc from it EJECT button ...

Page 85: ...nding on the model and use conditions CAUTION ELECTRIC SHOCK Before replacing the battery pack be sure to turn off the computer and disconnect the AC adapter from it Also don t touch any connector of the computer or battery pack to avoid electric shock IGNITION Do not connect this computer directly to a digital line such as ISDN or it may cause a fire or failure Always connect it via a TA terminal...

Page 86: ...plug on the other end of the cable you have connected to the computer in Step 1 Modular connector Rosette connector If your telephone line connector is rosette type it must be changed to a modular type If such a change is necessary have it done by an authorized person You can also ask your telephone company to do the work Pull it out while pressing in the clip of the modular cable ...

Page 87: ... computer environment purchase a new one with the proper length Caution in using the Internal Modem Connecting to the Internet for a long time while still running some applications applies a considerable load on the CPU of the computer It may lead to interruption of communication via the internal modem In this case exit all applications you are running except your browser and e mail software befor...

Page 88: ...ll not occur in a particular installation If this equipment does cause harmful interference to radio or television reception which can be determined by turning the equipment off and on the user is encouraged to try to correct the interference by one or more of these measures Reoriente or relocate the receiving antenna Relocate the equipment with respect to the receiver Plug the equipment into a di...

Page 89: ...f radio transmitters in the premises for automatic identification system or particular types of small electric power radio transmitters are not being operated nearby 2 When the unit causes radio wave interference with a radio transmitter in the premises for automatic identification system please stop sending the radio wave immediately and contact the Service below to discuss effective management t...

Page 90: ...Screen and illustrations may be slightly different from your OS depending on the make and model Mouse Operation Mouse operation is described as single click in this manual Please interpret it to double click depending on situations Product Name BluetoothTM Integrated Microsoft Windows XP Home Edition Microsoft Windows XP Professional Microsoft Windows 2000 Professional Modem Station compatible to ...

Page 91: ... the unit incorrectly ignoring this symbol may cause death or serious injury To operate the unit incorrectly ignoring this symbol may cause minor injury or damage to equipment Also to describe details of injury or damage the following symbols are used in addition to the symbols above Symbols Meaning to call the attention to a warning or caution The details shownin or beside the symbols to call the...

Page 92: ...dication Turn off the personal computer in crowded places There may be people with pace makers nearby Again the radio waves from the unit may affect functioning of pace makers Indication Turn off the personal computer in aircraft as it may obstruct a safe flight Indication Do not operate the unit while driving as it may cause accident Please pull over the vehicle to operate the unit Indication Kee...

Page 93: ...n The unit may be very hot immediately after operation Please take the unit out after a while to prevent a risk of burning Prohibition Avoid putting magnetic cards near the unit as the contents of floppy discs or credit cards may be eliminated Prohibition Do not put a heavy object on the unit If it falls off the unit you could be injured Prohibition Avoid dropping and any other strong impact to th...

Page 94: ...nstructions The meanings of the symbols found in the text are as follows Important Describing cautions and prohibitions when operating Please read carefully Critical Point Describing useful points to know Please read if necessary ...

Page 95: ...nnecting 104 Disconnecting 139 Using Launcher Button 141 Using Memory Button 148 Using WalkIn Function 150 Using File Transfer Function 152 Using Object Push Function 156 Using Chat Function 158 Understanding Security Function 160 Internet Connection Sharing 164 Troubleshooting Q A 180 Glossary 183 ...

Page 96: ...ible Set up the LifeBook apart from other units such as electric machinery AV units OA units digital cord less telephone and fax more than 2m more than 3m from microwaves as it s affected by microwaves when microwave is in use Setting up near those units may cause noise or reception obstacles on TV and radio screening disorder may occur on particular channels of UHF and satellite broadcasting When...

Page 97: ...re and interpretation of manual portion attached to Modem Station are necessary Interpreting Part of The Modem Station Operating Instructions When using Modem Station with this unit please refer to your Modem Station manual To connect to Modem Station please read Connecting to Modem Station in this manual ...

Page 98: ...ding radio waves with Plugfree Stop sending radio waves with LifeBook Stop Sending Radio Wave by Plugfree Click on Radio Wave Send Stop Blue turns to Gray after a while and stops sending radio waves Important Just finishing Plugfree doesn t stop sending radio waves Stop Sending Radio Wave by LifeBook 1 Disconnect all BluetoothTM connections Disconnect by Disconnecting All Button 2 Click to termina...

Page 99: ...mputer without using cables As it uses radio waves to communicate it is superior to former connection through cables as you don t have to be bothered by a complicated cable set up or worry about the length of cable to communicate easily What is BluetoothTM With the former cable connection setting up cables was complicated With BluetoothTM connecting is simple ...

Page 100: ...rea you can carry the unit while it s connected 1 Different from one to one cable connection enables surrounding units to share the connection 1 Connection area varies depending on each unit Refer to the manual of each surrounding unit for details Practical Examples of Using BluetoothTM With BluetoothTM connecting to various units is easy and so there will be new ways to use the personal computer ...

Page 101: ... your personal computer wherever you like and enjoy the internet or check e mail inside the premise 2 Connecting to Personal Computer Enables sharing saved files in personal computer with other personal computers or sharing the internet connection with other personal computers Enables building up a small network without using network cable LAN cable Enjoy the internet wherever you like Home Networ...

Page 102: ...om your personal computer You don t have to connect a personal computer and a mobile phone with a cable 4 Connecting to PDA Mobile Terminal Leave your PDA in your bag while you update the data Sync on your diary and address book The complicated connection of a mobile phone and a personal computer is no longer required ...

Page 103: ...er or Slave Master BluetoothTM unit is only one among all connected BluetoothTM units and the rest of BluetoothTM are all Slave Master BluetoothTM unit is able to search other BluetoothTM units while connected and connect to several BluetoothTM units at the same time though Slave BluetoothTM units are not able to search or connect by itself or to be searched or connected by other units while conne...

Page 104: ... a password so as to avoid an unknown party to connect to you This password is called the BluetoothTM Passkey The BluetoothTM Passkey is the same as the password and both units need to input the same BluetoothTM Passkey to connect to each other when you are under security Also when you set up to retain your partner unit s information once you have connected you are able to omit to input the Blueto...

Page 105: ...or easy understanding and drag drop connection Graphical Operating Screen The operating screen of Plugfree shows searching device searching other BluetoothTM units and connecting status with animation and sound effect What is Plugfree Searching Device Showing searching status with sound effect and animation Screen of Connecting Status Showing connecting status visually ...

Page 106: ...r connecting to BluetoothTM unit and running application by clicking on launcher button is set for each purpose such as the internet or e mail One Touch Connection Using Memory Button Memorize up to three connecting status so that you can connect to other devices as it brings back to the memorized connecting status by simply click on memory button This makes it convenient to connect to regular par...

Page 107: ...n Area Connecting Automatically When a registered BluetoothTM unit enters to connection area connecting is done automatically File Transfer Function Enables exchanging and sharing files between two personal computers You can open files in your personal computer or copy files from other personal computers You can exchange and share files between two personal computers ...

Page 108: ...s from your personal computer Received Folder Transmission You can send files to your partner s BluetoothTM unit from your personal computer Chat Function Enables sending short messages to your partner s personal computer in real time Welcome Back I m Home Exchanging Messages ...

Page 109: ...nal computers and sharing files and a printer Building up network between several personal computers Security Function Enables setting up strict security such as permitting connection to limited units when other personal computers and surrounding units try to connect to you Limit Accesses ...

Page 110: ... personal computer Installation of BluetoothTM Driver What you need is A Personal Computer with Integrated BluetoothTM BluetoothTM Driver CD In Composite CD The driver has been pre installed in the factory Apply this section only when you re install your Windows Windows XP 2000 1 Turn on your personal computer and wait for Windows to start 2 When Windows starts make sure the BluetoothTM status ind...

Page 111: ... letters of signification of the CD ROM Drive D or E depending on your personal computer 6 Ensure the bullet next to Search for the best driver in these locations is selected and check box next to Include this location in the search is ticked 5 Ensure the bullet next to Install from a list or specific location Advanced is selected and click the Next button ...

Page 112: ...94 8 Click the Continue Anyway button 9 Click the Finish button Wait for the next screen to display Wait for the next screen to display ...

Page 113: ... the next screen to display Note As Microsoft s Windows Hardware Compatibility Test HCT is not available for bluetooth devices at this moment of time it will be certified in due course and certified HCT driver will be provided later Fujitsu is aware that Bluetooth TM USB Dongle Network device driver has not gone through the Windows HCT however is re assured it s functionality is fine with Windows ...

Page 114: ...e the bullet next to Install the software automatically Recommended is selected and click the Next button 14 Click the Continue Anyway button 15 Click the Finish button Wait for the next screen to display Wait for the next screen to display ...

Page 115: ...ve See the manual of your personal computer on how to insert a CD 2 Locate the Plugfree Program in the CD D LBC6659 Plugfree 3 Run setup exe and click the OK button Critical Point You may need to change the letters of designation of the CD ROM Drive D or E depending on your personal computer 4 Click the Next button ...

Page 116: ...98 5 Confirm where you are installing to make any changes if necessary and click the Next button 6 Click the Yes button 7 Click the No button Installation starts ...

Page 117: ...bullet next to Yes I want to restart my computer now to be selected take the CD out of the disk drive and 2 click the Finish button Starting Plugfree 1 Click on the desktop Plugfree starts Personal computer restarts 2 1 ...

Page 118: ...isplayed Insert FMV JW282 BluetoothTM Driver CD specify the next location and install Bluetooth Virtual COM Driver you may need to change the letters of designation of the CD ROM Drive D or E depending on your personal computer D winme98 for Windows Me 98 D winxp2k for Windows XP 2000 You don t have to specify driver location after the second Bluetooth Virtual COM Click the Next button and then Fi...

Page 119: ... wave 2 Indication Mode Switch Button Switches indication of Animation Mode and Launcher Mode 3 Device Cube Shows detected BluetoothTM device 4 Minimize Button Closes Plugfree window However Plugfree itself is not closed To get the window back double click on at the button right corner of the screen 5 Help Button Opens Plugfree on line help 6 Finish Button Closes Plugfree Critical Point When finis...

Page 120: ...ed up from left to right by device name by BluetoothTM address and by device class 13 Detected Device Information Displays detected device information 14 Security Button Displays security setup dialogue box 15 Device Detail Information Button Displays details of device information 16 Scroll Button Allows you to scroll when the number of detected devices is large 17 Launcher Button Connects to your...

Page 121: ...toothTM 1 Click Settings The dialogue box below is displayed 2 Set up Local Device name and Device type Local Device name The name displayed on your BluetoothTM counterpart devices when they are in search A simple name is preferred full size characters are available computer name of your personal computer is displayed at initial status Device type Selects a type of your device 3 Click the OK butto...

Page 122: ...our BluetoothTM counterpart device select the connecting method prepared according to function called Service Some services may not be available depending on capability of your counterpart device has Even when your counterpart device has the capability only services supported by Plugfree can be used Basically there are two kinds of service which Plugfree can use Serial System Service and Network S...

Page 123: ...M port number Make sure you are aware of the COM port number so that you may use each application Confirm the COM port number as follows 1 Start Plugfree 2 Click Settings 3 Click Information to display the Usable service list 4 Confirm COM Port Number of each Service in the Usable service list Network System Service NDIS networking Service is one of the Network Services Using this service enables ...

Page 124: ...hen using FAX function Mainly used for connecting to a Modem Station See Connecting to Modem Station for details on how to connect to a Modem Station Select this service when using file transfer function Mainly used for connecting to a personal computer Network setup is not required See Using File Transfer Function for more information Select this service when using object push function Mainly use...

Page 125: ...TM counterpart device 2 Initial setup For First Time Users 2 Performing Communication 1 Connecting a personal computer to your BluetoothTM counterpart device using Plugfree General Connecting Method 1 Start Plugfree 2 Click Search Device cube and information are displayed when available BluetoothTM devices are detected ...

Page 126: ...lick on device cube Right click on device cube and click the Connect button 4 Click on the service icon you want 3 Drag drop the device cube you want to connect to into the connection area Device cube can be dragged dropped on to any of the 6 positions in the connection area ...

Page 127: ...splayed Configure the service you wish to use and click the OK button When the screen below is displayed 1 Bluetooth TM passkey and 2 click the OK button This screen may not be displayed depending on the type or setup of your BluetoothTM counterpart device Also it may be shown once on both your personal computer and your BluetoothTM counterpart device in that case enter the same BluetoothTM Passke...

Page 128: ...etup tool accompanying with Modem Station is not required Do not install Modem Station for connecting as installation is done with Plugfree If modem setup tool is installed to your personal computer please uninstall it 1 Modem Station Setup Refer to Modem Station Operating Instructions for details 2 Installation of Modem Driver Operating on Personal Computer Install modem driver for Modem Station ...

Page 129: ...rn on Modem Station 2 Set PC Card to your personal computer See the manual of your personal computer 3 Connect to Modem Station with your personal computer using Plugfree Connecting through dial up network FAX Communication Installing Modem Driver To use the Modem Station modem function installing modem drivers to your personal computer is required Please carry out the following steps to install t...

Page 130: ...e the manual of your personal computer on how to insert a floppy disk 3 Click Start button then Control Panel ForWindows XP click the Start button Control Panel and Printer and Other Hardware 4 Click the Modem button or Phone and Modem Options For Windows XP 2000 click the Modem tab again 5 Click Add button 6 1 Tick the check box next to Don t detect my modem I will select it from a list and 2 cli...

Page 131: ...1 Select FUJITSU FMWT 401 and 2 click the Next button 10 For Windows XP 2000 1 click the bullet next to Selected Port to be selected 2 select the port you use with this unit from the list and 3 click the Next button Critical Point When the screen of Digital Signature Not Found is displayed with Windows click Yes 11 Click Finish 12 Take the floppy disk for BluetoothTM modem setup tool out of the di...

Page 132: ... 2 Click Search When Modem Station is detected device cube and FUJITSU FMWT 401 are displayed 3 Click Security settings 4 Select Use Bluetooth TM passkey below in Bluetooth TM passkey during authentication and enter the BluetoothTM Passkey of Modem Station ...

Page 133: ...tion The number following PIN is your BluetoothTM Passkey 5 Click the OK button 6 Drag drop device cube into the connection area Service list is displayed 7 Click Dial up networking Service When device cubes are connected with line connection to Modem Station with your personal computer is completed ...

Page 134: ... up connection to the internet is available Please use FUJITSU FMWT 401 as the modem you use for connecting FAX Communication 1 Start Plugfree 2 Click Search When Modem Station is detected Device Cube and FUJITSU FMWT 401 appears ...

Page 135: ...tion and enter the BluetoothTM Passkey of Modem Station Services list is displayed Critical Point The BluetoothTM Passkey is displayed on the sticker at the back of the Modem Station The number following PIN is your BluetoothTM Passkey 5 Click the OK button 6 Drag drop device cube into the connection area ...

Page 136: ...our personal computer and Modem Station is completed when device cubes are connected with line With FAX communication software FAX communication is available When setting up FAX communication software select FUJITSU FMWT 401 as the modem you use ...

Page 137: ...up for sharing with personal computers Sharing Set Up 3 Setting up files and folders to share Sharing Set Up of Files 2 Connecting to your counterpart computer Connecting Using Network Service Connecting Using Serial Service Setting up a Network Windows XP 1 Click the Start button then Control Panel 2 Click Internet Connection to Network 3 Click Network Connection 4 Right click Local Area Connecti...

Page 138: ...Critical Point If Connecting Method is other than Bluetooth USB Dongle Network click the Cancel button and select another connection 6 1 Click Internet Protocol TCP IP then 2 click the Properties button 1 2 ...

Page 139: ...A 192 168 100 2 255 255 255 0 Personal computer B 192 168 100 3 255 255 255 0 Personal computer C 192 168 100 4 255 255 255 0 Personal computer X 192 168 100 254 255 255 255 0 Be aware that you do not to repeat the same IP address The subnet mask is standardized to 255 255 255 0 When using DHCP server select Get IP Address Automatically 8 Click the Close button 9 When prompted to restart click the...

Page 140: ...en change the setting click the Change button and change Item Meaning Names used to identify computers on the network The maximum length is less than 15 characters Workgroup name of the network All the personal computers in a network have the same group name The maximum length is less than 15 characters ...

Page 141: ... follow the instruction on the screen to restart Windows 2000 1 Click on Start button Settings then Control Panel 2 Click Network and Dial up Connections 3 Click Local Area Connection 2 4 Ensure Connecting Method is Bluetooth USB Dongle Network Critical Point If Connecting Method is other than Bluetooth USB Dongle Network click the Cancel button and select another connecting method ...

Page 142: ...124 5 1 Select Internet Protocol TCP IP then 2 click Properties 6 1 Click the bullet next to Use the following IP address to be selected 2 enter IP address then 3 click the OK button 1 2 3 1 2 ...

Page 143: ...ter C 192 168 100 4 255 255 255 0 Personal computer X 192 168 100 254 255 255 255 0 Be aware that you do not repeat the same IP address Subnet mask is standardized to 255 255 255 0 When using DHCP server select Get IP Address Automatically 7 Click the OK button 8 When prompted to restart click the Yes button Check the computer name and workgroup name after restarted 9 Click the Start button Settin...

Page 144: ...work All the personal computers in a network have the same group name The maximum length is less than 15 characters 12 Check Full computer name and Workgroup If you wish to change the settings click the Properties button and change Important Connection to a network may not be possible when the names include double byte characters periods and special characters ...

Page 145: ... OS Windows XP 1 Click the Start button then Control Panel 2 Click Internet Connection to Network 3 Click Network Connections 4 Right click Local Area Connection 2 then click Properties on displayed menu 5 Ensure Connecting Method is Bluetooth USB Dongle Network Critical Point If Connecting Method is other than Bluetooth USB Dongle Network click the Cancel button and select another connection ...

Page 146: ...128 6 1 Ensure the check box next to File and Printer Sharing for Microsoft Networks is ticked then 2 click the OK button When the check box is not ticked click empty to select it ticked 1 2 ...

Page 147: ...oft Networks then 2 click the OK button Critical Point When File and Printer Sharing for Microsoft Networks is not displayed follow the procedure below to perform Step 6 1 Click the Install button 2 1 Click the Service button then 2 click Add 1 2 1 2 ...

Page 148: ...is ticked then 2 click the OK button When the check box is not ticked click empty to select it ticked 7 Click on the Control Panel window Windows 2000 1 Click the Start button Settings then Control Panel 2 Click Network and Dial up Connections 3 Double click Local Area Connection 2 1 2 ...

Page 149: ...ot displayed follow the procedure below to perform Step 5 1 Click the Install button 2 1 Click the Service button then 2 click Add 3 1 Click File and Printer Sharing for Microsoft Networks then 2 click the OK button 5 Click the OK button 6 Click on the Control Panel window to close ...

Page 150: ...plorer 2 Right click the Work folder in C Drive then click sharing and security from the displayed menu 3 Tick the check box next to Share this folder on the network and configure necessary items Share name Allow network users to change my files Item Meaning Sets up the name of drive or folder to share Enables network users to produce change delete files in share folders 4 Click the OK button The ...

Page 151: ...nd configure necessary items Share name Comment User limit Access permissions Caching Item Meaning Set up the name of shared drives or folder Enter the explanation of shared drives or folders Limit the number of users to share Set up access authorization to folders Set up cache of folders 4 Click the OK button The Work folder is now available to other personal computers and the icon for the Work f...

Page 152: ...unterpart device wants to connect to you see the manual of your BluetoothTM counterpart device 1 Start Plugfree 2 Click Search to search device 3 When available personal computer is detected device cube and device information are displayed 4 Drag drop the device cube you want to connect to the connection area Service List is displayed ...

Page 153: ...DIS networking Service Critical Point The service displayed differs depending on your counterpart personal computer When device cubes are joined by a line on the screen connection between two computers is completed ...

Page 154: ... your personal computer and your BluetoothTM counterpart device once each in that case enter the same BluetoothTM Passkey Ask for the BluetoothTM Passkey from the owner of your counterpart personal computer Connection Using Serial Service This section describes the connecting procedure to your partner personal computer using the serial service 1 Start Plugfree 2 Click Search to search device 3 Whe...

Page 155: ...137 4 Drag drop the device cube you would like to connect into the connection area Service list is displayed 5 Click Serial Service 6 1 Choose the service you want to use then 2 click the OK button 1 2 ...

Page 156: ...BluetoothTM passkey of your BluetoothTM counterpart device then 2 click the OK button This screen may or may not be displayed depending on your BluetoothTM counterpart device s type or setup Also this screen may be displayed to your personal computer and your BluetoothTM counterpart device once each in that case enter the same BluetoothTM Passkey Ask for the BluetoothTM Passkey from the owner of y...

Page 157: ...ore proceeding to disconnect the device 1 If Plugfree is in Launcher Mode click the Switch Display Mode button It turns to animation mode 2 Drag the device cube you want to disconnect from the connection area and drop out of connection area You can drag drop anywhere out of the connection area Critical Point You also can right click the device cube you want to disconnect and click the Disconnect b...

Page 158: ...tiple services all services are cut at the same time See Help for more information on how to disconnect each service Disconnecting by Disconnect All Button This section describes how to disconnect all devices in connection by Disconnect All button 1 Click Disconnect All 2 Confirm the disconnection display and then click the Yes button The device cubes in the connection disappear and the communicat...

Page 159: ...ard browser after connected to a registered BluetoothTM device 2 e mail button Runs standard e mail software after connected to a registered BluetoothTM device 3 FAX button Runs specified FAX software after connected to a registered BluetoothTM device 4 File Transfer button Opens the window for file transfer after connected to a registered BluetoothTM device 5 LAN Access Point button Connects to L...

Page 160: ...thTM device 2 Register the buttons you want to use as follows Critical Point See Help for details on configuring items WEB mail Button Register BluetoothTM device to connect to when dialing up 1 1 Click Web mail then 2 click Settings 2 1 Click the drop down list next to Connected remote device to select the BluetoothTM device to connect to then 2 click the OK button 3 Click the Apply button 1 2 1 ...

Page 161: ... to connect to for using FAX 1 1 Click the FAX button then 2 click Settings 2 1 Click the drop down list next to Connected remote device to select the BluetoothTM device to connect to then 2 click the OK button 3 Click the Browse button 2 1 2 1 ...

Page 162: ...button File transfer Button Register BluetoothTM device to connect to for the file transfer function 1 1 Click File transfer then 2 click Settings 2 1 Click the drop down list next to Connected remote device to select the BluetoothTM device to connect to then 2 click the OK button 2 1 2 1 ...

Page 163: ...ipt folder My Document My Plugfree Inbox When changing the folders above click Sharing Setup or Sync Receipt from the tree directory then click Browse to select another folder for file transfers 3 Click the Apply button LAN access point Button Register LAN access point to connect to 1 1 Click LAN access point then 2 click Settings 2 1 Click the drop down list next to Connected remote device to sel...

Page 164: ...ist next to Dial up connection used for connection to select dial up connection Critical Point See the manual accompanying with LAN access point for operating instructions regarding the dial up connection 4 Click the Apply button ...

Page 165: ... number of your connection partners 4 Click the Apply button 5 Click the OK button when all registrations are completed How to Use 1 Start Plugfree 2 Click the necessary button Registered applications start after connecting automatically When the File Transfer button is clicked the Plugfree File Transfer folder opens Critical Point In case the button is registered to connect to multiple devices an...

Page 166: ...atus and can be utilized in the home and office Important You can record the connection status to memory buttons only when you demand connection Record Connection Status 1 Start Plugfree then search and connect to the BluetoothTM device 2 Click Memory Record Button 3 1 Click the button you wish to register 2 name the recording connection status then 3 click the Record button Critical Point When yo...

Page 167: ... wish to run at the same time as connection 4 To confirm click the OK button Reproduce Recorded Connection Status 1 Start Plugfree 2 Click on a recorded button Search and connection are automatically done and recorded connection status is reproduced Critical Point In case the button is registered to connect to multiple devices and when some registered devices are already connected only those devic...

Page 168: ... automatically done Setting Up of WalkIn Function 1 Click Settings when not connected to BluetoothTM device 2 1 Click WalkIn settings 2 tick the check box next to Enable WalkIn function then 3 click the Add button 3 1 Click the drop down list next to Connected remote device to select a BluetoothTM device to connect to 2 select Service of remote device to be connected then 3 click the OK button Cri...

Page 169: ...ions are finished Now when registered counterpart BluetoothTM devices are in the connection area they connect automatically Critical Point Register the BluetoothTM Passkey beforehand so that the dialogue box below does not appear every time you connect See Omission of BluetoothTM Passkey for registration method ...

Page 170: ...eating common folders accessable from other BluetoothTM devices and exchanging files and folders This function is mainly used for connecting to a personal computer or PDA Common Folders Common Folders Synchronization of files and folders Collates folders contents between two personal computers and matches them if there is a difference A txt created at 15 00 1 Collation Synchronized Folder A txt cr...

Page 171: ...he personal computer configured beforehand and the window below opens automatically 2 Click File transfer Remote folder This displays the contents of the shared folder by your remote computer Critical Point The file transfer function is unavailable when used simultaneously with the object push function ...

Page 172: ... windows open common folders in your counterpart BluetoothTM device only one can operate the file Initially the common and synchronizing folders for the file transfer function are specified as follows Common Folder My Document My Plugfree Common Synchronized Folder My Document My Plugfree Sync Copying Files and Folders from Remote Device toYour Personal Computer 1 Right click on the files and fold...

Page 173: ...ick the files or folders you want to synchronize then click Synchronize When the message Synchronization of Files is Finished is displayed click the OK button Collation the contents of synchronizing folder set in your personal computer is done with the steps above When synchronizing files or folders exist in both personal computers the newly dated one takes the place of an old one When the files o...

Page 174: ... or mobile phone Critical Point You cannot see your counterpart device s folders or files Therefore you cannot select files from your counterpart BluetoothTM device and copy them to your personal computer How to Use Object Push Function Critical Point The object push function and the file transfer function cannot be used simultaneously Transmitting 1 Start Plugfree then search and connect to the B...

Page 175: ...Point You are able to transmit multiple files but you cannot transmit a folder Receipt When receiving files with Plugfree they are saved in set Receipt folder Initially it s specified as follows Receipt folder My Document My Plugfree Inbox Critical Point When a file is received and has the same name as a file which already exist in the receipt folder the older file s name is changed ...

Page 176: ...ersonal computers connected with BluetoothTM exchanging of simple messages is available Plugfree have aprication Plugfree Chat so can use Chat Function immediately How to Use Chat Function 1 Start Plugfree then click the Chat button Connected to already set personal computer then Plugfree Chat starts Using Chat Function Critical Point Setting the launcher button beforehand is necessary ...

Page 177: ...artner you wish to Chat to then 2 click Chat 3 1 Enter your message in the area then 2 click Chat The message you sent is displayed as 3 When you get a reply it s displayed as 4 4 Click to finish Plugfree Chat 3 4 2 1 1 2 ...

Page 178: ...ther BluetoothTM devices demand connection to you the dialogue box below is displayed 1 In this case enter the appropriate BluetoothTM Passkey up to 16 alphanumeric characters and 2 click the OK button Then the dialogue box is displayed on the other device and the counterpart needs to enter the same BluetoothTM Passkey to be connected Setting Up Common BluetoothTM Passkey This means the initial se...

Page 179: ...ed as the BluetoothTM Passkey 2 1 Enter up to 16 alphanumeric characters in Common BluetoothTM Passkey then 2 click the OK button To use a common BluetoothTM Passkey you need to set the BluetoothTM Passkey for your counterpart BluetoothTM device to common Bluetooth TM passkey See Omission of Entering BluetoothTM Passkey or the procedure 1 2 ...

Page 180: ...BluetoothTM Passkey is transmitted to your counterpart when you get a connection demand Your counterpart only needs to enter the BluetoothTM Passkey This is convenient to use the same BluetoothTM Passkey for multiple BluetoothTM devices 2 Use BluetoothTM passkey below When you select this dialogue enter the BluetoothTM Passkey and click the OK button configured BluetoothTM Passkey is transmitted t...

Page 181: ...thTM device 2 1 Click Settings of standard security 2 click the bullet next to Enable connection only from device below to be selected 3 click the drop down list to select the devices you want to permit connection to then 4 click the Add button 3 Repeat step 2 depending on the number of devices you want to permit connection then click the OK button 1 2 3 4 ...

Page 182: ...me connection via a home network A primary computer that provides network connectivity must have one connection port for the internet eg a modem and one connection port for a home network eg LAN Home Network By using BluetoothTM for a home network connection such as in the above illustration the internet can be accessed from anywhere in the house Internet Connection Port for Home Network Connectio...

Page 183: ...internet connection it must be set up according to the manual of your personal computer or provided by your Internet Service Provider 2 Start Plugfree to set up a network with other computers 3 Set up Connection Sharing Windows XP 1 Click the Start button then Control Panel 2 Click Network and Internet Connection 3 Click Set up or change a home or small office network 4 Confirm the screen and clic...

Page 184: ...puter connects directly to the Internet to be selected then 2 Click the Next button 7 1 Select a LAN or modem which provides the internet connection then 2 click the Next button Critical Point Do not select Bluetooth USB Dongle Network 1 2 1 2 ...

Page 185: ...nge the computer name if necessary then 2 click the Next button 9 1 Enter a Workgroup name if necessary then 2 click the Next button 10 1 Confirm the settings you have made then 2 click the Next button 1 2 1 2 2 1 ...

Page 186: ...Click the bullet next to Just finish the wizard to be selected then 2 click the Next button 12 Click the Finish button When prompted to restart the system click the No button exit from Plugfree then restart 1 2 ...

Page 187: ...Dial up Connections 2 Right click on the LAN or modem which provides the internet connection then click the Properties button 3 Click on the Sharing tab 4 1 Tick the check box next to Enable Internet Connection Sharing for this connection then 2 click the OK button 1 2 ...

Page 188: ...lient on the home network 1 Set up TCP IP Windows XP 1 Click the Start button then Control Panel 2 Click Network Connections 3 Right click Local Area Connection 2 and click Properties 4 1 Confirm that Connection Method is BluetoothTM 2 click Internet Protocol TCP IP then 3 click Properties 1 2 3 ...

Page 189: ...let next to Obtain an IP address automatically to be selected then 2 click the OK button 6 Click the OK button 1 2 Critical Point If the connection method is other than BluetoothTM click Cancel and select another connection ...

Page 190: ...col TCP IP then 3 click Properties Critical Point If the connection method is other than BluetoothTM click Cancel and select another connection Windows 2000 1 Right click My Network on the desktop and click Properties 2 Right click Local Area Connection 2 and click Properties 2 1 3 ...

Page 191: ... the personal computer host through a network system service 2 Configure the Internet Connection Wizard and other settings Windows XP 1 Click the Start button then Control Panel 2 Click Network and Internet Connection 3 Click Set up or change your home or small office network 4 Confirm the screen and click the Next button 5 Click the OK button ...

Page 192: ... to This computer connects to the Internet through another computer on my network or through a residential gateway to be selected then 2 click the Next button 7 1 Click on the bullet next to Let me choose the connections to my network to be selected then 2 click the Next button 1 2 ...

Page 193: ...ck boxes except Bluetooth PC CARD Network then 2 click the Next button 9 1 Change the computer name if necessary then 2 click the Next button 10 1 Enter a workgroup name if necessary then 2 click the Next button 1 2 1 2 1 2 ...

Page 194: ... then 2 click the Next button 12 1 Click on the bullet next to Just finish the wizard to be selected then 2 click the Next button 13 Click the Finish button When prompted to restart the system click No then exit from Plugfree and restart 1 2 2 1 ...

Page 195: ...izard 2 1 Click the bullet next to I want to set up my Internet connection manually or I want to connect through a local area network LAN to be selected then 2 click the Next button 3 1 Click the bullet next to I connect through a local area network LAN to be selected then 2 click the Next button 1 2 1 2 ...

Page 196: ...178 4 1 Clear all check boxes then 2 click the Next button 5 1 Click the bullet next to No to be selected then 2 click Next 1 2 1 2 ...

Page 197: ...his box and then click Finish then 2 click Finish 1 2 How to Use 1 Start the computer which connects to the internet host 2 Start Plugfree on the host computer and connect with other computers clients through the network system service 3 Connect to the internet from client computers ...

Page 198: ...evice been set up correctly See the manual of your BluetoothTM counterpart device Is your BluetoothTM counterpart device too far Try moving it closer Though our product s transmission range is approximately 50m it may be shortened depending on the location of the device Repeat Device Search for several times A window for entering your BluetoothTM Passkey is displayed when your computer receives a ...

Page 199: ... them unusable Please follow the steps to enable the Plugfree COM port selections 1 Click the Plugfree Settings button then COM Port Setting 2 Click Return to Default Setting and confirm the available COM port numbers 3 Click the OK button Then reset COM port numbers for your communication software and BluetoothTM device See the manuals accompanying each product for settings If you are using a Mod...

Page 200: ... to resume transmission 1 Close the communication software 2 Restart Plugfree then connect using Plugfree 3 Resume transmission Device Search first detects devices then obtain device names Depending on when you press the button for the second time the Name Discovery process may be interrupted Confirm that you are connected to your BluetoothTM counterpart device via a FAX Service then restart the d...

Page 201: ...e devices through a single NDIS connection Functions available with BluetoothTM Different functions are available for different equipment A mask value which is used to obtain a subnet network address from an IP address A service that enables communication with a remote device through a virtual serial port One virtual serial port can communicate with one remote device You can set up multiple virtua...

Page 202: ......

Page 203: ...2 2 2 2 2 This section explains installation of options for this computer SECTION SECTION SECTION SECTION SECTION SECTION SECTION SECTION SECTION SECTION 2 2 2 2 2 SECTION 2 ...

Page 204: ...c Observe the following points when using PC cards to prevent breakdown Do not place PC cards in high temperature locations and locations subject to direct sunlight Do not subject PC cards to strong shocks Avoid rubbing PC cards and building up static electricity Do not place heavy objects on top of PC cards Be careful to avoid spilling coffee and other liquids on PC cards When storing a PC card a...

Page 205: ... driver when you install a specific PC Card Check with the instruction manual supplied with each PC Card Critical Point Some PC cards cannot be used along with any other PC card For more information refer to the manual for your PC card Your computer does not support PC cards with a working voltage of 12V PC Cards that can be Used with your Computer Your computer is compatible with PC Card Standard...

Page 206: ...on of how to remove a PC card Critical Point When you remove a PC card attached with a cable do not pull the cable connected to the PC card or it will result in failure When you remove a PC card follow the procedure below or it will result in failure Some PC cards require shutting down when you remove them Consult with the manual of the PC card 1 Install the PC card Insert the PC card fully into t...

Page 207: ...the PC card PCMCIA Properties dialog box that appears when you click the PC Card icon in Control Panel Doing so may cause your computer to become unsta ble Critical Point The message This device cannot be removed may appears depending on the PC card inserted If this message appears shut down the computer and proceed to step 4 CAUTION HIGH TEMPERATURE A PC card may be quite hot right after use Wait...

Page 208: ...card eject button The PC card eject button pops out 5 Eject the PC card Press the PC card eject button and pull out the PC card that has popped out 6 Push in the PC card eject button PC card eject button PC card PC card eject button ...

Page 209: ... depending on the network device used So be sure to read also the manual for the network device used LAN cable Network device Manual for the network device used Connecting a LAN Cable WARNING ELECTRIC SHOCK Before connecting a LAN cable always turn off your computer and disconnect the AC adapter if it is connected or you could get an electric shock ELECTRIC SHOCK If it thunders immediately turn of...

Page 210: ...the Power Options icon is not found in the Control Panel window click View all Control Panel options 7 Click the Power Options icon 8 Click of System standby on the Power Schemes tab and select Never 9 Click OK 10 Make all necessary network settings Critical Point When disconnecting the LAN cable from the LAN port pull it while pushing in the tab to avoid damage to the plug When using the LAN devi...

Page 211: ... computer Touch ing a terminal with oily fingers could cause poor contact FAILURE Memory is composed of parts very sensitive to static electricity and it may be dam aged even by static built up in a human body Before handling memory always touch a metal object with your hand to discharge static FAILURE Before installing or removing memory be sure to turn off the computer Installing or removing mem...

Page 212: ... cover in the direction of the arrow to detach it 4 Pull the lug on the keyboard slightly in the direction of the arrow Screw cover Cover Critical Point To avoid damage don t touch any components other than those needed for installation or removal of memory To avoid damage be careful not to drop a screw removed etc in the computer ...

Page 213: ...ks into place 7 Close the keyboard carefully While aligning the tabs on the keyboard with the notches in the computer upper panel close the keyboard carefully so as not to catch any cable between the keyboard and the computer 8 Attach the cover and secure it with a screw Reattach the cover that was removed in step 3 Notch in the RAM module Keyboard Tabs on the keyboard Cover Keyboard Expanded RAM ...

Page 214: ...shows an example of the expansion of 64 MB of memory Depending on the system configuration the memory size displayed may be 1 MB smaller than the actual memory size 6 Click OK The Control Panel window appears again Memory size IMPORTANT If memory is not installed correctly the message Extended memory error appears or nothing is displayed on the screen when you turn on the computer In such a case t...

Page 215: ...puter and disconnect the AC adapter from it 2 Open the screw cover 3 Remove the screw one and slide the cover in the direction of the arrow to detach it 4 Pull the lug of the keyboard slightly in the direction of the arrow 5 Lift the keyboard carefully to open it Screw cover Cover Lug ...

Page 216: ...rotrusion on the connector insert it diagonally in the slot and then tilt it over until it clicks into place 8 Close the keyboard carefully While aligning the tabs on the keyboard with the notches in the computer upper panel close the keyboard carefully so as no catch any cable between the keyboard and the computer Hook Notch in the RAM module Keyboard Tabs on the keyboard ...

Page 217: ...199 SECTION 2 9 Attach the cover and secure it with a screw Reattach the cover that was removed in step 3 10 Attach the screw cover as it was Cover Screw cover ...

Page 218: ...ntee the proper function of this computer when using peripherals from other sources If it becomes necessary to use a peripheral from another source consult with the manufacturer of that product Use peripherals that conform to ACPI standards This computer is set to ACPI mode Power saving and other functions may not work correctly if a peripheral does not work in ACPI mode Moreover your computer doe...

Page 219: ... If two or more floppy disks are included with your USB device use one that is compatible with Windows installed on your computer or that is marked with For PC AT compatible computers Manual for USB device Ways of connection vary from USB device to USB device So be sure to read also the manual for the USB device used Connecting a USB Device 1 Connect a cable to the USB device you want to use 2 Plu...

Page 220: ...splay pictures on a TV screen by connecting a cable to the S video port on the left panel of your computer WARNING ELECTRIC SHOCK Before connecting or disconnecting a TV to or from the computer always turn off the computer and disconnect the AC adapter from it Also turn off the TV and unplug its power cable Failure to do so could lead to an electric shock CAUTION FAILURE Before connecting a cable ...

Page 221: ...ter At that time fully insert the AV cable in the S video port 4 Connect the AV cable to the TV For the way of connection refer to the manual for your TV 5 Connect the power cable to the TV and turn it on 6 Connect the AC adapter to your computer and turn it on Then perform steps to display pictures on the TV screen S video port IMPORTANT For the method of displaying pictures on a TV refer to the ...

Page 222: ...ed with For PC AT compatible computers and that can be secured with screws to the printer port on your computer Manual for the printer Ways of connection and setup procedures vary from printer to printer So be sure to read also the manual for the printer used Some printer manuals are contained on a CD WARNING ELECTRIC SHOCK Before connecting disconnecting a printer always turn off your computer an...

Page 223: ...nter 5 Connect the AC adapter to the computer and turn the power on 6 When using a printer for the first time you may need to install the driver Parallel port Tighten these screws Printer cable Caution in Using a Printer Even if the printer manual states that the driver will be installed automatically if the printer is connected and turned on the driver may not be installed as described in the man...

Page 224: ...ritical Point Connecting a PS 2 mouse automatically disables the Flat Point To use a mouse concurrently with the Flat Point or to enable or disable the Hot Plug feature you need to modify settings under Keyboard Mouse Settings of the BIOS Setup window If you are using a mouse with a scroll function don t disconnect it when the computer is in operation To use a mouse with multiple functions includi...

Page 225: ...t Point To disable the Flat Point follow the steps described in the next section Disabling the Flat Point Disabling the Flat Point When a USB mouse is connected to your computer not only the mouse but also the Flat Point are enabled To disable the Flat Point follow these steps 1 Select Manual under Internal pointing device of the BIOS Setup window 2 After Windows starts press the key while holding...

Page 226: ...int can be turned on and off manually only when the Manual option is selected under Internal pointing device in the Detailed Menu of the BIOS Setup window If the Manual option is unselected select it The message Internal pointing device Enabled or Disabled does not appear on the screen if the Hotkey Utility is not installed If you want to hold the Flat Point disabled select the Always disabled opt...

Page 227: ...y could cause your computer and external display to break down Prepare an external display that supports PC AT compatible or DOS V computers Used to connect an external display to your computer Usually a display cable is connected to the back of a display or included with a display If no display cable is included with your external display or if the cable connector is not compatible with the exter...

Page 228: ...T display For the way to connect the cable refer to the manual for your CRT display 4 Plug the power cable of the CRT display in a wall outlet and turn it on 5 Connect the AC adapter to the computer turn it on and then switch displays Critical Point The following may take place when you turn on your computer for the first time after connect ing an external display to it Images are displayed on bot...

Page 229: ...ains what to do when trouble occurs with this computer and when messages are displayed Read this section as the necessity arises SECTION SECTION SECTION SECTION SECTION SECTION SECTION SECTION SECTION SECTION 3 3 3 3 3 SECTION 3 ...

Page 230: ...s running low LOW BATTERY Connect the AC adaptor When using the computer for the first time after leaving it unused for a long time connect the AC adaptor and switch on the main switch to switch on the power Nothing displayed on the LCD panel Checkpoint Is anything displayed on the status indicator LCD Is displayed on the LCD panel Cause and Solution Connect the AC adaptor and switch on the main s...

Page 231: ...lay flashes Was the charging stopped midway Cause and Solution Check that the AC adaptor is correctly plugged into the power socket and into the computer If the ambient temperature is high and the battery temperature becomes too high during use the battery protection function may be triggered to stop the charging If the battery temperature falls too low the battery protection function may be trigg...

Page 232: ...be controlled by this item Set the write protect tab on the floppy disk to the write enable position If it works with a different floppy disk then the problem floppy disk may be damaged LCD panel does not close Checkpoint Is something caught in the LCD panel Cause and Solution Forcing the LCD panel closed can damage it Check for some thing caught in the LCD panel Also a metal object such as a pape...

Page 233: ...rsonal computer main unit is in operating mode because its CD ROM drive has an electronic lock Check that the personal computer main unit is in operating mode and press the EJECT button If for some reason the CD tray does not come out even when you press the EJECT button insert a clip or something into the hole to the right of the EJECT button and pull the tray out If the tray doesn t still come o...

Page 234: ...ation from the BIOS is transferred to the installed operating system to provide it with information on the configuration and status of the hardware Bit An abbreviation for binary digit A single piece of information which is either a one 1 or a zero 0 bps An abbreviation for bits per second Used to describe data transfer rates Boot To start up a computer and load its operating system from disk ROM ...

Page 235: ...software that make up your system and how it is allocated for use CRT Cathode Ray Tube A display device which uses a beam of electronic particles striking a luminescent screen It produces a visual image by varying the position and intensity of the beam Data The information a system stores and processes DC Direct current A voltage or current that does not fluctuate periodically with time Default Va...

Page 236: ...using one channel to process sound form all sources MPU 401 A standard for MIDI interfaces and connectors NTSC National TV Standards Commission The standard for TV broadcast and reception for the USA Operating System A group of control programs that convert application commands including driver programs into the exact form required by a specific brand and model of microprocessor in order to produc...

Page 237: ...d error messages may be displayed before the operating system is loaded If the self test detects failures that are so serious that operation can not continue the operating system will not be loaded Disk A spinning platter of magnetic data storage media If the platter is very stiff it is a hard drive if it is highly flexible it is a floppy disk if it is a floppy disk in a hard housing with a shutte...

Page 238: ...e than the 640KB recognized by MS DOS as system memory FCC Federal Communication Commission Floppy Disk A spinning platter of magnetic data storage media which is highly flexible GB Gigabyte Hard drive A spinning platter of magnetic data storage media where the platter is very stiff Hexadecimal A decimal notation for the value of a 4 bit binary number 0 9 A B C D E F Example 2F in hexadecimal 0010...

Page 239: ...andom Access Memory A hardware component of your notebook that holds binary information both program and data as long as it has the proper power applied to it RAM Module A printed circuit card with memory and associated circuitry which allows the user to add additional memory to the computer without special tools Reset The act of reloading the operating system A reset erases all information stored...

Page 240: ...cur SMART makes a status report available so that the LifeBook can prompt the user to back up the data on the drive Naturally not all failures are predictable SMART predictability is limited to those attributes which the drive can self monitor In those cases where SMART can give advance warning a considerable amount of precious data can be saved SRAM Static random access memory A specific technolo...

Page 241: ...eo Random Access Memory A memory dedicated to video display data and control WFM Wired for Management is Intel s broad based initiative to reduce the total cost of ownership TCO of business computing without sacrificing power and flexibility Write Protect Prevent alteration of the binary state of all bits in a storage media Example all information on a device such as a floppy diskette a block of s...

Page 242: ...Cooling Fan 7 CoolScroll Button 16 CoolScroll button 3 CoolView Applet 38 Configure Greeting 38 Configure Setting 40 Configure Timer 39 Confirue Message Board 40 CoolView Panel One touch Buttons 3 19 Cover Close Switch 3 D DC IN Jack 4 Desktop Control Panel 42 Disc Player 41 E E mail Account Settings 29 Configure After Checking Mail 33 E Mail Notification LED 25 Expanded Keyboard Mouse Port 7 Expa...

Page 243: ...ation Panel 24 Configuration 25 Line In Jack 6 Lock switch 20 M Main Switch 4 Message Display Area 19 Mic In Jack 6 Mode Button 20 Modular Jack 7 Mouse 206 Connecting a PS 2 Mouse 206 Connecting a USB Mouse 207 Disabling the Flat Point 207 N Num Lock Indicator 20 O One touch Buttons 3 20 P Parallel Port 7 PC Card 186 Access Indicator 20 Eject Button 4 Slot 4 Power Saving Function 44 Hibernation Mo...

Page 244: ...Sound Level Indicator 20 Speakers 3 Starting an Application 22 SUS RES Suspend Resume Indicator 19 Switch 3 Switching Modes 22 T TV 202 U USB Device 201 Port 8 V Volume Control 5 ...

Reviews: