53
T r o u b l e s h o o t i n g
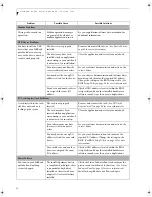
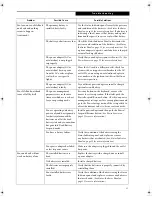
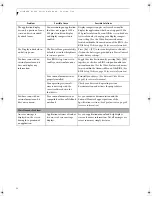
Your notebook appears to
change setup parameters
when you start it.
(continued)
The BIOS CMOS hold-up
battery has failed.
Contact your support representative for repairs.
This is not a user serviceable part but has a normal
life of 3 to 5 years.
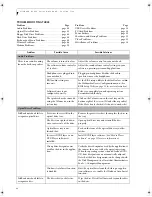
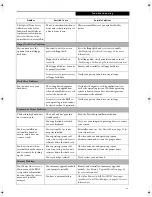
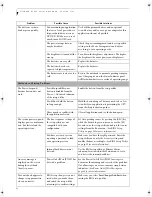
Video Problems
The built-in display is blank
when you turn on your
LifeBook notebook.
Something is pushing on the
Closed Cover switch.
Clear the Closed Cover switch.
(See figure 2-3 on
page 6 for location)
The notebook is set for an
external monitor only.
Pressing [F10] while holding down the [Fn] key
allows you to change your selection of where to send
your display video. Each time you press the keys you
will step to the next choice. The choices, in order,
are: built-in display panel only, both built-in display
panel and external monitor or external monitor
only.
The display angle and bright-
ness settings are not adequate
for your lighting conditions.
Move the display and the brightness control until
you have adequate visibility.
The power management time-
outs may be set for very short
intervals and you failed to
notice the display come on
and go off again.
Press any button the keyboard, or move the mouse
to restore operation. If that fails, push the Power/
Suspend/Resume button. (The display may be shut
off by Standby mode, Auto Suspend or Video
Timeout)
The notebook turned on
with a series of beeps and
your display is blank.
Power On Self Test (POST) has
detected a failure that does not
allow the display to operate.
Contact your support representative.
The display goes blank by
itself after you have been
using it.
The notebook has gone into
Video timeout, Standby mode,
or Hibernate mode because
you have not used it for a
period of time.
Press any button on the keyboard, or move the mouse
to restore operation. If that fails, push the Power/
Suspend/Resume button. Check your power manage-
ment settings, or close your applications and go to the
Power Savings menu of the setup utility to adjust the
timeout values to better suit your operation needs.
(See BIOS Setup Utility on page 25 for more informa-
tion)
The power management time-
outs may be set for very short
intervals and you failed to
notice the display come on
and go off again.
Press any button on the keyboard, or move the mouse
to restore operation. If that fails, push the Power/
Suspend/Resume button. (The display may be shut
off by Standby Mode, Auto Suspend or Video
Timeout)
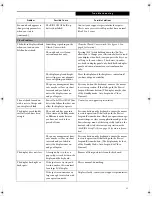
The display does not close.
A foreign object, such as a
paper clip, is stuck between the
display and the keyboard.
Remove all foreign objects from the keyboard.
The display has bright or
dark spots.
If the spots are very tiny and
few in number, this is normal
for a large LCD display.
This is normal; do nothing.
If the spots are numerous or
large enough to interfere with
your operation needs.
Display is faulty; contact your support representative.
Problem
Possible Cause
Possible Solutions
fennec2.book Page 53 Thursday, December 21, 2006 12:43 PM
Summary of Contents for LifeBook A6020
Page 1: ...Fujitsu LifeBook A6020 Notebook User s Guide ...
Page 2: ......
Page 8: ...L i f e B o o k A 6 0 0 0 S e r i e s N o t e b o o k ...
Page 9: ...1 Preface ...
Page 10: ...L i f e B o o k A 6 0 0 0 S e r i e s N o t e b o o k ...
Page 12: ...2 L i f e B o o k A 6 0 0 0 S e r i e s N o t e b o o k ...
Page 13: ...3 2 Getting to Know Your LifeBook Notebook ...
Page 14: ...4 L i f e B o o k A 6 0 0 0 S e r i e s N o t e b o o k S e c t i o n T w o ...
Page 31: ...21 3 Getting Started ...
Page 32: ...22 L i f e B o o k A 6 0 0 0 S e r i e s N o t e b o o k S e c t i o n T h r e e ...
Page 39: ...29 4 User Installable Features ...
Page 40: ...30 L i f e B o o k A 6 0 0 0 S e r i e s N o t e b o o k S e c t i o n F o u r ...
Page 54: ...44 L i f e B o o k A 6 0 0 0 S e r i e s N o t e b o o k S e c t i o n F o u r ...
Page 55: ...45 5 Troubleshooting ...
Page 56: ...46 L i f e B o o k A 6 0 0 0 S e r i e s N o t e b o o k S e c t i o n F i v e ...
Page 70: ...60 L i f e B o o k A 6 0 0 0 S e r i e s N o t e b o o k S e c t i o n F i v e ...
Page 71: ...61 6 Care and Maintenance ...
Page 72: ...62 L i f e B o o k A 6 0 0 0 S e r i e s N o t e b o o k S e c t i o n S i x ...
Page 76: ...66 L i f e B o o k A 6 0 0 0 S e r i e s N o t e b o o k S e c t i o n S i x ...
Page 77: ...67 7 System Specifications ...
Page 78: ...68 L i f e B o o k A 6 0 0 0 S e r i e s N o t e b o o k S e c t i o n S e v e n ...
Page 83: ...73 8 Glossary ...
Page 84: ...74 L i f e B o o k A 6 0 0 0 S e r i e s N o t e b o o k S e c t i o n E i g h t ...
Page 92: ...82 L i f e B o o k A 6 0 0 0 S e r i e s N o t e b o o k S e c t i o n E i g h t ...
Page 93: ...83 Appendix A Integrated Wireless LAN User s Guide ...
Page 94: ...84 L i f e B o o k A 6 0 0 0 S e r i e s N o t e b o o k A p p e n d i x ...
Page 105: ...95 Appendix B Using the Fingerprint Sensor ...
Page 106: ...96 L i f e B o o k A 6 0 0 0 S e r i e s N o t e b o o k ...
Page 114: ...104 L i f e B o o k A 6 0 0 0 S e r i e s N o t e b o o k ...
Page 118: ...108 L i f e B o o k A 6 0 0 0 S e r i e s N o t e b o o k I n d e x ...
Page 119: ......
Page 120: ......

