background image

Chapter 2  Installing the Tape Library
  2.6  Connecting

FUJITSU Storage ETERNUS LT40 S2/LT60 S2 LTO Library Installing, Starting Up and Maintaining

Copyright 2018 FUJITSU LIMITED

P3AM-5392-07ENZ0

34

2

Attach one end of the signal cable

to the SAS connector of a SAS tape drive.

to the FC connector of a FC tape drive.

3

Attach the other end of the signal cable

in a SAS configuration to the SAS HBA or a SAS expander.

in a FC configuration to the FC HBA, an FC hub, an FC device with two I/O ports or an FC switch.

4

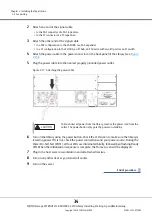
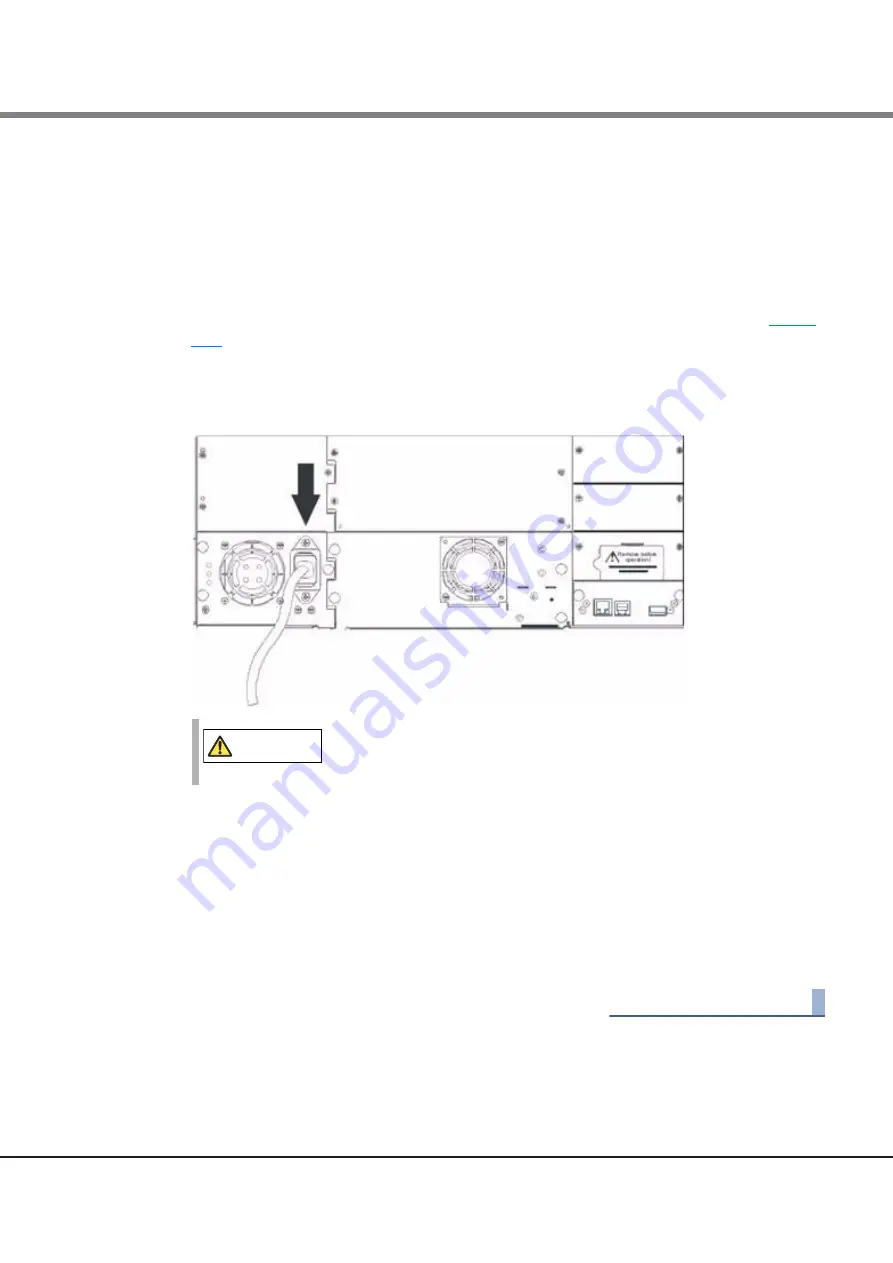
Attach the power cable to the power connector on the back panel of the Library (see 

Figure 

2.15

).

5

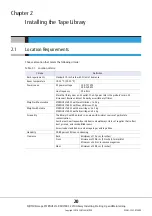
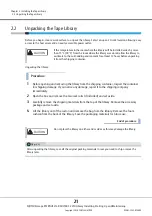
Plug the power cable into the nearest properly grounded power outlet.

Figure 2.15   Attaching the power cable

6

Turn on the library using the power button. Check the LCD screen to make sure the library is 
receiving power. If it is not, check the power connections and your power source. During the 

Power-On-Self-Test (POST), all four LEDs are illuminated briefly, followed by a flashing Ready 

LED. When the initialization sequence is complete, the Home screen will be displayed.

7

Plug in the host server or workstation and all attached devices.

8

Turn on any other devices you turned off earlier.

9

Turn on the server.

End of procedure

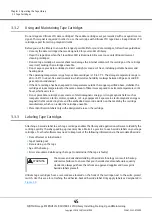
CAUTION

To disconnect all power from the library, remove the power cord from the 
outlet. The power button only puts the power on stand-by.

Summary of Contents for ETERNUS LT40 S2

Page 1: ...FUJITSU Storage ETERNUS LT40 S2 LT60 S2 LTO Library Installing Starting Up and Maintaining P3AM 5392 07ENZ0 ...

Page 2: ...This page is intentionally left blank ...

Page 3: ...anual italics Denote names of commands system calls functions files procedures programs etc as well as menu options and input output fields from figures in the main body of text fixed pitch font Indicates system output such as error messages messages notes file excerpts and program examples fixed pitch semi bold font Denotes user input in examples 1 2 3 Activities of the user Highlights additional...

Page 4: ...duct s enclosure through openings Precautions Do not expose the unit to moisture The operating temperature for this unit is between 10 C 50 F and 35 C 95 F Use the unit on a firm level surface free from vibration Do not place anything on top of the unit Product Warranty Caution The warranty for the tape library shall not apply to failures of any unit when The tape library is physically abused or u...

Page 5: ...RNING To reduce the risk of personal injury or damage to equipment Extend levelling jacks to the floor Ensure that the full weight of the rack rests on the levelling jacks Install stabilizing feet on the rack In multiple rack installations secure racks together Extend only one rack component at a time Racks may become unstable if more than one component is extended ...

Page 6: ...5 1 Preparing 26 2 5 2 Installing the Library in a Rack 27 2 6 Connecting 32 2 6 1 Connection Recommendations and Additional Remarks 32 2 6 2 Power and Signal Cable 33 2 6 3 Verifying the Detection of the Library Under Windows 35 Chapter 3 Operating the Tape Library 36 3 1 Operator Control Panel OCP 36 3 1 1 OCP Philosophy 36 3 1 2 Power Up Display 37 3 1 3 Note about the LEDs 37 3 1 4 Input Modes...

Page 7: ...3 5 4 Identity 51 3 5 5 Status 53 3 5 6 Configuration 55 3 5 7 Operations 66 3 5 8 Service 67 Chapter 4 Troubleshooting 72 4 1 Installation Problems 72 4 1 1 LUN Scanning 72 4 1 2 Backup Application Installation 72 4 1 3 Device Driver Installation 72 4 2 Troubleshooting Table 73 4 3 Removing Stuck Tapes From Slots 76 4 4 Magazine Does not Unlock via OCP or RMU 77 4 5 Media Removal Prevented 79 4 6...

Page 8: ...RMU 93 5 9 Removing and Replacing the Base Chassis 94 5 10 Adding a New License Key 95 5 10 1 Sequence of Installation 96 5 10 2 Add a License Key via OCP 96 5 10 3 Add the License Key via RMU 99 5 11 How to Get the Serial No in Storage Systems 101 Chapter 6 Technical Specifications 103 Chapter 7 Packaging Before Transportation 104 Chapter 8 Recycling and Disposal 106 Chapter 9 Regulatory Informat...

Page 9: ...il rear side 30 Figure 2 13 Remove the flange cover 31 Figure 2 14 Screwing on the library 31 Figure 2 15 Attaching the power cable 34 Figure 3 1 Home screen of the ETERNUS LT60 S2 37 Figure 3 2 Menu tree overview 39 Figure 3 3 Ultrium tape cartridge and proper barcode label placement 46 Figure 3 4 Write protecting the Ultrium data cartridge 46 Figure 3 5 Slot numbering left magazine with mailslot...

Page 10: ...gure 3 42 ETERNUS LT40 S2 Service Cartridge Memory 71 Figure 4 1 Removing stuck tapes from slot 76 Figure 4 2 Access holes for the left and right magazine 77 Figure 4 3 Remove the left magazine 78 Figure 4 4 Media Removal information in the Library Status page LT60 S2 example Allowed 79 Figure 4 5 Media Removal information in the Drive Status page LT60 S2 example Allowed 79 Figure 5 1 Drive sled c...

Page 11: ...1 Location criteria 20 Table 3 1 Write protecting 47 Table 3 2 Slot numbering left magazine 48 Table 3 3 Slot numbering right magazine 49 Table 3 4 Status icons 50 Table 4 1 Troubleshooting table 73 Table 4 2 Access to manually release a magazine 77 Table 4 3 Removing the left magazine 78 Table 4 4 Error codes 81 Table 5 1 Description for Figure 5 1 86 Table 7 1 Re Packaging description 105 Table ...

Page 12: ...in a compact 4U form factor with easy access to tape cartridges via four removable magazines and a mailslot for importing and exporting cartridges The library is equipped with up to four half height LTO6 LTO7 or LTO8 tape drives or up to two full height tape drives Each magazine can hold up to twelve cartridges The library does not occupy an own signal interface but is controlled via a separate LU...

Page 13: ... capability The ETERNUS LT40 S2 LT60 S2 LTO Library includes the following features USB interface to improve serviceability and to store customer specific settings User friendly Operator Control Panel with simple character set Support of further LTO generations Integral Remote Management Unit Supports industry standard management software tools such as SNMP and SMI S future developments Mailslot R...

Page 14: ... not necessary 5 LED ATTENTION Amber Illuminated if the library has detected a condition that requires attention by the operator 6 LED ERROR Amber Illuminated if an unrecoverable tape drive or library error occurs A corresponding error message displays on the LCD screen see for more information 7 Control key CANCEL button X The CANCEL button is used to cancel a user action and return to the last m...

Page 15: ...r Panel The rear panel of the tape Library provides access to SAS or FC connectors tape drive bays the power connector Ethernet serial and the USB port Figure 1 3 ETERNUS LT40 S2 rear panel Figure 1 4 ETERNUS LT60 S2 rear panel No Description 1 Power connector The library requires a 110 220 volt AC power connection 2 Shipping lock storage location 3 Fan vent 4 Tape drive sled 5 Ethernet port 6 Ser...

Page 16: ...Figure 1 5 SAS tape drive LTO Ultrium 5 7 Controller LED 8 USB port Host 9 Product label foil see Chapter 7 Packaging Before Transportation page 104 10 Power Supply LED s from top blue LED on AC connected green LED on Power good yellow LED on degraded Fan 11 Tape drive sled 12 Tape drive sled 13 Tape drive sled No Description 1 Fan vent 2 Ethernet port 3 SAS connector 4 Tape drive LED No Descripti...

Page 17: ...U LIMITED P3AM 5392 07ENZ0 17 Figure 1 6 FC tape drive LTO Ultrium 6 with Ethernet port Figure 1 7 FC tape drive LTO Ultrium 6 7 8 No Description 1 Fan vent 2 Ethernet port unavailable 3 FC connector port A 4 FC connector port B is unavailable 5 Tape drive LED No Description 1 Fan vent 2 FC connector port A 3 FC connector port B is unavailable 4 Tape drive LED 2 1 3 4 5 ...

Page 18: ...rary Installing Starting Up and Maintaining Copyright 2018 FUJITSU LIMITED P3AM 5392 07ENZ0 18 Figure 1 8 SAS tape drive LTO Ultrium 6 7 8 There are two types of rear panels for the SAS interface No Description 1 Fan vent 2 SAS connector port A 3 SAS connector port B is unavailable 4 Tape drive LED 2 1 3 4 ...

Page 19: ...Maintaining Copyright 2018 FUJITSU LIMITED P3AM 5392 07ENZ0 19 1 3 Inside Components Figure 1 9 Inside components Table 1 2 Inside components No Description 1 Left upper magazine 2 Robotic with barcode reader 3 Controller 4 Power supply 5 Drive sled 6 Chassis 7 Right upper magazine 8 Left lower magazine 9 Right lower magazine 7 6 5 4 3 2 9 1 8 ...

Page 20: ... AC disconnect device and must be easily accessible at all times Weight without media ETERNUS LT40 S2 with two HH drives 16 5 kg ETERNUS LT60 S2 with four HH drives 27 kg Weight with media ETERNUS LT40 S2 with 24 cartridges 24 2 kg ETERNUS LT60 S2 with 48 cartridges 42 4 kg Air quality The library should be placed in an area with minimal sources of particulate contamination Avoid areas near freque...

Page 21: ... and remove the two rack rails if included and set aside 3 Carefully remove the shipping materials from the top of the library Remove the accessory package and set aside 4 Lift the library out of the carton and remove the bag from the library Remove the foam cushion from the back of the library Save the packaging materials for future use End of procedure CAUTION If the temperature in the room wher...

Page 22: ...ry 2 2 Unpacking the Tape Library FUJITSU Storage ETERNUS LT40 S2 LT60 S2 LTO Library Installing Starting Up and Maintaining Copyright 2018 FUJITSU LIMITED P3AM 5392 07ENZ0 22 Figure 2 1 Unpacking the library ETERNUS LT40 S2 1 3 4 6 2 5 ...

Page 23: ... LT40 S2 LT60 S2 LTO Library Installing Starting Up and Maintaining Copyright 2018 FUJITSU LIMITED P3AM 5392 07ENZ0 23 Figure 2 2 Unpacking the library ETERNUS LT60 S2 No Description 1 Accessories 2 Sliding rails 3 Top shell parts 4 ETERNUS LT40 S2 LT60 S2 unit 5 Bottom shell 6 Box 1 3 2 4 5 6 ...

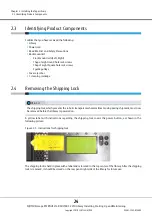
Page 24: ...bag of eight Square hole rack screws 2 guide pulleys Cover eject bar 1 cleaning cartridge 2 4 Removing the Shipping Lock A yellow label with instructions regarding the shipping lock covers the power button as shown in the following picture Figure 2 3 Instructions for shipping lock The shipping lock is held in place with a label and is located in the top center of the library After the shipping loc...

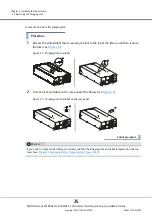
Page 25: ...ve the yellow label that is securing the lock to the top of the library and then remove the lock see Figure 2 4 Figure 2 4 Shipping lock and label 2 Store the lock and label on the rear panel of the library see Figure 2 5 Figure 2 5 Shipping lock and label on the rear panel End of procedure If you need to transport the library we recommend that the shipping lock and label is replaced on the top co...

Page 26: ...re or after library installation However if you install the software first you may need to reconfigure it for use with the library after library installation is complete The library must be operated in the horizontal position Do not place the library on its side and do not place objects on top of the library WARNING Weight Risk of personal injury or damage to the loader Always remove all tapes to ...

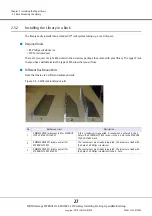
Page 27: ...ine the type of M6 screw that you will use Different Rackmount Kits Note that there are 3 different rackmount rails Figure 2 6 3 different rackmount rails No Rackmount rail Description 1 PRIMECENTER rackmount rail for ETERNUS LT20 S2 LT40 S2 LT60 S2 A Torx screwdriver is requested A counternut is entered in the 2 hole in the ETERNUS LT20 S2 rack or in the 4 hole in the ETERNUS LT40 S2 LT60 S2 rack...

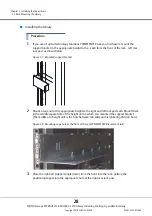
Page 28: ... front of the rack left rear rack post as shown below Figure 2 7 Mounted support bracket 2 Mount a cage nut at the appropriate height to the right and left rack post each Mount them in the middle square hole of the height unit in which you mounted the support bracket The middle of a height unit is the hole between two wide and neighboring division bars Figure 2 8 Mounting cage nuts at the front of...

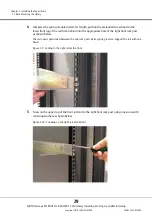
Page 29: ...eloaded screw head in the lower front lug of the rail from behind into the appropriate hole of the right front rack post as shown below The rail now is positioned between the two rack posts by its spring pressure Support the rail with one hand Figure 2 9 Setting in the right rail at the front 5 Screw on the upper lug of the front rail end to the right front rack post using one screw with centering...

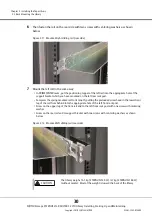
Page 30: ...ppropriate hole of the support bracket which you have mounted on the left rear rack post Compress the spring mounted rail to its length putting the preloaded screw head in the lower front lug of the rail from behind into the appropriate hole of the left front rack post Screw on the upper lug of the front rail end to the left front rack post with one screw with centering washer Screw on the rear ra...

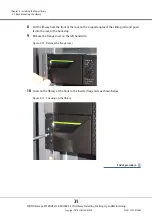
Page 31: ...ITSU LIMITED P3AM 5392 07ENZ0 31 8 Put the library from the front of the rack on the support angles of the sliding rails and push it into the rack to the back stop 9 Remove the flange cover on the left hand side Figure 2 13 Remove the flange cover 10 Screw on the library at the front to the inserted cage nuts as shown below Figure 2 14 Screwing on the library End of procedure ...

Page 32: ...elligent interconnection scheme called a Fabric to connect devices Everything between the ports on FC is called the Fabric The Fabric is most often a switch or series of switches that takes the responsibility for routing 2 6 1 2 SAS SAS features Serial data transfer to and from storage devices as disk and tape drives 4 SAS channels per SAS HBA port typical not mandatory for a maximum of 4 storage ...

Page 33: ...s printers and other devices Remove the power cables from the server and all attached accessories CAUTION Do not force a SAS cable s mini SAS connector into the tape drive s mini SAS connector because it might be mechanically keyed differently Fujitsu recommends a maximum SAS cable length of 4 meters from HBA to one tape drive Do not use any adapter or converter between HBA and tape drive s CAUTIO...

Page 34: ...ibrary see Figure 2 15 5 Plug the power cable into the nearest properly grounded power outlet Figure 2 15 Attaching the power cable 6 Turn on the library using the power button Check the LCD screen to make sure the library is receiving power If it is not check the power connections and your power source During the Power On Self Test POST all four LEDs are illuminated briefly followed by a flashing...

Page 35: ...on install the software and or the drivers compatible with the library Backup software packages may require additional software or licensing to communicate with the library Confirm the host server s operating system recognized the library in Windows Server 2012 R2 or Windows Server 2016 by going to Settings Control Panel System Hardware Device Manager Tape Drive and or Media Changer For more infor...

Page 36: ...o the Information and Login menu item until a login with correct PIN is done 3 1 1 OCP Philosophy OCP operation must obey some basic rules These rules of operation constitute a philosophy Any operational conflict between commands received over RMU and those entered via the front panel will be avoided with a reservation mechanism on a first come first served basis Any reservation by OCP is canceled...

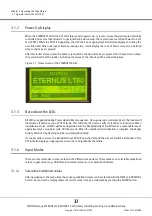
Page 37: ...te about the LEDs All LEDs are updated during Power Up and Reset sequences Upon power up or software Reset the loader will illuminate all LEDs as soon as POST allows This will help the User to verify if all LEDs are functional When initialization starts all LEDs will be extinguished and the Ready Activity LED will flash at a reasonable rate of approximately 1 second per cycle 50 duty cycle When th...

Page 38: ... NEXT and PREVIOUS button After pressing the ENTER button the cursor is set to the next editable digit It can be changed in the same way After pressing the ENTER button at the last digit the complete entry will be stored Pressing the CANCEL button will cancel the whole edit process and the old value is valid again 3 1 5 Power ON OFF Part of the Operator Control Panel is the Power On Off button Pre...

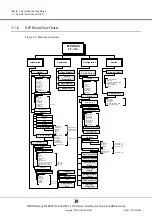
Page 39: ...Library Health Check Run Tests Library FW Upgrade by USB Dump all to USB Display Contrast Reboot Drive Library 1 Drive 1 Error Log Barcode Reporting Drive Interface FC only Drive Status Identity Drive 1 Drive 1 Status Activity Source Temperature Cooling Media Removal Topology A Topology B Speed A Speed B Loop ID A Loop ID B FC only FC only FC only IPv4 DHCP IP Address Netmask Gateway DNS 1 DNS 2 i...

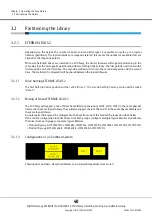
Page 40: ...configured will be shared between the logical libraries 3 2 1 1 Drive Naming ETERNUS LT40 S2 The first half high drive position will be called Drive 1 the second half high drive position will be called Drive 2 3 2 1 2 Mixing of Drives ETERNUS LT40 S2 The 2U library will support a mix of drives from different generations LTO5 LTO6 LTO7 in the same physical library and the same logical library They ...

Page 41: ... libraries 3 2 2 1 Drive Naming ETERNUS LT60 S2 When one or more half high drives are added to a 4U library the first half high drive position will be called Drive 1 The second half high drive position will be called Drive 2 The third half high drive position will be called Drive 3 The fourth half high drive position will be called Drive 4 3 2 2 2 Mixing of Drives ETERNUS LT60 S2 The 4U library wi...

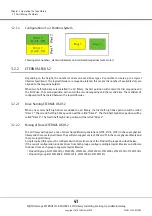
Page 42: ...ting Up and Maintaining Copyright 2018 FUJITSU LIMITED P3AM 5392 07ENZ0 42 3 2 2 3 Configuration of a 1 Partition System Contains any drives present in any drive positions and it will contain all four magazines This is not different than today Showing drive numbers 1 2 3 4 element addresses El Adr and correlated magazines same color ...

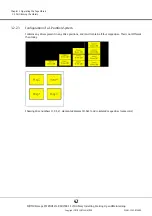
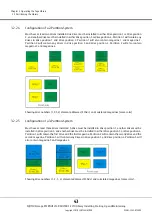
Page 43: ...rives in drive position 3 and drive position 4 Partition 2 will also contain magazine 3 and magazine 4 Showing drive numbers 1 2 3 4 element addresses El Adr and correlated magazines same color 3 2 2 5 Configuration of a 3 Partition System Must have at least three drives installed A drive must be installed in drive position 1 another drive must be installed in drive position 2 and another drive mu...

Page 44: ...te protect your tape cartridges will help you to prolong the life of your tape cartridges as well as the tape library 3 3 1 ETERNUS LT40 S2 LT60 S2 LTO Library Tape Library Cartridge Type The cartridge types supported depends on the drive types installed The loader will support any type of data cartridge and cleaning cartridge the drive s will support Some tape drives include support for both rewr...

Page 45: ...d above stabilize the cartridge at room temperature for the same amount of time it was exposed to extreme temperatures or 24 hours whichever is less Do not place data cartridges near sources of electromagnetic energy or strong magnetic fields such as computer monitors electric motors speakers or X ray equipment Exposure to electromagnetic energy or magnetic fields can destroy data and the embedded...

Page 46: ... library make sure the write protect switch on the front of the cartridge is in the desired position Slide the switch to the right to write protect the cartridge A small pad lock is visible indicating that the cartridge is write protected see Figure 3 4 Slide the switch to the left to allow the library to write data to the cartridge see Figure 3 4 Figure 3 4 Write protecting the Ultrium data cartr...

Page 47: ...the Autoclean Function The autoclean function is disabled by factory default After enabling autoclean the autoclean process automatically starts when a cartridge is unloaded from the tape drive that reports cleaning requested For cleaning the drive the library can use every previously in an inventory identified cleaning cartridge A cleaning cartridge must have a CLN barcode label to work with the ...

Page 48: ...LT60 S2 LTO Library tape library has two removable magazines in the 4U library see Figure 3 5 and Figure 3 7 Magazine access can be password protected For safety reasons the robotic motion is stopped when a magazine is removed See section 3 5 6 6 Changing the Administrative Password page 62 The magazines can be released using the Operator Control Panel OCP or the Remote Management Unit RMU In case...

Page 49: ...numbering right magazine Table 3 3 Slot numbering right magazine Procedure 1 Unlock the magazines and remove it from the Library Use the OCP see section 5 7 Removing and Replacing a Magazine Using the OCP page 92 or use the RMU see section 5 8 Removing and Replacing a Magazine Using the RMU page 93 2 Insert cartridge in the magazines 3 Put the magazines back to the tape Library Pull lightly on the...

Page 50: ...osts a dedicated protected Internet site that displays a graphical representation of your library After establishing a connection to the library open any HTML browser and enter the IP address of the library To configure the RMU you must first set the IP address at OCP or DHCP In the following sections mostly the screenshots of LT40 S2 are shown The screenshots of LT60 S2 differ only marginally 3 5...

Page 51: ...ns you can initiate from those areas Figure 3 8 RMU login page 3 5 4 Identity 3 5 4 1 Viewing Static Library Information This page provides access to the static information about the system The yellow exclamation point for Status Warning indicates that user intervention is necessary but that the library is still capable of performing operations The red X Status Error indicates that user interventi...

Page 52: ...ade from this page Serial Number Product ID Currently Installed Library Firmware Bootcode Firmware Revision Barcode Reader Library Mode WWide Node Name If the unit has more than one partition the properties of all logical libraries are displayed Figure 3 9 ETERNUS LT40 S2 Identity Library page 3 5 4 2 Viewing Static Drive Information This page provides detailed information about the drive s No cha...

Page 53: ...k s No changes can be made from this page Figure 3 11 ETERNUS LT40 S2 Identity Network page 3 5 5 Status 3 5 5 1 Viewing Dynamic Library Information This page displays the dynamic information about the library such as the current status of the components The following information can be found on this page Status Cartridge in Transport Number Of Moves Total Power On Time Robotic Status Internal Tem...

Page 54: ...ary Installing Starting Up and Maintaining Copyright 2018 FUJITSU LIMITED P3AM 5392 07ENZ0 54 Figure 3 12 ETERNUS LT60 S2 Status Library page 3 5 5 2 Viewing Dynamic Drive Information This page provides detailed information about all drives that are present in the library Figure 3 13 ETERNUS LT60 S2 Status Drive page ...

Page 55: ...tory page 3 5 6 Configuration 3 5 6 1 Changing the System Configuration As changes are made they will only be applied after the Apply Selections or Submit button down right is selected To make the changes visible you have to click the Refresh button After making the selection a warning page will inform the user of the impact of their proposed change In some cases a pop up screen will ask the opera...

Page 56: ...ws the user to add additional functionality to the unit by entering license key information Figure 3 16 ETERNUS LT60 S2 Adding license keys License keys are required for setting Logical Libraries and Slot Extension options The Slot Extension 2 option can be configured for ETERNUS LT60 S2 models only After setting the Logical Libraries option an additional Logical Libraries menu item is available i...

Page 57: ...on through this page which activates the drive Figure 3 17 ETERNUS LT40 S2 Configuration Drive page 3 5 6 4 Changing the Network Configuration This page shows the current network configuration of the library and allows modification to the configuration When a change is requested a pop up box will ask to confirm the changes A list of changes that can be made is Host Name Domain Name IPv4 DHCP Addre...

Page 58: ...Configuration Network page Certificate Installation for SSL Data Transfer To ensure secure SSL data transfer it is necessary to install a certificate For this purpose the user is requested in Windows to generate a certificate when a connection is set up Figure 3 19 Certificate generation Reply field Meaning Yes The certificate is generated and installed No You exit the procedure Display certificat...

Page 59: ...0 S2 LTO Library Installing Starting Up and Maintaining Copyright 2018 FUJITSU LIMITED P3AM 5392 07ENZ0 59 The following screen is displayed for selection item 3 Figure 3 20 Certificate information The following screen appears when you install the certificate Figure 3 21 Certificate import wizard Welcome ...

Page 60: ... S2 LTO Library Installing Starting Up and Maintaining Copyright 2018 FUJITSU LIMITED P3AM 5392 07ENZ0 60 The screens below are displayed when you click on Next Figure 3 22 Certificate import wizard Storage Figure 3 23 Certificate import wizard Finishing 1 Figure 3 24 Certificate import wizard Finishing 2 ...

Page 61: ...rtificate installation To terminate installation of the certificate either click on OK or the X in the top right hand corner of the screen After certificate installation a parameter must be modified in Internet Explorer to prevent the request for the certificate always appearing In Internet Options Extended uncheck the box for showing warnings if the certificate address does not match and click OK...

Page 62: ...ddresses IPv6 Target 1 3 Community Name Security User Name SNMP Trap Notification Filter Figure 3 27 ETERNUS LT40 S2 Configuration SNMP page 3 5 6 6 Changing the Administrative Password This page allows the user to add and modify user accounts Access Level Choose from 1 Standard 2 Admin or 3 Service Access Level Name the name associated with the chosen Access Level New Password The password can be...

Page 63: ...ion User page 3 5 6 7 Setting Date Time This page allows the user to set the time and date and how it will be displayed Time 24H Enter the current time Using the 24 hour format 1 00 pm would be 13 00 00 HH MM SS Date Enter the current date Clock Synchronization Configuration Enable Clock Synchronization Click to enable or disable the SNTP server Click Help for further information SNTP Server Addre...

Page 64: ...5 6 9 Setting Event Notification Parameters This page allows the user to set the event notification to On To use this function the Host Name and the Domain Name must be set For details refer to 3 5 6 4 Changing the Network Configuration page 57 Choices for the event notification are Event Notification Select this item to be notified of library errors via email Notification Level Specify at which t...

Page 65: ...ive the dump Send additional Dump by Mail Enter the desired frequency for the dump SMTP Server Address IPv4 Enter the address of the mail server of the individual you would like to receive the errors and or warnings Figure 3 31 ETERNUS LT40 S2 Configuration Event notification page 3 5 6 10 Restoring Factory Defaults This page allows the user to reset the configuration to the factory defaults resto...

Page 66: ... Library This page allows the user to move tape cartridges within the library The source and destination are selected and then the move button in the center of the screen is clicked to activate the move Figure 3 33 ETERNUS LT40 S2 Operations Move Media page 3 5 7 2 Determining Current Media Inventory This page provides the user with a means to re scan the library to determine the current media inv...

Page 67: ...5 8 1 Performing General Library Diagnostics This page provides the system administrator with general tests to verify the usability and reliability of the library The user selects the number of test cycles before starting the test To cancel the test before it completes the cycles select the Stop button Figure 3 36 ETERNUS LT40 S2 Service General Diagnostic page To manually release a magazine see s...

Page 68: ...the drive The user selects the drive test type A Drive Support Ticket can be created and downloaded which can support service engineers solving drive and media problems Figure 3 37 ETERNUS LT40 S2 Service Drive Diagnostic page 3 5 8 3 Determining and Updating Firmware This page displays the current library and all drive firmware versions Firmware can be downloaded to the host then uploaded to the ...

Page 69: ...on to the library may be lost If the connection is lost the user will have to reload the page manually Figure 3 39 ETERNUS LT40 S2 Service Reboot page 3 5 8 5 Viewing Library Logs This page allows the user to view the library logs after entering the following Log Type Total Number of Entries Start Entry Number of Entries per Page Update Dump Log Save Service Dump Email Service Dump Some options of...

Page 70: ... S2 LT60 S2 LTO Library Installing Starting Up and Maintaining Copyright 2018 FUJITSU LIMITED P3AM 5392 07ENZ0 70 Figure 3 40 ETERNUS LT40 S2 Service Library Logs page 3 5 8 6 Cleaning Tape Drive This page allows the user to clean the tape drive Figure 3 41 ETERNUS LT40 S2 Service Clean Drive page ...

Page 71: ...ary Installing Starting Up and Maintaining Copyright 2018 FUJITSU LIMITED P3AM 5392 07ENZ0 71 3 5 8 7 Cartridge Memory Selecting Cartridge Memory you get information on all cartridges in the library and on all specific values the library handles for each cartridge Figure 3 42 ETERNUS LT40 S2 Service Cartridge Memory ...

Page 72: ...UNs to control the tape drive LUN 0 and library robot LUN 1 The ETERNUS LT40 S2 60 S2 requires an HBA that supports LUN scanning and LUN scanning must be enabled 4 1 2 Backup Application Installation Refer to the documentation included with your backup application for instructions on how to verify proper installation Some backup software packages require an additional module to communicate with th...

Page 73: ...ice representative Tape Movement Tape stuck in drive Power cycle the library allow it to complete initialization which in rare cases can take as long as 10 minutes and then retry unloading the tape using the library operator control panel Allow the tape drive to complete all operations This may take as long as ten minutes if you reset or cycle power on the library while the cartridge is positioned...

Page 74: ...the cartridge has not been exposed to harsh environmental or electrical conditions and is not physically damaged in any way Many backup applications do not read or write to cartridges that were created using a different backup application In this case you may have to perform an erase format or label operation on the cartridge Make sure you understand any data protection or overwrite protection sch...

Page 75: ...ing that the library is installed in a clean contamination free environment Cartridges should be stored vertically in their plastic cases Continue cleaning the tape drive as needed Non acclimated media A cartridge should be acclimated for at least 24 hours before being used particularly if it has been stored at a substantially different temperature or level of humidity than the library Cartridge i...

Page 76: ... a Magazine Using the OCP page 92 Use the RMU see section 5 8 Removing and Replacing a Magazine Using the RMU page 93 2 The finger holes on the back side of the magazines see Figure 4 1 allow the user to pull the cartridges out of the slot Remove and insert the cartridge mechanically Repeat the process ten times Figure 4 1 Removing stuck tapes from slot 3 During this process the burr will be remov...

Page 77: ... OCP or RMU If you are not able to remove the magazines using OCP and RMU an emergency release mechanism is available Procedure 1 Unplug the power cord from the library 2 Find the access holes for the right and left magazines See Figure 4 2 Figure 4 2 Access holes for the left and right magazine Table 4 2 Access to manually release a magazine WARNING Use only in case of emergency No Description 1 ...

Page 78: ...o the access hole for each magazine at the back of the library While holding the paper clip have a second person pull the magazine out of the front of the unit See Figure 4 3 Figure 4 3 Remove the left magazine Table 4 3 Removing the left magazine End of procedure If there are additional tapes still in the library or if you were unable to manually remove the magazines and drive contact service for...

Page 79: ... From on library firmware version 4 70 the backup software can prevent media removal by disabling mailslot opening and magazine removal functionality In the Library Status and the Drive Status pages then the Media Removal entries are set to Prevented Figure 4 4 Media Removal information in the Library Status page LT60 S2 example Allowed Figure 4 5 Media Removal information in the Drive Status page...

Page 80: ...mple Error Code EVENT 6 A5 F1 Where Sequence number 6 indicates the position in sequence list 0 being the most recent Log shows a load error code A5 fan error sub code F1 caused by the fan at the back connector plate The event log with the library also includes a date stamp for each event Press Enter to display the associated timestamp in the following format ddd hh mm ss HH where A description of...

Page 81: ...l support 89 Gripper blocked Run Library Health Check after several occurrences contact technical support 8A Slider blocked Run Library Health Check after several occurrences contact technical support 8B Elevator blocked Run Library Health Check after several occurrences contact technical support 8C Rotation blocked Run Library Health Check after several occurrences contact technical support 8D Sl...

Page 82: ...brary Health Check after several occurrences contact technical support A1 Open mailslot Import Export Element failed Retry operation after several occurrences contact technical support B0 Robotic controller response timeout A command did not complete in the required amount of time Reset the unit and retry operation After several occurrences contact technical support B1 NACK received from robotic c...

Page 83: ...t technical support D8 Data base error Retry operation after several occurrences contact technical support DA In Library Verify Test the barcode reader has read different barcode data for the same cartridge label Check barcode label on scratch cartridge and run Library Verify Test again If the error recurs contact technical support DB Warning event t b d DC I2 C Bus Failure Retry operation after s...

Page 84: ... 84 F4 Drive Load Timeout Drive has run in a timeout while loading a tape The subcode indicates which drive is affected Retry operation if not successful contact technical support F5 Drive Unload Timeout Drive has run in a timeout while unloading a tape The subcode indicates which drive is affected Retry operation if not successful contact technical support Error Code Description User Action ...

Page 85: ...tubes bags or boxes Keep electrostatic sensitive parts in their containers until they arrive at static free stations Cover the library with approved static dissipating material Provide a wrist strap connected to the work surface and properly grounded tools and equipment Keep the work area free of no conducting materials such as ordinary plastic assembly aids and foam packing Make sure you are alwa...

Page 86: ... Remote Management Unit or the Operator Control Panel unload the tape cartridge s from the drive to be removed Figure 5 1 Drive sled components of rear panel Table 5 1 Description for Figure 5 1 This part is hot pluggable It is not mandatory to power down the library to replace a drive Steps Description 1 Power down the library using the power button on the front pan 2 The LED on the tape drive be...

Page 87: ...the tape drive Ensure that the connectors are intact free of any foreign objects and have no cracks or deformed or bent contacts 2 Slowly insert the new tape drive into the drive bay and align the connectors on the library while supporting the drive assembly see Figure 5 3 Figure 5 3 Installing a tape drive 3 Push the tape drive slowly into the drive bay until the drive seats itself against the ba...

Page 88: ...sing the power button on the front panel 8 Run the Library Verify test End of procedure 5 4 Removing and Replacing the Library Controller The library should only be removed by an experienced service technician To remove a library controller The library controller is installed at the back of the library Before you remove the library controller Procedure 1 Turn off power to the library power button ...

Page 89: ...secure 4 Replace the power cord cable 5 Switch on power to the library power button on the front panel End of procedure The library maintains a backup of all Critical and Configuration Data separate from the library controller so that when replacing the library controller the Critical and Configuration data can be maintained and will not have to be entered manually again When replacing a library c...

Page 90: ...y an experienced service technician To remove a power supply Power supply is installed at the back of the library Before you remove the power supply Procedure 1 Turn off power to the library power button on the front panel 2 Remove the power cord cable 3 Loosen the three captive thumbscrews on the power supply see Figure 5 6 Figure 5 6 Position of the three thumbscrews 4 Pull straight back on the ...

Page 91: ...sembly 3 Tighten the captive thumbscrews until the power supply is secure 4 Replace the power cord cable 5 Switch on power to the library power button on the front panel End of procedure 5 6 Replacing a Redundant Power Supply Figure 5 8 Replacing a redundant power supply Procedure 1 Loosen the three screws on the library see Figure 5 8 step 1 2 Unpack the redundant power supply from its package 3 ...

Page 92: ...lock 5 Enter the Administrative password if requested 6 The display will read Left Magazine Unlocked or Right Magazine Unlocked 7 Pull the released magazine out of the Library WARNING The magazine must only be removed manually in an emergency Failure to follow normal procedure can cause data loss and equipment damage The magazines should be released using the Operator Control Panel OCP or the Remo...

Page 93: ... is replaced After exchanging tapes in a magazine slide the magazine completely into the Library Pull lightly on the magazine to check that it is locked The magazine will lock into place once it is correctly installed and the Library will inventory the magazine End of procedure 5 8 Removing and Replacing a Magazine Using the RMU Procedure 1 To login enter the correct password and press Enter Figur...

Page 94: ...ion 3 5 7 1 Moving Media Within the Library page 66 To remove the components in the base chassis and the base chassis from the rack Procedure 1 Obtain adequate assistance to lift and stabilize the library during removal and replacement 2 Remove the magazines from the library 3 Turn off power to the library and disconnect all cables 4 Remove the library from the rack From the front of the library l...

Page 95: ... label to the top cover see Figure 7 1 16 Slide the replacement Library enclosure onto the metal rails that are already in position in the rack 17 Tighten the mounting bracket screws to anchor the replacement Library enclosure to the rack 18 Plug in the power cord and host interface cable into the replacement Library enclosure 19 Power on the Library 20 Run the Library Health Check 21 Securely pac...

Page 96: ... the same Installation in a device with 2HU Delivery 1 magazine on the left hand side Upgrade 2 magazine on the right hand side Installation in a device with 4HU Delivery 1 magazine on the bottom left 2 magazine on the top left Upgrade 3 magazine on the bottom right 4 magazine on the top right 5 10 2 Add a License Key via OCP The following figure shows the front panel LCD with 4 buttons on the rig...

Page 97: ...97 5 10 2 1 Menu to Change the License Key If you switch on the front panel LCD the front panel LED Ready is lit and the Home Screen is displayed Procedure 1 Press Enter to get to the main menu 2 Use the Next button to choose Configuration Figure 5 12 Menu item Configuration 3 Press Enter and choose Add License Key in the submenu Figure 5 13 Menu item Add License Key The 15 digit license key is di...

Page 98: ...4 Use the Next button and the Previous button to choose the requested digit for the key alphabetic or numeric character Press Enter to move to the next digit or Cancel to get back 5 If the license key is complete choose Activate End of procedure After activation of the license key a reboot is requested You have 3 different possibilities to start the reboot Reboot via OCP Power cycle the storage sy...

Page 99: ...10 3 Add the License Key via RMU To login select the access type and enter the correct password There are three levels of access Standard user level Admin user level Service personnel user level Access to this level is by Service personnel only Procedure 1 You have to be Admin user to add a new license key Figure 5 15 RMU login page 2 Choose Configuration License Key from the Menu Figure 5 16 RMU ...

Page 100: ... license key After confirming the key the licensed functions activated magazines or partitions are displayed in a table in the bottom line You are asked whether you are sure that the new license key is correct Figure 5 17 Confirmation of license key 4 You are requested to reboot the system Figure 5 18 Request for reboot If you press Refresh a reboot is executed After confirmation the license key i...

Page 101: ... case of reclamation This document describes three different methods to get the serial number of ETERNUS LT20 S2 ETERNUS LT40 S2 and ETERNUS LT60 S2 devices Procedure 1 Read the serial number from the flap on the rear of the device In the following picture you see the flap on the rear of the device If you pull it out you will find the serial number on it Figure 5 19 Flap with serial number Please ...

Page 102: ...erties of all logical libraries are displayed Figure 5 20 Serial number via RMU 3 Get the serial number of the system via Operation Control Panel The following figure shows the front panel LCD with 4 buttons on the right hand side End of procedure Menu to get the serial number Select Information from the main menu Press Enter Select Library from the submenu Press Enter Select Identity Press Enter ...

Page 103: ...u find the technical data of the libraries the types of drives you can use and their performance characteristics in the DATSHEET FUJITSU ETERNUS LT40 S2 and DATSHEET FUJITSU ETERNUS LT60 S2 which are available at http www fujitsu com global products computing storage tape eternus lt lt40 and http www fujitsu com global products computing storage tape eternus lt lt60 respectively ...

Page 104: ...n the rear panel see Figure 7 1 3 Store the lock and the label on the top cover The shipping lock prevents the robotic mechanism from moving during shipment Figure 7 1 Replacing shipping lock before transportation 4 Before sending the defect Library back please contact the service department to give the informations of the Part and Serial Numbers see Figure 7 2 If you need to transport the library...

Page 105: ...8 FUJITSU LIMITED P3AM 5392 07ENZ0 105 Figure 7 2 Product label 5 Package the tape Library Please use the original Box see Figure 7 3 Figure 7 3 Re Packaging the library Table 7 1 Re Packaging description 6 Send the Library to the service center End of procedure No Description 1 Box 2 Bottom shell 3 Unit 4 Shipping lock 5 Middle shell 6 Top shell ...

Page 106: ...er to a designated collection point for the recycling of waste electrical and electronic equipment The separate collection and recycling of your waste equipment at this time of disposal will help to conserve natural resources and ensure that it is recycled in a manner that protects human health and the environment For more information about where you can drop off your waste equipment for recycling...

Page 107: ...compliance with safety and regulatory agency standards 9 1 Device Standards Table 9 1 IEC 60297 rack standards CAUTION To comply with the following regulations and standards the tape Library must be properly installed in an office or industrial environment with shielded cables and adequate grounding of the bus and the input power Countries Standard by BDT USA Canada FCC ETL CS AUS European Union C...

Page 108: ...emission limits as specified in the above cited Rules there is no guarantee that interference will not occur in a particular installation Interference can be determined by turning the equipment off and on while monitoring radio or television reception The user may be able to eliminate any interference by implementing one or more of the following measures Reorient the affected device and or its rec...

Page 109: ...pared with the utmost attention to detail However Fujitsu shall assume no responsibility for any operational problems as the result of errors omissions or the use of information in this manual Fujitsu assumes no liability for damages to third party copyrights or other rights arising from the use of any information in this manual The content of this manual may not be reproduced or distributed in pa...

Page 110: ......
Reviews: