background image

Colour monitor 38B2-M

A26361-K853-Z200-1-5E19

English - 13

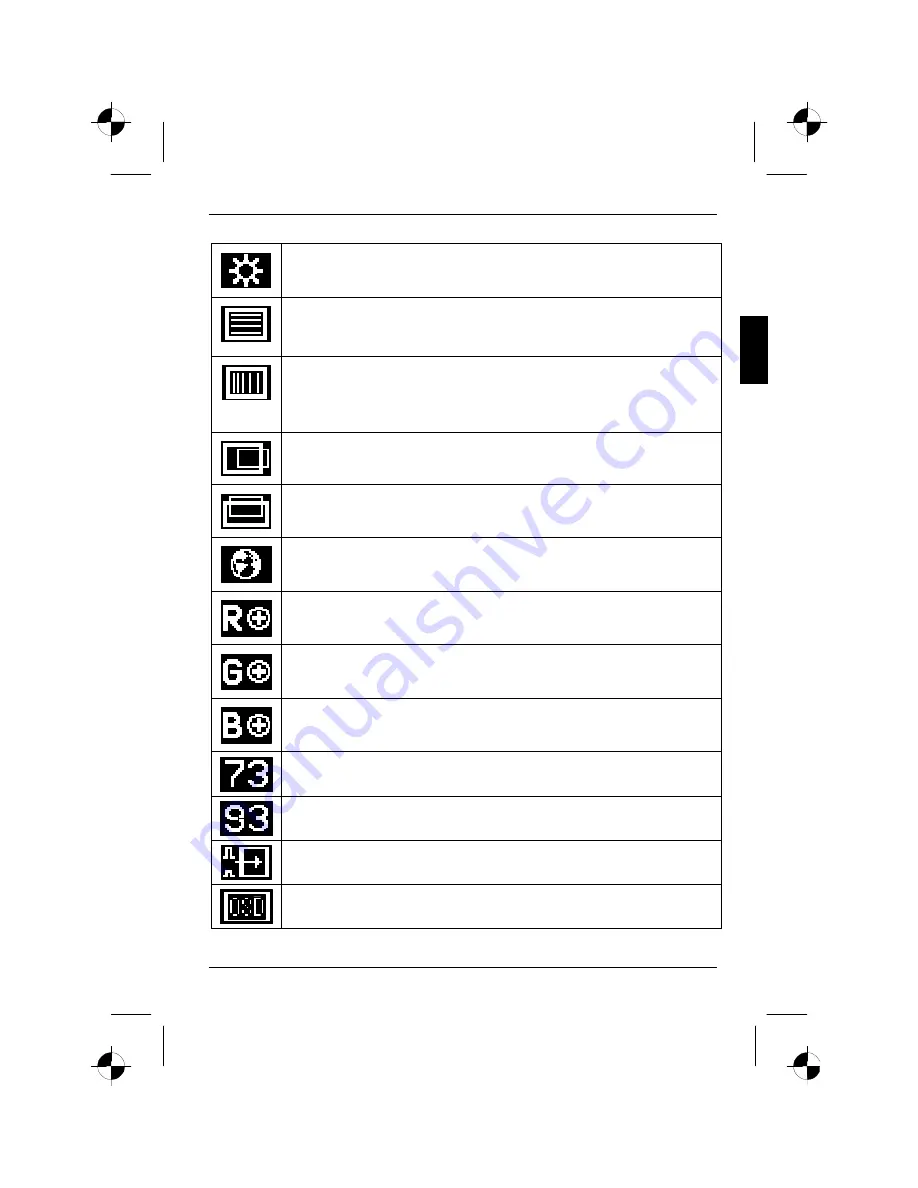
Setting the brightness of the display (

Brightness

)

Setting the focus (picture definition) (

Focus

)

With this function you can eliminate a possible picture noise and improve the picture
definition.

Setting the clock (picture width) (

Clock

)


With this function you can eliminate vertical interference with local fuzziness
(synchronisation with the graphic card signals).

There is only one proper setting per resolution and refresh rate for these parameters.

Adjusting the horizontal position (

H. Position

)

With this function you can move the picture to the left or to the right.

Adjusting the vertical position (

V. Position

)

With this function you can move the picture up or down.

Setting language for the OSD menu (

Language

)

You can choose from English (default setting), German, French, Spanish and Italian.

Changing the colour tone of the screen, setting the red ratio (

Red

)

Changing the colour tone of the screen, setting the green ratio (

Green

)

Changing the colour tone of the screen, setting the blue ratio (

Blue

)

Setting the colour tone of the screen to 7300 K (less blue)

Setting the colour tone of the screen to 9300 K (bluer)

Setting the contrast automatically to an optimal value ()

Setting position of the OSD menu (

OSD

)

Summary of Contents for 38B2-M

Page 1: ...Checking the contents of the consignment 6 Assembling the monitor base 6 Installing an ergonomic video workstation 7 Connecting the monitor 7 Operation of the monitor 9 Switching the monitor on off 9 Notes on power management 10 Changing the monitor settings 10 Notes on ergonomic colour adjustment 14 Removing the monitor base 15 Technical data 15 VESA DDC compatible VGA interface 16 Preset operati...

Page 2: ......

Page 3: ...consumption when the computer system is not in use compliance with the recommendations in accordance with TCO 99 compliance with the ergonomic standards ISO 13406 2 In normal screen mode dark characters against a light background the monitor satisfies the ergonomic requirements for the GS symbol This operating manual contains important information you require to start up and run your LCD monitor A...

Page 4: ...o as to avoid lasting damage Newton rings scratches If the device is brought into the installation site from a cold environment condensation can form Before operating the device wait until it is absolutely dry and has reached approximately the same temperature as the installation site During installation and before operating the device please observe the instructions on environmental conditions in...

Page 5: ... and incorrect repair may greatly endanger the user electric shock fire risk You may set only those resolutions and refresh rates specified in the Technical data chapter Otherwise you may damage your monitor If you are in any doubt contact your sales outlet or our help desk Keep this operating manual together with your device If you pass on the device to third parties you should include this manua...

Page 6: ...mber specified above was tested conforming to the applicable FCC rules under the most accurate measurement standards possible and that all the necessary steps have been taken and are in force to assure that production units of the same equipment will continue to comply with the Commissions requirements Important note on power cable To guarantee safe operation use the cable supplied Use the followi...

Page 7: ...ls enter a low power mode when not in use the overall savings in electricity could amount to 2 thousand million annually These savings could also prevent the emission of 20 million tons of carbon dioxide into the atmosphere the equivalent of 5 million automobiles As an Energy Star Partner Fujitsu Siemens Computers GmbH has determined that this product meets the Energy Star guidelines for energy ef...

Page 8: ...e one floppy disk one Warranty Booklet this operating manual Should you discover that the delivery does not correspond to the delivery note notify your local sales outlet immediately i It is recommended not to throw away the original packaging material Keep it for future transportation Assembling the monitor base Ê Place the monitor base on a level surface e g a table Ê Place the monitor on the ba...

Page 9: ...0 60 0 permissible viewing sector preferable viewing sector permissible viewing sector approx 90 and more approx 90 Position the monitor for optimum viewing The viewing distance to the monitor should be approximately 50 cm Keep ventilated areas clear Remember to maintain correct posture Connecting the monitor Information on the computer connections and interfaces is contained in the operating manu...

Page 10: ...of the monitor Ê Firmly insert the socket with the power cable supplied into the power cable connection of the power adapter 3 and check whether the socket is securely seated Ê Depending on the version plug the plug of the power cable into the monitor mains outlet of the computer 4a or into a properly grounded mains outlet 4b Ê Insert the audio cable plug in the AUDIO IN socket 5 of the monitor Ê ...

Page 11: ...reen when the monitor and computer are switched on The power indicator glows amber when the monitor does not receive a video signal or is in the energy saving mode The power indicator goes off when the monitor is switched off When you switch the computer system on you must proceed in the following order Ê First switch the LCD monitor on with the ON OFF switch 3 Ê Then switch on the computer i If y...

Page 12: ...computer i When the monitor is switched to the energy saving mode by the power management system a power consumption of up to 3 W is maintained to feed the circuit for redrawing the screen contents To completely switch off the power consumption switch off the computer or pull the plug of the monitor power cable out of the monitor socket of the computer or of the mains outlet Changing the monitor s...

Page 13: ...m values for your system Adjusting the brightness Ê Press the 3 button to activate the setting window for brightness Brightness Ê Set the brightness with the 3 or 4 buttons until the picture appears correct Ê Press the MENU button to save the settings and to switch the OSD menu off If you make no changes for 10 seconds the settings will automatically be saved and the OSD menu will be deactivated A...

Page 14: ...ed setting with the 3 or 4 button Ê Press the MENU button to return to the main menu If you want to change another setting Ê Use the 3 or 4 button to mark another icon in the main menu e g H Position Ê Press the MENU button and make the desired setting with the 3 or 4 button Ê To save and end the settings mark the Exit icon in the main menu with the buttons 3 or 4 and then press the MENU button If...

Page 15: ...tal position H Position With this function you can move the picture to the left or to the right Adjusting the vertical position V Position With this function you can move the picture up or down Setting language for the OSD menu Language You can choose from English default setting German French Spanish and Italian Changing the colour tone of the screen setting the red ratio Red Changing the colour ...

Page 16: ...ay in your application programmes take note of the information below The primary colours blue and red on a dark background do not produce the minimum required contrast of 3 1 and are therefore not suitable for continuous text and data entry When using several colours for characters and background and giving the primary colours full modulation you can obtain very suitable colour combinations see th...

Page 17: ...ching Ê Unbolt both snap fits with a screwdriver while pulling the monitor base downwards Technical data Dimensions and weight LCD monitor Visible diagonals 38 cm Dot pitch 0 297 mm Screen size 304 mm x 228 mm Maximal resolution 1024 x 768 pixels Luminance 200 cd m2 typical Dimensions W x H x D incl monitor base 357 mm x 355 mm x 160 mm Turning area 5 forward 25 back Weight approx 3 3 kg Accessori...

Page 18: ...nditions Environment class 3K2 IEC 721 Rated range of operation Humidity 15 C 35 C 20 85 Limit range of operation Humidity 5 C 35 C 20 85 Condensation must be avoided VESA DDC compatible VGA interface Your monitor is equipped with a VESA DDC compatible VGA interface VESA DDC Video Electronics Standard Association Display Data Channel is used as the communications interface between the monitor and ...

Page 19: ...x 480 640 x 480 640 x 480 60 Hz 67 Hz 72 Hz 75 Hz 31 47 kHz 35 00 kHz 37 86 kHz 37 50 kHz 800 x 600 800 x 600 800 x 600 800 x 600 56 Hz 60 Hz 72 Hz 75 Hz 35 16 kHz 37 88 kHz 48 08 kHz 46 87 kHz 832 x 624 75 Hz 49 73 kHz 1024 x 768 1024 x 768 1024 x 768 1024 x 768 1024 x 768 60 Hz 70 Hz 72 Hz 75 Hz 75 Hz 48 36 kHz 56 48 kHz 57 52 kHz 60 02 kHz 60 24 kHz For ergonomical reasons a resolution of 1024x...

Page 20: ...owing points If the distortion is still not eliminated the monitor should if possible be checked on another computer If you are unable to solve the problem please inform our help desk The display is too small or not centred The monitor recognises an undefined mode see Technical data Ê Adjust the position and the size of the display and save your settings see Operation of the monitor No display pow...

Page 21: ...ard ISO 13406 2 Class II Example a 15 flat screen monitor with a resolution of 1024 x 768 has 1024 x 768 786432 pixels Each pixel consists of three subpixels red green and blue so there are about 2 4 million dots in total According to ISO 13406 2 Class II a maximum of 4 pixels and 5 subpixels may be defective i e a total of 17 faulted dots This corresponds to approx 0 002 of the entire screen surf...

Reviews: