Fujitsu Siemens Computers AMILO Pa series Easy Manual Download Page 63


Removing and installing components during servicing
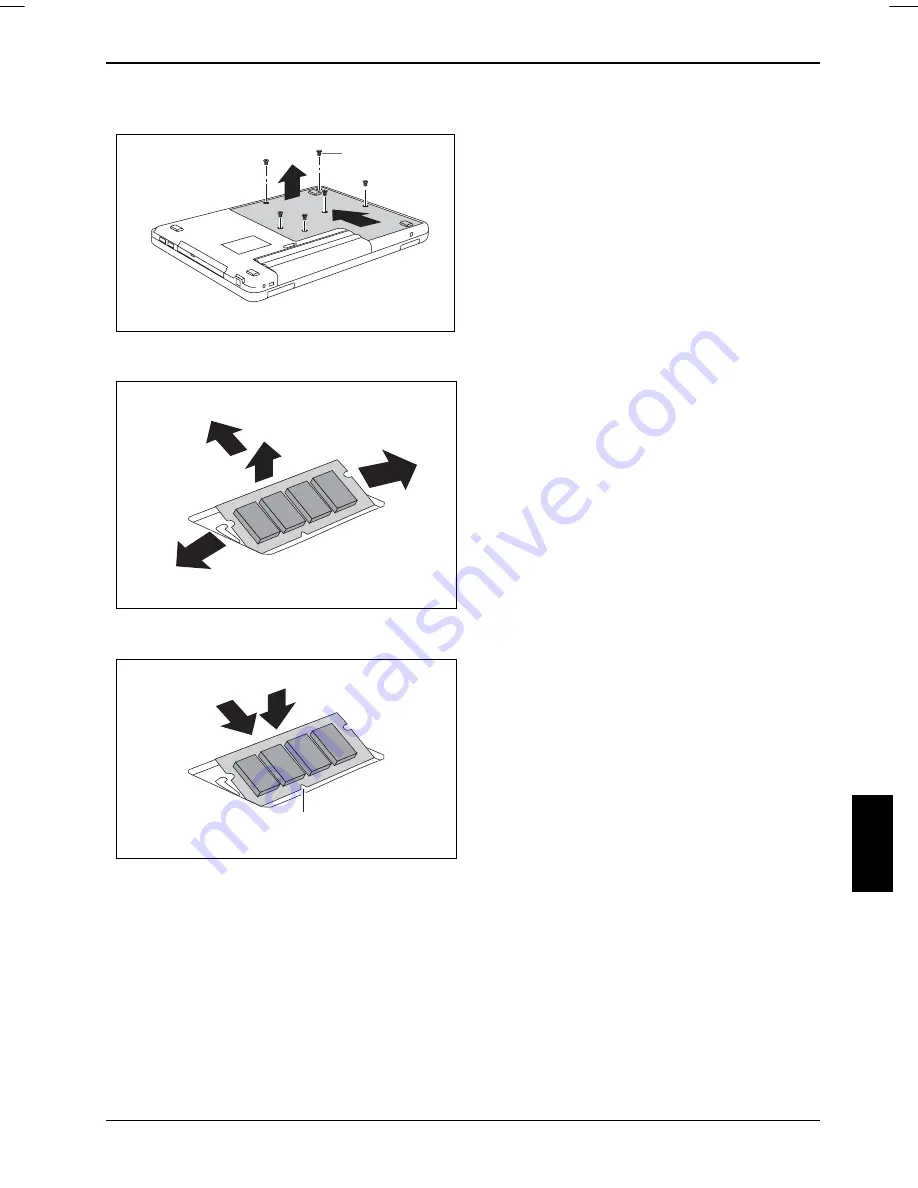
 

Removing cover 

1

3

2


Remove the screws (1). 


Swivel the cover in the direction of the 
arrow (2). 


Lift the cover off the notebook in the 
direction of the arrow (3). 

Memory modules: removing 


3

2

1

1


Carefully push the two mounting clips 
outwards (1). 

The memory module will flap upward (2). 


Pull the memory module out of its slot in the 
direction of the arrow (3). 

Installing memory modules 


Insert the memory module with the contacts 
and the recess (a) facing the slot (1). 

2

a

1


Carefully push the memory module 
downwards until it engages noticeably (2). 


10600718673, edition 1 

53 

Summary of Contents for AMILO Pa series

Page 1: ...Notebook EasyGuide English AMILO Pa Pi Series...

Page 2: ...ww fujitsu siemens com helpdesk your sales partner your sales outlet Additional information is contained in the Help Desk list and the Warranty manual You can find the Warranty manual on your notebook...

Page 3: ......

Page 4: ...This manual was produced by Xerox Global Services Published by Fujitsu Siemens Computers GmbH Printed in the Federal Republic of Germany AG 07 05 Edition 1 Order No 10600718673 Order No 440 N30702...

Page 5: ...a Ports and operating elements Manufacturer s notes Important notes Index Preparing the notebook for use Using your notebook Security functions Connecting external devices Memory expansion Settings in...

Page 6: ...ronics Inc All other trademarks referenced are trademarks or registered trademarks of their respective owners whose protected rights are acknowledged Copyright Fujitsu Siemens Computers GmbH 2006 All...

Page 7: ...eyboard settings 21 Easy Launch keys 21 Touchpad and touchpad buttons 22 LCD screen 23 Information on LCD monitor 23 Monitor settings 24 Battery 24 Charging caring for and maintaining the battery 24 B...

Page 8: ...e battery 50 Removing and installing the hard disk 50 Removing the hard disk 50 Installing the hard disk 51 Memory expansion 52 Installing and removing the memory extension 52 Settings in BIOS Setup U...

Page 9: ...Contents CE marking 66 Index 67 10600718673 edition 1...

Page 10: ...Contents 10600718673 edition 1...

Page 11: ...Video out for connecting your notebook to your television an IEEE 1394 FireWire connection for high speed devices such as digital camcorders several USB ports which provide easy expansion with webcam...

Page 12: ...ate your warranty destroy the notebook or endanger your life i Indicates important information which is required to use the system properly Texts which follow this symbol describe activities that must...

Page 13: ...1 2 3 4 6 5 7 98 13 Touchpad 1 Kensington Lock 14 Touchpad buttons 2 DC jack DC IN 15 Status indicators 3 Monitor port 16 Headphones SPDIF port 4 S Video out socket 17 Microphone port Line In 5 LAN p...

Page 14: ...Ports and operating elements 4 10600718673 edition 1...

Page 15: ...nal safety precautions for devices with radio components in the Safety manual This notebook complies with the relevant safety regulations for data processing equipment If you have questions about usin...

Page 16: ...are compatible If this is not the case buy a power cable that matches the local conditions Do not use a connection adapter for electrical devices to connect the notebook Enquire with the corresponding...

Page 17: ...and polishes can damage the markings on the keyboard and the device the paintwork or the notebook itself Ensure that no liquid enters the notebook The Crystal View display is very sensitive to scratch...

Page 18: ...Important notes 8 0600718673 edition 1...

Page 19: ...ease the battery s life by enabling the system s energy saving functions When you use your notebook in your home or office we recommend you use the mains adapter instead of the battery Please see the...

Page 20: ...the fan intake or exhaust openings of the notebook or the mains adapter Do not expose the notebook to extreme environmental conditions Protect the notebook from dust humidity and heat Connecting the...

Page 21: ...make it easier for you use your notebook for the first time the operating system has been preinstalled on the hard disk and the manuals stored on the hard disk Switch the notebook on see Using your n...

Page 22: ...Using your notebook for the first time 12 10600718673 edition 1...

Page 23: ...devices such as a mouse and a printer to the notebook Please take note of the information in the Important notes chapter Switching on the notebook Slide the release button in the direction of the arr...

Page 24: ...e operating system properly e g Windows XP by clicking Start then Turn off Computer If the notebook is not switched off automatically press the ON OFF switch 1 for approx five seconds Close the LCD sc...

Page 25: ...yboard functions Three displays are also visible when the notebook is closed power on indicator wireless LAN display and battery display 1 A A Standby Power on indicator Caps Lock indicator Indicator...

Page 26: ...indicator The indicator lights up The indicator lights up one of the drives e g hard disk CD DVD is being accessed A Caps Lock indicator The indicator lights up The Caps Lock key has been pressed All...

Page 27: ...he functions of an enhanced keyboard Some enhanced keyboard functions are mapped with key combinations The following description of keys refers to Windows Additional functions supported by the keys ar...

Page 28: ...tion simply press the Caps Lock key again Shift key The Shift key causes uppercase characters to appear In the case of overlay keys the character printed on the upper left of the key appears when that...

Page 29: ...cator is not lit see Status indicators section 2 Characters enabled when Num Lock indicator is lit see Status indicators section Key combination The following description of key combinations refers to...

Page 30: ...ontrol Center LCD CRT LCD CRT Fn F5 Increasing the volume This key combination raises the volume of the integrated loudspeakers F6 Fn Decreasing the volume This key combination reduces the volume of t...

Page 31: ...e Details button in the Languages tab Click on Add to add other keyboard layouts to the selection In the Default input language field choose the keyboard layout you want to use when you start your not...

Page 32: ...mouse 1 2 1 Touchpad 2 Touchpad buttons Moving the pointer Move your finger on the touchpad The pointer will move accordingly Selecting an item Move the pointer to the item you wish to select Tap the...

Page 33: ...440 x 900 UXGA 1600 x 1200 WSXGA 1680 x 1050 WUXGA 1920 x 1200 The screen resolution of the LCD monitor of your notebook is optimally set at the factory Permanently unlit or lit pixels The standard of...

Page 34: ...tebook battery can only be charged when the ambient temperature is between 5 C and max 35 C You can charge the battery by connecting the notebook to the mains adapter see Connecting the power adapter...

Page 35: ...s Computers for your notebook Never use force when inserting or removing a battery Make sure that no foreign bodies get into the battery connections Removing battery Switch the notebook off and pull t...

Page 36: ...are finished working with your notebook we advise you to come out of an energy saving mode and then turn off as normal Never turn off your notebook while it is in an energy saving mode If the notebook...

Page 37: ...xpressCard you should reinsert the placeholder into the slot This prevents foreign matter from getting into the ExpressCard slot Insert the ExpressCard in the slot guide with the connection contacts f...

Page 38: ...want to stop and remove Press the Enter key Wait for the dialogue box which tells you that it is now safe to remove the ExpressCard Pull the ExpressCard out of the slot Insert the placeholder for the...

Page 39: ...rd Carefully push the memory card into the slot The label should be facing upward The memory card may protrude by one to several millimetres depending on the memory card type Removing memory card Pull...

Page 40: ...tten only once with a maximum of 700 Mbytes of data Then these data cannot be changed but can be read as often as desired CD RW Abbreviation for Compact Disc ReWriteable A CD RW is an optical data sto...

Page 41: ...Label Flash A CD R LF is an optical data storage device that can be written once only with a maximum of 4 7 Mbytes of data Then these data cannot be changed but can be read as often as desired The da...

Page 42: ...flash data memories Writing to data stores does take some time depending on the quality setting i Ensure that you place the label flash data store to be written to correctly into the drive otherwise...

Page 43: ...ing upwards or Take out an inserted CD DVD Push in the drive tray until you feel it lock into place Manual removal emergency removal In the event of a power failure or damage to the drive it may be ne...

Page 44: ...corresponding DVD films Then the last regional code selected is retained and cannot be changed again i If a DVD film is to be watched in all regions it has the regional code 0 Before buying a DVD film...

Page 45: ...you attach headphones or external loudspeakers the built in loudspeakers are disabled Volume adjustment Set the desired volume with the key combination Fn F5 or Fn F6 or To adjust the volume use the...

Page 46: ...Finland France Greece Great Britain Holland Ireland Iceland Italy Luxembourg Norway Austria Portugal Sweden Switzerland and Spain Pulse dialling Belgium France Holland and Italy Also in Poland Sloveni...

Page 47: ...ujitsu Siemens Computers GmbH voids the permits CE issued for this device A wireless LAN is integrated in your notebook Switching wireless LAN module on and off i Check whether the wireless LAN module...

Page 48: ...Using your notebook 38 10600718673 edition 1...

Page 49: ...e If you forget your passwords you will need to contact the help desk Passwords are not covered by your warranty and a charge will be made for assistance Brief overview of the security functions Secur...

Page 50: ...etup Utility with both the supervisor and the user password With the supervisor password you have access to all functions of the BIOS Setup Utility and with the user password only to part of the funct...

Page 51: ...d you will then be asked to enter a new password Press the Enter key twice Select the Exit Saving Changes option in the Exit menu Select OK and press the Enter key Your notebook will now restart and t...

Page 52: ...u do not want to make any other settings you can exit BIOS Setup Utility Select the Save Changes and Exit option under Exit The notebook restarts Password protection of the system has been cancelled 4...

Page 53: ...necting devices to notebook 1 Turn off your notebook and all external devices 2 Unplug your notebook and all devices from the mains sockets 3 Connect the cables for your external devices following the...

Page 54: ...rnal monitor can be connected to the notebook Switch off the notebook and the external monitor Connect the data cable of the external monitor to the monitor port of the notebook First switch on the ex...

Page 55: ...ces that also have a USB port e g a printer a scanner or a modem USB devices are hot pluggable This means you can connect and disconnect devices while your operating system is running i USB 1 x has a...

Page 56: ...h a digital optical input to your notebook Connect the data cable to the external device Connect the data cable to the headphone SPDIF port of the notebook i If you attach headphones or external louds...

Page 57: ...h speed devices can be connected to the FireWire port The FireWire port operates at a speed of 400 Mbit per second FireWire devices are hot pluggable Therefore the cables of FireWire devices can be co...

Page 58: ...ut socket on your notebook is a 4 pin Hosiden socket also called a 4 pin mini DIN socket The plug needed for this connection is a Hosiden connector Connectors Port Pin configuration 1 2 3 4 Position M...

Page 59: ...of the mains socket Remove the battery Take care when you use the locking mechanisms on the battery and any other component Never use sharp objects such as screwdrivers scissors or knives as leverage...

Page 60: ...at it locks into place Disconnect all cables connected to the notebook Turn your notebook over and place it on a sturdy flat surface Removing the battery see Removing battery Remove the screws 1 1 3 2...

Page 61: ...he drive bay in the direction of the arrow 1 1 4 2 4 3 Pull out the hard disk by the tag 2 straight 3 to the right so that the contacts engage Push a little harder with a finger on the left edge of th...

Page 62: ...bay You must open the service bay when removing and installing a memory module Once you have removed the cover the various components are exposed These components should be removed and replaced only...

Page 63: ...ow 3 Memory modules removing 3 2 1 1 Carefully push the two mounting clips outwards 1 The memory module will flap upward 2 Pull the memory module out of its slot in the direction of the arrow 3 Instal...

Page 64: ...direction of the arrow 1 3 2 1 Swivel the cover in the direction of the arrow 2 Fasten the cover with the screws 3 Install the battery again see Inserting the battery Turn the notebook over and place...

Page 65: ...system The following or a similar display appears on the screen during booting with the AMILO Pi F2 BIOS Setup F12 Boot Menu When this message appears press the function key F2 i If a password has be...

Page 66: ...tility Select Save Changes and Exit and Yes to save the current settings and exit the BIOS Setup Utility The notebook is rebooted and the new settings come into effect Discard Changes and Exit Discard...

Page 67: ...information on acoustic signals Any changes you have made to the hardware or software after receiving the notebook Any changes you have made to the BIOS Setup settings after receiving the notebook You...

Page 68: ...attery that supplies the internal clock is dead Please contact your sales outlet or our hotline help desk The LCD screen of the notebook remains blank Cause Troubleshooting Monitor is switched off Pre...

Page 69: ...and the external monitor if it is plugged in with a connector Switch on the external monitor and the notebook The external monitor is blank or the image is unstable Cause Troubleshooting The wrong ex...

Page 70: ...itch the notebook off Check whether the mains adapter is connected correctly to the notebook Switch the notebook on The notebook stops working Cause Troubleshooting The notebook is in Standby or Suspe...

Page 71: ...The DVD film does not continue to play Cause Troubleshooting Accelerated hard decryption activated Should the picture freeze when playing some DVD films deactivate the accelerated hardware decryption...

Page 72: ...Troubleshooting and tips 62 10600718673 edition 1...

Page 73: ...find the correct technical data for your device see the device information plate The device information plate is located on the underside of the device Model designation example AMILO Pa 1510 1060071...

Page 74: ...ers Utilities CD DVD supplied and on the Internet at www fujitsu siemens com i Battery Times Charging time when not in operation approx 3 5 hours about 2 2 8 hours depending on battery used and type o...

Page 75: ...uirements and other relevant provisions of Directive 1999 5 EC Copyright protected technology This product incorporates copyright protection technology that is protected by method claims of certain U...

Page 76: ...ent and mutual recognition of conformity This equipment can be used in the following countries Belgium Denmark Germany Estonia Finland France Greece UK Ireland Iceland Italy Latvia Liechtenstein Lithu...

Page 77: ...upervisor password 41 Changing the password 41 Changing the user password 41 Charging capacity battery 24 Charging the battery 24 Cleaning 7 Cleaning the notebook 7 Cleaning the touchpad 7 Combo drive...

Page 78: ...ng the volume 20 Indicator disk drive indicator 16 Drives 16 Num Lock 16 19 Infrared interface 3 Inserting ExpressCard 27 Inserting memory card 29 Inserting the battery 25 Installing memory modules 53...

Page 79: ...ebook operating 13 Notes 5 boards 49 cleaning 7 disposal recycling 65 energy saving 5 LCD screen 23 manufacturer 65 safety 5 transporting 6 Num Lock indicator 16 Numeric keypad 17 see Virtual nmeric k...

Page 80: ...ty 55 T Technical data 63 65 W mains adapter 64 battery 64 notebook 64 Time not correct 58 Time daylight savings 58 Tips 57 Touchpad 3 22 buttons 22 dragging items 22 executing commands 22 moving the...

Reviews: