background image

Colour monitor 19P2

A26361-K713-Z100-1-5E19

English - 13

Settings with the OSD menu

To set the OSD menu, perform the following steps:

Ê 

Press the MENU button to activate the OSD menu.

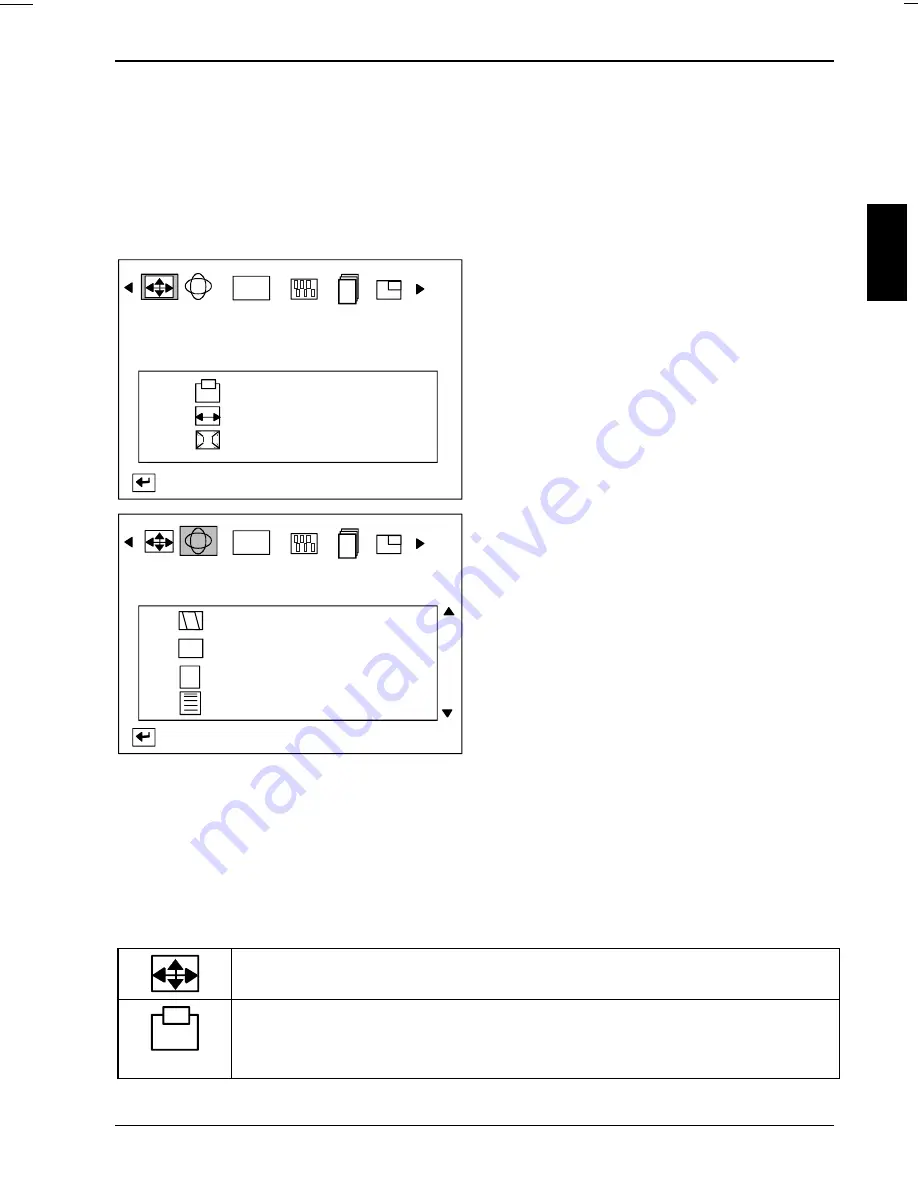
The main menu appears on the screen with icons for the setting functions. The last icon set is
marked (in this case

Position/Size

). A setting window with selection options is displayed for the

highlighted icon (here:

Position

,

Size

,

Zoom

).

Position/Size

RGB

Position
Size
Zoom

: Access Function

Ê 

If necessary, use the

!

or

"

button to

mark another icon, e. g.

Geometry

.

Ê 

Press the MENU button to activate the
setting window.

Geometry

RGB

Parallel/Rotation
Pincushion/Trapezoid
Pinbalance
Linearity

: Access Function

((

) (

In the setting window the arrow keys (

$

,

#

,

!

and

"

) which you can use to make your

selection are now displayed.

Ê 

Press the relevant arrow key to make define
your setting.

Ê 

Press the MENU key to confirm your
setting.

All modifications are automatically stored if no button is pressed for several seconds. The power
indicator flashes once to indicate the storage.

The OSD menu disappears after a short time (e. g. 10 seconds). The time can be set in the OSD
menu (

Duration

).

The OSD menu can be hidden by pressing the EXIT button.

All possible adjustments of the monitor using the OSD menu are described in the following.

Adjusting size and position

Calling the

Position/Size

setting window

Adjusting picture position (

Position

)

! "

= Shifting the picture to the left or to the right

$ #

= Shifting the picture down or up

Summary of Contents for 19P2

Page 1: ...P2 19P2 19P2 19P2 Bildschirm Moniteur Monitor Skärm Beeldscherm BETRIEBSANLEITUNG BETRIEBSANLEITUNG BETRIEBSANLEITUNG BETRIEBSANLEITUNG OPERATING MANUAL OPERATING MANUAL OPERATING MANUAL OPERATING MANUAL ...

Page 2: ... zu unseren Produkten Tipps Updates usw finden Sie im Internet http www fujitsu siemens com Are there any technical problems or other questions you need clarified Please contact our Help Desk see Warranty Card The latest information on our products tips updates etc can be found on the Internet under http www fujitsu siemens com ...

Page 3: ......

Page 4: ...ciclado Questo manuale è stato stampato su carta da riciclaggio Denna handbok är tryckt på recyclingpapper Dit handboek werd op recycling papier gedrukt Herausgegeben von Published by Fujitsu Siemens Computers GmbH Bestell Nr Order No A26361 K713 Z100 1 5E19 A26361 K713 Z100 1 5E19 A26361 K713 Z100 1 5E19 A26361 K713 Z100 1 5E19 Printed in Korea AG 01 01 01 01 A26361 K713 Z100 1 5E19 ...

Page 5: ...nitor Moniteur couleur Monitor de color Monitor a colori Färgskärm Kleurenbeeldscherm Betriebsanleitung Operating Manual Deutsch English Français Español Italiano Svenska Nederlands TCO 99 Ausgabe Januar 2001 January 2001 edition ...

Page 6: ...en Dieses Handbuch wurde erstellt von cognitas Gesellschaft für Technik Dokumentation mbH www cognitas de VESA DDC and DPMS are registered trademarks of Video Electronics Standards Association Copyright ã Fujitsu Siemens Computers GmbH 2001 All rights including rights of translation reproduction by printing copying or similar methods even of parts are reserved Offenders will be liable for damages ...

Page 7: ... 6 Disposal and recycling 6 Checking the contents of the consignment 7 Installing an ergonomic video workstation 8 Connecting the monitor 8 Operation of the monitor 10 Switching the monitor on 10 Switching the monitor off 10 Notes on power management 11 Changing the monitor settings 11 Notes on ergonomic colour adjustment 17 Technical data 17 VESA DDC compatible VGA interface 18 Preset operating m...

Page 8: ......

Page 9: ...monitor The monitor interacts closely with the graphics card screen controller of your computer The monitor processes the data supplied to it by the screen controller The screen controller the associated driver software is responsible for setting the modes resolution and refresh rate Target group You don t need to be an expert to perform the operations described here Do however read the chapter Im...

Page 10: ... monitor The device automatically sets itself to the correct voltage within the range from 100 V to 240 V Ensure that the local mains voltage lies within these limits The device must be installed in such a way that the user has good access to the appliance socket The ON OFF switch does not disconnect the device from the mains voltage To disconnect the mains voltage completely remove the power plug...

Page 11: ...agnetic fields Transport the monitor with care and only in its original packaging or another corresponding packaging fit to protect it against knocks and jolts Above all never drop the monitor If the CRT is damaged there is a risk of implosion X ray radiation This device complies with the German X ray regulations Röntgenverordnung RöV The local dosage emitted is less than 1 µSv h micro Sievert per...

Page 12: ...te on power cable To guarantee safe operation use the cable supplied Use the following guidelines if it is necessary to replace the original cable set The female male receptacles of the cord set must meet CEE 22 requirements The cable has to be HAR certified or VDE certified The mark HAR or VDE will appear on the outer sheath or on the insulation of one of the inner conductors For devices which ar...

Page 13: ...ation of Conformity This device complies with Part 15 of the FCC Rules Operation is subject to the following two conditions 1 this device may not cause harmful interference and 2 this device must accept any interference received including interference that may cause undesired operation Product Name Monitor Trade Name Fujitsu Siemens Computers Model Number s 19P2 Name of Responsible Party Siemens I...

Page 14: ...as determined that this product meets the Energy Star guidelines for energy efficiency CE certificate The shipped version of this device complies with the requirements of the EEC directives 89 336 EEC Electromagnetic compatibility and 73 23 EEC Low voltage directive Disposal and recycling This device has been manufactured to the highest possible degree from materials which can be recycled or dispo...

Page 15: ...urred during transportation Ê Check whether the delivery agrees with the details in the delivery note The complete shipment comprises one monitor with data cable one power cable one warranty card this Operating Manual Should you discover that the delivery does not correspond to the delivery note notify your local sales outlet immediately i It is recommended not to throw away the original packing m...

Page 16: ...missible viewing sector approx 90 and more approx 90 Position the monitor for optimum viewing The viewing distance to the monitor should be approximately 50 cm Keep ventilated areas clear Remember to maintain correct posture Connecting the monitor Information on the computer connections is contained in the operating manual for your computer Please note the information provided in the Safety sectio...

Page 17: ...afety screws i If your computer has two monitor ports onboard screen controller and separate graphics card the monitor port for the separate graphics card is usually active Ê Plug the power cable supplied into the power connector of the monitor Ê Plug the power cable into the monitor connector at the rear of the computer Ê Plug the power connector of the computer into a properly grounded mains out...

Page 18: ... on i If your computer has a power management function energy saving mode you should read the Notes on power management of the monitor in this chapter When you start your system several mode changes will usually be carried out when various programmes are called automatically different settings for resolution and image refresh rate Do not be confused by the unusual displays They are not error messa...

Page 19: ...nd full power is restored The length of the individual stages is determined by the power management system of the computer For detailed information on how energy saving mode operates refer to the Operating Manual or Technical Manual of your computer i The service life of your monitor will be extended if the OFF mode is switched to after 30 minutes at the earliest setting in screen saver or in your...

Page 20: ... with the arrow keys or respectively shown in the OSD menu Adjusting the brightness and contrast If the OSD menu is not shown you can directly open the setting window for brightness with the keys or and the setting window for contrast with the keys or and make the settings i You will increase the life of your screen if you adjust the contrast and brightness to medium Brightness Brightness setting ...

Page 21: ...Trapezoid Pinbalance Linearity Access Function In the setting window the arrow keys and which you can use to make your selection are now displayed Ê Press the relevant arrow key to make define your setting Ê Press the MENU key to confirm your setting All modifications are automatically stored if no button is pressed for several seconds The power indicator flashes once to indicate the storage The O...

Page 22: ...arallel Rotation Reducing the angle of the left and right sides Rotating the picture in a clockwise or counter clockwise direction Correcting pincushion and trapezoid distortion Pincushion Trapezoid Bending the right and left side inward or outward Making the bottom edge narrower and the top edge wider or making the top edge narrower and the bottom edge wider Correcting unsymmetrical pincushion di...

Page 23: ...eteriorate reduced picture definition slight flickering To optimally restore the picture focus in the horizontal and vertical picture area use the function Focus Corner distortion is when the corner edges of the screen display are bent inward or outward Unsymmetrical corner distortion is when the corner edges of the screen display are bent inward on one side and outward on the other side Calling t...

Page 24: ...e video signal Video Input Level If required the entry level of the video signal can be changed from 0 7 V default to 1 V If the monitor is operated on a PC use the default setting of 0 7 V Setting the OSD menu and displaying monitor information Calling the Menu setting window Hz Display information on the current and available modes Display Timing Display default Factory Timing and user modes Use...

Page 25: ...ns see the following table Background Characters black white purple blue cyan green yellow red black white purple blue cyan green yellow red Colour combination very suitable light background colours are only suitable for devices which are operated with a refresh rate of at least 75 Hz Colour combination not suitable because colour locations are too close together thin characters are not identifiab...

Page 26: ...peration Humidity 15 C 35 C 20 85 5 C 40 C 20 85 Condensation must be avoided VESA DDC compatible VGA interface Your monitor is equipped with a VESA DDC compatible VGA interface VESA DDC Video Electronics Standard Association Display Data Channel is used as the communications interface between the monitor and the computer If your computer is equipped with a VESA DDC compatible VGA interface it can...

Page 27: ...Hz 0 5 kHz 80 8 kHz 0 5 kHz 91 2 kHz 0 5 kHz 93 1 kHz 0 5 kHz 60 Hz 2 Hz 70 Hz 2 Hz 100 Hz 2 Hz 85 Hz 2 Hz 100 Hz 2 Hz 85 Hz 2 Hz 100 Hz 2 Hz 85 Hz 2 Hz 100 Hz 2 Hz 640 x 480 720 x 400 640 x 480 800 x 600 800 x 600 1024 x 768 1024 x 768 1280 x 1024 1152 x 864 For ergonomic reasons we recommend a refresh rate of at least 75 Hz and a maximum resolution of 1024 x 1280 pixels Pin assignment D SUB 15 p...

Page 28: ...ble on the monitor is connected correctly The screen is blank power indicator lights Ê Check whether the computer is switched on Ê Check whether the data cable for the monitor is correctly attached to the monitor and the monitor port on the computer Ê Check whether the monitor connection of the computer used is active Ê Press any key on the computer keyboard the computer may be in energy saving mo...

Page 29: ... the brightness and contrast see Operation of the monitor Ê Degauss the monitor with the OSD menu see Operation of the monitor Ê Set the moiré reduction with the OSD menu see Operation of the monitor The screen display is flickering Ê Set an ergonomic refresh rate 75 Hz using the computer software see documentation for your computer or your graphics card A muffled noise can be heard after switch o...

Reviews: