30
2
F
irst St
eps
Attaching a Lens
The camera can be used with lenses for the FUJIFILM
X-mount.
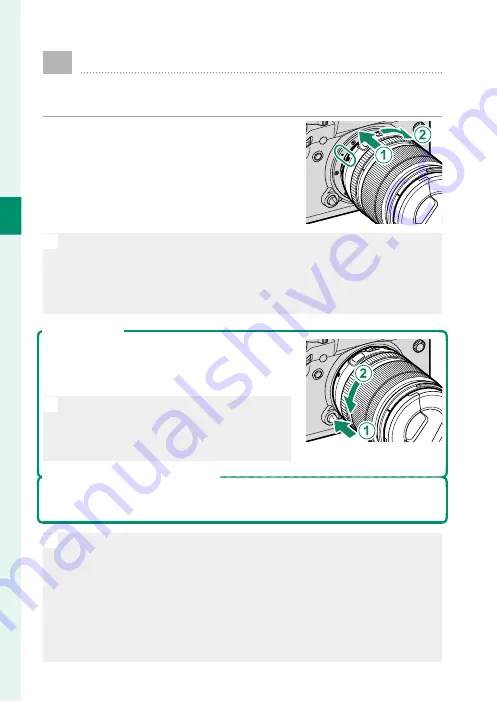
Remove the body cap from the camera
and the rear cap from the lens. Place the
lens on mount, keeping the marks on the
lens and camera aligned (
A
), and then
rotate the lens until it clicks into place
(
B
).
O
•
When attaching lenses, ensure that dust or other foreign matter does
not enter the camera.
•
Be careful not to touch the camera’s internal parts.
•
Rotate the lens until it clicks securely into place.
•
Do not press the lens release button while attaching the lens.
Removing Lenses
To remove the lens, turn the camera off , then
press the lens release button (
A
) and rotate the
lens as shown (
B
).
O
To prevent dust accumulating on the lens
or inside the camera, replace the lens caps
and camera body cap when the lens is not
attached.
Lenses and Other Optional Accessories
The camera can be used with lenses and accessories for the FUJIFILM
X-mount.
O
Observe the following precautions when attaching or removing (ex-
changing) lenses.
•
Check that the lenses are free of dust and other foreign matter.
•
Do not change lenses in direct sunlight or under another bright light
source. Light focused into the interior of the camera could cause it to
malfunction.
•
Attach the lens caps before exchanging lenses.
•
See the manual provided with the lens for information on use.
Summary of Contents for X-T3
Page 1: ...Owner s Manual BL00004970 200 EN ...
Page 21: ...1 Before You Begin ...
Page 32: ...12 1 Before You Begin The LCD Monitor 12800 ᵎᵏᵍᵎᵏᵍᵐᵎᵏᵖᴾᵏᵎᵘᵎᵎᴾᵟᵫ ALL Intra H 264 ...
Page 46: ...26 MEMO ...
Page 47: ...27 First Steps ...
Page 64: ...44 MEMO ...
Page 65: ...45 Basic Photography and Playback ...
Page 71: ...51 Movie Recording and Playback ...
Page 77: ...57 Taking Photographs ...
Page 121: ...101 The Shooting Menus ...
Page 179: ...159 Playback and the Playback Menu ...
Page 204: ...184 MEMO ...
Page 205: ...185 The Setup Menus ...
Page 241: ...221 Shortcuts ...
Page 252: ...232 MEMO ...
Page 253: ...233 Peripherals and Optional Accessories ...
Page 270: ...250 MEMO ...
Page 271: ...251 Connections ...
Page 285: ...265 Technical Notes ...
Page 322: ...302 MEMO ...
Page 323: ...303 MEMO ...


