background image

95

Software

Installation

5

2

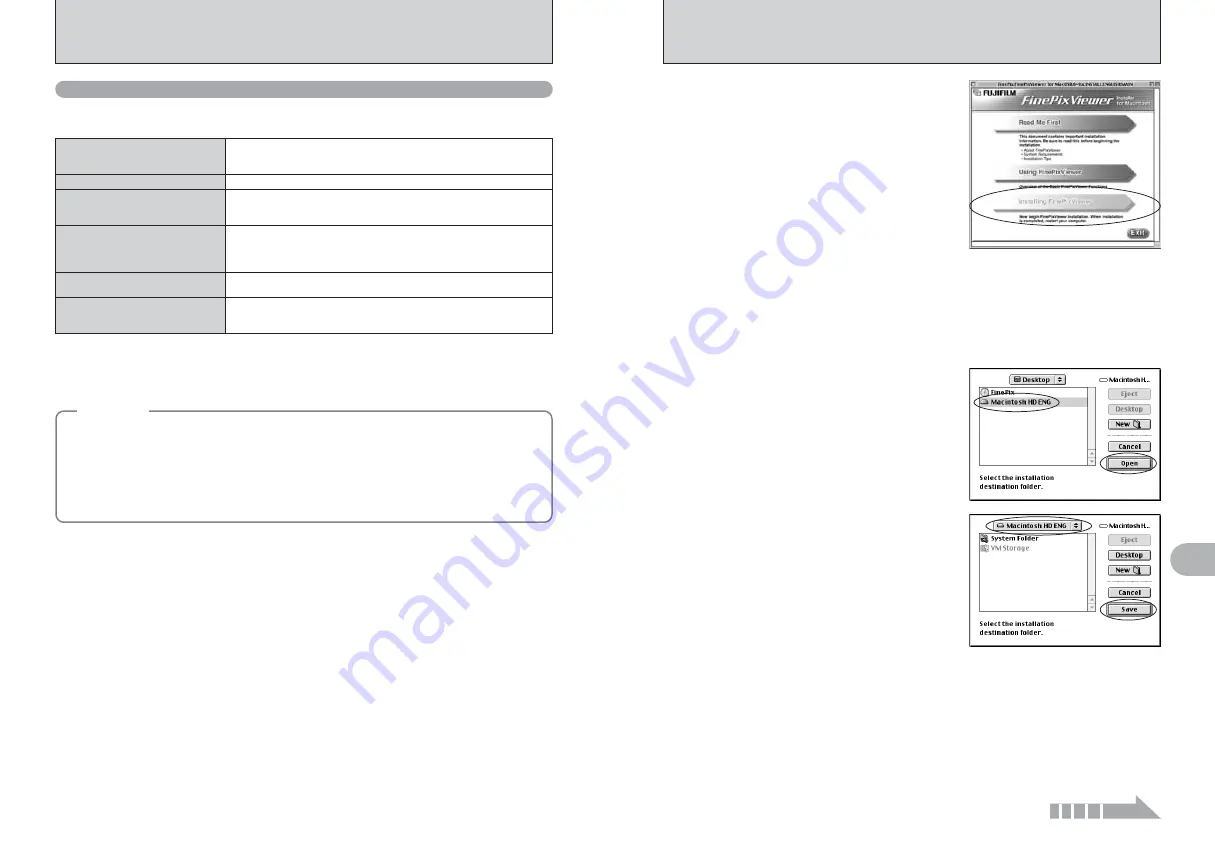
Click the [Save] button.

4

The Installer setup screen appears. Click the
[Installing FinePixViewer] button.

!

For more information on what is installed, click the [Read Me
First] button and [Using FinePixViewer] button.

7

Select the installation destination for FinePixViewer.

1

Click the [Open] button to open the installation
destination folder.

5

A confirmation message appears asking whether you want to continue with the installation.
Click the [OK] button.

6

The User License Agreement for this software appears. Read the agreement carefully and
then, if you agree to the terms of the Agreement, click the [Agree] button. If you click the
[Disagree] button, the software is not installed.

8

Install ImageMixer VCD2 for FinePix as directed by the on-screen instructions.

Continued

94

5.2 INSTALLATION ON A Mac OS 9.2

Pre-installation checklist

To run this software, you must have the hardware and software described below. Check your
system before you begin the installation.

Compatible Mac

Power Macintosh G3

1

, PowerBook G3

1

Power Macintosh G4, iMac, iBook, 
Power Macintosh G4 Cube or PowerBook G4

Operating System

Mac OS 9.2.2

2

RAM

64 MB minimum

3

Minimum 256 MB when RAW FILE CONVERTER LE is used
(When using ImageMixer VCD2 for FinePix: 128 MB or better)

Hard disk space

Amount required for installation: 400 MB minimum
Amount required for operation: 600 MB minimum
(When using ImageMixer VCD2 for FinePix: 2 GB or better)
Minimum 1 GB when RAW FILE CONVERTER LE is used

Display

800 

×

600 pixels or better, at least 32,000 colors

(When using ImageMixer VCD2 for FinePix: 1024 

×

768 or better)

Internet connection

4

i

To use the FinePix Internet Service or mail attachment function
An Internet connection and e-mail transmission software

i

Connection speed: 56 k or better recommended

1 Models with a USB port as a standard feature

2 This software does not run correctly in the Mac OS X Classic environment.

3 Turn virtual memory on if necessary.

4 Required to use the FinePix Internet Service. The software can still be installed even if you do not have an Internet

connection.

Notes 

i

Connect the camera directly to the Macintosh using the USB cable (included). The software may not
operate correctly if you use an extension cable or connect the camera via a USB hub.

i

Push the USB connector fully into the socket to ensure that it is securely connected. The software
may not operate correctly if the connection is faulty.

i

Additional USB interface board is not guaranteed.

i

On Macintosh computers, allocate at least 400 MB of virtual memory when RAW FILE CONVERTER
LE is used. If other applications will be used at the same time, allocate the additional amount required
for those applications also.

1

Turn on your Macintosh and start up Mac OS 9.2.2.

!

Do not connect the camera to your Macintosh until the software installation is completed.

3

When the bundled CD-ROM is loaded into the CD-ROM drive, the [FinePix] volume appears.
Double-click the volume icon to open the volume window.

Double-click “Installer for MacOS9” to launch the Installer.

2

Summary of Contents for FinePix FinePix F710

Page 1: ...dvanced Features Software Installation Settings 1 2 3 4 5 6 Viewing Images BL00370 200 1 This manual will show you how to use your FUJIFILM DIGITAL CAMERA FinePix F710 correctly Please follow the instructions carefully OWNER S MANUAL ...

Page 2: ... of Software Media or Documentation to any third party without FUJIFILM s prior written consent You also shall not sublicense assign or otherwise transfer all or any part of the rights granted to you by FUJIFILM under this Agreement without FUJIFILM s prior written consent 3 2 Except as expressly granted by FUJIFILM hereunder you shall not copy or reproduce all or any part of Software or Documenta...

Page 3: ...L PHOTOGRAPHY MENU 58 STILL PHOTOGRAPHY MENU p PHOTO MODE STILL PHOTOGRAPHY M N STILL PHOTOGRAPHY FUNCTIONS 3 Advanced Features SELF TIMER PHOTOGRAPHY 58 A WHITE BALANCE 59 FOCUSING 61 AF CENTER 61 AF MULTI 61 AF AREA 62 MF Manual Focus 62 j BRACKETING 63 G SHARPNESS 63 z FLASH BRIGHTNESS ADJUSTMENT 63 B PLAYBACK PLAYBACK INFORMATION 64 o ERASING SINGLE ALL FRAMES 65 i PROTECTING IMAGES FRAME SET ...

Page 4: ...l Camera This camera contains precision electronic components To ensure that images are recorded correctly do not subject the camera to impact or shock while an image is being recorded Trademark Information h and xD Picture Card are trademarks of Fuji Photo Film Co Ltd h IBM PC AT is a registered trademark of International Business Machines Corp of the U S A h Macintosh Power Macintosh iMac PowerB...

Page 5: ...K button P 19 DISP Display button P 19 Battery cover P 11 MENU OK button P 19 4 direction abdc button P 19 a Photometry button P 47 T Tele zoom button P 19 Strap mount Viewfinder lamp P 24 Viewfinder Continuous shooting button P 49 Exposure compensation button P 48 Tripod mount LCD monitor WIDE STD switch xD Picture Card slot P 11 Battery compartment P 11 Battery release catch P 11 Photo mode butt...

Page 6: ...ack mode Camera parts and features Example of LCD Monitor text display Still photography mode LOADING THE BATTERY AND THE MEDIA 1 Getting Ready Compatible Battery Always use the Rechargeable Battery NP 40 included The use of other brands of rechargeable battery could cause faults or damage to the camera h Rechargeable Battery NP 40 1 The battery is not fully charged at shipment and must be fully c...

Page 7: ... is changed 2The battery is almost half charged Only displayed for 3 seconds when the camera is turned on or the mode is changed 3There is insufficient charge left in the battery The battery will soon run out Have a new battery ready 4The battery is depleted The display will shortly go blank and the camera will stop working Replace or recharge the battery Blinking red Lit white Lit white 1 2 4 Lit...

Page 8: ...ens as it is a precision component Obstructing the lens will cause damage and ß or will appear Take care also not to get fingerprints on the camera lens as this will result in impaired image quality in your shots DC IN 5V socket 1 2 Check that the camera is turned off Plug the AC power adapter connector into the DC IN 5V socket on the camera and then plug the adapter itself into the main power out...

Page 9: ...ges the numbers continuously When the time displayed passes 12 00 the AM PM setting changes 0 1 0 2 0 3 1 1Press the MENU OK button 2Press d or c to select F OPTION and then press a or b to select SET UP 3Press the MENU OK button 0 1 0 3 0 2 SET UP SET UP 2 1 3 4 DATE TIME DATE TIME TIME DIFFERENCE TIME DIFFERENCE SET SET SET SET SHUTTER SHUTTER BEEP BEEP SET SET CANCEL CANCEL OK OK BACK BACK 0 1 ...

Page 10: ...r s Manual the up down left and right directions on the 4 direction button are indicated by black triangles Up or down is shown as a or b and left or right is shown as d or c Displaying the On screen Help TRI TRIMMING MING OK OK BASIC OPERATION GUIDE 2 Using the Camera You ve read the chapter on getting ready and the camera is now set up and ready to take pictures Using the Camera describes the ba...

Page 11: ... 960 pixels 1536 864 pixels 640 480 pixels 320 240 pixels Q 640 360 pixels W 320 184 pixels Movie photography Still photography Using viewfinder for wide angle shooting Images WIDE and STD shot When a distance from the subject is 1 5m 4 9 ft to infinity the area marked by in the figure is photographed LCD monitor during playback For more precise shot framing or close up shots use the LCD monitor t...

Page 12: ... with no substance such as smoke or flames h Dark subjects h Fast moving subjects h Subjects with little or no contrast between the subject and the background such as white walls or subjects dressed in the same color as the background h Shots where another high contrast object not the subject is close to the AF frame and is either closer or further away than your subject such as a shot of someone ...

Page 13: ...ntervals Camera in Power Save mode Lit red Battery charging is in progress Blinking red i xD Picture Card Warnings No card loaded card not formatted incorrect format card full xD Picture Card error i Lens operation error Detailed warning messages appears on the LCD monitor P 118 119 TAKING PICTURES B AUTO MODE STILL PHOTOGRAPHY MODE The camera focuses most easily when a picture is taken at a dista...

Page 14: ... zoom scale Approx 1 4 Approx 142 mm 256 mm max zoom scale Approx 1 8 35 mm camera equivalents Zoom button USING THE ZOOM OPTICAL ZOOM DIGITAL ZOOM Click Bebeep Move the camera slightly so that one of the subjects is in the AF frame 2 Press the Shutter button down halfway The camera emits a short double beep and focuses on your subject The AF frame on the LCD monitor becomes smaller and the camera...

Page 15: ...d No text displayed Framing guideline displayed LCD monitor OFF The Framing Guideline display consists of horizontal and vertical lines that divide the image on the LCD monitor into 9 frames When a picture is taken with the Framing Guideline displayed the photographed image appears in the bottom left corner of the LCD monitor Assist window This serves as a guide for taking other shots with similar...

Page 16: ...e first frame taken on the date is selected Press c to view in the date order Press d to select the last frame when the cursor is on the first frame Turn the Command dial to select the image Press the MENU OK button to enlarge the selected image 2 26 2004 26 2004 2 27 2004 27 2004 3 2 2004 2 2004 1 10 1 10 1 4 1 4 1 4 1 4 Photography date 3 3 2 2004 2 2004 1 4 1 4 1 10 1 10 2 26 2004 26 2004 2 27 ...

Page 17: ... ERASE 1 Set the Power switch to w 2 3 1Press the MENU OK button during playback to display the menu 2Press d or c to select o ERASE 1Press a or b to select FRAME 2Press the MENU OK button to confirm the selection See P 65 for information on ALL FRAMES 4 1Press d or c to select the frame file to be erased 2Press the MENU OK button to erase the displayed frame file To erase another image repeat ste...

Page 18: ...brightens or darkens the image By selecting Auto bracketing you can shoot 3 frames one underexposed one at the reference exposure 0 and one overexposed 0 Main subject FOCUSING DISTANCE STILL PHOTOGRAPHY FUNCTIONS 3 Advanced Features The distance from the subject to the camera is referred to as the shooting distance When the shooting distance is set correctly and the image appears sharp the image i...

Page 19: ...ing with exposure compensation C AF Continuous AF Use C AF when photographing moving subjects 3 Take the pictures check the exposure and focus adjust the shot composition press the Shutter button down fully You can use the menus for more detailed settings P 53 63 82 The table below provides a number of sample settings You can achieve any number of other effects by using the settings effectively Tr...

Page 20: ...e appears as the shutter speed and aperture setting on the LCD monitor Set the Mode dial to B This is the easiest mode to use and can be used for most types of shot Set the Mode dial to m This is the most suitable for shooting portrait Skin tones are shown beautifully and the overall tone is soft Set the Mode dial to This mode is the best for shooting scenery in daylight and provides crisp clear s...

Page 21: ... the shutter speed setting When this occurs press the Shutter button down halfway to measure the light level again and display a value Metering failed Underexposed Overexposed Set the Mode dial to M This is an automatic mode to set the shutter speed Use this mode for shots to freeze a moving subject fast shutter speed or convey the impression of movement slow shutter speed シャッタースピード 320 320 F6 3 F...

Page 22: ... 80 cm 1 0 ft to 2 6 ft AUTO AUTO 19 19 0 1 0 2 e MACRO CLOSE UP STILL PHOTOGRAPHY FUNCTIONS Set the Mode dial to Use Manual mode to set any shutter speed and aperture setting M 500 500 F5 6 F5 6 19 19 Shutter speed M 1000 1000 F8 F8 19 19 Aperture 0 1 0 2 MANUAL STILL PHOTOGRAPHY FUNCTIONS Setting the shutter speed Turn the Command dial to select the shutter speed h Shutter speed setting 3 sec to...

Page 23: ...caused by the light of the flash reflecting off the inside of the eye Use Red eye reduction flash to minimize the likelihood of the effect Take the following measures to make Red eye reduction more effective h Get the subjects to look at the camera h Get as close as possible to the subjects 1 Set the Power switch to q 2 Set the Mode dial to B m N M or mode 3 Press the Flash pop up button to pop up...

Page 24: ...yday photography h SPOT This mode is useful for subjects with strongly contrasting light and dark areas where you want to achieve the correct exposure for a particular feature h AVERAGE The advantage of this mode is that the exposure tends not to change for different compositions or subjects This mode is particularly effective for shots of people wearing black or white clothing and shots of scener...

Page 25: ...TOGRAPHY FUNCTIONS 250 250 F5 6 F5 6 P 19 19 250 250 F5 6 F5 6 P OFF OFF 19 19 2 3 0 1 0 2 Use this function for shots to get the correct brightness exposure such as shots with extremely high contrast between the subject and the background D EXPOSURE COMPENSATION STILL PHOTOGRAPHY FUNCTIONS P 250 250 F5 6 F5 6 19 19 Exposure compensation indicator Set the Power switch to q 1 Set the Mode dial to N...

Page 26: ...his mode you can shoot up to 5 frames at intervals as short as 0 2 seconds When you take the shots the photographed images are displayed in sequence from the left and automatically recorded The maximum file recording time is 12 5 seconds for 5 frame continuous shooting Press Shutter button Max 40 shots 5 frames 1 2 3 4 5 Release Shutter button Press the MENU OK button to display the menu and chang...

Page 27: ...y setting other than 1 when the camera is set to high sensitivity mode appears blinking and the quality cannot be changed For full screen playback on a wide screen or high definition TV or to print at HV Hi Vision size select a quality setting for wide angle shooting While the C AF button is pressed the camera continues to focus on the main subject in the AF frame Use this button to take pictures ...

Page 28: ...de p button In r Movie mode do not set the S sensitivity setting 2 3 1Press d or c to select the S setting and then press a or b to change the setting 2Press the MENU OK button to confirm the setting h Settings B AUTO 160 to 800 400 800 1600 m N M and 200 400 800 1600 When the sensitivity is set to 200 400 800 or 1600 the selected sensitivity setting appears on the LCD monitor When setting CCD RAW...

Page 29: ...q 2Set the Mode dial to Still photography mode 3Press the Photo mode p button 0 1 0 3 0 2 In r Movie mode do not set the J FinePix COLOR setting 3 STANDARD STANDARD CHROME CHROME B W B W COLOR COLOR 2 1Press d or c to select the J FinePix COLOR setting and then press a or b to change the setting 2Press the MENU OK button to confirm the setting 0 1 0 2 p CHROME may have little visible effect with s...

Page 30: ...ustom white balance 2Press the MENU OK button Custom white balance To use the white balance set previously press the MENU OK button without pressing the Shutter button Continued 250 250 F5 6 F5 6 2 Beep Bebeep 250 250 F5 6 F5 6 P 19 19 2 1Press the Shutter button down halfway to focus on the subject 2Without releasing the Shutter button press the button all the way down fully pressed to start the ...

Page 31: ...trast subject in the center of the LCD monitor For a high contrast subject in the center of the LCD monitor Care is required when taking pictures using the viewfinder as you cannot check the focus After taking the picture play it back to check the focus Continued 3 When the correct exposure is measured ç appears Press the MENU OK button to confirm the setting The specified custom white balance is ...

Page 32: ...formation on EVs Depending on the type of subject and the shooting distance brightness adjustment may have no effect The image may appear dark when the shutter speed is set to speeds higher than 1 1000 sec 0 3 0 3 0 6 0 6 0 0 0 3 0 3 FLASH FLASH z FLASH BRIGHTNESS ADJUSTMENT Available Photography mode Near Far 250 250 F5 6 F5 6 P 19 19 SELECT AF AREA SELECT AF AREA After moving Before moving 2 The...

Page 33: ...annot be used during multi frame playback P 29 Use this function to check the photography information Hold down the D button to check the information 100 0009 100 0009 4 1 2004 12 00 AM 4 1 2004 12 00 AM 2000 2000 F2 8 F2 8 0 3 0 3 Quality mode Shutter speed Aperture setting display FinePix COLOR Sensitivity Exposure compensation Histogram PLAYBACK INFORMATION PLAYBACK FUNCTIONS Histograms A histo...

Page 34: ...ected frames files P 88 Continued 66 ALL FRAMES ALL FRAMES 100 0009 100 0009 ERASE ALL OK ERASE ALL OK IT MAY TAKE A WHILE IT MAY TAKE A WHILE YES YES CANCEL CANCEL OK OK BACK BACK 100 0009 100 0009 YES YES CANCEL CANCEL OK OK BACK BACK FRAME FRAME ERASE OK ERASE OK 1Press d or c to select the frame file to be erased 2Press the MENU OK button to erase the currently displayed frame file To erase an...

Page 35: ...9 If both STD and WIDE images are included the display mode for the two image types may differ on some TVs 68 100 0009 100 0009 FRAME FRAME UNPROTECT OK UNPROTECT OK YES YES CANCEL CANCEL OK OK BACK BACK 1Press d or c to select the protected frame file 2Press the MENU OK button to unprotect the displayed frame file FRAME RESET Press the MENU OK button to protect all the frames files SET ALL Press ...

Page 36: ...TART START CANCEL CANCEL OK OK BACK BACK VOICE MEMO VOICE MEMO REC STANDBY REC STANDBY 30s 30s 100 0009 100 0009 ON ON VOICE MEMO VOICE MEMO 2 4 1Press the MENU OK button to display the menu screen 2Press d or c to select t VOICE MEMO 3Press the MENU OK button To end your comment during recording press the MENU OK button Voice memos cannot be added to movies When appears unprotect the frame The re...

Page 37: ...ayed back using multi frame playback Press the DISP BACK button twice to select single frame playback 2 1Press b to play the voice memo 2The playback time appears on the LCD monitor along with a progress bar When the sound is difficult to hear adjust the volume P 84 0 1 0 2 0 1 0 2 Take care not to block the speaker Speaker t PLAYING BACK VOICE MEMOS PLAYBACK MENU Indicated by the t icon Compatibl...

Page 38: ...ly one print size can be specified e g all 10 15 9 13 cm size or all HV H 10 18 cm size Specify separate print orders for the respective print sizes Some stores may not support the specified print sizes Check with the store for details P 66 When erasing the image the DPOF setting for that image is deleted at the same time P 76 When inserting an xD Picture Card that contains images specified for pr...

Page 39: ...r of prints to 0 zero To cancel the DPOF setting for another frame file repeat steps 1 and 2 Press the MENU OK button or photo mode p button to complete the settings 76 DPOF DPOF WITH DATE WITH DATE WITHOUT DATE WITHOUT DATE DPOF DPOF WITH DATE WITH DATE WITHOUT DATE WITHOUT DATE 1 1Set the Power switch to w 2Press the photo mode p button 0 1 0 2 Press d or c to select u DPOF 2 3 1Press a or b to ...

Page 40: ...e store for specific information h Using an in store self service digital printing system Check with the store as to whether the system supports HV H 10 18 cm size prints h Ordering prints at a print processing store If you do not specify the print size the images will all be printed at the 10 15 9 13 cm size with the left and right edges of the image cropped i To specify HV H 10 18 cm size The HV...

Page 41: ...E Q 640 360 pixels W 320 184 pixels h Frame rate 30 frames per second Changing the quality movie size setting P 82 The available recording time for a video may decrease depending on the amount of free space on the xD Picture Card Because a movie is recorded onto the xD Picture Card as it is saved it cannot be recorded correctly if the camera suddenly loses power if you open the battery cover or di...

Page 42: ...ayback begins Playback stops when the end of the movie is reached During playback this button pauses the movie Stops playback Press d or c while movie playback is stopped to go back to the previous file or advance to the next file respectively Press d or c during playback to skip forwards or backwards through the movie Press d or c when the movie is paused the movie advances or goes back one frame...

Page 43: ...settings press the MENU OK button to confirm the settings Press a or b to select a menu option and then press d or c to change the setting Press c for FORMAT DATE TIME TIME DIFFERENCE or qRESET 0 3 SET UP F USING THE SET UP SCREEN Continued 84 1 1Set the Power switch to q or w 2Press the MENU OK button to display the menu on the LCD monitor 3 1Press d or c to select F OPTION and then press a or b ...

Page 44: ...es shot can be checked in the top 5 frame continuous shooting final 5 frame continuous shooting or auto bracketing modes However you cannot use the preview zoom 1Press d or c to check the images 2Press the MENU OK button to record all the images 86 SET UP SET UP menu options IMAGE DISP 1 2 3 4 ON OFF PREVIEW ON Specifies whether the Preview images the photographed image is displayed after taking a...

Page 45: ...inutes or 5 minutes it is turned off Use this function when you want to get the maximum possible running time from your battery The Power save setting is disabled during automatic playback and when a USB connection is being used SET UP SET UP 2 1 3 4 POWER SAVE POWER SAVE FORMAT FORMAT 2 MIN 2 MIN IMAGE DISP IMAGE DISP ON ON OK OK LCD LCD ON ON SET SET CANCEL CANCEL OK OK BACK BACK SET UP POWER SA...

Page 46: ...EW Pictures are stored on each xD Picture Card beginning with a file number 0001 Setting this function to CONT makes file management easier as it ensures that file names are not duplicated when images are downloaded to a PC When the camera settings are qRESET the frame number setting CONT or RENEW is changed to CONT and the frame number itself does not return to 0001 When the xD Picture Card alrea...

Page 47: ...o not have an Internet connection Operating System 1 CPU Windows 98 including the Second Edition Windows Millennium Edition Windows Me Windows 2000 Professional 2 Windows XP Home Edition 2 Windows XP Professional 2 200 MHz Pentium or better recommended 800 MHz Pentium IIIor better recommended for Windows XP RAM 64MB minimum 128 MB minimum for Windows XP Minimum 256 MB when RAW FILE CONVERTER LE is...

Page 48: ...r better Minimum 1 GB when RAW FILE CONVERTER LE is used Display 800 600 pixels or better at least 32 000 colors When using ImageMixer VCD2 for FinePix 1024 768 or better Internet connection 4 i To use the FinePix Internet Service or mail attachment function An Internet connection and e mail transmission software i Connection speed 56 k or better recommended 1 Models with a USB port as a standard ...

Page 49: ...nternet connection Notes i Connect the camera directly to the Macintosh using the USB cable included The software may not operate correctly if you use an extension cable or connect the camera via a USB hub i Push the USB connector fully into the socket to ensure that it is securely connected The software may not operate correctly if the connection is faulty i Additional USB interface board is not ...

Page 50: ...STALLATION ON A Mac OS X 1 Turn your Macintosh on and start up Mac OS X Do not launch any other applications 2 When the bundled CD ROM is loaded into the CD ROM drive the FinePix icon appears Double click the FinePix icon to open the FinePix volume window 3 Double click Installer for MacOS X 5 The Authenticate dialog appears Enter the name and password for the administrator account and then click ...

Page 51: ...mage to the xD Picture Card or malfunctions during PC connection Check that the camera is turned off Plug the AC power adapter connector into the DC IN 5V socket and then plug the AC power adapter into the power outlet The socket outlet shall be installed near the equipment and shall be easily accessible The shape of the plug and socket outlet depends on the country of use DC IN 5V socket 6 1 CAME...

Page 52: ...P SP1 Microsoft Windows Messenger 5 0 or later is required to use the WEB Camera function For downloading and using this software Please refer to the below explanation for Using Video Chat with Windows Messenger No 1 Please download it from the Messenger web site Images are not output to a TV When using Video Chat with the WEB Camera function Windows XP sp1 is required also for your partner s OS C...

Page 53: ...ng installation In this event change CD ROMs as directed by the on screen instructions h FinePixViewer automatically starts up and the Save Image Wizard window Save Image dialog box appears Follow the instructions provided on screen to save the images at this point To proceed without saving the images click the Cancel button Screen for Windows 98 SE Windows 98 98 SE Me 2000 Professional Macintosh ...

Page 54: ...at is explained in How to Use FinePixViewer How to Use FinePixViewer covers a range of topics including batch processing and ordering prints Continued 1Check that the camera is not connected to the PC 2Quit all currently running applications 3Open the My Computer window open the Control Panel and double click Add Remove Programs Windows 4The Add Remove Programs Properties window appears Select the...

Page 55: ... USB 6 4 1 Specifying images for printing on the camera Do not connect to a PC when the USB MODE setting is set to ˆ Refer to P 121 if you connect to PC by mistake 1 1Slide the Power switch to the side to turn the camera on 2Set the USB MODE setting in the SET UP menu to ˆ P 85 3Slide the Power switch to the side to turn the camera off SET UP SET UP 2 1 3 4 USB USB MODE MODE CCD RAW CCD RAW OFF OF...

Page 56: ... to download the data to the printer and print the frames specified in the DPOF settings To end printing press the DISP BACK button Press the DISP BACK button to cancel the printing Depending on the printer the printing may not be canceled immediately or printing may stop mid way through When printing stops mid way briefly turn the camera off and then on again 5 1Press a or b to select uPRINT DPOF...

Page 57: ... immediately or printing may stop mid way through When printing stops mid way briefly turn the camera off and then on again Press the DISP BACK button to return to step 5 Press the MENU OK button to download the data to the printer and start printing the specified number of prints To end printing press the DISP BACK button Always press the MENU OK button to complete the settings 1Check that is not...

Page 58: ... 0 C and 40 C 32 F and 104 F At an ambient temperature of 23 C 73 F it takes approximately 90 minutes to charge a fully depleted NP 40 battery i You should charge the NP 40 at an ambient temperature between 10 C and 35 C 50 F and 95 F If you charge the NP 40 at a temperature outside this range charging takes longer because the performance of the NP 40 is impaired h The NP 40 does not need to be fu...

Page 59: ...pecified h Dispose of used battery promptly To avoid damaging the battery or shortening its life observe the following h Do not drop the battery or otherwise subject it to strong impacts h Do not expose the battery to water To make sure that you obtain optimum battery performance observe the following h Always keep the battery terminals clean h Do not store battery in warm or humid places Storing ...

Page 60: ... is too dark take the picture at a distance of around 2 m 6 6 ft from the subject i Use AF lock to take the picture Outside the AE continuous range Aperture Shutter speed display Lit red The picture can be taken but the exposure will not be correct No xD Picture Card is inserted Insert an xD Picture Card i The xD Picture Card is not formatted i The xD Picture Card contact area is soiled i Camera f...

Page 61: ...he viewfinder lamp does not light when charging the battery The viewfinder lamp blinks during charging and the battery won t charge No power Power cuts out during operation Battery runs out quickly No photograph is taken when the Shutter button is pressed Can t use the flash The flash settings are restricted and cannot be selected Can only select Suppressed flash mode Can only select the 1 and qua...

Page 62: ...el 3 35 million pixels Storage media xD Picture Card 16 32 64 128 256 512 MB File format Still image DCF compliant Compressed Exif Ver 2 2 JPEG DPOF compatible Design rule for Camera File System compliant DPOF compatible Uncompressed CCD RAW RAF Movie AVI format Motion JPEG Audio WAVE format Monaural sound Number of recorded pixels Still image STD 2832 2128 pixels 2048 1536 pixels 1600 1200 pixels...

Page 63: ...ssed format Uncompressed recording is used on this camera WAVE files can be played back on a personal computer using the following software Windows MediaPlayer Macintosh QuickTime Player QuickTime 3 0 or later White Balance Whatever the kind of the light the human eye adapts to it so that a white object still looks white On the other hand devices such as digital cameras see a white subject as whit...

Page 64: ... Contact with other metallic objects or battery could cause the battery to ignite or burst Keep xD Picture Cards out of the reach of small children Because xD Picture Cards are small they can be swallowed by children Be sure to store xD Picture Cards out of the reach of small children If a child swallows an xD Picture Card seek medical attention or call emergency number WARNING 126 Safety Notes h ...

Page 65: ...Printed in Japan FGS 406102 FG Printed on recycled paper 26 30 Nishiazabu 2 chome Minato ku Tokyo 106 8620 Japan http home fujifilm com products digital ...

Reviews: