background image

88

S

etting Sa

ve

, L

oad

, and Reset

7

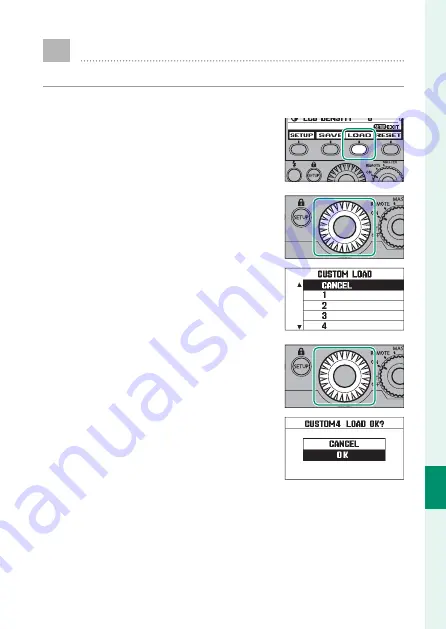
Loading Settings

To recall saved settings:

Press the 

SETUP

 button to display the setup menu.

In the setup menu, press the 

f

 function button.

Rotate the command dial to high-
light a slot and press 

OK

 to select 

(to exit to the setup menu without 
loading settings, select 

CANCEL

).

A confi rmation dialog will be dis-
played; rotate the command dial 
to highlight 

OK

 and press the 

OK


button.  A progress dialog will be 
displayed, followed by the setup 
menu with the selected settings 
restored.

Summary of Contents for EF-X500

Page 1: ...Owner s Manual BL00004854 200...

Page 2: ...The flash may slip from the hot shoe causing the camera to fall The LED video light is intended only to provide lighting for the camera and should not be used for other purposes Remove the batteries i...

Page 3: ...Introduction and Chapter 1 for basic information on using the flash Introduction ii 1 Getting Started 12 2 Flash Controls 22 3 Single Flash Mode 28 4 Wireless Flash Photography 46 5 Slave Mode 76 6 Se...

Page 4: ...Remote Mode 6 Master Mode 7 Adjusting Settings 10 1 Getting Started 12 Getting Started 12 Inserting Batteries 13 Battery Life and Recycling Time 14 Attachment and Removal 15 Attaching the Flash 15 Det...

Page 5: ...The Diffuser 26 3 Single Flash Mode 28 Single Flash Mode 28 Flash Control Mode 29 TTL Mode 29 Manual Mode 31 Repeating Flash Mode 33 Camera Controls 37 Flash Setup 37 Other Settings 38 Lighting 38 Cov...

Page 6: ...Flash Compensation Output 51 Channel 52 Remote Mode Options Summary 53 The Master Flash 54 Group 55 Channel 56 Master Mode Options Summary 57 Camera Controls 59 Flash Setup 59 Taking Photographs 60 T...

Page 7: ...DY INDICATOR 83 SENSOR FORMAT 84 CUSTOM SENSOR FORMAT 84 STANDBY 84 REMOTE STANDBY 85 AUTO POWER OFF 85 7 Setting Save Load and Reset 86 Setting Save Load and Reset 86 Saving Settings 87 Loading Setti...

Page 8: ...lash units via optical wireless control The following features are available when the unit is mounted on an X series camera with a hot shoe Feature Feature Camera with full EF X500 support Camera with...

Page 9: ...h heads to the desired angles Receiver The flash can control remote flash units in up to three groups A B and C each of which may contain multiple flash units A C B B B The approximate maximum ranges...

Page 10: ...shoe contacts 15 G Mount 15 H Optical receiver 2 48 49 I LED video light 40 41 42 J Power connector K Bounce latch 23 L LCD display 4 M Battery chamber cover 13 N Power switch latch 17 O Power switch...

Page 11: ...with the flash control mode P29 TTL P20 29 A Flash control mode B TTL lock C Temperature warning D Coverage E Aperture F ISO sensitivity G Flash compensation H Range I Function button 3 J Function but...

Page 12: ...output B Number of ashes C Frequency O The display is shown with all indicators lit for illustrative pur poses The page and function button icons at the bottom of the display vary with the page select...

Page 13: ...is rotated to REMOTE The display varies according to whether the flash is in normal or slave mode P50 77 Normal Mode Group A B or C P50 A Remote mode indicator B Group C Flash compensation TTL ash out...

Page 14: ...The display varies with the flash control mode P60 64 68 71 TTL P60 A Master mode indicator B Group group A C TTL mode group A D TTL lock E Flash compensation group A F Flash compensation group B G Fl...

Page 15: ...ion P64 A TTL output ratio selection mode B Flash compensation groups A and B C Output ratio groups A and B Manual P68 A Manual mode group A B Flash output group A C Flash output group B D Flash outpu...

Page 16: ...ng mode B Flash output group A C Number of ashes D Flash output group B E Frequency F Flash output group C Master Mode Not Supported The display at right appears in the flash LCD if master mode is not...

Page 17: ...ress the function button D immediately below the item to highlight it rotate the command dial E to display the desired option and press OK F N The makeup of each page and the items associated with the...

Page 18: ...only a narrow slit with the result that the light from a normally timed flash reaches only a small section of the sensor Flash photography consequently requires slower shutter speeds severely limitin...

Page 19: ...12 Getting Started This chapter describes how to ready the flash for shooting and the basic procedure for taking pictures using the flash...

Page 20: ...y if the unit is wet dry it thoroughly before opening the cover and remove any droplets on or around the gasket 1 Press the area around the top of the cover down slightly and then continue sliding the...

Page 21: ...s shown in the table below in house measurements Choose a type that matches your needs Size type and number Size type and number Number of uses approx Number of uses approx Recycling time approx Recyc...

Page 22: ...r other product malfunction Remove any wa ter from the mount and the hot shoe before attach ing the flash Attaching the Flash 1 Release the latch by sliding it as shown O Be sure to release the latch...

Page 23: ...16 1 Getting Started Attachment and Removal Detaching the Flash Unlatch and detach the unit as shown Do not attempt to remove the unit without first unlatching it as this could damage the hot shoe...

Page 24: ...TER Choose ON to use the unit as a stand alone flash mounted on the camera hot shoe Choose REMOTE to use the unit as a re mote flash controlled via FUJIFILM optical remote flash control Use the suppli...

Page 25: ...figured not to beep when charging is complete P83 Except when camera menus are displayed you can test fire the flash or at some settings emit a modeling flash by pressing the ready lamp test button St...

Page 26: ...warning P95 is displayed You can adjust display contrast P82 disable the backlight or choose how long the backlight remains on P83 The D Lock Button To disable all controls other than the power switc...

Page 27: ...lens TTL flash control use the camera in mode P program AE 1 Rotate the power switch to ON 2 Press the page button until the page is displayed 3 Press the l function but ton to highlight flash control...

Page 28: ...ill not fire if you release the shutter before the ready lamp lights If you release the shutter while the lamp is flashing the flash will fire but not at full power If the subject appears underexposed...

Page 29: ...22 Flash Controls Read this chapter for information on bounce lighting the wide and catchlight panels and the diffuser...

Page 30: ...ns keep the bounce latches on the sides of the flash head pressed The bounce status indicator or is displayed while bounce lighting is in effect O The flash may not adequately light the subject if the...

Page 31: ...Return the catchlight panel to its housing above the flash window 3 Press the shutter button all the way down to fire the flash and take a photograph Confirm that the subject is within the effective...

Page 32: ...dd catchlights to your sub jects eyes 1 Raise the catchlight panel as shown Catchlight panel Wide panel 2 Return the wide panel to its hous ing For best results stay close to your subject and rotate t...

Page 33: ...ve the accessory mount cover When attaching or remov ing the cover cup your hand around it as shown Do not use force 2 Attach the diffuser as shown O When attaching or removing the diffuser observe ca...

Page 34: ...27 MEMO...

Page 35: ...28 Single Flash Mode ReadthischapterformoreinformationonusingtheEF X500 as a standalone flash unit...

Page 36: ...oxi mate range when the camera shutter button is pressed halfway m Flash Compensation Although in TTL mode flash output is automatically ad justed for optimal exposure you also have the option of manu...

Page 37: ...ngle Flash Mode Flash Control Mode 2 Press the m function button to highlight flash compensation 3 Rotate the command dial to choose the desired value or se lect 0 to turn flash compensa tion off 4 Pr...

Page 38: ...EV note that depending on shooting conditions output may be less than selected if the limits of the camera expo sure metering system are reached 1 Rotate the power switch to ON 2 Press the page button...

Page 39: ...h Mode Flash Control Mode 5 Press the m function button and rotate the command dial to adjust flash output 6 Press OK N The flash display shows the approxi mate range when the camera shutter button is...

Page 40: ...hat records moving subjects at multiple positions within the frame You can adjust flash output and choose the flash frequency the interval between flashes and the number of times the flash fires with...

Page 41: ...dial to se lect U repeating flash and press OK 5 Press the m function button and rotate the command dial to adjust flash output Press OK to proceed 6 Press the c function but ton and rotate the comma...

Page 42: ...re the selected number of times Shutter speed can be calculated as follows Shutter speed number of lashes frequency For example if the flash is set to fire 20 times at a frequency of 4 Hz choose a shu...

Page 43: ...ncy 1 1 6 12 30 60 90 100 100 100 2 2 4 10 30 60 90 100 100 100 3 3 3 8 30 60 90 100 100 100 4 4 3 7 25 50 90 100 100 100 5 5 3 6 20 50 90 100 100 100 6 7 6 7 3 5 13 40 80 90 100 100 8 9 8 9 3 5 12 30...

Page 44: ...settings can be adjusted using camera controls Flash Setup Flash settings can be adjust ed using the p FLASH SET TING FLASH FUNCTION SETTING option in the cam era shooting menu See the camera manual f...

Page 45: ...or flash coverage 1 Press the page button until the page is displayed 2 Press the n function button to highlight lighting 3 Rotate the command dial to high light one of the following options and pres...

Page 46: ...AUTO to automatically match coverage to lens focal length 1 Press the page button until the page is displayed 2 Press the e function but ton to highlight coverage 3 Rotate the command dial to se lect...

Page 47: ...h Mode Other Settings LED Video Light On Off Turn the LED on the front of the flash unit on or off 1 Press the page button until the page is displayed 2 Press the k function button to turn the video l...

Page 48: ...s Adjust the brightness of the LED video light 1 Press the page button until the page is displayed 2 Press the M function button to display the current video light brightness 3 Rotate the command dial...

Page 49: ...assist lamp for still photography Unlike the catchlight panel the LED catch light can be used when shooting with the camera rotated to take pictures in portrait tall orientation or when the flash head...

Page 50: ...Rotate the command dial to high light one of the following options and press OK to select AF assist lamp and catchlight off AF assist lamp on catchlight off AF assist lamp off catchlight on AF assist...

Page 51: ...B m ash compensation output 5 5 in EV steps TTL mode in EV steps mode M or in EV steps Multi mode 29 32 34 C c number of ashes frequen cy 2 100 ashes 1 500 Hz Multi only 34 A None B n lighting J outp...

Page 52: ...3 Single Flash Mode Other Settings Page Page Button Button Function Function Options Options P P A k LED video light on o On o 40 B M LED video light brightness 41 C d LED AF assist lamp catchlight 4...

Page 53: ...46 Wireless Flash Photography This chapter describes how to use the FUJIFILM optical wireless remote flash control system...

Page 54: ...h of which can contain multiple flash units Figure 2 The master flash can be includ ed in any of the groups or set not to fire P55 The channel for remote flash control can be chosen from channels 1 4...

Page 55: ...utdoors Indoors 70 N Use the supplied mini stand and rotate the flash heads to orient the remote units with the receivers facing the master flash This may not be necessary indoors where signals reflec...

Page 56: ...hoose the group P50 and channel P52 and make individual adjustments to flash compensation or output P51 1 Hold the power switch latch and rotate the switch to REMOTE 2 Use the supplied mini stand to o...

Page 57: ...on or output for the units in each group can be selected using the master flash 1 Press the page button until the page is displayed 2 Press the h function button to highlight the group 3 Rotate the co...

Page 58: ...applies regard less of the flash control mode selected with the master flash but note that only whole values can be selected with the master flash if individual adjustments are made to flash compensa...

Page 59: ...els can be used for different flash systems or to prevent interference when multiple systems are operating in close proximity be sure the master flash is set to the same channel as the units you wish...

Page 60: ...up C P MODE no pre flash N MODE normal 50 B m ash compensation output 5 5 in EV steps 51 C None A j channel 1 4 52 B n lighting J output priority I nor mal K coverage priority 38 C e coverage AUTO cov...

Page 61: ...configured for use as a master flash as described below You can choose the channel P56 and whether to assign the master flash to a group or turn it off P55 To configure the unit for use as a mas ter f...

Page 62: ...hoose the desired option and press OK Choose F G or H to have the master flash fire as part of group A B or C respectively or E to turn the master flash off O Even when off the master flash fires to c...

Page 63: ...ls can be used for different flash systems or to prevent interference when multiple systems are operating in close proximity be sure the master flash is set to the same channel as the units you wish t...

Page 64: ...ptions Options P P A l ash control mode O Q C T S 60 64 68 71 B m ash compensation output 5 5 in EV steps TTL and TTL modes in EV steps mode M or o or in EV steps Multi mode 61 66 69 72 C b output rat...

Page 65: ...hting J output priority I normal K coverage priority 38 C e cov erage AUTO coverage is automatically adjusted according to lens focal length M choose focal length between 24 and 105 mm in 35 mm format...

Page 66: ...ontrols Camera controls can not be used to ad just flash settings when the unit is in remote mode Flash Setup Flash settings can be adjust ed using the p FLASH SET TING FLASH FUNCTION SETTING option i...

Page 67: ...de In TTL mode overall flash output is automatically adjusted for optimal exposure 1 After confirming that the mas ter and remote units are set to the same channel P52 56 position the camera mas ter f...

Page 68: ...e lect P and press OK to set all the units in the current group to TTL If you want the master flash to fire assign it to a group P55 5 Press the m function button to highlight flash compensation 6 Rot...

Page 69: ...lamp to test fire the remote units If the remote units do not fire check that they are correctly positioned P48 9 Press the camera shutter button to fire the flash units and take the picture Add flas...

Page 70: ...standby mode if no operations are performed for a set period P84 Normal operation can be restored by pressing the test button to reactivate all units press the test button on the master flash If no op...

Page 71: ...set as a percentage of the overall output which is automatically adjusted for optimal exposure 1 After confirming that the mas ter and remote units are set to the same channel P52 56 position the cam...

Page 72: ...want the master flash to fire assign it to a group P55 If you want to fire the units in group C repeat Steps 2 4 to choose the flash control mode for group C which can be either P or D manual 5 Press...

Page 73: ...7 Press the m function button to highlight flash compensation 8 Rotate the command dial to choose the desired option and press OK 9 Confirm that the ready lamps on the master and remote units are lit...

Page 74: ...ress the camera shutter button to fire the flash units at the selected output ratio and take the picture Add flash units if lighting is insufficient Remote Flash Compensation Output The flash compensa...

Page 75: ...roups 1 After confirming that the mas ter and remote units are set to the same channel P52 56 position the camera mas ter flash and remote flash units P48 2 Press the page button to display the page f...

Page 76: ...to choose D and press OK to set all the units in the current group to manual If you want the master flash to fire assign it to a group P55 5 Press the m function button to highlight flash output 6 Rot...

Page 77: ...fire the remote units If the remote units do not fire check that they are correctly positioned P48 9 Press the camera shutter button to fire the flash units at the selected flash output and take the p...

Page 78: ...confirming that the mas ter and remote units are set to the same channel P52 56 position the camera mas ter flash and remote flash units P48 2 Press the page button to display the page for a group yo...

Page 79: ...al to choose W and press OK to set all the units in the current group to repeating flash mode If you want the master flash to fire assign it to a group P55 5 Press the m function button to highlight f...

Page 80: ...s the flash will fire 8 Press the c function but ton again and rotate the com mand dial to choose the flash frequency 9 Press OK to proceed 10 Confirm that the ready lamps on the master and remote uni...

Page 81: ...ioned P48 12 Press the camera shutter button to fire the flash units at the selected settings and take the picture Add flash units if lighting is insufficient Remote Flash Compensation Output The flas...

Page 82: ...75 MEMO...

Page 83: ...76 Slave Mode This chapter describes how to use the flash with units that do not support the optical wireless control...

Page 84: ...ave mode P or N allows it to be slaved to an on camera unit that does not support optical wireless control 1 Hold the power switch latch and rotate the power switch to REMOTE 2 Press the page button u...

Page 85: ...pre flash The unit ignores monitoring pre flash pulses and fires only in response to the main flash Choose this option if the master unit uses pre flash pulses N MODE normal The unit fires in response...

Page 86: ...des Flash Output To adjust the output of the slave unit 1 Press the page button until the page is displayed 2 Press the m function button to highlight flash output 3 Rotate the command dial to choose...

Page 87: ...80 Setup Read this chapter for information on the options in the flash setup menu...

Page 88: ...er ba sic settings It is available in all modes single flash master and remote 1 Press SETUP 2 Rotate the command dial to high light the desired item and press OK 3 Rotate the command dial to high lig...

Page 89: ...Adjust test flash output in TTL mode Option Option Description Description i The ash res at full power j The ash res at nd of full power B The ash res at th of full power SCALE UNITS Choose whether di...

Page 90: ...n the beep speaker on or off Option Option Description Description J Beep speaker on Examples of when a beep may sound include when charging is complete a temperature warn ing is displayed or a remote...

Page 91: ...s currently attached Q Choose the sensor size manually CUSTOM SENSOR FORMAT Choose the multiplier used to convert to 35 mm format when CUSTOM is selected for SENSOR FORMAT The default is 1 00 STANDBY...

Page 92: ...on Description Description c The unit goes on standby after 60 minutes of inactivity b The unit goes on standby after 10 minutes of inactivity h The unit does not go on standby AUTO POWER OFF Choose t...

Page 93: ...86 Setting Save Load and Reset This section describes how to save load and reset flash settings including setup menu settings and the settings selected in ON REMOTE and MASTER modes...

Page 94: ...igh light a slot and press OK to select to exit to the setup menu without saving settings select CANCEL 5 A confirmation dialog will be dis played rotate the command dial to highlight OK and press the...

Page 95: ...function button 3 Rotate the command dial to high light a slot and press OK to select to exit to the setup menu without loading settings select CANCEL 4 A confirmation dialog will be dis played rotat...

Page 96: ...unction button 3 A confirmation dialog will be dis played rotate the command dial to highlight OK and press the OK button to exit to the setup menu without performing a reset select CANCEL A progress...

Page 97: ...90 Appendix This chapter covers such topics as troubleshooting and specifications...

Page 98: ...he test button Check the battery level and replace or recharge the batter ies if necessary P13 Single Flash Mode Problem Problem Solution Solution The flash does not fire Confirm that the camera suppo...

Page 99: ...ts of the camera exposure system have been exceeded See the camera manual for details Increase flash compensation TTL mode P29 or flash output manual mode P32 Note that in TTL mode some subjects may a...

Page 100: ...with a soft dry cloth P15 Check that the master flash power switch is rotated to MAS TER P17 The flash displays r and settings can not be adjusted Use a camera that supports master mode Remote units...

Page 101: ...details Pictures are too dark Check camera exposure settings including whether the lim its of the camera exposure system have been exceeded See the camera manual for details Increase flash compensati...

Page 102: ...to prevent overheating Wait until the indicator clears from the display before proceed ing Be sure not to resume use too soon if you immediately proceed to re the ash multiple times in quick successio...

Page 103: ...rox 5 600 K when red at full power FP high speed sync Available with compatible cameras only Exposure control Flash control modes TTL manual repeating manual Flash compensation Up to 5 EV in steps of...

Page 104: ...sd for more information 2 35 mm format equivalent 3 Selected value may not be reached depending on shooting conditions Other Other Power source On board Four AA alkaline or NiMH batteries External Co...

Page 105: ...3 1 3 4 4 1 5 4 5 8 6 0 6 1 6 2 6 3 1 128 1 128 1 3 2 2 2 4 2 9 3 8 4 1 4 2 4 3 4 4 4 5 56 56 0 9 1 6 1 7 2 1 2 7 2 9 3 0 3 1 3 1 3 2 1 512 1 512 0 7 1 1 1 2 1 5 1 9 2 1 2 1 2 2 2 2 2 2 FP Flash Flash...

Page 106: ...99 MEMO...

Page 107: ...100 MEMO...

Page 108: ...7 3 AKASAKA 9 CHOME MINATO KU TOKYO 107 0052 JAPAN http www fujifilm com products digital_cameras index html...

Reviews: