background image

14

Taking Pictures in 

k

 (Auto) Mode

  3

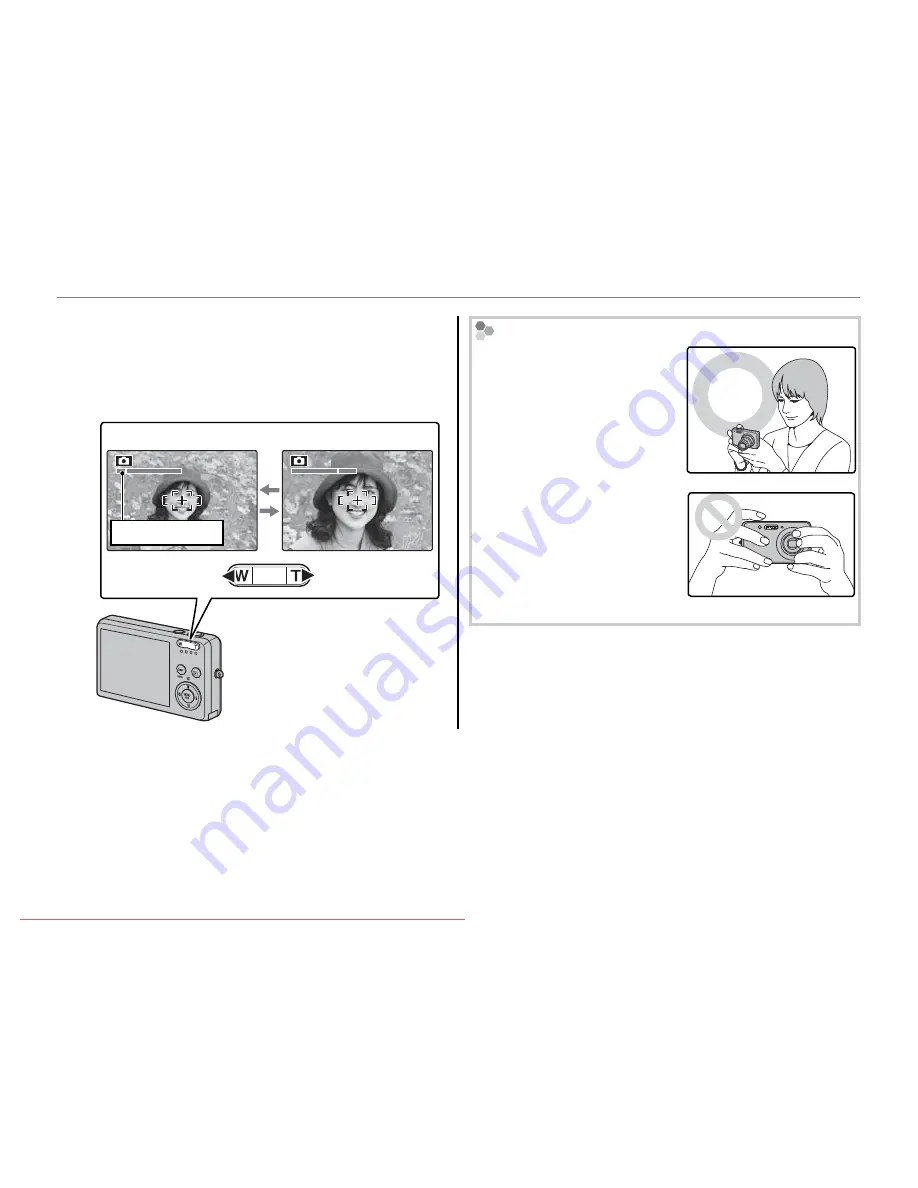
  Frame the picture.

Position the main subject in the focus area 
and use the zoom buttons to frame the 
picture in the monitor.

Zoom in using optical 
zoom, or use digital zoom 
(pg. 75) to zoom in closer.

Press 

W

 to zoom out

Press 

T

 to zoom in

Zoom indicator

 Holding the Camera

Hold the camera steady 
with both hands and brace 
your elbows against your 
sides.  Shaking or unsteady 
hands can blur your shots.

To prevent pictures that 
are out of focus or too dark 
(underexposed), keep your 
fi ngers and other objects 
away from the lens and 
fl ash.

B

  Tip: Focus Lock

Use focus lock (pg. 21) to focus on subjects that are not in the focus frame.

Downloaded From camera-usermanual.com Fujifilm Manuals

Summary of Contents for A160

Page 1: ... for your purchase of this product This manual describes how to use your FUJIFILM FinePix J20 or J25 digital camera and the supplied software Be sure that you have read and understood its contents before using the camera For information on related products visit our website at http www fujifilm com products index html BL00835 200 EN Downloaded From camera usermanual com Fujifilm Manuals ...

Page 2: ...d displays 86 How much charge is left in the battery Battery level 13 Taking Pictures Taking Pictures Question Question Key phrase Key phrase See page See page How many pictures can I take Memory capacity 91 Is there a quick and easy way to take snapshots k mode 13 How can I make good portraits Intelligent Face Detection 18 Can the camera automatically select the most suitable mode G mode 29 Is th...

Page 3: ... pictures during playback Playback zoom 33 How do I view a lot of pictures at once Multi frame playback 34 How do I view all pictures taken on the same day Sort by date 35 Can I protect my pictures from accidental deletion Protect 66 Can I hide the icons in the monitor when viewing my pictures Choosing a display format 32 How do I view my pictures on TV Viewing pictures on TV 41 Sharing Pictures S...

Page 4: ... Eye Removal 18 Focus Lock 21 L Macro mode Close ups 23 K Using the Flash 24 J Using the Self Timer 26 a Shooting Mode 28 Selecting a Shooting Mode 28 Shooting Modes 29 G SCENE RECOGNITION 29 More on Playback More on Playback Single Frame Playback 32 Playback Zoom 33 Multi Frame Playback 34 Sort by Date 35 A Deleting Pictures 36 Movies Movies A Recording Movies 38 D Viewing Movies 40 Connections C...

Page 5: ... 70 The Setup Menu 71 Using the Setup Menu 71 Setup Menu Options 72 a IMAGE DISP 73 b FRAME NO 74 c DIGITAL ZOOM 75 a LCD POWER SAVE 75 f PLAYBACK VOLUME 75 g LCD BRIGHTNESS 75 m FORMAT 76 o AUTO POWER OFF 76 p TIME DIFFERENCE 77 Technical Notes Technical Notes Optional Accessories 78 Accessories from Fujifilm 79 Troubleshooting Troubleshooting Troubleshooting 80 Warning Messages and Displays 86 A...

Page 6: ...roubleshooting Troubleshooting pg 80 pg 80 Having a specific problem with the camera Find the answer here Glossary Glossary pg 90 pg 90 The meanings of some technical terms may be found here TableofContents TableofContents pg iv pg iv The Table of Contents gives an overview of the entire manual The principal camera operations are listed here WarningMessagesandDisplays WarningMessagesandDisplays pg...

Page 7: ...r are shown in bold In the illustrations in this manual the monitor display may be simplified for explanatory purposes Supplied Accessories Supplied Accessories The following items are included with the camera or FinePix software CD IMPORTANT read the End User License Agreement before opening NP 45 rechargeable battery BC 45A battery charger with power cable or built in plug USB cable Attaching th...

Page 8: ... 15 Battery chamber cover 6 1 Shutter button 15 16 2 ON OFF button 11 3 Flash 24 4 Microphone 38 5 Speaker 40 6 Lens and lens cover 7 Self timer lamp 26 8 Monitor 3 1 6 7 3 4 2 5 18 19 20 Selector button MENU OK button pg 12 Move cursor left L macro button pg 23 Move cursor right K flash button pg 24 Move cursor up o monitor brightness button see below I delete button pg 17 Move cursor down J self...

Page 9: ...ash mode 24 3 Silent mode 25 4 Intelligent Face Detection indicator 18 5 Shooting mode 28 6 Battery level 13 7 Self timer indicator 26 8 White balance 60 9 Continuous mode 61 10 Focus frame 15 Indicates that no memory card is inserted and that pictures will be stored in the camera s internal memory pg 8 Playback Playback ISO 100 ISO 100 100 0001 100 0001 12 31 2050 12 31 2050 12 31 2050 10 00 AM 1...

Page 10: ...hat connects to the power outlet via a power cable B Rechargeable battery Terminals Arrow Battery charger type B Battery charger type A 2 Plug the charger in Plug the charger into a power outlet The charging indicator will light Type A Type B The Charging Indicator The charging indicator shows battery charge status as follows Chargingindicator Chargingindicator Battery status Battery status Action...

Page 11: ... casing The battery gradually loses its charge when not in use Charge the battery one or two days before use Read the supplied documentation for additional cautions concerning battery use C Caution Battery Life A noticeable decrease in the length of time the battery will hold a charge indicates that it has reached the end of its service life and should be replaced C Cautions Using the Battery Char...

Page 12: ...e when handling the battery chamber cover 2 Insert the battery Check the label in the battery chamber Face the gold contacts downward and insert the battery into the battery chamber pressing the battery latch with the battery in the direction shown below Confirm that the battery is securely latched Label Battery latch C Caution Insert the battery in the correct orientation Do NOT use force or atte...

Page 13: ...he Battery After turning the camera off open the battery chamber cover press the battery latch to the top and slide the battery out of the camera as shown Battery latch C Caution Turn the camera off before removing the battery Downloaded From camera usermanual com Fujifilm Manuals ...

Page 14: ...m becoming full be sure to delete pictures when they are no longer needed When a memory card is inserted as described below the card will be used for recording and playback CompatibleMemoryCards CompatibleMemoryCards SanDisk SD and SDHC memory cards have been tested and approved for use in the camera A complete list of approved memory cards is available at http www fujifilm com products digital_ c...

Page 15: ...e or use force 3 Close the battery chamber cover Removing Memory Cards Be sure the camera is off before opening the battery chamber cover Press the card in and then release it slowly The card can now be removed by hand C Cautions The memory card may spring out if you remove your finger immediately after pushing the card in Memory cards may be warm to the touch after being removed from the camera T...

Page 16: ...ra off or remove the memory card while the memory card is being formatted or data are being recorded to or deleted from the card Failure to observe this precaution could damage the card Do not affix labels to memory cards Peeling labels can cause camera malfunction Movie recording may be interrupted with some types of memory card The data in internal memory may be erased or corrupted when the came...

Page 17: ... lens Keep the lens clean The n button does not completely disconnect the camera from its power supply Playback Mode Playback Mode To turn the camera on and begin playback press the D button for about a second Press the D button again to turn the camera off B Tip Switching to Shooting Mode To exit to shooting mode press the shutter button halfway Press the D button to return to playback B Tip Auto...

Page 18: ...2 1 Press the selector left or right to highlight the year month day hour or minute and press up or down to change To change the order in which the year month and day are displayed highlight the date format and press the selector up or down 2 2Press MENU OK B Tip The Camera Clock If the battery is removed for an extended period the camera clock will be reset and the language selection dialog will ...

Page 19: ...ctivated and the camera is optimized for taking portrait photographs For more information on using Intelligent Face Detection see page 18 2 Check the battery level Check the battery level in the monitor q w e r Indicator Indicator Description Description q white Battery partially discharged w white Battery more than half discharged e red Low battery Charge as soon as possible r blinks red Battery ...

Page 20: ...ess T to zoom in Zoom indicator Holding the Camera Hold the camera steady with both hands and brace your elbows against your sides Shaking or unsteady hands can blur your shots To prevent pictures that are out of focus or too dark underexposed keep your fingers and other objects away from the lens and flash B Tip Focus Lock Use focus lock pg 21 to focus on subjects that are not in the focus frame ...

Page 21: ...e in the final photograph 4 Focus Press the shutter button halfway to focus on the main subject in the focus frame 1 250 1 250 F3 3 F3 3 Focus frame Press halfway Camera selects small focus frame and focuses on subject If the camera is able to focus it will beep twice and the indicator lamp will glow green If the camera is unable to focus the focus frame will turn red a R indicator will appear in ...

Page 22: ...ndicator lamp The indicator lamp shows camera status as follows Indicator lamp Indicator lamp Camera status Camera status Glows green Focus locked Blinks green Camera shake warning AF warning or AE warning ready to shoot Blinks green and orange Recording pictures Additional pictures can be taken Glows orange Recording pictures No additional pictures can be taken at this time Blinks orange Flash ch...

Page 23: ...right to view pictures in the order recorded left to view pictures in reverse order Press the shutter button to exit to shooting mode Deleting Pictures To delete the picture currently displayed in the monitor press the selector up A The following dialog will be displayed SET ERASE OK OK CANCEL To delete the picture press the selector left to highlight OK and press MENU OK To exit without deleting ...

Page 24: ...hooting menu SHOOTING MODE FACE DETECTION SHOOTING MENU QUALITY ISO CONTINUOUS AUTO OFF N 1 2Press the selector up or down to highlight c FACE DETECTION 1 3Press the selector right to display Intelligent Face Detection options 1 4Press the selector up or down to highlight the desired option Option Option Description Description B ON S ON Intelligent Face Detection and red eye removal on Use with t...

Page 25: ...the shutter button halfway to set focus and exposure for the subject in the green border C Cautions If no face is detected when the shutter button is pressed halfway pg 82 the camera will focus on the subject at the center of the monitor and red eye will not be removed In each shooting mode the camera will detect and focus on faces but exposure will be optimized for the entire scene rather than th...

Page 26: ...ocessed to reduce red eye before it is recorded the b RED EYE REMOVAL option in the playback menu can also be used to reduce red eye pg 64 Intelligent Face Detection Intelligent Face Detection is recommended when using the self timer for group or self portraits pp 26 27 777 The camera can zoom in on pictures taken with Intelligent Face Detection during slide shows pg 65 and when pictures are displ...

Page 27: ...ile the shutter button is pressed halfway AF AE lock 250 250 F3 3 F3 3 Press halfway Repeat steps 1 and 2 as desired to refocus before taking the picture 3 Recompose the picture Keeping the shutter button pressed halfway recompose the picture 250 250 F3 3 F3 3 4 Shoot Press the shutter release button the rest of the way down to take the picture Press the rest of the way down Downloaded From camera...

Page 28: ...s Subjects photographed through a window or other reflective object Dark subjects and subjects that absorb rather than reflect light such as hair or fur Insubstantial subjects such as smoke or flame Subjects that show little contrast with the background for example subjects in clothing that is the same color as the background Subjects positioned in front of or behind a high contrast object that is...

Page 29: ...ect the camera focuses on subjects near the center of the monitor Use the zoom buttons to frame pictures To exit macro mode press the selector left L Macro mode can also be cancelled by turning the camera off or selecting another shooting mode ANote Use of a tripod is recommended to prevent blur caused by camera shake Downloaded From camera usermanual com Fujifilm Manuals ...

Page 30: ... whenever a picture is taken Use for backlit subjects or for natural coloration when shooting in bright light W suppressed flash The flash does not fire even when the subject is poorly lit 0 will appear in the monitor at slow shutter speeds to warn that pictures may be blurred Use of a tripod is recommended T slow sync Capture both the main subject and the background when shooting at night note th...

Page 31: ...ustration at right Silent Mode In situations in which camera sounds or light from the flash may be unwelcome press the DISP BACK button until is displayed in the monitor The camera speaker shooting indicator flash and indicator and self timer lamps turn off Flash and volume settings pg 75 can not be adjusted while silent mode is in effect To restore normal operation press the DISP BACK button unti...

Page 32: ...ssed The current self timer mode is displayed in the monitor c The picture is taken after 10 seconds b The picture is taken after 2 seconds 2 Focus Press the shutter button halfway to focus C Caution Stand behind the camera when using the shutter button Standing in front of the lens can interfere with focus and exposure 3 Start the timer Press the shutter button the rest of the way down to start t...

Page 33: ...e Detection pg 18 is recommended when using the self timer for group portraits or self portraits To use the self timer with Intelligent Face Detection set the timer as described in Step 1 and then press the shutter button all the way down to start the timer The camera will detect faces while the timer is counting down and adjust focus and exposure immediately before the shutter is released Be care...

Page 34: ...s the selector up or down to highlight a SHOOTING MODE 3 Press the selector right to display shooting mode options MANUAL BABY MODE AUTO CANCEL SET Automatic mode setting according to shooting conditions SCENE RECOGNITION 4 Press the selector up or down to highlight the desired mode 5 Press MENU OK to select the highlighted option ANote See the restrictions in another supplied document for flash m...

Page 35: ...T H For soft toned portraits with natural skin tones LANDSCAPE I For crisp clear daylight shots of buildings and landscapes NIGHT J For night and twilight scenes a using high sensitivity setting to minimize blurring MACRO K For clear close ups of flowers etc BACKLIGHT PORTRAIT T For a subject backlit against the sun preventing the background from becoming dim NIGHT PORTRAIT Z For a subject in a di...

Page 36: ...ildings and landscapes L L SPORT SPORT Choose this mode when photographing moving subjects Priority is given to faster shutter speeds D D NIGHT NIGHT A high sensitivity setting is selected automatically to minimize blurring for recording night and twilight scenes U U NIGHT TRIPOD NIGHT TRIPOD Slow shutter speeds are used to record night scenes Use of a tripod is recommended to prevent camera shake...

Page 37: ...and sunsets O O FLOWER FLOWER Choose for vivid close ups of flowers The camera focuses in the macro range and the flash turns off automatically I I PARTY PARTY Capture indoor background lighting under low light conditions H H MUSEUM MUSEUM Choose where flash photography is prohibited or the sound of the shutter may be unwelcome The flash speaker and self timer lamp turn off automatically ANote Pho...

Page 38: ...der Keep the selector pressed to scroll rapidly to the desired frame Choosing a Display Format Press the DISP BACK button to cycle through playback display formats as shown below 1 13 1 13 2050 2050 12 31 12 31 2050 12 31 2050 250 F4 2 F4 2 250 F4 2 ISO 100 ISO 100 ISO 100 100 100 0001 0001 100 0001 N N 12 31 2050 10 00 AM 10 00 AM 10 00 AM Indicators displayed Indicators hidden Sort by date ANote...

Page 39: ...ator When the picture is zoomed in the selector can be used to view areas of the image not currently visible in the display Navigation window shows portion of image currently displayed in monitor Press DISP BACK to exit zoom ANote The maximum zoom ratio varies with image size Playback zoom is not available with pictures taken at an image size of p Downloaded From camera usermanual com Fujifilm Man...

Page 40: ... two nine or a hundred ISO 100 ISO 100 100 0001 100 0001 12 31 2050 12 31 2050 10 00 AM 10 00 AM N N Press T to reduce the number of images displayed Use the selector to highlight images and press MENU OK to view the highlighted image full frame In the nine and hundred frame displays press the selector up or down to view more pictures Downloaded From camera usermanual com Fujifilm Manuals ...

Page 41: ...mains selected 1 13 1 13 2050 2050 12 31 2 Press the selector up or down to select a date 3 Press the selector left or right to select a picture B Tips Rapid Scroll Press and hold the selector up or down to scroll dates rapidly Press and hold the selector left or right to rapidly scroll pictures taken on the same date Downloaded From camera usermanual com Fujifilm Manuals ...

Page 42: ... down to highlight ERASE 3 Press the selector right to display delete options PLAYBACK MENU SLIDE SHOW RED EYE REMOVAL PRINT ORDER DPOF PROTECT ERASE FRAME BACK ALL FRAMES 4 Press the selector up or down to highlight FRAME or ALL FRAMES 5 Press MENU OK to display options for the selected item see pg 37 B Tips Deleting Pictures When a memory card is inserted pictures will be deleted from the memory...

Page 43: ...ACK to exit when all the desired pictures have been deleted ALL FRAMES ALL FRAMES DeletingAllImages DeletingAllImages Selecting ALL FRAMES displays the confirmation shown at right ERASE ALL OK IT MAY TAKE A WHILE YES CANCEL Press MENU OK to delete all unprotected pictures The dialog shown at right is displayed during deletion Press DISP BACK to cancel before all pictures have been deleted any pict...

Page 44: ...available is displayed in monitor Choosing the Frame Size To choose the frame size press MENU OK and select k QUALITY Choose t 640 480 pixels for better quality s 320 240 pixels for longer movies Press MENU OK to return to movie recording mode SHOOTING MENU SHOOTING MODE SET UP QUALITY 999m59s 99m59s 2 Frame the scene using the zoom buttons 12s 12s STANDBY STANDBY Zoom indicator Zoom can not be ad...

Page 45: ...usted automatically throughout recording The color and brightness of the image may vary from that displayed before recording begins 4 Press the shutter button to end recording Recording ends automatically when the movie reaches maximum length or memory is full B Tip There is no need to keep the shutter button pressed during recording A Recording Movies Downloaded From camera usermanual com Fujifil...

Page 46: ...e the current movie Advance rewind Press the selector right to advance left to rewind If playback is paused the movie will advance or rewind one frame each time the selector is pressed Adjust volume Press MENU OK to pause playback and display volume controls Press the selector up or down to adjust the volume press MENU OK again to resume playback Progress is shown in the monitor during playback 15...

Page 47: ...V cable connector Press D for about a second to turn the camera on The camera monitor turns off and pictures and movies are played back on the TV Note that the camera volume controls have no effect on sounds played on the TV use the television volume controls to adjust the volume ANote Image quality drops during movie playback C Caution When making the A V cable connection be sure the connectors a...

Page 48: ...d to turn the camera on w USB will be displayed in the monitor followed by the PictBridge display shown below at right USB 00 OK SET FRAME PICTBRIDGE TOTAL 00000 SHEETS Printing Selected Pictures Printing Selected Pictures 1 Press the selector left or right to display a picture you wish to print 2 Press the selector up or down to choose the number of copies up to 99 3 Repeat steps 1 2 to select ad...

Page 49: ...amera clock was not set when the picture was taken ANote If no pictures are selected when the MENU OK button is pressed the camera will print one copy of the current picture Printing the DPOF Print Order Printing the DPOF Print Order To print the print order created with C PRINT ORDER DPOF in the playback menu pg 62 1 In the PictBridge display press DISP BACK to open the PictBridge menu PRINT DPOF...

Page 50: ...ting the Camera Confirm that PRINTING is not displayed in the monitor and press D to turn the camera off Disconnect the USB cable ANotes Print pictures from internal memory or a memory card that has been formatted in the camera If the printer does not support date printing the PRINT WITH DATE y option will not be available in the PictBridge menu and the date will not be printed on the pictures in ...

Page 51: ...re WITH DATE WITH DATE y WITHOUT DATE WITHOUT DATE To modify the DPOF print order select C C PRINT ORDER DPOF in the playback menu and press the selector up or down to highlight WITH DATE y or WITHOUT DATE SLIDE SHOW RED EYE REMOVAL PRINT ORDER DPOF PROTECT ERASE PLAYBACK MENU WITHOUT DATE RESET ALL WITH DATE WITH DATE y Print date of recording on pictures WITHOUT DATE Print pictures without date ...

Page 52: ... of copies 3 Repeat steps 1 2 to complete the print order Press MENU OK to save the print order when settings are complete or DISP BACK to exit without changing the print order 4 The total number of prints is displayed in the monitor Press MENU OK to exit The pictures in the current print order are indicated by a x icon during playback ISO 100 ISO 100 100 0001 100 0001 12 31 2050 12 31 2050 10 00 ...

Page 53: ...eate or modify a print order for the pictures in internal memory Print orders can contain a maximum of 999 pictures If a memory card is inserted containing a print order created by another camera the message shown at right will be displayed Pressing MENU OK cancels the print order a new print order must be created as described above YES CANCEL RESET DPOF OK YES CANCEL RESET DPOF OK YES NO RESET DP...

Page 54: ...k 2 Windows XP Professional Service Pack 2 or Windows 2000 Professional Service Pack 4 CPU CPU Windows Vista 800MHz Pentium 4 or better 3GHz Pentium 4 or better recommended Windows XP 800MHz Pentium 4 or better 2GHz Pentium 4 or better recommended Windows 2000 200MHz Pentium or better RAM RAM Windows Vista 512MB or more 1GB or more recommended Windows XP 512MB or more Windows 2000 128MB or more Fr...

Page 55: ...k SETUP exe A User Account Control dialog will then be displayed click Allow The installer will start automatically click Installing FinePixViewer and follow the on screen instructions to install FinePixViewer S Note that the Windows CD may be required during installation If the Installer Does Not Start Automatically If the installer does not start automatically select Computer or My Computer from...

Page 56: ...ive and click Restart to restart the computer Store the installer CD in a dry location out of direct sunlight in case you need to re install the software The version number is printed at the top of the CD label for reference when updating the software or contacting customer support Installation is now complete Proceed to Connecting the Camera on page 53 Downloaded From camera usermanual com Fujifi...

Page 57: ...ommended Operation is not guaranteed other USB ports Internet connection 56kbps or faster recommended required to use FinePix Internet Service Internet connection and e mail software required to use e mail option 2 After starting the computer and quitting any applications that may be running insert the installer CD in a CD ROM drive Double click the FinePix CD icon on the desktop and double click ...

Page 58: ...ftware or contacting customer support 5 Select Applications in the Finder Go menu to open the applications folder Double click the Image Capture icon and select Preferences from the Image Capture application menu The Image Capture preferences dialog will be displayed Choose Other in the When a camera is connected open menu then select FPVBridge in the Applications FinePixViewer folder and click Op...

Page 59: ... use a USB hub or keyboard 3 Press the D button for about a second to turn the camera on FinePixViewer will start automatically and the Save Image Wizard will be displayed Follow the on screen instructions to copy pictures to the computer To exit without copying pictures click CANCEL C Caution If FinePixViewer does not start automatically the software may not be correctly installed Disconnect the ...

Page 60: ...iewer in the same way as on a standalone computer The user bears all applicable fees charged by the phone company or Internet service provider when using services that require an Internet connection Disconnecting the Camera After confirming that the indicator lamp is out follow the on screen instructions to turn the camera off and disconnect the USB cable Uninstalling FinePixViewer Only uninstall ...

Page 61: ... The options displayed in the shooting menu vary depending on the shooting mode 2 Press the selector up or down to highlight the desired menu item 3 Press the selector right to display options for the highlighted item AUTO OFF N AUTO SHOOTING MODE FACE DETECTION QUALITY ISO CONTINUOUS AUTO OFF N SHOOTING MENU OFF TOP 3 4 Press the selector up or down to highlight the desired option 5 Press MENU OK...

Page 62: ...O sensitivity pg 57 Choose higher values when the subject is poorly lit AUTO 1600 800 400 200 100 AUTO k QUALITY Choose image size and quality pg 58 rF rN g3 2 o n m p rN d EXP COMPENSATION Adjust exposure for bright dark or high contrast scenes pg 59 2EV to 2EV in increments of 1 3 EV 0 e WHITE BALANCE Adjust color for different light sources pg 60 AUTO p q s t u r AUTO c CONTINUOUS Shoot a serie...

Page 63: ...that mottling may appear in pictures taken at high sensitivities If AUTO is selected the camera will adjust sensitivity automatically in response to shooting conditions Settings other than AUTO are shown by an icon in the monitor if you use M 17 17 M N N ISO 100 ISO 100 17 17 17 17 M N N ISO 100 ISO 100 17 17 Downloaded From camera usermanual com Fujifilm Manuals ...

Page 64: ...22 16cm 8 5 6 5in n 17 13cm 7 5in m 14 10cm 5 3 4in p 5 4cm 2 1 5in Suited to e mail or the web The number of pictures that can be taken at current settings pg 91 is displayed to the right of the image quality icon in the monitor Aspect Ratio Pictures taken at an image quality setting of g3 2 have an aspect ratio of 3 2 the same as a frame of 35 mm film Pictures taken at other settings have an asp...

Page 65: ...explanation of the term EV see the Glossary on page 90 Highly reflective subjects or very bright scenes e g snowfields 1EV Scenes that are mostly sky 1EV Spotlit subjects particularly if photographed against dark backgrounds 2 3 EV Subjects with low reflectivity pine trees or dark colored foliage 2 3 EV ANote At settings other than 0 a 5 icon is displayed in the monitor Exposure compensation is no...

Page 66: ...t sunlight q For subjects in the shade s Use under daylight fluorescent lights t Use under warm white fluorescent lights u Use under cool white fluorescent lights r Use under incandescent lighting If AUTO does not produce the desired results for example when taking close ups choose the option that matches the light source ANote Results vary with shooting conditions Play pictures back after shootin...

Page 67: ...tton is pressed ANotes Frame rate varies with shutter speed Focus and exposure are determined by the first frame in each series The number of pictures that can be recorded depends on the memory available Additional time may be required to record pictures when shooting ends The pictures are displayed in the monitor while recording is in progress STORING STORING Downloaded From camera usermanual com...

Page 68: ... SLIDE SHOW RED EYE REMOVAL PRINT ORDER DPOF PROTECT ERASE 3 Press the selector up or down to highlight the desired menu item 4 Press the selector right to display options for the highlighted item PLAYBACK MENU SLIDE SHOW RED EYE REMOVAL PRINT ORDER DPOF PROTECT ERASE FRAME BACK ALL FRAMES 5 Press the selector up or down to highlight the desired option 6 Press MENU OK to select the highlighted opt...

Page 69: ...BSLIDE SHOW View pictures in a slide show pg 65 CPRINT ORDER DPOF Select pictures for printing on DPOF and PictBridge compatible devices pg 45 EPROTECT Protect pictures from accidental deletion pg 66 FCOPY Copy pictures between internal memory and a memory card pg 67 DIMAGE ROTATE Rotate pictures pg 69 HTRIMMING Create cropped copies of pictures pg 70 jSET UP Perform basic camera setup pg 71 Downl...

Page 70: ... REMOVING b b RED EYE REMOVAL RED EYE REMOVAL This option is used with pictures taken using Intelligent Face Detection to create copies that have been processed to remove red eye ANotes Red eye may not be removed if the camera is unable to detect a face or the face is in profile Results may differ depending on the scene Red eye can not be removed from pictures that have already been processed usin...

Page 71: ...era will not turn off automatically while a slide show is in progress PLAYBACK MENU SLIDE SHOW RED EYE REMOVAL PRINT ORDER DPOF PROTECT ERASE WIPE WIPE NORMAL NORMAL PLAYBACK MENU SLIDE SHOW RED EYE REMOVAL PRINT ORDER DPOF PROTECT ERASE WIPE WIPE NORMAL NORMAL Option Option Description Description NORMAL Press selector left or right to go back or skip ahead one frame Select WIPE for wipe transiti...

Page 72: ...the operation is complete SET ALL SET ALL Press MENU OK to protect all pictures or press DISP BACK to exit without changing picture status YES CANCEL SET ALL OK IT MAY TAKE A WHILE RESET ALL RESET ALL Press MENU OK to remove protection from all pictures or press DISP BACK to exit without changing picture status YES CANCEL RESET ALL OK IT MAY TAKE A WHILE If the number of pictures affected is very ...

Page 73: ...lector right to display options for the highlighted item YES CANCEL COPY CARD INTERNALMEMORY CARD INTERNALMEMORY CARD FRAME ALLFRAMES 3 Press the selector up or down to highlight FRAME or ALL FRAMES 4 Press MENU OK B Tip Copying Pictures Between Memory Cards To copy pictures between two memory cards insert the source card and copy the pictures to internal memory then remove the source card insert ...

Page 74: ...s 1 2 to copy additional images Press DISP BACK to exit when the operation is complete ALL FRAMES ALL FRAMES Press MENU OK to copy all pictures or press DISP BACK to exit without copying pictures 100 0001 100 0001 YES CANCEL IT MAY TAKE A WHILE COPY ALL OK C Cautions Copying ends when the destination is full DPOF print information is not copied pg 45 Downloaded From camera usermanual com Fujifilm ...

Page 75: ...ng pictures pg 66 The camera may not be able to rotate pictures created with other devices To rotate a picture play the picture back and select D IMAGE ROTATE in the playback menu pg 62 CANCEL SET IMAGE ROTATE CANCEL SET IMAGE ROTATE 1 Press the selector down to rotate the picture 90 clockwise up to rotate the picture 90 counterclockwise 2 Press MENU OK to confirm the operation to exit without rot...

Page 76: ...ithout creating a cropped copy press DISP BACK Navigation window shows portion of image currently displayed in monitor YES CANCEL TRIMMING Zoom indicator 2 Press MENU OK A confirmation dialog will be displayed CANCEL REC REC OK Copy size o n m or p see page 58 is shown at the top if the size is p OK is displayed in yellow Larger crops produce larger copies all copies have an aspect ratio of 4 3 3 ...

Page 77: ...page 2 1 Press the selector left or right to choose a page 2 2Press the selector down to enter the menu 3 Adjust settings 3 1 Press the selector up or down to highlight a menu item 3 2Press the selector right to display options for the highlighted item LANG 2 MIN NTSC ENGLISH SET UP AUTO POWER OFF TIME DIFFERENCE TIME DIFFERENCE VIDEO SYSTEM VIDEO SYSTEM FORMAT FORMAT 5 MIN 2 MIN OFF 3 3Press the ...

Page 78: ...low o mute m e SHUTTER VOLUME Adjust the volume of the shutter sound f PLAYBACK VOLUME Adjust the volume for movie playback pg 75 7 g LCD BRIGHTNESS Control the brightness of the monitor pg 75 0 L L m FORMAT Format internal memory or memory cards pg 76 n w Choose a language pg 12 See page 93 ENGLISH o AUTO POWER OFF Choose the auto power off delay pg 76 5 MIN 2 MIN OFF 2 MIN p TIME DIFFERENCE Set ...

Page 79: ...ities larger than p can be zoomed in to check focus and other fine details see page 33 If Intelligent Face Detection is on pg 18 the camera will automatically zoom in on the face used to set focus and exposure press the selector down to cycle through the other faces detected Note that ZOOM CONTINUOUS is disabled during continuous shooting pg 61 and that the colors displayed at settings of 1 5 SEC ...

Page 80: ...e last file number used or the first available file number whichever is higher Choose this option to reduce the number of pictures with duplicate file names RENEW Numbering is reset to 0001 after formatting or when a new memory card is inserted ANotes If the frame number reaches 999 9999 the shutter release will be disabled pg 88 Selecting sRESET pg 72 does not reset frame numbering Frame numbers ...

Page 81: ... than optical zoom a a LCD POWER SAVE LCD POWER SAVE If ON is selected the monitor will dim to save power if no operations are performed for several seconds Full brightness can be restored by pressing the shutter button halfway The monitor does not dim in movie mode or during playback f f PLAYBACK VOLUME PLAYBACK VOLUME Press the selector up or down to choose volume for movie playback and press ME...

Page 82: ...ttery cover during formatting o o AUTO POWER OFF AUTO POWER OFF Choose the length of time before the camera turns off automatically when no operations are performed Shorter times increase battery life if OFF is selected the camera must be turned off manually Note that regardless of the option selected the camera will not turn off automatically when connected to a printer pg 42 or computer pg 53 or...

Page 83: ...ess the selector left or right to highlight hours or minutes press up or down to edit The minimum increment is 15 minutes 1 4Press MENU OK when settings are complete 2 Switch between local time and your home time zone To set the camera clock to local time highlight j LOCAL and press MENU OK To set the clock to the time in your home time zone select k HOME If j LOCAL is selected j will be displayed...

Page 84: ...e printer available from third party suppliers USB Audio Visual Audio Visual TV available from third party suppliers Audio visual output ComputerRelated ComputerRelated Computer available from third party suppliers USB SD card slot or card reader SD SDHC memory card Printer available from third party suppliers Downloaded From camera usermanual com Fujifilm Manuals ...

Page 85: ...formation on the accessories available in your region check with your local Fujifilm representative or visit http www fujifilm com products digital_cameras index html NP 45 rechargeable Li ion battery supplied Additional NP 45 slimline batteries can be purchased as required AV C1 A V cable Connects the camera and a TV Downloaded From camera usermanual com Fujifilm Manuals ...

Page 86: ...ferent shooting mode 29 The battery has been charged many times The battery has reached the end of its charging life Purchase a new battery The camera turns off suddenly The battery is exhausted Charge the battery or insert a fully charged spare battery 4 6 Battery charger Charging does not start The battery is not correctly inserted Re insert the battery in the charger 6 The battery is not in the...

Page 87: ...d or internal memory 76 There is dirt on the memory card contacts Clean the contacts with a soft dry cloth 9 The memory card is damaged Insert a new memory card 8 The battery is exhausted Charge the battery or insert a fully charged spare battery 4 6 The camera has turned off automatically Turn the camera on 11 76 The monitor goes dark after shooting The flash has fired The monitor may darken whil...

Page 88: ...omposition so that the subject s face occupies a larger area of the frame The subject s head is tilted or horizontal Ask the subject to hold their head straight The camera is tilted Hold the camera straight 14 The subject s face is poorly lit Shoot in bright light Wrong subject selected The selected subject is closer to the center of the frame than the main subject Recompose the picture or turn fa...

Page 89: ...makes some flash modes unavailable Choose a different shooting mode 28 The camera is in silent mode Turn silent mode off 25 The flash does not fully light the subject The subject is not in range of the flash Position the subject in range of the flash 93 The flash window is obstructed Hold the camera correctly 14 Problem images Pictures are blurred The lens is dirty Clean the lens 97 The lens is bl...

Page 90: ...plied 66 Frame no File numbering is unexpectedly reset The battery chamber cover was opened while the camera was on Turn the camera off before opening the battery chamber cover to replace the battery or insert a memory card 11 74 Connections Problem Problem Possible cause Possible cause Solution Solution Page Page TV No picture or sound The camera is not properly connected Connect the camera corre...

Page 91: ...is not PictBridge compatible The date is not printed Miscellaneous Problem Problem Possible cause Possible cause Solution Solution Page Page Nothing happens when the shutter button is pressed Temporary camera malfunction Remove and reinsert the battery 6 The battery is exhausted Charge the battery or insert a fully charged spare battery 4 6 The camera does not function as expected Temporary camera...

Page 92: ...l be over or under exposed If the subject is dark use the flash FOCUS ERROR Camera malfunction Turn the camera off and then on again taking care not to touch the lens If the message persists contact a FUJIFILM dealer ZOOM ERROR NO CARD No memory card inserted when COPY is selected in the playback menu Insert a memory card CARD NOT INITIALIZED The memory card or internal memory is not formatted For...

Page 93: ...MEMORY FULL INTERNAL MEMORY IS FULL INSERT A NEW CARD WRITE ERROR Memory card error or connection error Re insert the memory card or turn the camera off and then on again If the message persists contact a FUJIFILM dealer Not enough memory remaining to record additional pictures Delete pictures or insert a memory card with more free space The memory card or internal memory is not formatted Format t...

Page 94: ...rce d NO IMAGE p CAN NOT TRIM An attempt was made to crop a p picture These pictures can not be cropped CAN NOT TRIM The picture selected for cropping is damaged or was not created with the camera DPOF FILE ERROR The DPOF print order on the current memory card contains more than 999 images Copy the pictures to internal memory and create a new print order CAN NOT SET DPOF The picture can not be pri...

Page 95: ...for details If printing does not resume automatically press MENU OK to resume CAN NOT BE PRINTED An attempt was made to print a movie a picture not created with the camera or a picture in a format not supported by the printer Movies and some pictures created with other devices can not be printed If the picture was created with the camera check the printer manual to confirm that the printer support...

Page 96: ...rts Group A compressed file format for color images The higher the compression rate the greater the loss of information and more noticeable drop in quality when the picture is displayed Motion JPEG An AVI Audio Video Interleave format that stores images and sound in a single file with the images recorded in JPEG format Motion JPEG files can be played in QuickTime 3 0 or later Smear A phenomenon sp...

Page 97: ...80 320 240 File size File size 4 9MB 2 5MB 2 2MB 1 2MB 780KB 630KB 130KB Internal memory Internal memory approx 20MB approx 20MB 3 7 8 13 19 26 90 13s 31s SD card SD card 512MB 512MB 95 190 210 350 480 640 2220 6min 12min 1GB 1GB 190 380 420 700 960 1280 4420 12min 28min 2GB 2GB 390 760 860 1400 1930 2580 8850 25min 57min SDHC card SDHC card 4GB 4GB 790 1520 1720 2810 3870 5160 17720 50min 116min ...

Page 98: ... 35 5mm 106 5mm Digital zoom Approx 5 7 up to 17 1 when combined with optical zoom Aperture Two steps Focus range distance from front of lens Approx 40 cm 1 3 ft infinity wide angle 40cm 1 3ft infinity telephoto Macro mode approx 10 cm 80 cm 3 9 in 2 6 ft wide angle 40 cm 80 cm 1 3 ft 2 6ft telephoto Sensitivity Equivalent to ISO 100 200 400 800 1600 AUTO Standard Output Sensitivity Metering 256 s...

Page 99: ... flash with red eye reduction off slow sync with red eye reduction red eye removal on Monitor FinePix J20 2 7 in 230k dot amorphous silicon TFT color LCD monitor frame coverage approx 96 Monitor FinePix J25 3 0 in 230k dot amorphous silicon TFT color LCD monitor frame coverage approx 96 Movies Camera can record movies with monaural sound and a frame size of 640 480 t or 320 240 s at a frame rate o...

Page 100: ...a turned off and then on again every 10 shots Note that the number of shots that can be taken with a fully charged battery varies with temperature and shooting conditions Camera dimensions 91 0mm 56 0mm 17 4mm 3 6in 2 2in 0 7in W H D excluding projections Camera weight FinePix J20 Approx 96 5g 3 4oz excluding battery accessories and memory cards Camera weight FinePix J25 Approx 100 0g 3 5oz exclud...

Page 101: ...100V 10 8VA 240V Rated output 4 2V DC 550mA Supported batteries NP 45 rechargeable batteries Charging time Approx 100 minutes at 23 C 73 F Dimensions W H D built in plug model 101 7mm 56mm 20mm 4 0in 2 2in 0 8in Dimensions W H D power cable model 85mm 54mm 20mm 3 3in 2 1in 0 8in Weight built in plug model Approx 66g 2 3oz excluding battery Weight power cable model Approx 56g 2 0oz excluding batter...

Page 102: ...nt to determine whether the charger can be used abroad Color Television Systems NTSC National Television System Committee is a color television telecasting specification adopted mainly in the U S A Canada and Japan PAL Phase Alternation by Line is a color television system adopted mainly in European countries and China Notices Specifications subject to change without notice FUJIFILM shall not be h...

Page 103: ...easide avoid exposing the camera to water or sand Do not place the camera on a wet surface Condensation Condensation Sudden increases in temperature such as occur when entering a heated building on a cold day can cause condensation inside the camera If this occurs turn the camera off and wait an hour before turning it on again If condensation forms on the memory card remove the card and wait for t...

Page 104: ...7 3 AKASAKA 9 CHOME MINATO KU TOKYO 107 0052 JAPAN http www fujifilm com products digital_cameras index html Downloaded From camera usermanual com Fujifilm Manuals ...

Reviews: