Connecting the Power Cord
Once a month, unplug the machine and check the power cord for
the following:
• The power cord is plugged firmly into a receptacle.
• The plug is not excessively heated, rusted, or bent.
• The plug and receptacle are free of dust.
• The cord is not cracked or frayed.
If you notice any unusual conditions, contact your Xerox Customer
Support Centre.
Connect a parallel cable
Confirm that the computer POWER is turned off.
Connect the parallel cable to the parallel port
on the rear of this printer.
Push the parallel cable in the parallel port of
the computer, and secure it with the screws.
Connect the USB cable.
Connect the USB cable after installing the printer driver in
the computer.
Refer to Chapter 2, “Installing the Printer Driver” in the “User
Guide”.
For 100Base-TX, a category 5 cable is required.
For 100Base-TX, a shielded twist pair cable is recommended.
Connect the network cable to the connector
on the rear of this printer.
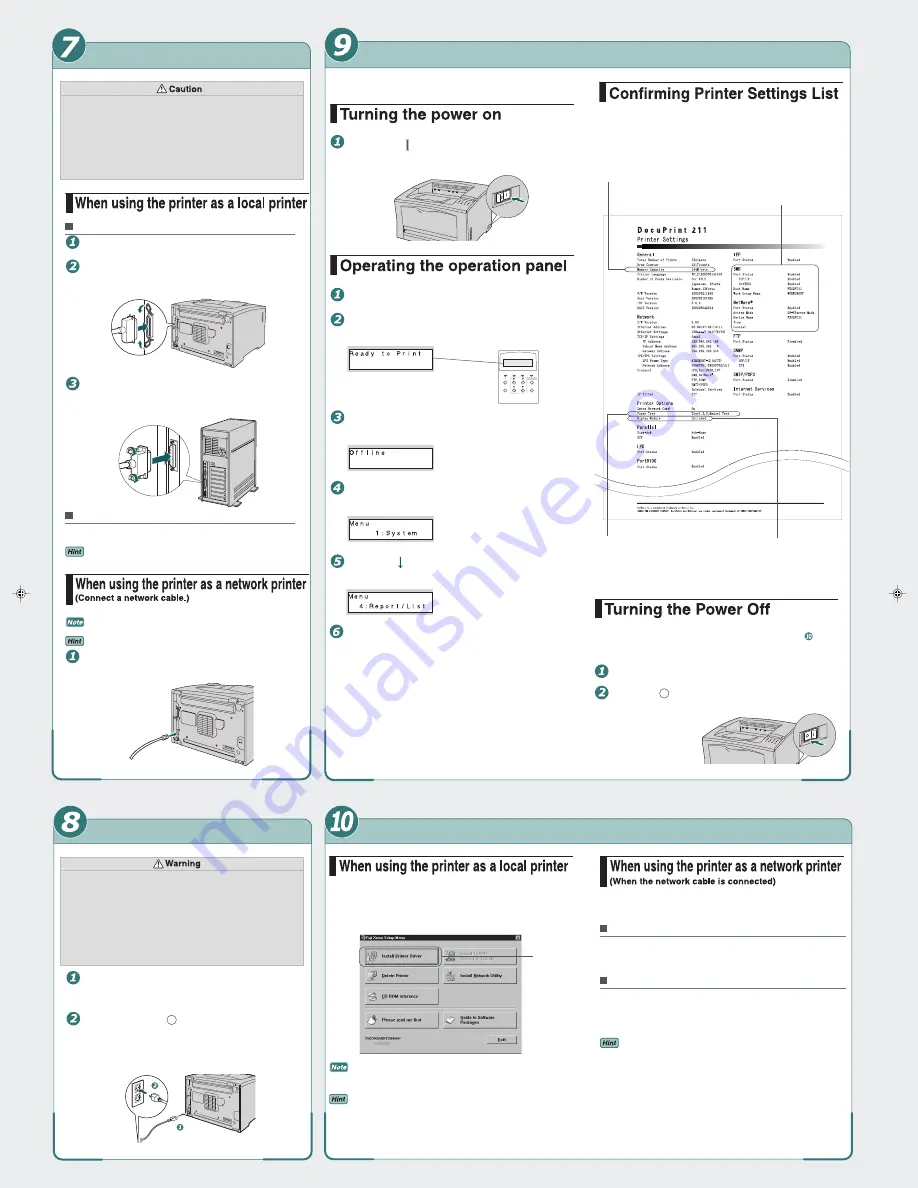
To confirm whether the printer is installed correctly, print the printer setting list.
Press the " " side of the power switch of this
printer to turn the power on.
Set A4-size paper in the cassette.
Confirm that the message below appears on
the LCD.
(Printer ready state)
Press the Online button.
The message below appears on the LCD.
Press the Menu button.
The message below appears on the LCD.
Press the button three times.
After the printer settings list is printed out, confirm whether the options are
installed correctly.
When continuing the computer setup procedure, go to step
. When
stopping this work, follow the procedure below to turn the power off.
Confirm that the printer is not active.
Press the " " side of the power switch of this printer
to turn the power off.
The message below appears on the LCD.
Press the Eject/Set button.
The printer setting list is printed out.
The available types of paper trays are
printed out.
Standard : Tray 1, bypass tray
At addition of
cassette feeder : Tray 1, Tray 2, bypass tray
or Trays 1 to 3, bypass tray
The contents of the memory mounted in this printer
are printed out as follows.
Standard
: 16Mbyte
At addition of additional memory : 144Mbyte, 272Mbyte
Printed out when the network expan-
sion card is installed to this printer.
Whether the duplex module
is installed is printed out.
Standard
: Not printed out.
At addition of
duplex module : Printed out.
Connecting Cable
Printing the Printer Settings List
Setting up the Computer
Online
Data
Error Power Saver
Menu
Eject/Set
Cancel
(Exit Power Saver)
Insert the attached "Software Pack" CD-ROM in the drive; after
selecting the language to be installed appears. On the setup menu,
click the item as shown below to install the printer driver.
When using the USB port, it must be set after installing the printer
driver.
For more detailed information on the installation procedure, refer
to the relevant section of the “User Guide”.
The power specifications are listed below. The specifications that
apply to your machine depend on your machine configuration. Con-
nect the power plug only to a properly rated power outlet. Other-
wise, it can cause fire or electric shocks. If in doubt, contact your
Xerox Customer Support Center.
Rated voltage: 220-240 V
Rated frequency: 50/60 Hz
Never use multi-plug adaptors to plug multiple power plugs in the same
outlet. Be sure to operate the machine on a sole-use receptacle. Mul-
tiple connectors can cause the outlet to overheat and cause fire.
Connect the power cord to the connector for
the power cord.
Confirm that the " " side of the power switch
of the printer is pressed (turned off), and plug
the power cord to the electrical outlet.
Click here.
After setting up the network environment, install the printer driver.
For TCP/IP and SMB (Windows
network)
Refer to Chapter 1, "Preparation for Printing," in the "User Guide"
to set up the network and install the printer driver.
Others
Refer to the "Network Print Environment User Guide" (PDF files
(net.pdf) in the attached "Software Pack" CD-ROM to set up the
environment and install the printer driver.
- To display the "Network Print Environment User Guide" on
the screen, Adobe Acrobat Reader is necessary.
If Adobe Acrobat Reader is not installed in your computer, first
install Adobe Acrobat Reader contained in the "Software
PACK" CD-ROM.
- When using Adobe Acrobat Reader on Windows XP, install
Adobe Acrobat Reader 5.0. For details of systems compatible
with Adobe Acrobat Reader, visit Adobe’s website.
00-setupguide2_E.p65
5/14/2002, 9:15 PM
5


