background image

12 Computer Operations

412

Co
m

p

ut

e

r O

p

er

at

io

n

s

12

CentreWare Internet Services

CentreWare Internet Services requires a TCP/IP environment, and enables you to view the 
status of the machine and its jobs, as well as change settings via a web browser. You can also 
import files stored in a folder.

For information on how to import files, refer to "Importing Using CentreWare Internet Services" (P.410).

For information on the settings of CentreWare Internet Services, refer to "6 CentreWare Internet Services Settings" in the 
Administrator Guide.

CentreWare Internet Services Screen

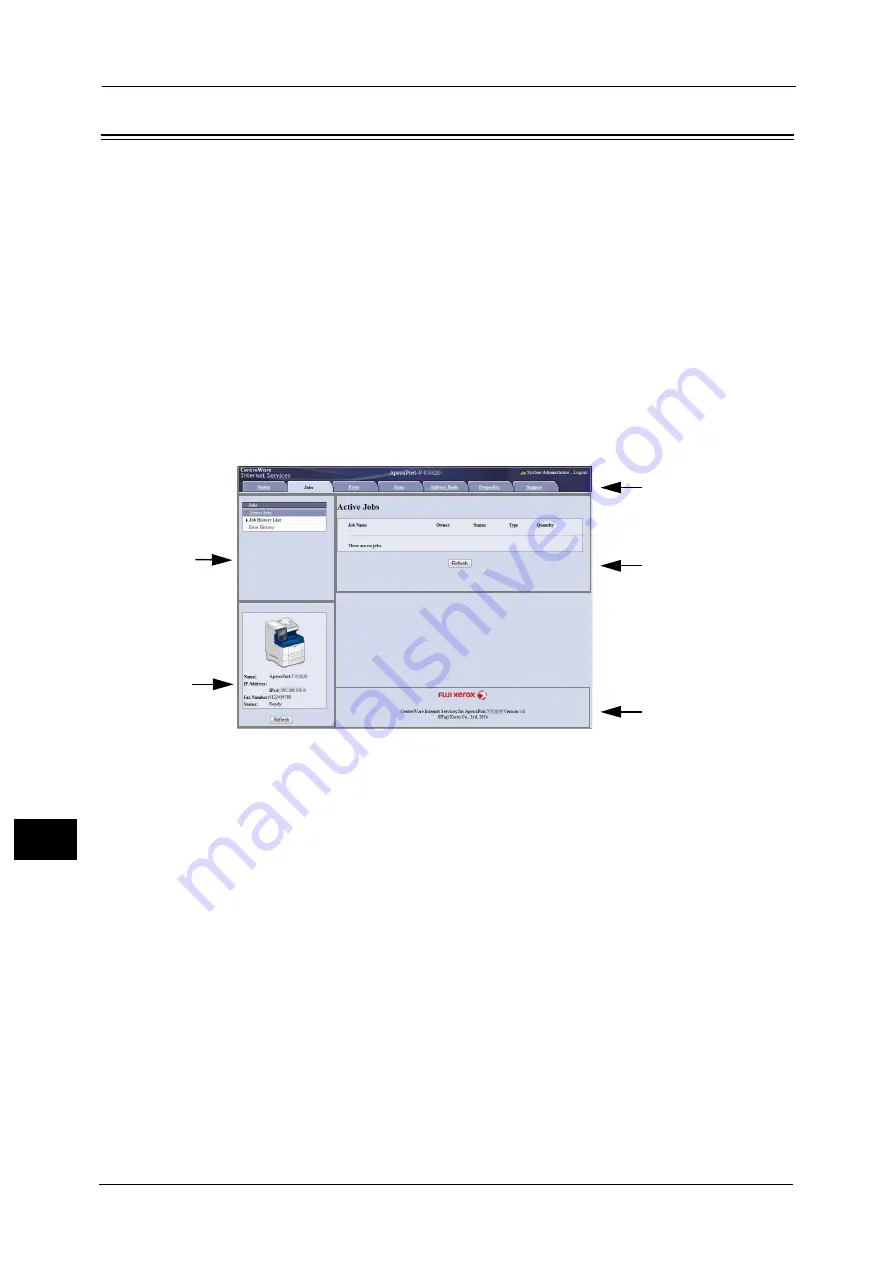
The [CentreWare Internet Services] screen consists of five frames (divided windows). The 
information displayed in each frame depends on the selected category: [Status], [Jobs], 
[Print], [Scan], [Address Book], [Properties], or [Support].

Note

Clicking [Help] in the top frame displays the help for CentreWare Internet Services.

Important •

To display the online help for CentreWare Internet Services, users need to have the environment to 
connect to the Internet. The communication fee shall be borne by you.

Top Frame

Displays the model of the machine, user information, a link to the online help, and the tabs 
(links) to go to each category.

[Logout] is displayed on the right of the user information when you log in as the 
authenticated user using the Authentication feature or as the System Administrator.

Click [Logout] to cancel the Authentication mode or log out of the System Administrator 
mode.

For information on each feature provided by CentreWare Internet Services, click [Help] in this frame to view the help.

Important •

To display the online help for CentreWare Internet Services, users need to have the environment to 
connect to the Internet. The communication fee shall be borne by you.

Upper Left Frame

Displays the menu tree (list of the setting items) of the selected category. The item selected 
from the menu tree is displayed on the upper right frame.

For the [Print] and [Support] tabs, the machine information and status, and the [Refresh] 
button are displayed on the frame instead of the menu tree. Click the [Refresh] button to 
update the displayed information.

Top frame

Upper left frame

Lower left frame

Lower right frame

Upper right frame

Summary of Contents for ApeosPort-V C3320

Page 1: ...User Guide ApeosPort V C3320 DocuPrint CM415 AP...

Page 2: ...in Japan and or other countries In this manual safety instructions are preceded by the symbol Always read and follow the instructions before performing the required procedures As the copying machine c...

Page 3: ...About License 29 RSA BSAFE 29 Heimdal 29 JPEG Code 29 Libcurl 29 FreeBSD 30 OpenLDAP 31 DES 32 AES 33 TIFF libtiff 33 ICC Profile Little cms 33 XML Paper Specification XPS 33 EDICT and COMPDIC 33 Cyru...

Page 4: ...ying Two Pages onto One Sheet 94 Original Orientation Specifying the Orientation of Loaded Documents 94 Copy 95 Reduce Enlarge Making Enlarged Reduced Copies 95 Paper Supply Selecting the Paper for Co...

Page 5: ...ents Scanned with Different Settings as One Job 141 Sample Job Checking the Finished Output of the Copy 145 Combine Original Sets Adding Originals 146 Delete Outside Delete Inside Deleting Outside or...

Page 6: ...the Scan Size for the Original 190 Book Faxing Scanning Facing Pages onto Separate Sheets 190 Reduce Enlarge Specifying a Scan Ratio 191 Lighten Darken Adjusting Fax Density 192 Fax Internet Fax Opti...

Page 7: ...Specifying a Destination Using the Address Book Type 2 248 Add New Address Registering a Recipient on the Address Book 251 New Recipient Specifying an E mail Address 252 Add Me Adding the Sender s Add...

Page 8: ...al Size Specifing a Scan Size 291 2 Sided Scanning Scanning Both Sides of a Document 291 File Format Selecting a File Format for Output Data 292 Store Send Link 293 Scan To Displaying the E mail Addre...

Page 9: ...ail Encrypted by S MIME 314 Digital Signature Sending E mail with a Digital Signature by S MIME 315 Login Name 315 Password 315 Meta Data 315 6 Send from Folder 317 Folder Operating Procedure 318 Step...

Page 10: ...strictions on Media Print 355 Inserting USB Memory Device 357 Media Print Text 361 Selecting Files 361 Select From List Screen 362 Media Print Photos 363 Selecting Files 363 Select From List Screen 36...

Page 11: ...1 Sending Fax 402 Registering Destinations 402 Importing Scanned Data 405 Importing to a TWAIN Compatible Application 405 Importing Using Stored File Manager 3 407 Importing Using CentreWare Internet...

Page 12: ...12...

Page 13: ...es how to use this guide as well as safety notes and legal notice you should read before using the machine Preface 14 Types of Manuals 15 Using This Guide 16 Safety Notes 18 Regulation 27 Environment...

Page 14: ...system and network products For information on how to configure your network environment refer to the Administrator Guide For information on optional components for the print feature also refer to th...

Page 15: ...tor of the organization where the machine is installed and describes the setup procedures related to security This guide is included in the Media Software Product Manual Manual HTML The manual describ...

Page 16: ...e Copy service 4 Fax Describes the basic operations and features for the Fax services 5 Scan Describes the basic operations and features for the Scan services 6 Send from Folder Describes the basic op...

Page 17: ...d read Note Additional information on operations or features A cross reference included in this guide Names of features touch screen messages and input text Folders files applications button or menu n...

Page 18: ...e information Used for item that if not followed strictly can lead death or severe or fatal injuries and the possibility to do it is comparatively high Used for items that if not followed strictly can...

Page 19: ...rear panel of this product for its rated ampere and voltage Never touch the power cord with wet hands It may cause electric shock Do not put an object on the power cord Always keep the plug connectio...

Page 20: ...ntative Do not locate this product where people might step on or trip over the power cord Friction or excessive pressure may generate heat and eventually cause electric shock or a fire accident Never...

Page 21: ...bstruct ventilation openings of the product Keep the minimum clearance as follows for ventilation and an access to the power plug Unplug the product if an abnormal condition is noted 213 mm 213 mm 109...

Page 22: ...ays use the cable ties and spiral tubes that Fuji Xerox supplies Otherwise it may cause some defects To keep this product in a good performance and condition always use it in the following environment...

Page 23: ...lled into the product The product is soaked in water Any part of the product is damaged Do not insert any object into slots or openings of this product Do not put any of the followings on the product...

Page 24: ...he Class 1 Laser Equipment requirements defined by the international standard IEC60825 and has no light exposure hazard The product has no hazardous light emission as it features light protection comp...

Page 25: ...y a paper wrapped around the fusing unit or the heat roller Otherwise it may cause injuries or burns Switch off the product immediately and contact your local Fuji Xerox representative Ventilate well...

Page 26: ...tle no longer needed contact your local Fuji Xerox representative for its disposal Keep drum cartridges or drum if not a cartridge type and toner cartridges out of the reach of children If a child acc...

Page 27: ...owever there is no guarantee that interference will not occur in a particular installation If this product does cause harmful interference to radio or television reception which can be determined by t...

Page 28: ...resources Fuji Xerox reuses returned toner cartridges and drum cartridges to make recycle parts recycle materials or energy recovery Proper disposal is required for toner cartridges and drum cartridge...

Page 29: ...OR CONSEQUENTIAL DAMAGES INCLUDING BUT NOT LIMITED TO PROCUREMENT OF SUBSTITUTE GOODS OR SERVICES LOSS OF USE DATA OR PROFITS OR BUSINESS INTERRUPTION HOWEVER CAUSED AND ON ANY THEORY OF LIABILITY WHE...

Page 30: ...of FreeBSD codes The FreeBSD Copyright Copyright 1994 2006 The FreeBSD Project All rights reserved Redistribution and use in source and binary forms with or without modification are permitted provided...

Page 31: ...g this software is available at http www umich edu dirsvcs ldap ldap html This work also contains materials derived from public sources Additional information about OpenLDAP can be obtained at http ww...

Page 32: ...THE AUTHOR S OR OWNER S OF THE SOFTWARE BE LIABLE FOR ANY DIRECT INDIRECT INCIDENTAL SPECIAL EXEMPLARY OR CONSEQUENTIAL DAMAGES INCLUDING BUT NOT LIMITED TO PROCUREMENT OF SUBSTITUTE GOODS OR SERVICE...

Page 33: ...icensed to customers under the terms and conditions of a Creative Commons Attribution ShareAlike License Prior to use be sure to check the terms and conditions of this license at the URL below Use of...

Page 34: ...urce file s the following copyright notices will apply to the contents of the newlib subdirectory 1 Red Hat Incorporated Copyright c 1994 2009 Red Hat Inc All rights reserved This copyrighted material...

Page 35: ...OF USE DATA OR PROFITS OR BUSINESS INTERRUPTION HOWEVER CAUSED AND ON ANY THEORY OF LIABILITY WHETHER IN CONTRACT STRICT LIABILITY OR TORT INCLUDING NEGLIGENCE OR OTHERWISE ARISING IN ANY WAY OUT OF T...

Page 36: ...reserved 8 Hewlett Packard c Copyright 1986 HEWLETT PACKARD COMPANY To anyone who acknowledges that this file is provided AS IS without any express or implied warranty permission to use copy modify an...

Page 37: ...HER IN CONTRACT STRICT LIABILITY OR TORT INCLUDING NEGLIGENCE OR OTHERWISE ARISING IN ANY WAY OUT OF THE USE OF THIS SOFTWARE EVEN IF ADVISED OF THE POSSIBILITY OF SUCH DAMAGE 12 SuperH Inc Copyright...

Page 38: ...IED WARRANTIES OF MERCHANTABILITY AND FITNESS FOR A PARTICULAR PURPOSE ARE DISCLAIMED IN NO EVENT SHALL THE AUTHOR OR CONTRIBUTORS BE LIABLE FOR ANY DIRECT INDIRECT INCIDENTAL SPECIAL EXEMPLARY OR CON...

Page 39: ...tice is included in all copies of any software which is or includes a copy or modification of this software and in all copies of the supporting documentation for such software THIS SOFTWARE IS BEING P...

Page 40: ...above copyright notice and following paragraph are duplicated in all such forms This file is distributed WITHOUT ANY WARRANTY without even the implied warranty of MERCHANTABILITY or FITNESS FOR A PAR...

Page 41: ...ears in allcopies and that the name of Hewlett Packard Company not be used in advertising or publicity pertaining to distribution of the software without specific written prior permission Hewlett Pack...

Page 42: ...REMENT OF SUBSTITUTE GOODS OR SERVICES LOSS OF USE DATA OR PROFITS OR BUSINESS INTERRUPTION HOWEVER CAUSED AND ON ANY THEORY OF LIABILITY WHETHER IN CONTRACT STRICT LIABILITY OR TORT INCLUDING NEGLIGE...

Page 43: ...TY OF SUCH DAMAGE 30 Alex Tatmanjants targets using libc posix Copyright c 1995 Alex Tatmanjants alex elvisti kiev ua at Electronni Visti IA Kiev Ukraine All rights reserved Redistribution and use in...

Page 44: ...IMPLIED WARRANTIES OF MERCHANTABILITY AND FITNESS FOR A PARTICULAR PURPOSE ARE DISCLAIMED IN NO EVENT SHALL THE REGENTS OR CONTRIBUTORS BE LIABLE FOR ANY DIRECT INDIRECT INCIDENTAL SPECIAL EXEMPLARY O...

Page 45: ...his list of conditions and the following disclaimer 2 Redistributions in binary form must reproduce the above copyright notice this list of conditions and the following disclaimer in the documentation...

Page 46: ...OR IMPLIED WARRANTIES INCLUDING BUT NOT LIMITED TO THE IMPLIED WARRANTIES OF MERCHANTABILITY AND FITNESS FOR A PARTICULAR PURPOSE ARE DISCLAIMED IN NO EVENT SHALL THE COPYRIGHT OWNER OR CONTRIBUTORS...

Page 47: ...RRANTIES OF MERCHANTABILITY AND FITNESS FOR A PARTICULAR PURPOSE ARE DISCLAIMED IN NO EVENT SHALL THE COPYRIGHT HOLDER OR CONTRIBUTORS BE LIABLE FOR ANY DIRECT INDIRECT INCIDENTAL SPECIAL EXEMPLARY OR...

Page 48: ...t the GNU General Public Licenses are intended to guarantee your freedom to share and change free software to make sure the software is free for all its users This license the Lesser General Public Li...

Page 49: ...d libraries and is quite different from the ordinary General Public License We use this license for certain libraries in order to permit linking those libraries into non free programs When a program i...

Page 50: ...modifications and or translated straightforwardly into another language Hereinafter translation is included without limitation in the term modification Source code for a work means the preferred form...

Page 51: ...distribution of the whole must be on the terms of this License whose permissions for other licensees extend to the entire whole and thus to each and every part regardless of who wrote it Thus it is n...

Page 52: ...the object file is unrestricted regardless of whether it is legally a derivative work Executables containing this object code plus portions of the Library will still fall under Section 6 Otherwise if...

Page 53: ...icense restrictions of other proprietary libraries that do not normally accompany the operating system Such a contradiction means you cannot use both them and the Library together in an executable tha...

Page 54: ...atents or other property right claims or to contest validity of any such claims this section has the sole purpose of protecting the integrity of the free software distribution system which is implemen...

Page 55: ...NG BUT NOT LIMITED TO LOSS OF DATA OR DATA BEING RENDERED INACCURATE OR LOSSES SUSTAINED BY YOU OR THIRD PARTIES OR A FAILURE OF THE LIBRARY TO OPERATE WITH ANY OTHER SOFTWARE EVEN IF SUCH HOLDER OR O...

Page 56: ...acker signature of Ty Coon 1 April 1990 Ty Coon President of Vice Other Licenses DES des cpp FreeType 2 freetype version 2 3 6 HarfBuzz harfbuzz JavaScriptCore WebCore WebKit Easing Equations by Rober...

Page 57: ...s of items that may be illegal to copy or print in your country Currency Banknotes and checks Bank and government bonds and securities Passports and identification cards Copyright material or trademar...

Page 58: ...1 Before Using the Machine 58 Before Using the Machine 1...

Page 59: ...ation of the machine such as machine components how to switch the machine on and off and how to use the touch screen Machine Components 60 Power Source 63 Power Saver Mode 66 Control Panel 68 About th...

Page 60: ...ument Feeder Load documents here Refer to Duplex Automatic Document Feeder P 62 6 IC Card Reader optional Used to authenticate a user using a smart card When you touch the smart card to the IC Card Re...

Page 61: ...in Trays 1 and 2 14 Tray 1 and 2 Load paper here Note Tray 2 is optional 15 Toner cartridges Contains toner 16 Front cover Open this cover to replace consumable and clean the machine No Component Func...

Page 62: ...ner to paper Important Do not touch this unit as it is extremely hot 11 Power connector Connects to the power code 12 Rear cover Open this cover to clear paper jams replace consumable and clean the ma...

Page 63: ...rvice Switching the Main Power On The following describes how to switch the main power on Important Do not switch off the main power immediately after switching on the main power This may damage the h...

Page 64: ...n the following situations If the power is switched off the data being processed may be erased While data is being received While a job is being printed While a job is being copied While a job is bein...

Page 65: ...emote Location The following describes how to switch the power off from remote location Note A user ID and passcode are required to switch the power off Ask your system administrator for the user ID a...

Page 66: ...wer Saver mode For how to change the interval for entering the Power Saver mode refer to 1 Before Using the Machine Power Saver Mode Changing the Interval for Entering Power Saver Mode in the Administ...

Page 67: ...ollowing device is connected to the machine and a user performs the following operation the Low Power mode can be deactivated without pressing the Power Saver button Touching the IC Card Reader option...

Page 68: ...nistration mode the Authentication mode or the Accounting mode Displays the User ID entry screen for entering the System Administration mode the Authentication mode or the Accounting mode Press this b...

Page 69: ...refer to 4 Machine Status Machine Information Print Reports Folder List in the Administrator Guide You can check stored fax files in a Stored File List For information on the Stored File List refer to...

Page 70: ...the Control Panel Assigning Services to the Custom Buttons in the Administrator Guide 21 Custom Button 3 Review Review is assigned to this button by default On the Review screen you can check a list o...

Page 71: ...igning Services to the Custom Buttons You can assign services to the custom buttons on the control panel Custom 1 to Custom 3 By assigning frequently used services to the custom buttons you can switch...

Page 72: ...the following home screen appears In this case you can switch pages by selecting the button For information on how to disable flick or double tap refer to 5 Tools Common Service Settings Screen Butto...

Page 73: ...ou can set the features for the Fax service Note This service is not available for some models For more information contact our Customer Support Center For more information refer to Fax P 149 E mail Y...

Page 74: ...ntrol Panel in the Administrator Guide Store to USB You can scan documents and save the scanned data to a USB memory device For more information refer to Store to USB P 286 Note This service is not av...

Page 75: ...racters other than a selected language the characters in the file may be garbled or the import may fail CSV Comma Separated Values is a file format that is often used for saving data by spreadsheets a...

Page 76: ...fer to 15 Appendix Activity Report in the Administrator Guide Fax Receiving Mode You can specify a mode for receiving faxes For more information refer to 4 Machine Status Machine Information Fax Recei...

Page 77: ...red with your finger touched the touch screen Drag the touch screen from side to side to switch pages Drag the touch screen up and down to scroll a list Note During drag scrolling stops when you move...

Page 78: ...p the touch screen to switch the thumbnail bar to be displayed or not Note The operation of pinch in or pinch out moving two fingers inward or outward to zoom in or out screens is not supported Double...

Page 79: ...ion Entering alphabets and numerals To enter uppercase letters select Shift To return to the lowercase letters select Shift again Entering symbols Select More Characters Note Depending on the keyboard...

Page 80: ...2 Product Overview 80 Product Overview 2...

Page 81: ...ter describes the basic operation and features for the Copy service Copying Procedure 82 Operations during Copying 88 Simple Copy 91 Copy 95 Image Quality 106 Layout Adjustment 112 Output Format 123 J...

Page 82: ...on the screen to print the already scanned data or cancel the job In the case the following features are selected the machine will not print the already scanned data Covers Attaching Covers to Copies...

Page 83: ...t again 3 Adjust the document guides to match the size of the document loaded 4 Pull out the document stopper Document Glass The document glass supports a single sheet a book or other similar document...

Page 84: ...ow to select features on the Copy screen For information on Simple Copy refer to Simple Copy P 91 Note The features displayed on the screen depend on the configuration of your machine When the Authent...

Page 85: ...enter up to 999 sets 1 Enter the number of copies using the numeric keypad The number of copies entered appears on the upper right of the touch screen 2 If you have entered an incorrect value press th...

Page 86: ...Original while scanning is in progress Note When using the document feeder load the next document after the machine has finished scanning the first document When Next Original is displayed on the scr...

Page 87: ...us button 2 Confirm the job status Note Select to return to the previous screen or to move to the next screen Scroll the list by drag or flick operation to switch the screen to be displayed For inform...

Page 88: ...ocedure 1 Press either the Stop button on the control panel or Delete on the touch screen 2 Select Delete If Delete does not appear on the screen 1 Press the Job Status button 2 3 5 6 8 9 0 C Power Sa...

Page 89: ...rag or flick refer to Touch Screen P 77 3 Select Delete 4 Select Delete Changing the Number of Copies To change the number of copy sets during scanning or copying use the following procedure 1 Press e...

Page 90: ...or when Next Original has been selected Even when the Interrupt button is pressed the machine may not accept another copy job if 10 sets or less are being copied using the document glass 1 Press the I...

Page 91: ...the Paper for Copying 91 Reduce Enlarge Making Enlarged Reduced Copies 92 2 Sided Copying Making 2 Sided Copies 93 Auto Detect Color Black White Selecting the Color for Copying 93 Lighten Darken Adju...

Page 92: ...t a copy ratio to enlarge or reduce the size of copies 1 Select Reduce Enlarge 2 Select a copy ratio 100 Copies at the same image size as the original document Auto Automatically determines the copy r...

Page 93: ...ll color if the original document is colored and in single color black if the document is black and white Note If a color document is in one of the following conditions the machine may copy the docume...

Page 94: ...single sheet of paper refer to Pages per Side Copying Multiple Pages onto One Sheet P 127 1 Select 2 Pages per Side Original Orientation Specifying the Orientation of Loaded Documents This feature all...

Page 95: ...ormoreinformation referto 5Tools Copy Service Settings Copy Tab Features Allocation in the Administrator Guide 1 Select Copy on the Services Home screen 2 Select a feature on the Copy screen Reduce En...

Page 96: ...nd Specifying 100 allows you to make copies at the same image size as the original document When you make enlarged reduced copies from standard sized documents on standard sized paper the following co...

Page 97: ...etermines the reduction enlargement ratios for the width and length so that the document image fits in the paper Fit Image to Paper Size X Y Automatically determines the reduction enlargement ratios f...

Page 98: ...ncrements Copy Size Allows you to enter the width and length of output copies in the range from 1 to 999 mm in 1 mm increments Paper Supply Selecting the Paper for Copying This feature allows you to s...

Page 99: ...lays paper sizes Type Displays paper types Color Displays paper colors Forinformation on how toset Paper Color refer to 5 Tools Common Service Settings PaperTray Settings Paper Tray Attributes in the...

Page 100: ...ize is Selected Enter the width and length of the original document on the fields displayed after selecting Custom Size Specify the X width in the range from 77 to 215 mm and the Y length in the range...

Page 101: ...Guide Color Copies in full color Black White Copies in black and white regardless of the colors in the original document Dual Color Red Black Copies color documents using two colors You can change the...

Page 102: ...ore colors from your document to define them as source colors Refer to Source Color Screen P 102 Target Area Color Displays the Target Area Color screen on which you can select the target color to be...

Page 103: ...set options Target Area Color Screen This screen allows you to select the target color to be used in place of the source colors specified in Source Color You can select one color from seven preset and...

Page 104: ...Settings Custom Colors in the Administrator Guide 1 Select Dual Color 2 Select Non target Area Color 3 Select any color Output Color Color Screen This screen allows you to specify the color to be used...

Page 105: ...screen For more information refer to Copy Output Specifying Finishing Options P 138 Pages per Side Copying Multiple Pages onto One Sheet This feature is the same as Pages per Side on the Output Format...

Page 106: ...screen 2 Select a feature on the Image Quality screen Note If the color reproduction is unsatisfactory perform calibration For information on calibration refer to 3 Maintenance Executing Calibration i...

Page 107: ...xt Text on See Through Paper Select this option to reduce blurs of tracing paper documents or to suppress background shadows of lightweight documents Text on See Through Paper may not be displayed dep...

Page 108: ...er and colored paper You can also adjust the contrast Note Image Enhancement is not available when Original Type is set to Photo If Suppress Background or Contrast is set concurrently with Color Effec...

Page 109: ...ects the setting made in Color Effects will be cleared 1 Select Color Effects 2 Select any option Off Copies with the Image Enhancement Image Options Color Shift and Color Balance settings at their de...

Page 110: ...Balance 2 Select any option Normal Always copies a document with the density balance set to 0 for the four toner colors yellow magenta cyan and black Basic Color Allows you to adjust the density level...

Page 111: ...l Color slider becomes closer to the R red cell on the Copy Color slider and thus a yellow fruit appears more reddish and riper looking At the same time the tone of all the other colors changes The re...

Page 112: ...tion 119 Invert Image Making Reversed Copies of Images 121 Original Orientation Specifying the Orientation of Loaded Documents 121 1 Select Copy on the Services Home screen 2 Select a feature on the L...

Page 113: ...en you want the orientation of the front and back sides of the copy to be the opposite of that of the document Original Orientation Allows you to specify the orientation of the document so that the ma...

Page 114: ...t page of facing pages Right Page then Left Copies the right page and then the left page of facing pages Top Page then Bottom Copies the top page and then the bottom page of facing pages Both Pages Co...

Page 115: ...nal Orientation Specifying the Orientation of Loaded Documents P 121 A non standard size document may not be separated into two acculately Use the document glass to load a document 1 Select 2 Sided Bo...

Page 116: ...ct Automatically determines the scanning area from the size and reduction enlargement ratio of a docoment Important When Auto Detect is selected and a copy job is started an error message may be displ...

Page 117: ...ou set Reduce Enlarge the edge erase amounts will be reduced or enlarged in proportion to the ratio you specified The binding shift specified in Booklet Creation will not affect the edge erase amounts...

Page 118: ...nter Erases the shadow in the center of facing pages of a bound document or a booklet You can set the binding erase width in the range from 0 to 50 mm in 1mm increments Important When you use this fea...

Page 119: ...For more information refer to Original Orientation Specifying the Orientation of Loaded Documents P 121 Margin Shift Allows you to specify the amounts of the top and bottom and left and right margins...

Page 120: ...m and left and right margins in the range from 0 to 50 mm in 1 mm increments Important When you use this feature please be sure to set the paper size For more information refer to Original Orientation...

Page 121: ...rmation refer to Original Orientation Specifying the Orientation of Loaded Documents P 121 Note When Output Color is set to Black White or Single Color the black color on the document is inverted to w...

Page 122: ...e document loaded Upright Images Select this option when placing the top edge of the document against the top side of the document glass or document feeder Sideway Images Select this option when placi...

Page 123: ...Copy Output Specifying Finishing Options 138 ID Card Copy Copying Both Sides of an ID Card 139 1 Select Copy on the Services Home screen 2 Select a feature on the Output Format screen Note Select to r...

Page 124: ...e Output Format screen 3 Select any option Off Disables this feature Create Left Top Bound Booklet Copies are made to enable left binding or top binding Create Right Bound Booklet Copies are made to e...

Page 125: ...50 mm in 1 mm increments 1 Use and or the numeric keypad to specify a binding shift value Booklet Creation Divide Output Screen When you have a large number of originals the originals are divided to...

Page 126: ...e copied on the front and back sides of the front cover Back Cover Attaches a back cover to the copies Off No back cover is attached Blank Cover Blank sheets of paper are attached as back covers Print...

Page 127: ...et This feature allows you to copy two four or eight pages of a document together onto a single sheet of paper Note When you deselect Auto in Reduce Enlarge when you select another copy ratio image lo...

Page 128: ...uced to fit on the selected paper You can also specify how the repeated copies of the image are arranged Important When you use this feature please be sure to set the original size For more informatio...

Page 129: ...Output Format 129 Copy 3 The specified number of images are evenly arranged on the paper Side by Side The specified number of images are arranged with no space on the paper...

Page 130: ...on the layout template when printed For information on Force Annotation refer to 5 Tools Common Service Settings Force Annotation in the Administrator Guide This feature does not appear for some model...

Page 131: ...page only or onto each copy page Position Displays the Comment Position screen You can select a comment position from nine options For side 2 of copy sheets you can select Same as Side 1 or Mirror Si...

Page 132: ...n Page numbers are add onto copies Style 1 2 3 Adds page numbers only 1 2 3 Adds page numbers and hyphens before and after each page number Example 1 2 Page 1 Page 2 Page 3 Adds page numbers and the t...

Page 133: ...en allows you to specify a page range to add page numbers 1 Select any option All Pages Adds page numbers to all copy pages Starting Page Number Allows you to specify the start page to add a page numb...

Page 134: ...To Displays the Apply Bates Stamp To screen Refer to Apply Bates Stamp To Screen P 134 Position Displays the Bates Stamp Position screen You can select a prefix and page number position from six optio...

Page 135: ...rk Printing Control Numbers on the Background of Copies This feature allows you to faintly print a sequential control number in the background of each copy page If you set 1 as the starting number 1 i...

Page 136: ...te and time when the copy job started For information on the date format refer to 5 Tools Common Service Settings Watermark Date Format in the Administrator Guide Serial Number Allows you to select wh...

Page 137: ...g on the option you select on the Watermark Effect screen Note This feature does not appear for some models An optional component is required For more information contact our Customer Support Center 1...

Page 138: ...ion Off Disables this feature 2 Times Makes two copies of the document image on a single sheet of paper 4 Times Makes four copies of the document image on a single sheet of paper 8 Times Makes eight c...

Page 139: ...u to specify the orientation of the document so that the machine can identify the top of the document Note If the Original Orientation setting differs from the actual document orientation the machine...

Page 140: ...hat the whole image can be scanned When the reduced size is specified to copy an ID card the machine may copy the ID card in a different orientation from the original orientation depending on the magn...

Page 141: ...ected Area 147 Stored Programming Calling a Stored Program for Build Job 148 1 Select Copy on the Services Home screen 2 Select a feature on the Job Assembly screen Build Job Processing Documents Scan...

Page 142: ...reen When Build Job is in Progress The following describes the screen that appears while the Build Job is being executed Chapter Start Displays the Build Job Chapter Start screen Refer to Build Job Ch...

Page 143: ...of copies you can print a sample set to check the finished output and then print the remaining copy sets You can select to continue or cancel the job after the confirmation Build Job Chapter Start Scr...

Page 144: ...s First two pages of the loaded documents are copied onto each side of a separator and the rest of the pages starting from the third page are copied onto the paper other than a separator When Pages pe...

Page 145: ...rator Guide 1 Select Sample Job 2 Select On Off No sample set is made On A sample set is made Copy Screen When Sample Job is in Progress After the sample set is copied the machine pauses the job and d...

Page 146: ...more information on Auto Clear refer to 5 Tools Common Service Settings Machine Clock Timers Auto Job Release in the Administrator Guide 1 Select Combine Original Sets 2 Select On Off Disables this fe...

Page 147: ...areas to be deleted from a document image Up to three areas can be specified Important When you use this feature please be sure to set the original size For more information refer to Original Orienta...

Page 148: ...gth Y in 1 mm increments Note Specify the 2 coordinates from the top right corner of the document When specifying multiple areas the specified areas can overlap each other When Reduce Enlarge is set t...

Page 149: ...services Fax Procedure 150 Operations during Faxing 156 About Internet Fax 161 About Server Fax 168 Simple Fax 170 Fax Internet Fax 174 Layout Adjustment 189 Fax Internet Fax Options 193 More Options...

Page 150: ...5 5 x 5 5 Standard size A6 to 8 5 x 14 Legal Size The document feeder accepts the following number of sheets Important To avoid paper jams use the document glass for folded or wrinkled documents cut...

Page 151: ...er similar documents with size 8 5 x 14 Legal Size Important Always close the document cover after using the document glass 1 Open the document cover 2 Load the document face down and align it against...

Page 152: ...When the Authentication or Accounting feature is enabled a user ID and passcode may be required Ask your system administrator for the user ID and passcode 1 Press the Services Home button 2 Select Fax...

Page 153: ...send the documents with a single phone call This feature is called Batch Send Note that you cannot use Batch Send with Broadcast Send Relay Broadcast Remote Folder and Delay Start when prior to the s...

Page 154: ...ressBook referto SpecifyingaDestinationUsingtheAddress Book P 175 For information on how to specify a fax number using the speed dialing refer to Speed Dialing Specifying a Destination Using an Addres...

Page 155: ...ob Status The following describes how to confirm the status of a fax job 1 Press the Job Status button 2 Confirm the job status Note Select to return to the previous screen or to move to the next scre...

Page 156: ...lowing procedure 1 Press either the Stop button on the control panel or Delete on the touch screen 2 Select Delete If Delete does not appear on the screen 1 Press the Job Status button 2 3 5 6 8 9 0 C...

Page 157: ...ad select Preview A preview screen is displayed and the first page of the lastly read document is displayed Note To send a job select Send Last Original or select Send on the preview screen Selecting...

Page 158: ...displayed When the page switching buttons are displayed When the thumbnail bar is displayed In the entire view the following operations are available Drag or flick the preview area side to side to swi...

Page 159: ...itch whether to display the slider or thumbnail bar Drag the slider to change the ratio of the image size Drag the thumbnail bar side to side to scroll thumbnails Tap the desired thumbnail to be displ...

Page 160: ...ext Original 2 Select Change Settings 3 Set Resolution Original Size and Lighten Darken For each setting refer to Resolution Specifying the Scanning Resolution P 188 Original Size Specifying the Scan...

Page 161: ...service allows you to send documents scanned by the machine as TIFF format attachments to Internet Fax compatible machines Important The TIFF file profiles that can be processed differ depending on t...

Page 162: ...ay station P 166 Precautions when sending Internet Fax The message Files Sent displayed on the Job Status screen of the machine the Job History Report and a Transmission Report indicates that the tran...

Page 163: ...u are using the fax gateway feature you can set Starting Rate and F Code For more information on the fax gateway feature refer to Sending Internet Fax to regular fax machines via a relay station P 166...

Page 164: ...ient is not the same model as this machine it may not print data received from this machine Confirm the Internet Fax features supported by the destination machine before sending data to it When specif...

Page 165: ...ature is called Domain Filtering You can register up to 50 domains as permitted or rejected domains When receiving an e mail the machine checks the Domain Filtering settings If the domain is registere...

Page 166: ...way can receive e mail via SMTP Note The e mail received by the fax gateway is deleted even if the fax was not correctly sent The setting specified in Starting Rate on the Fax Internet Fax Options scr...

Page 167: ...machine to pick them up You can also save paper by displaying the documents on your computer screen How to forward Internet Fax The following operations are required for using the forwarding feature...

Page 168: ...re Product Manual Important While the Server Fax service is enabled the Fax service is detected as not installed even if the Fax Service is installed on the machine During that time therefore fax tran...

Page 169: ...y You can specify the following settings of the Server Fax service under Tools System Settings Scan Service Settings Scan Defaults Background Suppression Lighten Darken Sharpness Features Available fo...

Page 170: ...a feature on the Simple Fax screen Note For the Simple Fax service you can only set Resolution Original Type and 2 Sided Scanning In addition when you use this service Original Type is set to Text an...

Page 171: ...r registered for the Internet Fax service cannot be specified 1 Press the Speed Dial button and enter a 4 digit address number Note If you have entered an incorrect value press the C Clear button and...

Page 172: ...hine and there is a corresponding loss in quality The higher the resolution the lower the transmission speed Usually we recommend that you select Superfine 400 dpi or lower Only Fine 200 dpi is availa...

Page 173: ...ges feature is enabled image loss may occur on the fax document depending on the recipient s machine For example when you select 2 Sided Skip Blank Pages to send an A4 fax document image loss may occu...

Page 174: ...184 Entering Specific Symbols 184 Removing Confirming a Recipient 185 Previewing the Read Images during a Fax Internet Fax Job 185 Lighten Darken Adjusting Fax Density 186 Original Size Specifying th...

Page 175: ...en the Server Fax service is used for fax transmission the attributes other than Fax Number Name and Index are ignored in the Address Book Note Select Add New Address on the Fax Address Book screen to...

Page 176: ...ess types Select from All Types Fax and Internet Fax The features to be displayed on the screen depend on your machine configuration Next This item is displayed when Chain Dial is set to Yes in the Sy...

Page 177: ...p Recipients in the Administrator Guide Search Allows you to set Simple Search or Advanced Search Searches by the keyword specified for Simple Search or by search entries for Advanced Search Note For...

Page 178: ...t name as a keyword After you set an advanced search condition select the box to display the screen for entering the keyword Up to 32 characters are allowed Example Smith Fax Number Searches with a fa...

Page 179: ...ettings Fax Speed Dial Default in the Administrator Guide List all public entries Displays the list of registered recipients Select to return to the previous screen or to move to the next screen Scrol...

Page 180: ...ard for the last digit When using wildcards for the last two digits When you specify address numbers confirm that the corresponding fax numbers are correctly registered on the machine For information...

Page 181: ...Add New Address 2 Select a method to register a recipient New Enter a new recipient using the keyboard Add From Redial Select a recipient to be registered from the Redial list Note This item does not...

Page 182: ...tion on how to enter characters refer to Entering Text P 79 6 To change the index select Index select a new character from the keyboard displayed on the screen and then select Save You can register a...

Page 183: ...screen Important When transmission to a certain recipient is prohibited in the System Administration mode the keyboard button cannot be used 1 Select the keyboard button 2 Specify a recipient with up...

Page 184: ...r to Remote Folder Using Remote Folder P 202 and Broadcast P 217 Feature Button Function Input method Enter pause or Pause Used to enter a pause One pause is 3 seconds You can enter pauses of 6 second...

Page 185: ...s the pop up menu Details Screen This screen allows you to confirm recipients Starting Rate Allows you to select a communication mode according to the features of recipient Previewing the Read Images...

Page 186: ...delete unwanted margins You can change the default values for buttons in the System Administration mode For information on how to change the default values refer to 5 Tools Fax Service Settings Origin...

Page 187: ...example when you select 2 Sided Skip Blank Pages to send an A4 fax document image loss may occur in the area where the edge erase amounts is set when the fax is printed on an A4 document by the recipi...

Page 188: ...y Fine 200 dpi is available for the Server Fax service You can specify the resolution for each address number For information on how to register address numbers refer to 5 Tools Setup Add Address Book...

Page 189: ...k Faxing Scanning Facing Pages onto Separate Sheets 190 Reduce Enlarge Specifying a Scan Ratio 191 Lighten Darken Adjusting Fax Density 192 1 Select Fax Internet Fax on the Services Home screen 2 Sele...

Page 190: ...on Specifying the Scanning Resolution P 188 Original Size Specifying the Scan Size for the Original This feature is the same as Original Size on the Fax Internet Fax screen For more information refer...

Page 191: ...age then Bottom is selected Reduce Enlarge Specifying a Scan Ratio This feature enlarges or reduces scanned images with a specified ratio Important Some destination machines may not be able to receive...

Page 192: ...r more information refer to 5 Tools Fax Service Settings Reduce Enlarge Presets in the Administrator Guide Lighten Darken Adjusting Fax Density This feature is the same as Lighten Darken on the Fax In...

Page 193: ...gital Signature by S MIME 210 1 Select Fax Internet Fax on the Services Home screen 2 Select a feature on the Fax Internet Fax Options screen Note Only Delay Start is available for the Server Fax serv...

Page 194: ...rmation Options is set to On and the transmission completes unsuccessfully a Transmission Report Job Undelivered will be printed The following procedure uses the Read Receipts feature as an example Th...

Page 195: ...omatically switches modes in the following order G3 Unique ECM G3 Unique ITU T G3 ECM ITU T G3 Forced 4800 bps Select this mode when transmitting over noisy or poor telephone lines as can be the case...

Page 196: ...y Start is available when the FTP or SMB protocol is used but not when the SMTP protocol is used When Delay Start is set for Server Fax this setting applies to transmission from the Server Fax server...

Page 197: ...rmation refer to 5 Tools Fax Service Settings Fax Defaults Delay Start Specific Time in the Administrator Guide 1 Select AM or PM 2 Set Hours and Minutes Important If you press the Start button after...

Page 198: ...the recipient name comment sender name machine fax number number of pages and date and time of transmission You can specify whether to attach a cover page for each address number For information on h...

Page 199: ...gister comments refer to 5 Tools Setup Add Fax Comment in the Administrator Guide About the Cover Page To When an address number is used the recipient name registered for the address number is printed...

Page 200: ...ubject is entered the following will be automatically entered as a subject InternetFAX From Send Date and Time Internet Fax Message Editing the Internet Fax Mail Contents You can edit Internet Fax com...

Page 201: ...registered comments Forinformationonhowtoregistercomments referto 5 Tools Setup Add Fax Comment in the Administrator Guide Recipient Print Sets Printing Multiple Sets at the Remote Machine This featu...

Page 202: ...ou do not want others to see Note This feature is not available for the Server Fax service Sending to Folder Fax Signal Method This feature allows you to send a file directly to a folder on the remote...

Page 203: ...l Sending to Folder Fax Signal Method 1 Select Remote Folder 2 Select On Off Disables the Remote Folder feature On Enables the Remote Folder feature Enter a folder number in Remote Folder Number Remot...

Page 204: ...ote folder using the numeric keypad If a passcode is not set leave this box blank Format for Auto Send DTMF Method 1 Select the keyboard button on the Fax Internet screen to display the keyboard on th...

Page 205: ...address number For information on how to register address numbers refer to 5 Tools Setup Add Address Book Entry in the Administrator Guide You can use the Relay Broadcast and Remote Relay Broadcast fe...

Page 206: ...r the numeric keypad Note You can enter up to 20 digits for the F code 4 If necessary select the Password box and enter a password using the displayed keyboard or the numeric keypad Note You can enter...

Page 207: ...ons tab to display the Fax Internet Fax Options screen 6 Select F Code 7 Select On 8 Select the F Code box and enter the F Code using the displayed keyboard or the numeric keypad Note You can enter up...

Page 208: ...ible machines Note The profiles that can be processed differ depending on the Internet Fax compatible machine of the recipient Before specifying a profile confirm the profiles the Internet Fax compati...

Page 209: ...that can be encrypted from the Address Book Note To send Internet Fax encrypted by S MIME register certificates of the machine and the recipient s machine in advance For information on certificates r...

Page 210: ...tion on certificates refer to 12 Encryption and Digital Signature Settings Configuration of E mail Encryption Digital Signature in the Administrator Guide When Digital Signature Outgoing Internet Fax...

Page 211: ...formation Services For information on Facsimile Information Services refer to Receiving Faxes P 225 Note The Remote Polling feature may not be available depending on the remote machine This feature is...

Page 212: ...ice Enables the Remote Polling feature 3 Specify a destination and then press the Start button Secure Polling DTMF Method 1 Select the keyboard button on the Fax Internet Fax screen to display the key...

Page 213: ...ry in the Administrator Guide Store for Polling Storing Files on the Machine that a Remote Machine can Retrieve Store for Polling is a feature that store a file on your machine so that a remote machin...

Page 214: ...reen Refer to Public Folder Screen P 214 When Store for Secure Polling is selected Private Folder is displayed Selecting this button displays the Folder screen Select a folder to store files in for Se...

Page 215: ...e may also end abnormally You can change the volume of the line monitor in the System Administration mode For information on how to change the volume referto 5 Tools CommonService Settings AudioTones...

Page 216: ...4 Fax 216 Fax 4 More Characters Select this button to display a symbol screen allowing you to use symbols to specify a destination Line Cut Cuts the line connected...

Page 217: ...d the Cover Page and Remote Folder features are not available even if they are enabled on the control panel If you want to use Cover Page and Remote Folder set them when registering each recipient in...

Page 218: ...elay Broadcast feature register the following information Note Select Add New Address on the Fax Address Book screen to register the destination For more information refer to Add New Address Registeri...

Page 219: ...e above dialing format in an address number to send using the address number For information on how to register address numbers refer to 5 Tools Setup Add Address Book Entry in the Administrator Guide...

Page 220: ...password of the target relay station 1 Select the Fax Internet Fax Options tab to display the Fax Internet Fax Options screen 2 Select F Code 3 Select On 4 Select the F Code box and enter the F code...

Page 221: ...three methods are available in Remote Relay Broadcast Fax Signal Method This method employs a Fuji Xerox proprietary communication procedure that is only for use with specific machines that support t...

Page 222: ...igit number Note By default no password is set For setting a password contact our Customer Support Center If a password is not set you do not need to enter one Relay Station ID The last two digits of...

Page 223: ...tured machines that can be used as both an initiating station and a relay station we recommend that you use the fax signal method 1 Select the Fax Internet Fax Options tab to display the Fax Internet...

Page 224: ...tation registered at the primary relay station When the primary relay station ID is set the initiating station is notified of the results of the Remote Relay Broadcast When the primary relay station I...

Page 225: ...nt from the sender s machine G3 ID contains a phone number and other information that are registered in the sender s machine You can change the default value of Fax Receiving Mode in the System Admini...

Page 226: ...m a telephone use the receiver to talk If the call is from a fax machine you will hear the sound of a fax machine Note If you select On hook you will hear the sound from the machine speaker However yo...

Page 227: ...nes or to use the touch tone services while using a pulse line select Tone Some touch tone services may not be available even if you set your telephone to send tones 4 When the machine connects to the...

Page 228: ...n the screen to specify the call destination Selecting More Characters on the screen displays symbols Note When the line type is set to a tone line Tone does not appear If you want to send tones or to...

Page 229: ...mation on the network settings refer to 9 Scanner Environment Settings in the Administrator Guide Scanning Procedure 230 Operations during Scanning 238 E mail 244 Network Scanning 271 Scan to PC 273 S...

Page 230: ...A6 to 8 5 x 14 Legal size The document feeder accepts the following number of sheets Important To avoid paper jams use the document glass for folded or wrinkled documents cut and pasted documents cur...

Page 231: ...ys close the document cover after using the document glass 1 Open the document cover Important Ensure that the touch screen is active and then load a document Otherwise the machine may not properly de...

Page 232: ...ols Setup Create Folder in the Administrator Guide Network Scanning Scans a document using a job template created on CentreWare Internet Services For information on how to create a job template refer...

Page 233: ...Scan Service File Format can be Selected When File Format PDF Docu Works XPS 1 TIFF JPEG BMP PNG E mail Using the control panel when scanning O 2 O 3 O O O X X Scan to PC O 2 O 3 O O O X X Store to U...

Page 234: ...to Folder P 284 Advanced Settings P 299 Layout Adjustment P 304 E mail Options Filing Options P 310 When you use another Scan service Store to Folder is replaced with E mail Network Scanning Scan to...

Page 235: ...pages scanned by the machine exceeds the maximum the machine stops scanning Follow the message displayed on the screen and either abort the operation or save the already scanned data as a single set o...

Page 236: ...77 From the drop down menu you can select Scan Fax Internet Fax Jobs and display the desired job Step 5 Saving the Scanned Data When you used the Store to Folder service you can use the following meth...

Page 237: ...Manager 3 Use Stored File Manager 3 Fuji Xerox application software Refer to Importing Using Stored File Manager 3 P 407 Import using CentreWare Internet Services Use CentreWare Internet Services Refe...

Page 238: ...ollowing procedure 1 Press either the Stop button on the control panel or Delete on the touch screen 2 Select Delete If Delete does not appear on the screen 1 Press the Job Status button 2 3 5 6 8 9 0...

Page 239: ...select Preview A preview screen is displayed and the first page of the lastly read document is displayed Note When this screen or the preview screen is displayed and the time of Auto Clear lapsed with...

Page 240: ...splayed When the page switching buttons are displayed When the thumbnail bar is displayed In the entire view the following operations are available Drag or flick the preview area side to side to switc...

Page 241: ...er Specification Forinformationonhowtoset Searchable PageOrientation referto 5 Tools ScanService Settings OtherSettings Searchable Page Orientation in the Administrator Guide Enlarged view A previewed...

Page 242: ...E mail Store Send Link or Scan to PC is selected Send is displayed Select Send to send the current job Note Closing a preview screen by selecting Close returns to step1 When Store to Folder or Store...

Page 243: ...section for each feature Color Scanning Selecting an Output Color P 257 Resolution Specifying a Scanning Resolution P 304 Image Options Adjusting Scan Density and Image Sharpness P 300 Original Orien...

Page 244: ...tes of the machine and the recipient s device in advance For information on certificates refer to 12 Encryption and Digital Signature Settings Configuration of E mail Encryption Digital Signature in t...

Page 245: ...e registered in the Address Book in advance For more information refer to 5 Tools Setup Add Address Book Entry in the Administrator Guide To verify the validity of a certificate prior settings are req...

Page 246: ...P 247 Smart Card E mail Address Displays the addresses specified on the certificate in the Smart Card Note This item is displayed when the Smart Card Reader is connected When Public Entries is Selecte...

Page 247: ...e drop down menu on the left You can select Name E mail Address or Custom Item X for a search target X represents a number between 1 and 3 Important To display the online help for CentreWare Internet...

Page 248: ...ing the keyword Up to 128 characters are allowed Example myhost example com Custom Item Searches with a custom item as a keyword After you set an advanced search condition select the box to display th...

Page 249: ...ss or Custom Item enable the search filters on the Custom Filters screen of CentreWare Internet Services Simple Search For more information refer to the help of CentreWare Internet Services This featu...

Page 250: ...are used the address is searched with the AND clause For information on how to enter characters refer to Entering Text P 79 Name Searches with a recipient name as a keyword Selecting the field for Na...

Page 251: ...isted on the screen Add New Address Registering a Recipient on the Address Book You can register addresses on the Address Book The current recipients specified on the First Tab screen can also be regi...

Page 252: ...tering Text P 79 7 To change the address number select Change select a number from the list and then select Save 8 Select Next 9 Select an item to set The following items appear Address Type E mail Ad...

Page 253: ...Address Book Settings in the Administrator Guide Entering the Full E mail Address 1 Select New Recipient 2 Enter the full e mail address with up to 128 characters To Cc Bcc Allows you to switch the r...

Page 254: ...yed 1 From the Recipient s list select the recipient to be deleted confirmed or edited 2 Select any option from the pop up menu Remove Removes the selected recipient Edit Displays the Edit Recipient s...

Page 255: ...tal Signature Settings Configuration of E mail Encryption Digital Signature in the Administrator Guide From Setting the Sender s Address Specify a sender s e mail address You can specify only one addr...

Page 256: ...2 Close Menu Hides the pop up menu Subject Setting the Subject You can specify the e mail subject using the following procedure Auto Set Automatically sets the subject to Scan data from XXX where XXX...

Page 257: ...the Advanced Setting screen 1 From the menu displayed by selecting Color Scanning select any option Auto Detect The color of the document is determined automatically the machine scans in full color wh...

Page 258: ...sired scan size You can specify a value in the range from 15 to 356 mm for the scan width X and a value in the range from 15 to 216 mm for the scan length Y in 1 mm increments The scales attached on t...

Page 259: ...he document 2 Sided Select this option to scan both sides of the document Originals This option is displayed when 2 Sided is selected Head to Head Select this option when both sides of the 2 sided doc...

Page 260: ...e when either Color or Grayscale is selected in Color Scanning PDF Saves scanned data in PDF format Note The version of PDF files is Acrobat 4 0 PDF 1 3 DocuWorks Saves scanned data in DocuWorks forma...

Page 261: ...t a compression method from MH MMR JBIG2 Arithmetic Encoded and JBIG2 Huffman Encoded under Black White Pages and one from JPEG and Flate under Grayscale Color Pages Selecting Flate saves the image da...

Page 262: ...es on a computer one of the following software is required DocuWorks 6 0 or later DocuWorks Viewer Light 5 1 or later DocuWorks Viewer Light for Web 5 1 or later This feature is not available for some...

Page 263: ...sing the certificate of the machine Note The certificate of the machine is used for PDF digital signature A user certificate cannot be used for the digital signature Optimize For Quick Web View Optimi...

Page 264: ...When the text on the document is small 10 points or smaller scan the document with high resolution 300 dpi Color scanning is recommended when the document has text with white outline or text placed on...

Page 265: ...y the 128 bit AES method Files encrypted by this method can be opened with Acrobat 7 0 or later 256 bit AES Encrypts the file by the 256 bit AES method Files encrypted by this method can be opened wit...

Page 266: ...wed screen Specify whether to allow changing the file contents such as inserting pages or adding notes Allow Contents Copying and Extraction Displays the Allow Contents Copying and Extraction screen S...

Page 267: ...ficate was selected redundantly The certificate data was obtained from an LDAP server and the same certificate was selected redundantly Digital Certificate V5 or later Encrypts the file by the 128 bit...

Page 268: ...file When selecting a certificate a pop up menu appears Select Delete Change Rights Certificate Details or Cancel Select Certificate Details to display Certificate Details screen You can confirm cert...

Page 269: ...work prior settings are required in the System Administration mode Smart Card Certificate Searches recipients in the remote address list Note This item is displayed when the Smart Card Reader is conne...

Page 270: ...the certificate as one of the certificates of persons who are allowed to open the file Grant full access to this file Configure certificates of persons who are allowed to change access privileges incl...

Page 271: ...t to connect to the Internet The communication fee shall be borne by you 1 Select Network Scanning on the Services Home screen 2 Select a job template and then select a feature on the Network Scanning...

Page 272: ...Size Specifing a Scan Size You can specify the size to scan a document For more information refer to Original Size Specifying a Scan Size P 258 2 Sided Scanning Scanning Both Sides of a Document You...

Page 273: ...settings on Mac OS X 10 7 Lion or OS X 10 8 Mountain Lion refer to the official website of Apple Inc For information on supported operating systems refer to 15 Appendix Specifications in the Administr...

Page 274: ...g describes the Address Book When you select a recipient using the Address Book the following restrictions should be noted You cannot use address numbers input by the numeric keypad or group numbers t...

Page 275: ...tion on how to drag or flick refer to Touch Screen P 77 During scrolling the list is not displayed When scrolling stops it is displayed again List Thumbnail Allows you to switch the number of the reci...

Page 276: ...ntries or Retrieve entries using index from the drop down menu on the Server Address Book screen 3 Select Add Important You can only use destinations configured for SMB or FTP Note Select to return to...

Page 277: ...mode or the number of registered recipients For details on the settings and the number of registered recipients ask your system administrator 1 Select Add New Address 2 Select a method to register a r...

Page 278: ...Select Next Note To return to the previous screen select Back When Add from current location is selected 3 Select an item to set and set if you change a setting Note Transfer Protocol cannot be change...

Page 279: ...and then select Save 9 Select Next Note To return to the previous screen select Back 10 Select an item to set and set The following items appear Address Type Name Index Transfer Protocol Server Name...

Page 280: ...to Address Book Screen P 280 Previous Allows you to move to the upper directory Note This button is grayed out if there is no upper directory Next Allows you to move to the lower directory Note This b...

Page 281: ...dress Book to enter information Fields displayed on the screen vary depending on the selected protocol 2 Enter information using the keyboard displayed on the screen For information on how to enter ch...

Page 282: ...st Name Shared Name Directory Name When the save location is in the DFS namespace on Windows enter Domain Name Root Name Folder Name or Server Name Root Name Folder Name Up to 260 characters are allow...

Page 283: ...al Size Specifing a Scan Size You can specify the size to scan a document For more information refer to Original Size Specifying a Scan Size P 258 2 Sided Scanning Scanning Both Sides of a Document Yo...

Page 284: ...of the features displayed on the Store to Folder screen For more information refer to 5 Tools Scan Service Settings Screen Defaults 1st Tab Features Allocation in the Administrator Guide 1 Select Stor...

Page 285: ...ou can automatically scan both sides of a 2 sided document By setting the binding style both sides are scanned in the same orientation For more information refer to 2 Sided Scanning Scanning Both Side...

Page 286: ...AT12 FAT16 FAT32 and VFAT NTFS and exFAT are not supported A USB 2 0 compliant memory device USB 1 1 is not supported A USB memory device with a storage capacity of up to 128 GB Commercially available...

Page 287: ...he same if no media is inserted into the Memory Card Reader If a commercially available Memory Card Reader is used and it is left inserted all the time the machine does not detect media even when they...

Page 288: ...s Home button 1 2 3 4 5 6 7 8 9 0 C Power Da Clear All Interrupt Start Log In Out Review Not In Use Copy Services Home Job Status ABC GHI PQRS Dial Pause Speed Dial TUV WXYZ JKL MNO DEF Services Home...

Page 289: ...memory device by methods other than described in this guide When receiving the effect of electrical noise or an electrical discharge When a fault or failure occurs during operation If the USB memory...

Page 290: ...ich include characters that the machine does not support may not be correctly displayed If you specify the folders as file storage locations an error occurs For more information on characters that the...

Page 291: ...anning Selecting an Output Color You can set the output color to scan a document For more information refer to Color Scanning Selecting an Output Color P 257 Original Size Specifing a Scan Size You ca...

Page 292: ...Scan 292 Scan 5 File Format Selecting a File Format for Output Data You can select a file format for output data For more information refer to File Format Selecting a File Format for Output Data P 26...

Page 293: ...e features to manage documents such as backing up restoring files deleting all data at one time listing files or displaying available storage space The Store Send Link service allows you to retrieve s...

Page 294: ...rs using the displayed keyboard For information on how to enter characters refer to Entering Text P 79 Color Scanning Selecting an Output Color You can set the color mode to scan a document For more i...

Page 295: ...To prevent other parties from viewing your scan data select PDF or DocuWorks in File Format and set a password in PDF Security or DocuWorks Security before scanning the document For more information r...

Page 296: ...this feature is not available for computers with older OS Resolution file format and so on cannot be specified from the control panel of the machine Specify these settings in Scan Profiles of Windows...

Page 297: ...d then select the machine 4 Check that the machine model name is displayed to the right of Scanner Note If the machine model name is not displayed click Change and select the machine 5 Click the Profi...

Page 298: ...among 5 kinds of processing methods Scan to PC Scan for Print to PC Scan for E mail to PC Scan for Fax to PC Scan for OCR to PC in accordance with the intended use 3 Press the Start button 4 The scann...

Page 299: ...ument Background 302 Color Space Specifying the Color Space 302 1 On the Services Home screen select E mail Store to Folder Network Scanning Scan to PC Store Send Link or Store to USB 2 Select a featu...

Page 300: ...le when Searchable Text is set to Searchable on the File Format screen Photographs Scanning a Color Photograph Use this feature when scanning a color photograph This feature is available only when Col...

Page 301: ...e allows you to suppress the background color of a document such as newspaper and colored paper In addition when Color Scanning is set to Color or Grayscale you can adjust the contrast 1 Select Image...

Page 302: ...or Scanning is set to Color or Grayscale Important This feature cannot be used with Photographs 1 Select Shadow Suppression 2 Select Auto Suppression Color Space Specifying the Color Space This featur...

Page 303: ...in the Media Software Product Manual ICC profile is useful when using color processing application and performing special processing of data scanned based on Device Color Space When Device Color Spac...

Page 304: ...Scan Size 306 Edge Erase Erasing Edges and Margin Shadows in the Document 306 Reduce Enlarge Specifying a Scanning Ratio 308 Original Orientation Specifying the Orientation of the Loaded Document 309...

Page 305: ...Sided Scanning Scanning Both Sides of a Document You can automatically scan the both sides of a 2 sided document To scan the both sides in the same orientation set the binding style For more informat...

Page 306: ...om page only in page order You can select this option when Top Page then Bottom is selected Binding Edge Erase Erases the shadow from the center section of the document You can specify the binding era...

Page 307: ...ment You can specify the edge width to erase in the range from 0 to 50 mm in 1 mm increments Left Right Erases the shadows of left and right edges of the document according to the orientation of the l...

Page 308: ...arge 2 Select any option Proportional Allows you to select a preset ratio or enter a value in the range from 25 to 400 in 1 increments Use the numeric keypad or and to enter a value Variable Enter the...

Page 309: ...ation setting differs from the actual document orientation the machine may not detect the top of the document correctly Upright Images Select this option when placing the top edge of the document agai...

Page 310: ...tion to be Taken for File Name Conflict 313 File Name Specifying a Name for the File to be Saved 314 Encryption Sending E mail Encrypted by S MIME 314 Digital Signature Sending E mail with a Digital S...

Page 311: ...rvice you can receive read receipts from e mail recipients This feature is available only when recipients support the MDN feature Note Read Receipts is displayed only when Tools System Settings E mail...

Page 312: ...r e mail application supports message partial File Name Specifying a Name for the File to be Sent When using the E mail Scan to PC Network Scanning or Store Send Link service you can specify a name fo...

Page 313: ...the address for reply 1 Select Reply To 2 Enter an address for reply Reply To Select the Reply To box to display the keyboard screen on which you can enter an address for reply Note For information on...

Page 314: ...ings Filename Format in the Administrator Guide To set the file name 1 Select File Name 2 Enter a file name with up to 28 characters using the displayed keyboard Note If a document stored in a folder...

Page 315: ...mail with a digital signature Login Name You can use this feature to enter the login name for a destination server Note This feature is displayed only when Network Scanning is selected on the Services...

Page 316: ...5 Scan 316 Scan 5...

Page 317: ...bes the basic operations and features to use folders Folder Operating Procedure 318 Selecting a Folder 320 Checking Operating Files in a Folder 321 Checking File Details 323 Printing Files in a Folder...

Page 318: ...19 Step 4 Operating Files in a Folder 319 Step 1 Opening the Send from Folder Screen The following describes how to select features on the Send from Folder screen Note The features displayed on the sc...

Page 319: ...om List and Thumbnail 2 Select a file to send by e mail or to print For information on the File List screen refer to Checking Operating Files in a Folder P 321 Step 4 Operating Files in a Folder The f...

Page 320: ...Administrator Guide 1 Select a folder on the Send from Folder screen Note Select to return to the previous screen or to move to the next screen Scroll the list by drag or flick operation to switch the...

Page 321: ...u can also switch to list view as shown below You can sort files in ascending or descending order by selecting either File Name or Date Time At the left of each file name an icon is displayed to show...

Page 322: ...deselect all the files select this button again while all the files are being selected Delete Deletes the selected files in the folder File Details Preview Previews the selected file to allow you to...

Page 323: ...elect a file on the Folder File List screen 2 Click File Details Preview 3 When you select multiple files select a file to check details 4 Select any option Thumbnail view A previewed image is display...

Page 324: ...eview area to display the tapped page on the center of the screen Drag the thumbnail bar side to side to scroll thumbnails Tap the desired thumbnail to be displayed Enlarged view A previewed image is...

Page 325: ...all previewed images 90 degrees right from the currently displayed angle Delete Deletes the selected files in the folder Change File Name Allows you to change the file name Use the displayed keyboard...

Page 326: ...ect Print Note When a file stored by Store in Remote Folder of a print driver is printed the settings specified on the control panel or CentreWare Internet Services will override the settings specifie...

Page 327: ...is not available while interrupting another job Batch Print is not available for files received by fax or Internet Fax or files for Secure Polling When the selected files contain fax or Internet Fax f...

Page 328: ...folder where the job flow is created This type of job flow is not displayed on the Create Job Flow Sheet screen When the Authentication feature is enabled job flows sheets whose owners are authenticat...

Page 329: ...to check the result For information on the Job History Report refer to 5 Tools Common Service Settings Reports Job History Report in the Administrator Guide Cut Link Cancels the link between a folder...

Page 330: ...reate New Job Flow Sheet screen For more information refer to 5 Tools Setup Create Job Flow Sheet Create New Job Flow Sheet in the Administrator Guide Edit Delete Displays the Details screen For more...

Page 331: ...1 Select the filtering conditions and select Save Note The job flows that can be displayed on Send from Folder are those whose Target is Folder and those stored in the machine Owner Select the owner o...

Page 332: ...rom preset keywords if they have been registered in the System Administration mode For information on how to enter characters refer to Entering Text P 79 Select Keyword Displays the Select Keyword scr...

Page 333: ...a job flow sheet registered on the machine Job Flow Sheets is a service that allows you to register transfer settings of scan data such as a transfer method and destination to simplify data transfer...

Page 334: ...et 334 Step 3 Confirming Changing the Job Flow Sheet 335 Step 4 Starting the Job Flow Sheet 335 To create and register a job flow sheet use a computer Note To create a job flow sheet use Device Setup...

Page 335: ...to Selecting Changing a Job Flow Sheet P 336 Step 4 Starting the Job Flow Sheet 1 Load a document Note A job flow with an application linked does not require you to load a document 2 Press the Start b...

Page 336: ...heet in the Administrator Guide Select to return to the previous screen or to move to the next screen Drag or flick to scroll the list to switch the screen to be displayed For information on how to dr...

Page 337: ...ed from Group of Items Note The screen on the right does not appear if only one group is registered 3 Select the item to be changed Note A triangle icon appears at the left of each mandatory item 4 Se...

Page 338: ...unting Features Authentication for Job Flow Sheets and Folders Creating Using Job Flow Sheet in the Administrator Guide 1 Select Sheet Filtering 2 Select the filtering conditions and select Save Owner...

Page 339: ...ng This chapter describes the Stored Programming service that enables you to store customized job settings Stored Programming Overview 340 Registering Deleting Renaming Stored Programs 341 Calling a S...

Page 340: ...s For example this service is available when you want to record a procedure starting from pressing the Machine Status button to displaying the screen under Print Reports to print a Job History Report...

Page 341: ...ob Refer to Registering Stored Programs for Build Job P 343 Delete Deletes a stored program Select the stored program number to be deleted Refer to Deleting Stored Programs P 344 Enter Change Name Ent...

Page 342: ...rrupt button to cancel registration You can change the volume of the sound that notifies that a stored program is being registered For information on the setting refer to 5 Tools Common Service Settin...

Page 343: ...s Home screen The Network Scanning Job Flow Sheets and Web Applications on the Services Home screen The Custom button to which the Network Scanning or Job Flow Sheets service is assigned The Address B...

Page 344: ...layed to the left of each registered stored program for Build Job If no name is entered for a registered stored program the name becomes No Name Forinformationon howtonamearegisteredstoredprogram refe...

Page 345: ...Changing Icons for Stored Programs The following describes how to assign or change an icon of a stored program You can select from 12 icons 1 Select Assign Change Icon 2 Select the number to assign o...

Page 346: ...creen P 77 After the stored program has been called the machine sounds an audible tone If a failure occurs the machine sounds a fault tone For information on how to change the volume of the sound that...

Page 347: ...4 Select a number of a stored program containing the features you want to use Note You can only select registered numbers After the stored program has been called the machine sounds an audible tone If...

Page 348: ...8 Stored Programming 348 Stored Programming 8...

Page 349: ...s Note This service is not available for some models An optional component is required For more information contact our Customer Support Center Web Applications Overview 350 Accessing Web Applications...

Page 350: ...e and displaying the web application screen on the machine Storing scanned documents directly in a web application folder Printing a file directly that is stored on a remote server Note The web applic...

Page 351: ...rator Guide 1 Press the Services Home button 2 Select Web Applications 3 Select an access destination 4 Select Open from the pop up menu displayed Open Accesses the specified remote service Details Di...

Page 352: ...utton on the Services Home screen referto 5 Tools Common Service Settings Screen Button Settings Services Home in the Administrator Guide 1 Press the Services Home button 2 Select Head Office register...

Page 353: ...Photos when a USB Memory Kit is connected Note This service is not available for some models An optional component is required For more information contact our Customer Support Center Overview of Med...

Page 354: ...available Memory Card Reader with single slot 1 can be used for Media Print feature text photo but its performance is not guaranteed When a Memory Card Reader with multi slot 2 is used only one partic...

Page 355: ...sed with Media Print Use media formatted with digital cameras or computers FAT12 FAT16 FAT32 only Use USB 2 0 compliant memory devices with the size up to 128 GB only USB 1 1 compliant memory devices...

Page 356: ...ormation on Print Processing Mode refer to 15 Appendix PDF Direct Print in the Administrator Guide You can use a USB host adapter to print from your USB memory device or via your USB cable as necessar...

Page 357: ...reen status will be one of the above even when a USB memory device in which only encrypted data is stored is inserted or USB memory device in unsupported format is inserted In such case a warning mess...

Page 358: ...otos on the Services Home screen Note WSD Stands for Web Service on Devices 3 The Media Print Text screen or the Media Print Photos screen appears 1 2 3 4 5 6 7 8 9 0 C Power Da Clear All Interrupt St...

Page 359: ...When the Screen Display Does Not Change 1 If any screen other than the Services Home screen is displayed press the Services Home button 2 Select Media Print Text or Media Print Photos on the Services...

Page 360: ...se When disconnecting connecting the USB memory device by methods other than described in this guide When receiving the effect of electrical noise or an electrical discharge When a fault or failure oc...

Page 361: ...e details Select to return to the previous screen or to move to the next screen Scroll the list by drag or flick operation to switch the screen to be displayed For information on how to drag or flick...

Page 362: ...characters long the folder or file name is not displayed Folder names which include characters that the machine does not support may not be correctly displayed If you specify the folders as file stor...

Page 363: ...ails Select to return to the previous screen or to move to the next screen Scroll the list by drag or flick operation to switch the screen to be displayed For information on how to drag or flick refer...

Page 364: ...imes Note You can sort the list in ascending or descending order by selecting Name or Date Time The number of files selected appears on the top on the screen Thumbnail Displays a list of the images an...

Page 365: ...ay in which any of the following sizes of paper is loaded A4 B5 8 5 x 11 100 x 148 mm When the desired tray is not displayed select More and select the tray on the displayed screen When you select Mor...

Page 366: ...or Color Black White Media Print Text Paper Supply Trays 1 2 optional 5 Note Select Auto Select or the tray in which any of the following sizes of paper is loaded A4 B5 A5 8 5 x 11 8 5 x 14 When you s...

Page 367: ...he settings you have specified for Media Print Text or Media Print Photos before selecting the Index Print check box will be effective To change these settings deselect the Index Print check box chang...

Page 368: ...10 Media Print Text and Photos 368 Media Print Text and Photos 10...

Page 369: ...how to check the status of jobs and operate the jobs Job Status Overview 370 Checking Current Pending Jobs 371 Checking Completed Jobs 373 Printing and Deleting Stored Jobs 374 Printing Pending Jobs...

Page 370: ...Pending Jobs P 371 Checking completed jobs Displays the status of completed jobs and their details For more information refer to Checking Completed Jobs P 373 Checking stored jobs Prints or deletes jo...

Page 371: ...P 77 From the drop down menu you can select and display the desired type of jobs 3 Select Delete or Promote Job Print Waiting Jobs Prints the jobs that are waiting to be output or resumed For more in...

Page 372: ...iginal Select this button when you have another document to scan Start Resumes the suspended job Change Quantity Displays the Change Quantity screen on which you can change the number of print sets En...

Page 373: ...ast Sends Select a child job from the list to show its details When the Group Parent Jobs check box is selected select a parent job to show its child jobs and select a child job from the list to show...

Page 374: ...e machine The feature also enables you to set a passcode which is helpful to print confidential documents The following describes how to print or delete jobs stored with the Secure Print feature Note...

Page 375: ...Files in a folder can be displayed in a list or thumbnail view You can also preview the files The image of a direct print job from the USB port is not previewed You can set whether or not to display d...

Page 376: ...review image cannot be rotated Entire view An entire preview image is displayed In the entire view the file name Stored Date and Pages are displayed on the right side of the preview area Double tap th...

Page 377: ...Tools Stored File Settings Print Job Confirmation Screen in the Administrator Guide Print and Delete Starts printing the job After printing the job is deleted Print and Save Starts printing the job A...

Page 378: ...You can set whether or not to display detailed information in the list screen of the stored files For more information refer to 5 Tools Stored File Settings Display Details of Stored Print Job in the...

Page 379: ...red Date and Pages are displayed on the right side of the preview area Double tap the preview area to move to the enlarged view Enlarged view A previewed image is enlarged or reduced In the enlarged v...

Page 380: ...t automatically set Auto Job Release to Off For information on how to set Auto Job Release refer to 5 Tools Common Service Settings Machine Clock Timers Auto Job Release in the Administrator Guide No...

Page 381: ...ed File Settings Display Details of Stored Print Job in the Administrator Guide When the booklet layout is set using a printer driver the icon for booklet is displayed 3 Select any option Delete Delet...

Page 382: ...ys the output color of the document to be printed 2 Sided Printing Displays 1 Sided Flip on Short Edge and Flip on Long Edge Booklet Creation Displays Left Top Bind and Right Bottom Bind Note This ite...

Page 383: ...jobs without a user ID such as e mail printing and print jobs sent from ContentsBridge or CentreWare Internet Services and can print the jobs after authenticating users Charge Print appears when Save...

Page 384: ...ltaneously to print or delete the files If you select multiple files they are printed in the selected order The files in a folder can be displayed in a list or thumbnail view You can also preview the...

Page 385: ...screen A preview image cannot be rotated Entire view An entire preview image is displayed In the entire view the file name Stored Date and Pages are displayed on the right side of the preview area Do...

Page 386: ...Charge Print This feature allows you to temporarily store print data in the machine for each authentication user ID and request on the machine s control panel to print the data As the feature enables...

Page 387: ...Log In Out button lights up on the control panel To log out of the machine press the Log In Out button on the control panel 3 Select Private Charge Print Note If you are authenticated as a system adm...

Page 388: ...Selected 1 Select any option Note Only the first page is displayed for the preview screen A preview image cannot be rotated Entire view An entire preview image is displayed In the entire view the fil...

Page 389: ...isabled in the System Administration mode If Disabled is selected the machine automatically deletes the job after printing without displaying the confirmation screen For more information refer to 5 To...

Page 390: ...selected job stored in the public folder Refer to When Delete is Selected P 390 Print Prints the selected job stored in the public folder Refer to When Print is Selected P 390 When Delete is Selected...

Page 391: ...Fax is Selected P 391 Change Recipients Allows you to change the fax recipient and re send the undelivered fax job Refer to When Change Recipients is Selected P 391 When Delete This Fax is Selected 1...

Page 392: ...waiting to be resumed you can also resume the job If there are multiple jobs subsequent jobs are printed after the paused job has been printed Note If there are no pending jobs Print Waiting Jobs is d...

Page 393: ...Lists Transmission Report Job Undelivered in the Administrator Guide For more information on how to print the Transmission Report Job Undelivered automatically refer to 5 Tools Common Service Setting...

Page 394: ...11 Job Status 394 Job Status 11...

Page 395: ...n this chapter An optional component is required For more information contact our Customer Support Center The computer screen images shown in this chapter are as of July 2014 The procedures in this ch...

Page 396: ...achine For more information refer to E mail Printing P 401 Sending Fax Sends a fax directly from a computer For more information refer to Sending Fax P 402 Importing Scanned Data Imports files stored...

Page 397: ...rs Booklet Creation Performs 2 sided printing and page allocation for printing a booklet in the correct page order Transparency Separators Automatically inserts a blank sheet of paper as a separator e...

Page 398: ...Internet Services Important To display the online help for CentreWare Internet Services users need to have the environment to connect to the Internet The communication fee shall be borne by you Note...

Page 399: ...ntication SecuritySettings Authentication Charge PrivatePrintSettings intheAdministratorGuide ForinformationonhowtoprintaPrivateChargePrintjob refer to Private Charge Print P 386 Setup To print from y...

Page 400: ...en completed The document monitor is available in the Media Software Product Manual For information how to install the document monitor refer to the manual included in the Media Software Product Manua...

Page 401: ...then attach a document to the e mail if necessary Important Only plain text is available for the e mail body Change the body text format to plain text on your e mail application Any forwarded e mail...

Page 402: ...lve the problem according to the message 7 Click OK The Fax Job Confirmation dialog box appears after you have sent a fax job A list of recipients to whom the fax job is being sent will be displayed R...

Page 403: ...rnet Services For more information refer to the help of CentreWare Internet Services 1 Start up the computer and a web browser 2 Enter the machine s IP address or Internet address in the browser addre...

Page 404: ...ok on the Properties tab is not available for the Address Book data created based on a CSV file which is downloaded from the Export Template with Column Headings only or Download Template on Address B...

Page 405: ...Product Manual Toimportfilesstoredinafolder priorsettingsarerequired suchasenablingports Formoreinformation referto 9Scanner Environment Settings Configuration of Store to Folder in the Administrator...

Page 406: ...ers Clicking Select Scanner returns to step 5 where you can reselect a scanner 7 Click Confirm 8 Select a file to be imported from the list and click Import Note You can select multiple files Import R...

Page 407: ...that appears Importing Using Stored File Manager 3 The following describes how to use Stored File Manager 3 to import files from a machine s folder Stored File Manager 3 is software to import files fr...

Page 408: ...isplay of scanner names P 409 3 In the Folder Number field enter the number of the folder 001 200 that contains the file to be imported In the Passcode field enter a passcode up to 20 digits Note You...

Page 409: ...Settings To learn about fields in the displayed dialog box click Help to view the Stored File Manager 3 help Changing the display of scanner names You can change the display of scanner names listed To...

Page 410: ...rvices P 412 For more information on this operation click Help in the top frame to view the help Important To display the online help for CentreWare Internet Services users need to have the environmen...

Page 411: ...o 20 digits 5 Place a check mark next to each file to be imported set the necessary items and then click Retrieve Note When you import files in PDF format from a folder they cannot be optimized for we...

Page 412: ...o the Internet The communication fee shall be borne by you Top Frame Displays the model of the machine user information a link to the online help and the tabs links to go to each category Logout is di...

Page 413: ...trator for the ID and passcode Tab Name Main Features Status Displaying the machine status Displays the status of the paper trays output trays and consumables such as toner cartridges Usage Counters D...

Page 414: ...ties Connectivity Protocols HTTP Usable ports are 1 to 65535 If you set the port to a number other than 80 you must add and the port number after the IP address or the Internet address when entering t...

Page 415: ...crypted you must specify an address that starts with https instead of http to access CentreWare Internet Services If authentication of the system administrator fails the following message is displayed...

Page 416: ...12 Computer Operations 416 Computer Operations 12...

Page 417: ...13 Appendix This chapter contains a glossary of terms used in this guide Glossary 418...

Page 418: ...when the length of the transmitted document exceeds the length of paper installed on the receiving terminal A margin at the bottom of a received document can be eliminated so that the data can be prin...

Page 419: ...mage data in segments and retransmits segments that the remote machine receives incorrectly ECM described on the Activity Report shows that the communication was processed using ECM Edge Erase A featu...

Page 420: ...ugh edges reduced giving the appearance of a higher resolution Image Rotation This feature rotates a document image by 90 degrees when the document orientation is not the same as the paper supply orie...

Page 421: ...le Area The actual area on paper which can be printed Profile A protocol controlling image resolution paper size and other attributes when sending or receiving faxes using Internet Fax The profiles th...

Page 422: ...way data is transmitted commonly used for sending and receiving e mail Start Reservation In this guide this refers to loading a document selecting features and pressing the Start button immediately a...

Page 423: ...st send 162 175 221 browse 279 build job 141 C C clear button 69 calculator 97 calibration 75 calling a stored program 346 calling a stored program for Build Job 347 CentreWare Internet Services 410 4...

Page 424: ...08 entering a stored program name 344 entering specific symbols 184 entering text 79 entering the e mail body 294 erasing edges and margin shadows in the document 306 erasing the background color of d...

Page 425: ...nt 354 Media Print Photos 365 Media Print Text 366 message 256 294 message field 72 meta data 315 mirror image 121 more options 211 MRC high compression 261 N negative image 121 network entries 247 26...

Page 426: ...a recipient 185 reply to 313 reset image 128 resolution 172 188 304 retrieve entries using index 250 269 RSA BSAFE 29 S sample job 145 sample set 377 sample set print driver 397 saturation 108 save i...

Page 427: ...pping a fax job 156 stopping a scan job 238 Store Send Link 293 store for polling 213 store in remote folder print driver 398 Store to Folder 284 Store to USB 286 358 Store to WSD 296 Stored File Mana...

Page 428: ...Index 428 Index...

Page 429: ...ApeosPort V C3320 DocuPrint CM415 AP User Guide ME7072E2 1 Edition 1 August 2014 Fuji Xerox Co Ltd Copyright 2014 by Fuji Xerox Co Ltd...

Reviews: