Changing the Paper Size
51
P
ape
r a
nd O
the
r M
edia
2
Changing the Paper Size
This section describes how to change the paper size for Trays 1, 2, 6 and 7.
Important •
Do not load paper of mixed sizes together into a tray.
Note
•
The paper size for Trays 3 and 4 is fixed to A4. To change the paper size, contact our
Customer Support Center.
•
The paper types for Trays 1, 2, 6 and 7 are preset. Normally, plain paper is set. When you
replace the loaded paper with other types of paper, change the paper type settings to match
the type of paper to be loaded to maintain print quality. For information about changing the
paper types, refer to "Changing the Paper Settings" (P.55).
•
For Trays 1 and 2 when loading non-standard size paper, you must register the paper size.
For information on registering paper sizes, refer to "Paper Tray Attributes" (P.129).
For information on corresponding paper size, refer to "Paper Size Settings" (P.145).
For information on how to copy on non-standard size paper, refer to "3 Copy" > "Copy" > "Paper
Supply (Selecting the Paper for Copying)" in the User Guide. For information on how to print on non-
standard size paper, refer to the print driver's help.
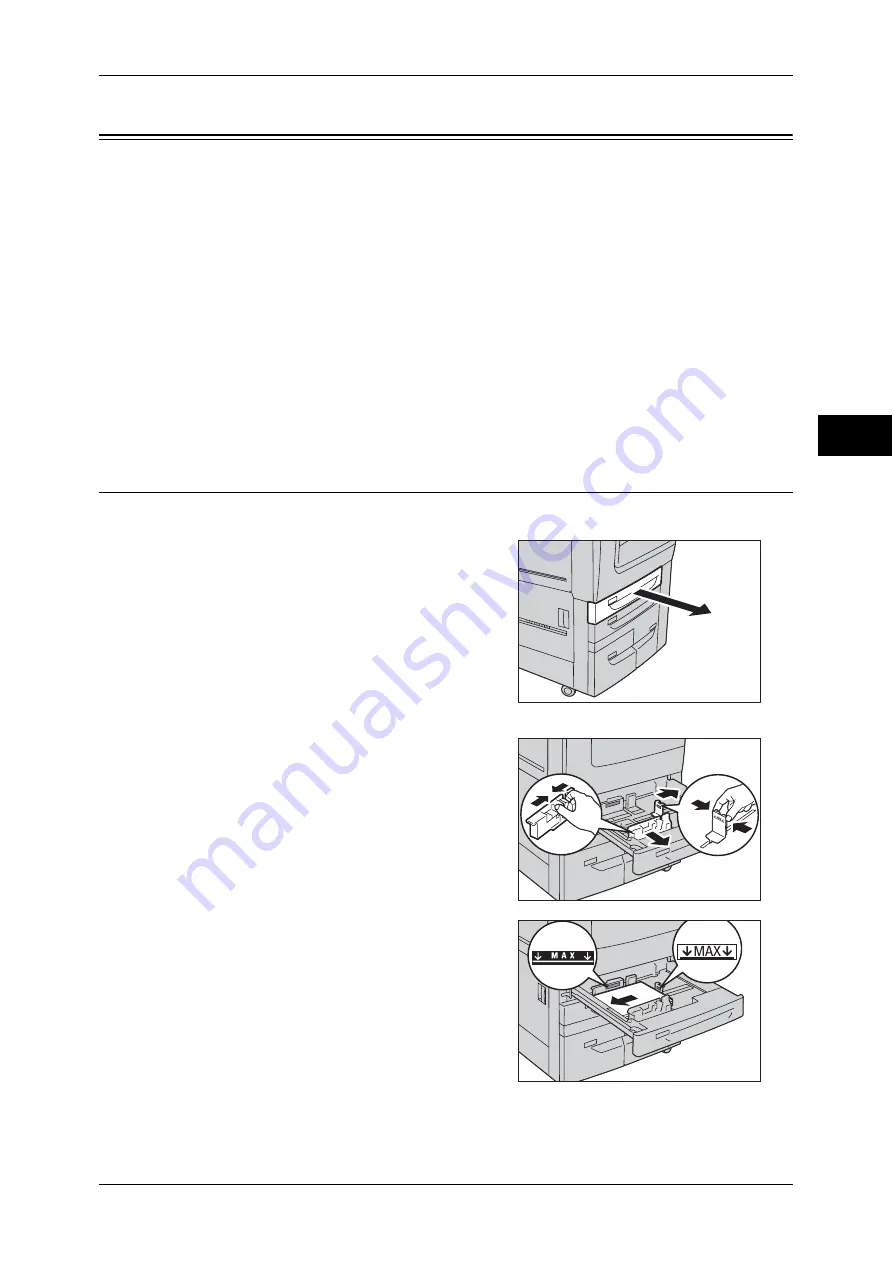
Changing the Paper Size for Trays 1 and 2
The following describes the procedure for changing the paper size for Trays 1 and 2.
1
Pull out the tray until it stops.
Important •
While the machine is processing a job, do
not pull out the tray that the job uses.
•
Do not add a new stack of paper on top of
the remaining paper in the tray to prevent
paper jams or any other troubles. First,
remove the remaining paper from the
tray, and then load the new stack of
paper.
2
Remove any paper loaded in the tray.
3
While pinching the two paper guides, move
them to the edges of the tray paper.
4
Load and align the edge of the paper against
the left edge of the tray with the side to be
copied or printed on facing down.
Important •
Do not load paper above the maximum fill
line. It might cause paper jams or
machine malfunctions.
•
Do not place any paper or objects in the
empty space on the right side of Tray 1 or
2. It may cause paper jams or machine
malfunction.
Summary of Contents for apeosport-IV 6080
Page 1: ...ApeosPort IV 7080 ApeosPort IV 6080 DocuCentre IV 7080 DocuCentre IV 6080...
Page 14: ...14...
Page 102: ...4 Machine Status 102 Machine Status 4...
Page 266: ...5 Tools 266 Tools 5...
Page 294: ...7 Printer Environment Settings 294 Printer Environment Settings 7...
Page 326: ...9 Scanner Environment Settings 326 Scanner Environment Settings 9...
Page 334: ...10 Using IP Fax SIP 334 Using IP Fax SIP 10...
Page 346: ...12 Using the Server Fax Service 346 Using the Server Fax Service 12...
Page 364: ...13 Encryption and Digital Signature Settings 364 Encryption and Digital Signature Settings 13...
Page 402: ...14 Authentication and Accounting Features 402 Authentication and Accounting Features 14...


