FTE Maximal MAX T90 HD Manual Download Page 31

PAG. 30

rev 1.0

ENGLISH

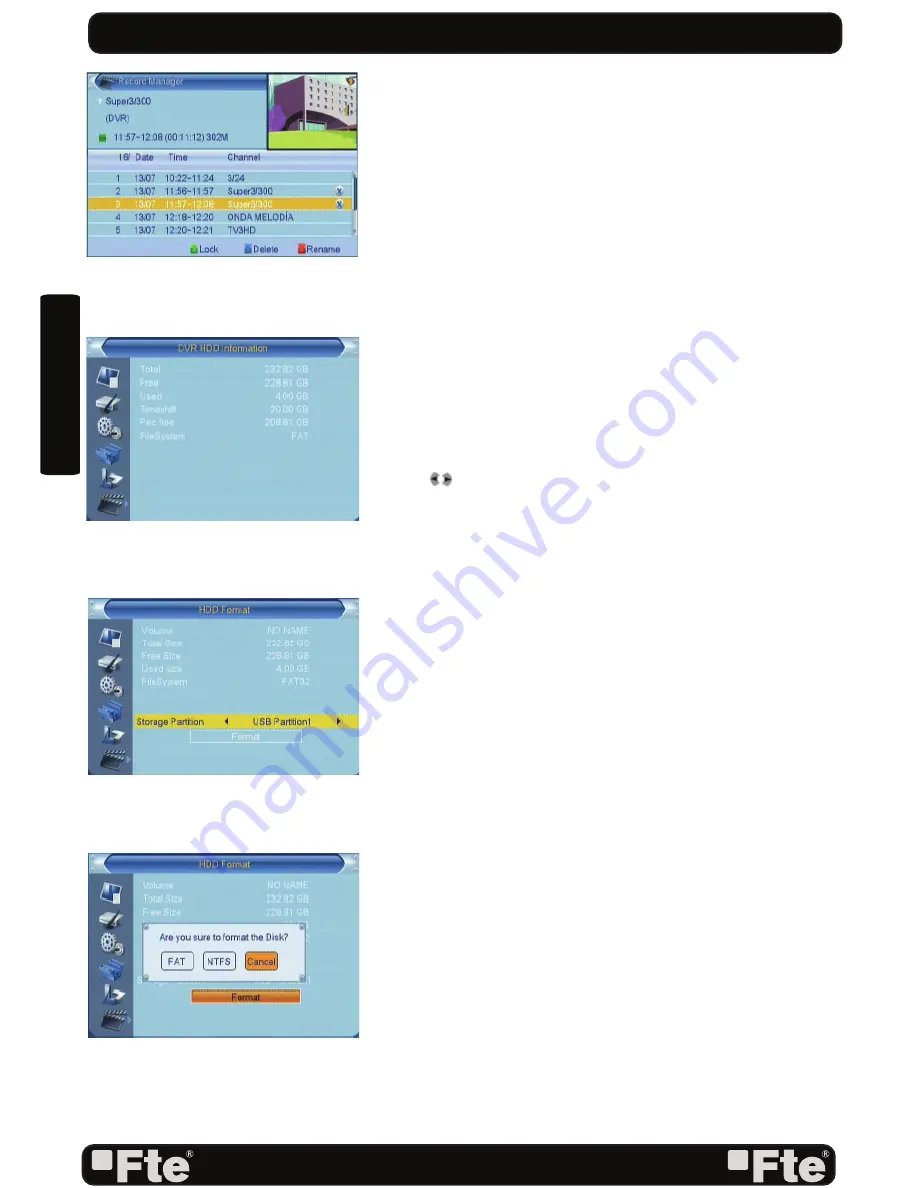
8.2.4. HOW TO DELETE A RECORDING

1. To delete one or more recordings, press the [Blue] key 

on the recording you want to delete (if you want to delete 
several recordings, select them one by one).

2. A mark will appear on the name of the channel (OSD 61).
3. The marked recordings will be deleted once you exit the 

menu.

8.3. DISK INFORMATION

In the HDD information submenu you can see the capacity 
of the hard disk. You also see the free space available (OSD 
62).

8.4. HDD FORMAT

This option will format the hard disk, deleting it completely 
(OSD 63)
1.  In the option “Storage Partition”, please select through the 
keys 

[

]

 the hard disk partition you want to format.

2. Please place the cursor over “Format” and press [OK]. 
3. A new window will appear, where you will have to choose 
the kind of format that you want to assign to the partition 
(OSD 64). Options: FAT or NTFS . Press [OK] over one of 
the options. The hard disk will be formatted and it will lose all 
the recordings in the memory.
NOTE: There is no turning back for this process. After the 
selection of one of these options, the data will be deleted.
4. Press [Exit] in order to go out without formatting.

8.5. DVR CONFIGURATION

In this menu you will be able to confi gure the Timeshift 

activation and the recording format (OSD 65).

1. You can confi gure the Timeshift in two ways:
On: From the moment the user access to the channel, the 

receiver keeps all the channel information in a buffer.

Off: the receiver will no store any channel information. If the 

users makes a Pause the image will stop, but when he 
wants to continue watching the program it will be running in 
the current moment.

 2. In the “Timeshift recording” option we can select between 

two options:

-On: It allows the running of the Timeshift while recording a 

channel.

- Off: The Timeshift option gets disabled while recording.
3. In the “recording type” option you can select between PS 

and TS format.

OSD 61

OSD 62

OSD 63

OSD 64

REC & MEDIA

Summary of Contents for MAX T90 HD

Page 1: ...MAX T90 HD...

Page 2: ......

Page 3: ...PAG 2 rev 1 0 ENGLISH RECEIVER REMOTE CONTROL BATTERIES X 2 QUICK INSTALLATION GUIDE CONTENT...

Page 4: ...wer supply cord out of the way where it will not be walked on Please take special attentions to cords at plugs convenience receptacles and the point where they exit from the unit Object and Liquid Ent...

Page 5: ...ssing the RES key you can configure the output format Options 576i 576p 720p 1080i 1080p STEP 2 CONNECTIONS Connect a coaxial cable from the output socket to the Ant In connector Connect a coaxial cab...

Page 6: ...ferent languages use keys of the remote control Output Video Mode is used to switch the display mode You can press key to select mode output video Aspect Mode is used for switching the screen aspect r...

Page 7: ...information in the streams QUICK INSTALLATION GUIDE CHANNEL INSTALLATION OSD Language This option allows selecting different menu and options languages TV System This option allows choosing the video...

Page 8: ...vice of safety way QUICK INSTALLATION GUIDE TOOLS Media Allows reproduce music image and video Record Management Allows to reproduce to block and to delete recordings Disk Information You can see the...

Page 9: ...10 EXIT 13 2 11 Menu 13 2 12 Mute 13 2 13 Back 13 2 14 Information 13 2 15 Teletext 13 2 16 Favourites 13 2 17 Fast recording 13 2 18 Timeshift 14 2 19 Video Format 14 2 20 Media 14 2 21 Usb 14 3 Chan...

Page 10: ...26 7 2 Sudoku 26 8 Rec Media 8 1 Media Player 27 8 1 1 Adding a new file to the list 28 8 1 2 Configure the slide show 28 8 1 3 Audio MP3 player 28 8 1 4 Picture viewer 28 8 1 5 Sort file 29 8 2 Recor...

Page 11: ...I output for connecting to a TV 5 TV Output SCART for the connection to a TV set 6 VIDEO Video output for external monitor TFT or video beamer 7 AUDIO Audio output for home audio systems 8 AC IN Mains...

Page 12: ...r opens channel list 15 Vol Vol Adjusts audio volume up and down 16 Record Quick start for recording 17 Stop Stop button for recording and TimeShift 18 Numeric keys For direct typing values and names...

Page 13: ...EL LIST 1 In full screen press OK List key can enter Channel List please refer to TV Channel List for detail information OSD 1 2 7 AUDIO 1 In TV mode press the Audio button to open the Audio Mode wind...

Page 14: ...ted channel 2 14 INFORMATION In TV mode press INFO button can open information screen OSD 5 2 15 TELETEXT 1 Press TXT button in TV mode to open the teletext page This service is depending on the suppo...

Page 15: ...hard disk for this reason it is possible to play pause fast forward and reward 1 Pressing the button or several times you can settle the speed of forward Options 2x 4x 8x 16x or 24x 2 Using the key In...

Page 16: ...ng function in Channel List 3 1 1 FAVOURITE 1 Press FAV and OK to open the Favourite window 2 You can move highlight between 8 favorite groups by press key and press OK key 3 Once the favourites group...

Page 17: ...above OSD 17 There are five kinds of sorting ways You can press key to move highlight and press OK key to confirm you selection 2 The five kinds of sorting way are Default Sorting by scanning result N...

Page 18: ...on so it will always display Radio s logo in the right side preview window OSD 20 3 3 DELETE ALL CHANNELS For removing all channel list press the button OK OSD 21 1 There will show up a warning messag...

Page 19: ...and press OK key to start scanning 4 In the Auto Scan menu press Exit key to draw back from the scanning 4 2 CHANNEL SCAN When you enter to Channel Scan menu there will display the screen like below...

Page 20: ...LCN This option makes an automatic ordering of the channels after a search Before activating this option please verify that the function LCN Logical channel number is available in your region OSD 27...

Page 21: ...uage for those channels using If a channel offers the same audio language as the First Audio you set the system will play this audio language as default If the channel does not offer this audio langua...

Page 22: ...to select each mode circularly 2 GMT Usage This item is use for open the usage of GMT You can press t keys to switch Off On 3 The GMT Offset item is valid only when the setting of GMT Usage is Off Yo...

Page 23: ...OK key there will pop an dialogue for you to input the password The default password is 0000 When you input the correct password you will see a screen like below OSD 35 1 Menu Lock determining that w...

Page 24: ...it key to draw back from the OSD Setting menu 5 7 FAVORITE In this menu user is able to change the name of the Favourite Groups Press OK to enter this menu and you will see a screen like beside OSD 37...

Page 25: ...e Factory Setting item 1 A warning message will be displayed like the one beside OSD 42 2 If you select Yes then all changes you made will be reset to default values Make sure you really want to do th...

Page 26: ...o upgrade the receiver In case during the reading of the file it is corrupted or it would be a not appropriated for this model of receiver an alert messagewould appear Error reading the USB disk 5 Aft...

Page 27: ...OK set chessman Exit Quit game and draw back to Game menu 7 2 SUDOKU 1 Moving highlight to Setup and press Left Right keys to select the game level degree of difficulty OSD 48 2 Moving highlight to St...

Page 28: ...option on the submenu Media Player Record Manager Disk Information HDD Format DVR Configuration Jump 8 1 MEDIA PLAYER In this menu option you can accede and manage the contents of the HDD previously...

Page 29: ...add all the images to the images play list press 1 8 1 2 CONFIGURE THE SLIDE SHOW Only available for the picture playlist OSD 53 This function allows you to configure the slide show therefore 1 Select...

Page 30: ...RENAME A RECORDING 1 Press the key Red to rename a recording 2 A window will appear where you can change the name of the record OSD 59 Press OK Blue to go out and modify the name 3 Press the Exit key...

Page 31: ...ress OK over one of the options The hard disk will be formatted and it will lose all the recordings in the memory NOTE There is no turning back for this process After the selection of one of these opt...

Page 32: ...is finished 8 6 JUMP STEP VALUE With this option you can settle the jump marks forward and reward OSD 66 On a current reproduction press the keys or to make a jump of a certain period of time on the r...

Page 33: ...4 5 6 7 8 Input Signal Frequency Imput Level Band width Rf Input connector RF Loopthrough Connector 47 862MHz 73dBm 20dBm 6 MHz 7 MHz 8 MHz IEC Female IEC Male Miscellanous USB Connector Media formats...

Page 34: ...ev 1 0 ENGLISH WE FTE MAXIMAL DECLARE THAT THE PRODUCT MAX T90 HD IS IN CONFORMITY WITH FOLLOWING DIRECTIVES LOW VOLTAGE DIRECTIVE 2006 95 EC EMC DIRECTIVE 2004 108 EC PART OF THE DECLARATION OF CONFO...

Page 35: ......

Page 36: ...0 39 05 22 90 97 48 fte fte it www ftemaximal com PORTUGAL Rua Jos Carlos Ary dos Santos A das Lebres Loures 2670 791 Santo Ant o do Tojal Tel 00 351 219 83 87 00 Fax 00 351 219 83 87 09 ftemaximal ft...

Reviews: