

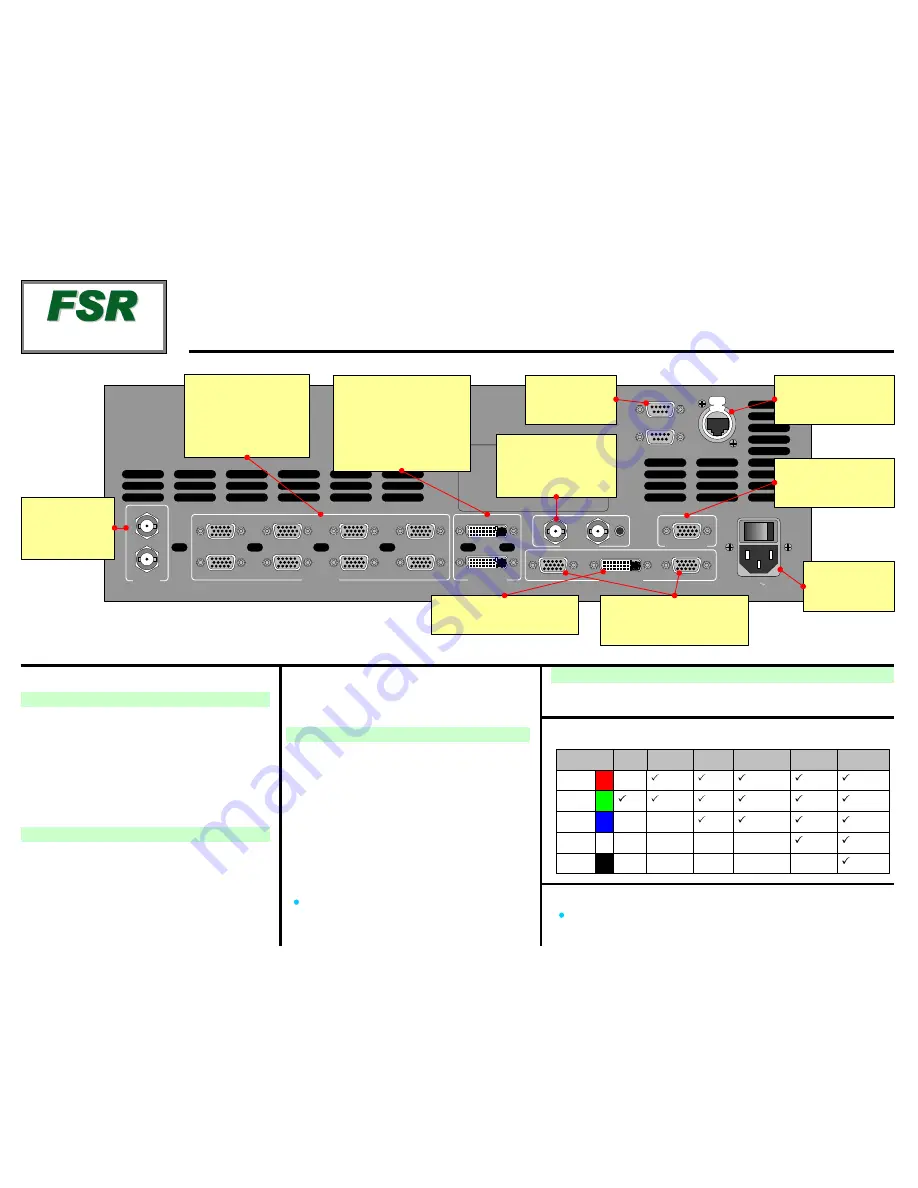
Background, DSK, and LOGO Setup
2
1
SDI In
Analog In
BG/DSK In
Genlock
Preview Out
Program Out
1
2
3
4
5
6
7
8
A
B
1
2
In
Loop
Serial 1
Serial 2
Ethernet
100-240 V 50-60 Hz
2.3 A
Quick Install and Setup
ScreenPRO-II User’s Guide
For complete details on all installation and operations procedures,
please refer to the ScreenPRO-II User’s Guide.
* Breakout Cables for Analog Inputs
Breakout Cable
Wire Color
Comp
Video
S-Video
(Y/C)
YUV
(YPbPr)
RGB
Sync on Green
RGB
Comp Sync
RGB
Separate H V
R
G
B
H Sync
V Sync
(Chrom)
(Pr)
(Lum)
(Lum)
(Pb)
1
.
Observe all safety precautions. Rackmount chassis, or
install in “tabletop” configuration.
2
.
Connect all inputs, monitors, projector and AC. Install
genlock signal if required. Power on.
3
.
Perform factory reset: Using
Touch Screen
buttons,
press {
SYSTEM
} > {
RESET
}. On
Reset Type
line, use
ADJ
knob to select
FACTORY
. Press {
RESET
} > {
YES
}.
4
.
Calibrate
Touch Screen
: Press {
DISPLAY
} >
{
LCD CAL
}, and follow on-screen prompts.
Getting Started
Input Setup
12
. On the
Source Selection Bus
, press an input button.
If the “acquire” is successful, the source appears on
Preview. This may take several seconds.
13
. Press {
SAVE
}. The
Input Menu
will appear.
14
. If the “
Acquisition Failed
” message appears, check
all connections and press {
FORCE ACQUIRE
}. If
successful, press {
SAVE
}.
15
. If the input still does not acquire, perform a detailed
setup. [User’s Guide: Chapter 5, “
Comprehensive
Input Setup
” section.]
16
. Repeat from step
12
for all remaining inputs. Be sure
to {
SAVE
} each input.
Note
: To adjust input size, use the {
SIZING
} menu.
[User’s Guide: Chapter 4, “
Sizing Menu
” section.]
5
.
Press {
OUTPUT
}.
6
.
On
Format
line, select projector’s native resolution.
7
.
Press {
SELECT FORMAT
} to accept, then {
SAVE
}.
8
.
For projector setup, press {
TEST PATTERN
}.
9
.
On the
Type
line, select the
Burst
pattern.
Output and Projector Setup
17
. See User’s Guide, Chapter 5 for setup procedures. DVI background
and DSK must be set at same resolution as system output.
10
. Adjust your projector as required. [User’s Guide:
Chapter 5, “
Projector Setup
” section.]
11
. When complete, set test pattern
Type
to
Off
, set
Raster Box
to
Off
, then press {
HOME
}.
Analog Inputs
Connect to analog sources
such as PCs, VTRs, and
cameras. Use breakout
cables as required.
See * below for details.
Background / DSK
Inputs
Connect to DVI sources such
as PCs. Input B can be either
BG or DSK, but not both.
Backgrounds and DSK are
unscaled sources.
Serial 1
For downloading
firmware updates.
Genlock
Connect a reference
signal such as black burst
or composite sync.
Program Out Digital
Connect to projector.
Program Out Analog
Connect to projector or analog
Program monitor.
Ethernet
For use with external
controller.
Preview Out
Connect to analog
Preview monitor.
AC
Connect to AC
power source.
SDI Inputs
On HD model only,
connect to SD-SDI
or HD-SDI sources.
Eagle 200
Quick Start Guide
TAKE A NEW LOOK
FSR Inc.
244 Bergen Boulevard
West Paterson, NJ
07424
Phone:
Fax:
Technical Support:
Website:
+1 (800) 332-3771
+1 (973) 785-3318
+1 (800) 332-3771
www.fsrinc.com
LIT 1119 D1
43897A


