z
Page 2
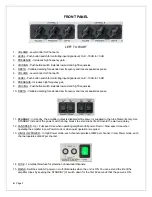
FRONT PANEL
LEFT TO RIGHT
1. VOLUME - Level control for Channel A.
2. LEVEL - Push button switch for controlling input signal level; Out = -10dB, In = 0dB.
3. PRESENCE - Increases high frequency gain.
4. VOICING - Push button switch. Extends low-mid and high frequencies
5. DEPTH - Variable damping for extended low frequency and looser speaker response.
6. VOLUME - Level control for Channel B
7. LEVEL - Push button switch for controlling input signal level; Out = -10dB, In = 0dB
8. PRESENCE- Increases high frequency gain.
9. VOICING - Push button switch. Extends low-mid and high frequencies
10. DEPTH - Variable damping for extended low frequency and looser speaker response.
11. STANDBY - In standby, the amplifier output is disabled while power is supplied to the tube filaments only. Use
STANDBY instead of the power switch during breaks to extend tube life and avoid the warm-up delay.
12. FAN SPEED - Up = Full speed. Use when operating amplifier at full power. Down = Slow speed. Use when
operating the amplifier in Low Power mode or when quiet operation is required.
13. HIGH/LOW POWER – In High Power mode, each channel operates at 98W per channel. In Low Power mode, each
channel operates at 60W per channel.
14. FUSE - 1 amp fast blow fuse for protection of individual channels.
15. MAINS - Switches main AC power on or off. Illuminates when the unit is ON. You can extend the life of the
amplifier tubes by keeping the STANDBY (V) switch down for the first 60 seconds that the power is ON.


