background image

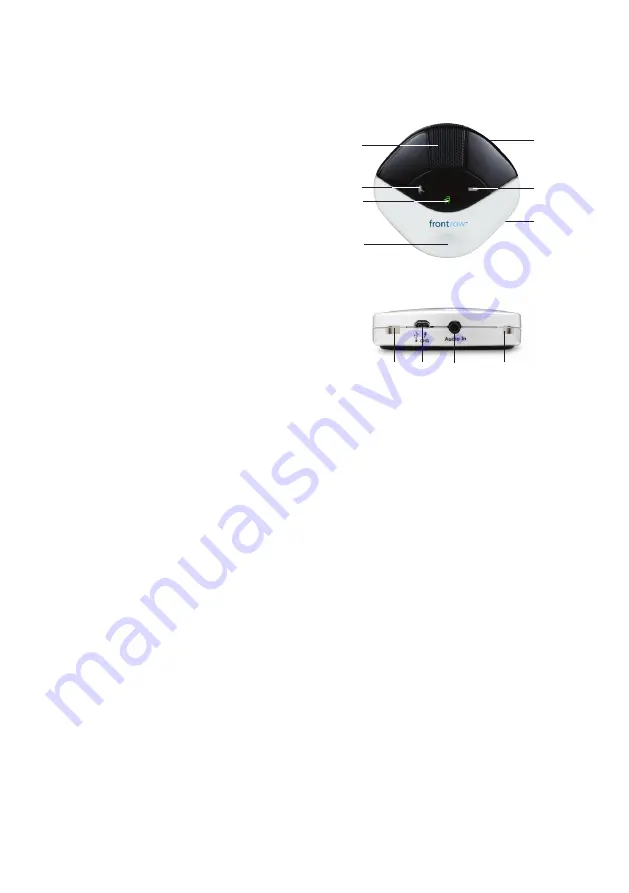
ITM-02L Pendant Microphone

Features

1  Amazing Sound Quality


With FrontRow's digital synthesis 
technology, the ITM-02L uses a single 
cardioid microphone element to deliver 
superb pickup and audio quality. And 
combined with a high-isolation, low- noise, 
open air microphone suspension, the  
ITM-02L minimizes noise from friction 
against clothing, buttons or jewelry.

2  Mute Indicator

 OFF/STANDBY. . . . .Un-muted
  SOLID RED . . . . . . . .Muted

3  Power Indicator

  SOLID GREEN  . . . . .Power On
 OFF  . . . . . . . . . . . . . .Standby

4   Smart  Button

   Controls all of the features of the Pendant 

Microphone. Tap the button to mute.

  When the Pendant Microphone is in 

standby mode:

  PRESS MOMENTARILY. . . . .Awaken

  When the Pendant Microphone is active:

  PRESS MOMENTARILY. . . . .Mute / Un-mute

5  Superior Comfort

  Lightweight (just 73.7g/2.6oz) with soft 

backing that provides comfort and reduces 
friction noise from contact with clothing, 
buttons or jewelry.

6  Battery Indicator


In Use

 OFF  . . . . . . . . . . . . . . . . . Battery Charged
  FLASHING RED . . . . . . . . . . . Battery Low


When Charging

  SOLID RED . . . . . . . . . . . . . . . . . . Charging
  SOLID GREEN  . . . . . . . . . . .Fully Charged
  FLASHING RED/GREEN . . . . Charge fault

7 Lithium Ion Battery


3-year life expectancy, lightweight, 
rechargeable lithium ion battery. 

8 Charging / Programming Jack

   For charging via USB cable or for con-

figuring settings using the FrontRow 
Microphone Settings application.

9  Portable Audio Interface

    3.5mm audio input jack lets you use the 

Pendant Microphone to transmit audio 
wirelessly from any secondary audio source 
such as a computer or MP3 player.

10 Charge Contacts

    For use with the optional IMC-01 

microphone charger.

 11  Adjustable power


Adjust the power to increase either  
battery life or range.

 12  Programmable channels


Program the switch positions to 2 of 5 
available channels.

6

5

7

1

3

4

Front

Bottom

2

10

9

8

10

3

Summary of Contents for 940R

Page 1: ...USER GUIDE 940R Receiver ITM 02L Pendant Microphone ISM 02L Pass Around Microphone IMC 01 Microphone Charger pro digital ...

Page 2: ...ound Microphone Using 8 Labeling 9 Battery 10 Charging 11 ICM 01 Microphone Charger 12 Using a Second Microphone 13 940R Pro Digital Receiver Features 14 Activate Receiver and Transmitter 15 Automatic Feedback Suppression and OptiVoice 16 Connecting to other Classroom Media 17 18 Auxiliary Output Rebroadcasting to Personal FM Receivers 19 CMBT Bluetooth Audio Receiver optional 20 Troubleshooting 2...

Page 3: ...ese instructions 3 Keep these instructions 4 Heed all warnings 5 Follow all instructions 6 Do not use this apparatus near water 7 Clean only with dry cloth 8 Do not block any ventilation openings Install in accordance with the manufac turer s instructions 9 Do not install near any heat sources such as radiators heat registers stoves or other apparatus including amplifi ers that produce heat 10 Do ...

Page 4: ...ive heat such as sunshine fire or the like 2 Proper Use of the Power Supply and Wiring An extension cord should not be used unless absolutely necessary Use of improper extension cord could result in a risk of fire and electric shock The cord MUST be plugged into a grounded outlet Make sure it is properly wired in good electrical condition and wire size is large enough for AC ampere rating of the p...

Page 5: ...h soft backing that provides comfort and reduces friction noise from contact with clothing buttons or jewelry 6 Battery Indicator In Use OFF Battery Charged FLASHING RED Battery Low When Charging SOLID RED Charging SOLID GREEN Fully Charged FLASHING RED GREEN Charge fault 7 Lithium Ion Battery 3 year life expectancy lightweight rechargeable lithium ion battery 8 Charging Programming Jack For charg...

Page 6: ...e g no need to take time from the conversation to turn the mic on and off during transition PRESS AND HOLD Push to talk PRESS AND SLIDE UP Power On 7 Name Plate Perfect for adding a name or room number for easy identification 8 Lithium Ion Battery 3 year life expectancy lightweight rechargeable lithium ion battery 9 Charging Programming Jack For charging via USB cable or for configuring settings u...

Page 7: ...nto stand by mode off automatically after 10 minutes in mute mode or 10 minutes of silence Press the Smart Button to wake it 4 Momentarily press the Smart Button to mute as needed for private conversations Mute indicator light will turn red 5 When the battery in your microphone gets low the battery indicator will flash red 6 At the end of the day charge your microphone Smart Button battery indicat...

Page 8: ...reduce risk of fire or burns Do not use batteries that have been dropped or otherwise damaged Do not attempt to open disassemble or service the battery pack Do not crush puncture or short external contacts or dispose of in fire or water Do not use the battery if exposed to moisture When exposed to moisture the red checked pattern next to the charge contacts will disappear Do not expose to temperat...

Page 9: ...ess you have first installed the software drivers as part of the FrontRow Desktop Teacher Edition or Microphone Settings software application To download the application visit gofrontrow com guides resources IMPORTANT To maintain proper charging when using the IMC 01 universal microphone charger occasionally clean the charge contacts on the bottom of the microphone using a cotton swab dipped in ru...

Page 10: ...ap Adjust the neck strap to position the microphone approximately 4 5in 10 13cm from the mouth 6 When needed you can simply push and hold the Power Switch while talking rather than sliding it into the on position This makes transitions when passing the microphone between students easier e g no need to take time from the conversation to turn the mic on and off during transition For best results whe...

Page 11: ...tery door facing up 2 Remove the battery door using the supplied Phillips screwdriver 3 Slide the clear window out of the battery door 4 Write the name of the microphone on a blank label that came with your microphone 5 Place the label in the battery door 6 Slide the clear window back into the battery door 7 Replace the battery door and tighten the screw clear window 9 ...

Page 12: ... risk of fire or burns Do not use batteries that have been dropped or otherwise damaged Do not attempt to open disassemble or service the battery pack Do not crush puncture or short external contacts or dispose of in fire or water Do not use the battery if exposed to mois ture When exposed to moisture the red checked pattern next to the charge con tacts will disappear Do not expose to temperatures...

Page 13: ...charge unless you have first installed the software drivers as part of the Teacher Edition or Microphone Settings software application To download the application visit gofrontrow com guides resources IMPORTANT To maintain proper charging when using theIMC 01 universal microphone charger occasionally clean the charge contacts on the bottom of the microphone using a cotton swab dipped in rubbing al...

Page 14: ...he power plug that is appropriate for the power outlet style in your country 3 Slide power plug onto the power supply 4 Plug the power supply into the power out let and into the back of the charging base Charger back Power Jack Battery Indicator When Charging SOLID RED Charging SOLID GREEN Fully Charged 12 ...

Page 15: ... may each use a microphone Or one teacher can use a microphone and stu dents can use a pass around microphone Microphones must be on different channels or interference will occur A B A A B B teacher channel A student channel B teacher 1 channel A teacher 2 channel B Classroom 1 Classroom 2 13 Using a Second Microphone ...

Page 16: ...imizes teacher s voice clarity for various room noise levels 9 Power jack 10 Transmitter charge output jack Charges up to two microphones 11 Infrared ceiling sensor input 12 Infrared wall sensor input 13 4 speaker terminals 14 Audio Out jack RCA for podcasting 15 Audio Out volume control 16 Aux In audio jack stereo RCA Computer CD player 17 Aux In audio jack stereo RCA TV VCR DVD 1 front back 2 4 ...

Page 17: ...ly go into standby mode in 10 minutes after you Turn off or mute your microphone Stop playing a secondary audio source computer MP3 player etc The receiver will come out of standby mode automatically when you Turn on or un mute your microphone Play a secondary audio source computer MP3 player etc connected to the receiver Daily operation is easier than ever the system will wake up and go to sleep ...

Page 18: ... system when speaking NOTE Feedback may still occur if the volume is turned up very high too high for sensible class room use If this occurs turn volume down in small increments until the feedback disappears PMS Orange 21C PMS 485 Red A powerful tool for test taking directions and ESL instruction Fragile consonant sounds carry about 75 of the meaning in speech but are easily destroyed by backgroun...

Page 19: ...audio cords from your local electronics store Option 1 Many classrooms use a computer as a multi media hub with an LCD projector which is connected to the internet or school network to download stream all audio and video and audio files For these classrooms you may only require one auxiliary audio input connection to the 940R Computer 940R back LCD Projector Audio Out Screen or Interactive White B...

Page 20: ... an LCD projector They also occasionally use the TV DVD VCR as a stand alone media For these classrooms you may need to use both auxiliary audio input connections to the 940R 940R back Audio Out Computer Audio Out Internet Audio Video Signal Converter 18 940R Pro Digital Receiver Connecting to other Classroom Media cont ...

Page 21: ...pe of the other end of the cord to the aux in on the transmitter typically 3 5mm 2 Adjust volume level setting for transmitter a if device you are connecting is a line level input set volume control nearer to maximum b if device you are connecting is a mic level input set volume control nearer to minimum Test and adjust as volume level as needed 1 2 19 940R Pro Digital Receiver Auxiliary Output Re...

Page 22: ...Audio Out jack on the CMBT and connect the other end to one of the available audio inputs on the 940R 3 5mm to RCA Testing your installation 1 Power up your amplifier receiver system 2 Initiate pairing mode by pressing the Bluetooth pairing button on The CB55 volume pairing control or The CB6000 touch control panel or The CMBT Bluetooth audio receiver 3 Go to the Bluetooth settings on your source ...

Page 23: ... see Installer Guide If using more than one microphone verify that they are not on the same channel Recharge or replace the microphone batteries Feedback squealing Lower the Microphone A or B Volume control s on the receiver Make sure that speakers are mounted as close as possible to the ceiling and to the listening area avoid mounting speakers in the teacher s primary lecture area Position the mi...

Page 24: ...ved by the Federal Communications Commission FCC in the U S and Industry Canada Other government approvals are available upon request Other international regulations may also apply Any changes or modifications made to any government approved element of this instru ment without the express approval of Phonic Ear Inc in writing could void the user s authority to operate those elements of the system ...

Page 25: ...0 Rev L 0719 USA Global Canada Australia Scandinavia 1690 Corporate Circle 1600 4950 Yonge Street 629 Nudgee Road Kongebakken 9 Petaluma CA 94954 6712 Toronto ON M2N 6K1 Nundah QLD 4012 2765 Smørum United States Canada Australia Denmark toll free 800 227 0735 toll free 800 340 9894 tel 1 800 746 642 tel 45 3917 7101 tel 707 769 1110 tel 905 461 5300 fax 1300 737 983 fax 45 3927 7900 fax 707 769 96...

Reviews: