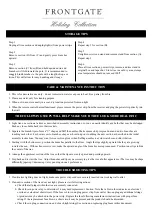
PARTS LIST
A. BOTTOM
B. LOWER MIDDLE
C. UPPER MIDDLE
D. TOP
HARDWARE
A. TREE STAND
QUANTITY 1 PC
B. 1/4” SCREWS FOR TREE STAND
QUANTITY 7 PCS
C. POWER STRIP
QUANTITY 1 PC
D. REMOTE CONTROL W/ RECEIVER
QUANTITY 1 SET
SKU 45829 - 9’ AUSTRIAN PINE
2469 TIPS METAL STAND
UL 1700 LIGHTS
MAX DIAMETER 69”
NUMBER OF PERSONS
RECOMMENDED FOR
ASSEMBLY: 2
Drawing not to Scale
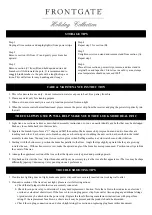
Wall Outlet
L
OWER MIDDLE SECTION
B
(BLUE PLUG)
U
PPER MIDDLE SECTION
C
(GREEN PLUG)
B
OTTOM SECTION
A
(RED PLUG)
R
EMOTE CONTROL
and
P
LUG-IN REMOTE
CONTROL RECEIVER
T
OP SECTION
D
(BLACK PLUG)
Step 1
Pull apart the legs of the stand so that they are “X” shaped.
Fasten the bottom screws to lock the stand into position.
Step 2
Insert the section (A) of the tree into the stand and tighten
screws on base to secure tree pole.
Step 3
Plug light set of (A) into power strip, plug power strip into
the remote control receiver. Then, plug remote control
receiver into wall outlet.
Step 4
To shape your tree start with the bottom most layer of
branches, with each branch start with the tips closest to the
pole and lift each tip up and out in alternating directions.
Repeat for each branch. It is recommended to shape section
(A) before adding section (B).
Step 5
Insert the section (B) of the tree into the section (A) of the
tree. Plug light set of section (B) into the power strip
Step 6
Repeat step 4 for shaping.
Step 7
Insert the section (C) of the tree into section (B) of the tree.
Plug lights from section (C) into power strip.
Step 8
Repeat step 4 for shaping.
ASSEMBLY INSTRUCTIONS
Step 9
Insert section (D) of the tree into the section (C) of the tree.
Plug lights from (D) into section (C).
Step 10
To shape the top (D) section of the tree it will be necessary to
gently bend the branches downward to the desired angle before
shaping tips.
COLOR CODE ON PLUG
RED
BLUE
GREEN
BLACK
E. EXTRA BULBS AND FUSES
QUANTITY EACH 18 PCS
L
EGS SET IN
X
SHAPE
9ft AUSTRIAN PINE TREE - ITEM #45829


