


6
Fronius manufac-
turer's warranty
Detailed, country-specific warranty terms are available on the internet:
www.fronius.com/solar/warranty
To obtain the full warranty period for your newly installed Fronius inverter or storage sys-
tem, please register at: www.solarweb.com.
IMPORTANT!
Please refer to the User Information "Installation and commissioning information sheet"
(42,0410,1962).
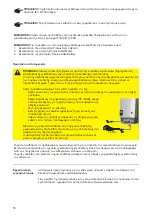
IMPORTANT!
Please set up the Fronius Energy Package in the following order:
1.
Install the Fronius Symo Hybrid inverter
2.
Install the Fronius Smart Meter
3.
Install the Fronius Solar Battery
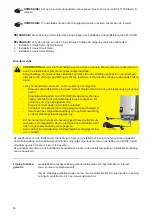
Fire prevention
CAUTION!
Risk of damage to inverters and other live photovoltaic system components due to poor or
unprofessional installation.
Poor or unprofessional installation can cause overheating of cables and terminal connections and result
in arcs. These can cause heat damage, which in turn may lead to fires.
Observe the following when connecting AC and DC cables:
-
Tighten all terminals to the torque specified in the Operating Instructions
-
Tighten all grounding terminals (PE / GND), including free ones,
to the torque specified in the Operating Instructions
-
Do not overload cables
-
Check cables for damage and verify that they are laid correctly
-
Take note of the safety instructions, Operating Instructions and
any local connection regulations
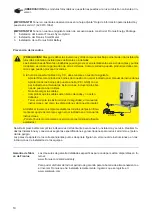
Using fastening screws, always screw the inverter firmly to the
mounting bracket to the torque specified in the Operating Instruc-
tions.
Ensure that the fastening screws are tight before starting the inver-
ter!
3
2
2.5 Nm
1
Observe the manufacturer's connection, installation and operating instructions at all times. To reduce the hazard
potential to a minimum, perform all installation and connection work carefully according to the instructions and
regulations.
Refer to the device Operating Instructions / Installation Instructions for the tightening torques to be used at the
relevant terminal connections.
Summary of Contents for Symo Hybrid
Page 2: ...2 ...
Page 37: ...37 1 1 1 1 1 2 3 4 ...
Page 38: ...38 1 1 1 1 2 3 ...
Page 39: ...39 1 min 4x 1 ...
Page 40: ...40 1 1 1 3 5 Nm 1 2 3 5 Nm 3 ...
Page 41: ...41 1 1 1 1 1 3 5 Nm 1 2 1 2 1 DC DC 2 3 D1 D2 D3 D1 D1 D1 15 mm 70 mm D 6 mm 4 5 ...
Page 42: ...42 1 1 1 1 1 1 2 DC DC 2 1 1 DC 6 7 1 2 1 DC DC 2 8 9 10 3 5 Nm 11 ...
Page 43: ...43 1 1 1 1 1 1 12 Fronius Solar Battery OFF 13 14 15 16 3 3 5 Nm 17 ...
Page 44: ...44 1 1 Fronius Solar Battery ON 18 19 ...
Page 45: ...45 PV 1 PV 1 PV 2 Fronius Solar Battery Check ...
Page 47: ...47 1 1 1 1 1 3 1 2 4 5 1 2 1 6 2 4 3 5 5 3 4 5 ...
Page 48: ...48 1 1 1 1 1 1 2 3 4 5 ...


